How to Edit DNS Settings in Web Hosting Services
cPanel
1. Log in to the cPanel administrative console. Click on the Simple DNS Zone Editor under the Domains section.
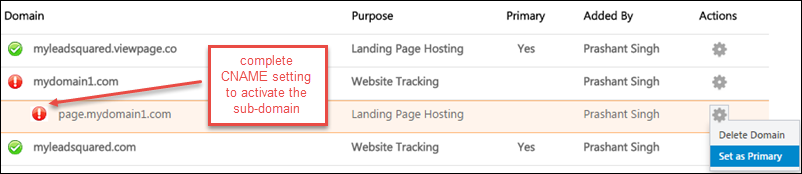
2. Fill in the name for your new CNAME sub-domain(sub-domain that you have specified in LeadSquared) in the Name field and cloud.viewpage.co in the CNAME field.
3. Click the Add CNAME Record button.
4. If you have completed specifying the sub-domain name and adding the CNAME record, you will see a success message in LeadSquared.
GoDaddy.com
- Log in to your Account Manager at www.godaddy.com.
- Next to Domains, click Launch.
- From the DNS menu, select DNS Manager, and then click Edit Zone for the domain name you want to update.
- Go to the Zone File Editor for the domain name you want to update. Click Add New Record. The Add DNS Record window displays.
- From the Record type list, select CNAME (Alias).
- In the CNAME (Alias) section, click Quick Add. If you’ve already created a CNAME record for the address, you can click anywhere in the existing CNAME record’s row to edit.
- In the new row that appears, enter the following information:Host: Enter the sub-domain name (which you have specified in LeadSquared); Points to: Enter cloud.viewpage.co.
- TTL: Leave the TTL value to the default selection.
- At the top or the bottom of the page, click the Save Zone File button.
- Click OK in the pop-up.
ix web hosting
- Log in to your account at ix web hosting.
- Click Manage below the Hosting Account section.
- On the left side, click the domain you’d like to use with your landing pages.
- Next to DNS Configuration, click EDIT.
- Click Add DNS CNAME Record.
- In the Name field, enter only the subdomain you want to use. For example, if you picked landingpages.mydomain.com as your landing page address, just enter landingpages.
- In the Data field, enter cloud.viewpage.co.
- Click Submit.
1and1
- Log in to your account at https://admin.1and1.com
- If it’s not already selected, click the Administration tab.
- Click Domains. The Domain Overview page appears.
- From the New drop-down menu, select Create Subdomain. (If you’ve already created a subdomain for your landing pages, skip to step six.)
- Enter only the subdomain you want to use, and click OK. For example, if you chose landingpages.mydomain.com for your landing pages, you should enter landingpages here.
- Select the checkbox next to the subdomain that you will be using. (Example: landingpages.mydomain.com)
- From the DNS menu, select Edit DNS Settings.
- Click the radio button next to CNAME.
- Enter cloud.viewpage.co next to Alias.
- Click OK.
Yahoo!SmallBusiness
- Log in to your account at smallbusiness.yahoo.com.
- Click Domain Control Panel below the domain you’d like to use with your landing pages.
- Click Manage Advanced DNS Settings.
- Click Add Record.
- In the Source field, enter only the subdomain you want to use. For example, if you designated landingpages.mydomain.com as the address of your landing pages, enter landingpages in the Source field.
- Enter cloud.viewpage.co in the Destination field.
- Click Submit.
No-IP
- Log in to your account at No-IP.
- On the left side, click Host/Redirects.
- Click Manage underneath Host/Redirects.
- Click Add for a new entry, or click Modify and skip to step six for an existing entry.
- Enter the host name (example: landingpages from landingpages.mydomain.com), and select your domain name.
- Select DNS alias CNAME at the host type.
- Enter cloud.viewpage.co as the Target Host and click Modify.
DNS Park
- Log in to your account at DNS Park.
- On the left side, click DNS Hosting.
- Click the domain you’d like to use with your landing pages.
- Since DNS Park is your hosting service, and not your domain registrar, be sure that your domain points to DNS Park’s nameservers. This will allow your MX record configuration to take effect.
- Click Alias Records.
- Under Host Name, enter only the subdomain you selected in LeadSquared. If you have chosen landingpages.mydomain.com to host your landing pages, enter landingpages.
- Under Destination Name, enter cloud.viewpage.co.
- Click Add Alias.
Big Rock
- Login to your Control Panel of Big Rock.
- Click Manage Orders > List/Search Orders.
- Search for the Order for which you have activated the DNS Service.
- On the next page, you would see a list of all your Product/Service Orders bought through BigRock. Click any domain name to reach its Overview.
- Click the DNS Management tab. This will bring up the DNS Service interface.
- Click the Manage DNS link. The DNS Management Console will pop-up through which you may add the DNS records.
- There you would find 3 fields:
- Host Name: Here the domain name, for which you are adding the Record for, would be pre-filled (e.g. yourdomainname.com). Now, if you wish to add a new Record for my.yourdomainname.com, then you would have to put in my the text box. If you wish to add a Record for just yourdomainname.com, then you can leave this box blank.
- Destination IPv4 Address: Here you would have to enter the IPv4 IP Address of the Web Server, where you wish to host this domain name.
- TTL: This is the Time To Live for this Record, in seconds. Any Server which once queries this Record will query it again after this time interval. The ideal TTL is 86400, which is 1 day. It can not be set to less than 14400, i.e., 4 hours.
Click the Add Record button to submit your Record.
BlueHost
- Login to your Bluehost Control Panel.
- Select the DNS Zone Editor icon in the Domains section.
- Select the domain you’re modifying from the drop-down box.
- Scroll down to the heading named Add DNS Record.
- In the Host Record field, enter the desired record name. If you wish to add a new Record for my.yourdomainname.com, then you would have to put my in the text box.
- Leave the TTL field at it’s default setting.
- In the Points To field, enter the address that the record should resolve to. Enter cloud.viewpage.co.
- Other fields may appear depending on the type of record you are creating.
- Click on the Add Record button to create the record.