How to Import Leads to LeadSquared?
1. Feature Overview
You can import your leads into LeadSquared through a CSV (Comma Separated Value) file. If you’re storing your lead data in a spreadsheet, database application or any other software, you’ll first have to export the leads to a CSV file and then follow the steps listed here.
Note:
- You can’t stop or undo a lead import once it starts.
- The default import limit through CSV is 25,000 leads. To extend this limit, contact your account manager or write to support@leadsquared.com. It can be extended to a maximum of 300,000.
- You can also bulk-update lead fields through CSV (excel) import by selecting Overwrite duplicates or Update empty fields of duplicates in Import Setting.
2. Prerequisites
- The file type must be CSV. If your data is stored in a Microsoft Excel file, save it as a Comma Separated Value (CSV) file. CSV content should not have comma (,) semicolon (;), pipe (|), tilde (~), back quote (`), caret (^) in the header. You can refer to Formats supported in Excel to learn more on how to save an excel file into CSV file.
- Column names are mandatory. You must enter column names in the CSV file. These are the different lead attributes or fields like First Name, Last Name, Email, etc.
- Download the sample CSV file. Download the sample CSV file to understand how your file should be structured.
- Create custom lead fields. LeadSquared has standard system fields like First Name, Last Name, Email, Phone, etc. If you want to import custom lead attributes specific to your business like Budget, Examination Results, etc., you can create them by navigating to My Account>Settings>Customization>Lead Fields. For more information, see How to Create Custom Lead Fields.
Note:
- You can also import custom field sets (non-file type fields). For example, if you have a parent lead field called ‘Identification Documents’ and the associated custom field set has the child field – ‘Status’, then pass – Identification Documents – Status.
- Lead import supports Prospect ID as a column header in the CSV file as well. This is useful when there are no unique fields configured in an account. Users can export the CSV, and use the Prospect ID to make updates and re-import the leads.
3. How it Works
- Upload the CSV file with your lead information.
- Map the CSV fields to the fields in your LeadSquared account.
- View the validation report to look for errors.
- Choose how you want to handle duplicate lead records, select the lead owner, and choose lead sources.
4. Upload the CSV File
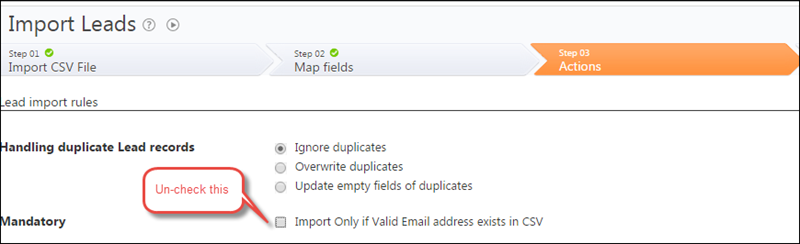
- Navigate to Lead Management>Leads, hover over the More Actions icon on the top-right corner of the screen and select Import Leads from the dropdown.
- Click Browse Files, select the file and upload it. Click Next once the file is uploaded.
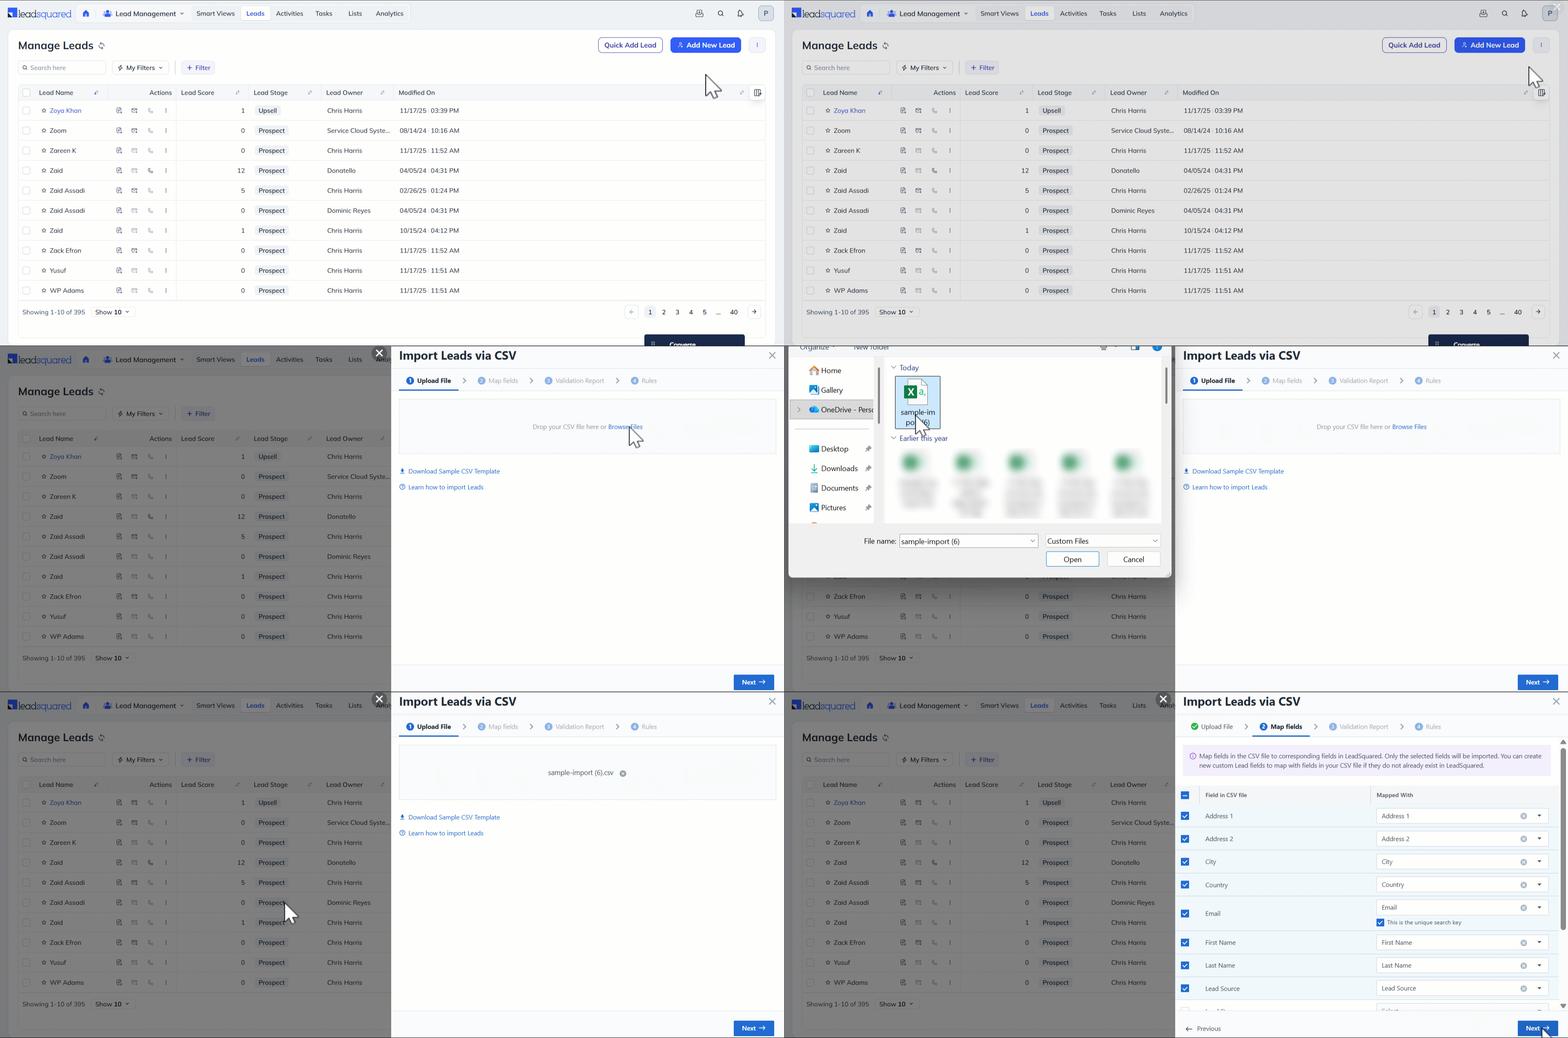
If you’re not sure of how to arrange the data in the CSV file, click to download the sample CSV as highlighted below –
5. Map Fields
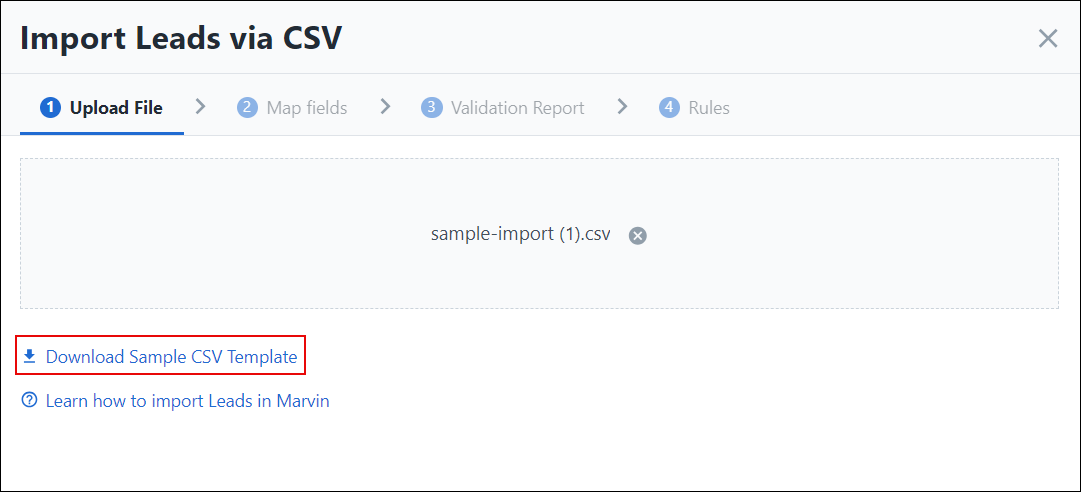
Click the checkboxes alongside the fields you want to map. By default, all the checkboxes are selected. You can uncheck the irrelevant fields. Select the relevant field in your LeadSquared account from the drop-down on the right.
Note: You can also map Account Type and Account Name fields in your CSV to an account type and account name in LeadSquared.
- The Account Type you pass in the CSV must exist in your LeadSquared system.
- If you pass an existing account name, the lead will be added to that account.
- If you pass a new account name, a new account will be created in LeadSquared and the lead will be added to it.
6. Validation Report
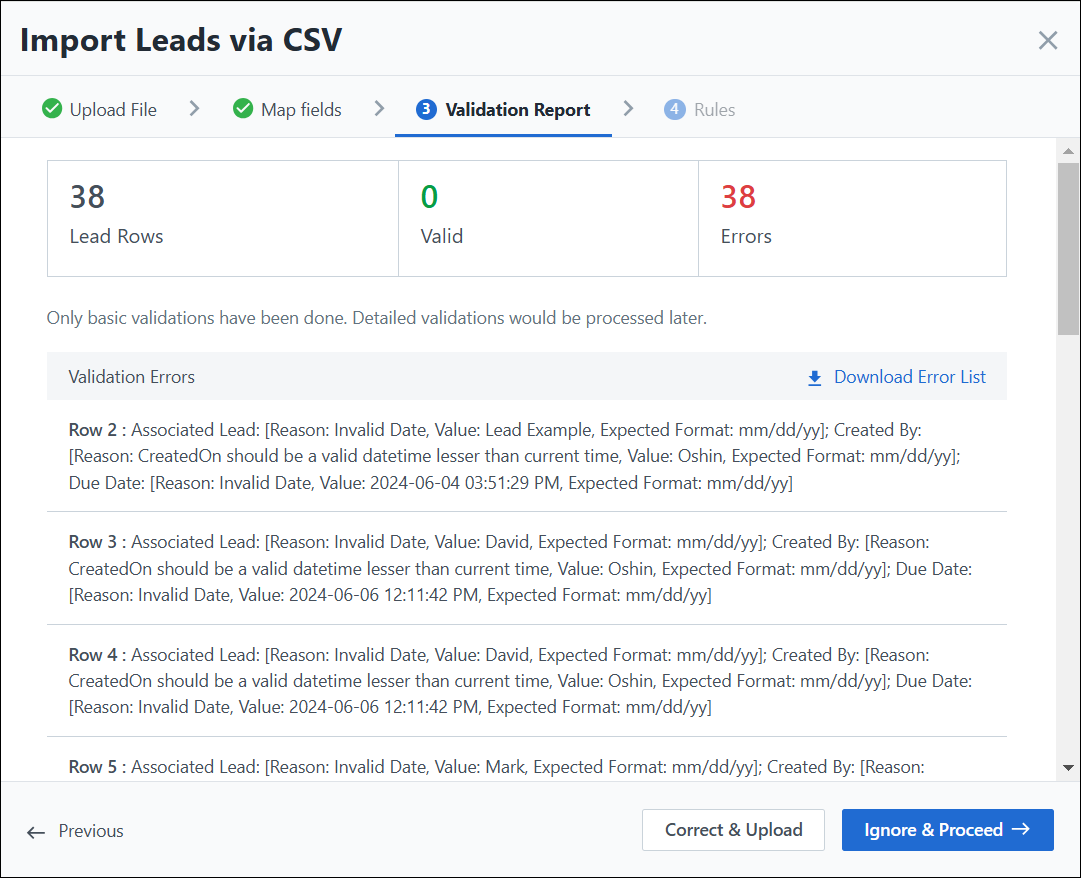
You can view the status of your lead import. This pop-up displays a table with the number of lead rows, the number of valid lead rows and the errors. Below the table, you can find the list of Validation Errors. You can also download the error list from here. At the bottom of the pop-up, select –
- Correct & Upload to make changes in the CSV and re-upload the file
- Ignore & Proceed to continue with the import without making any changes
7. Import Settings
7.1 Lead Import Rules
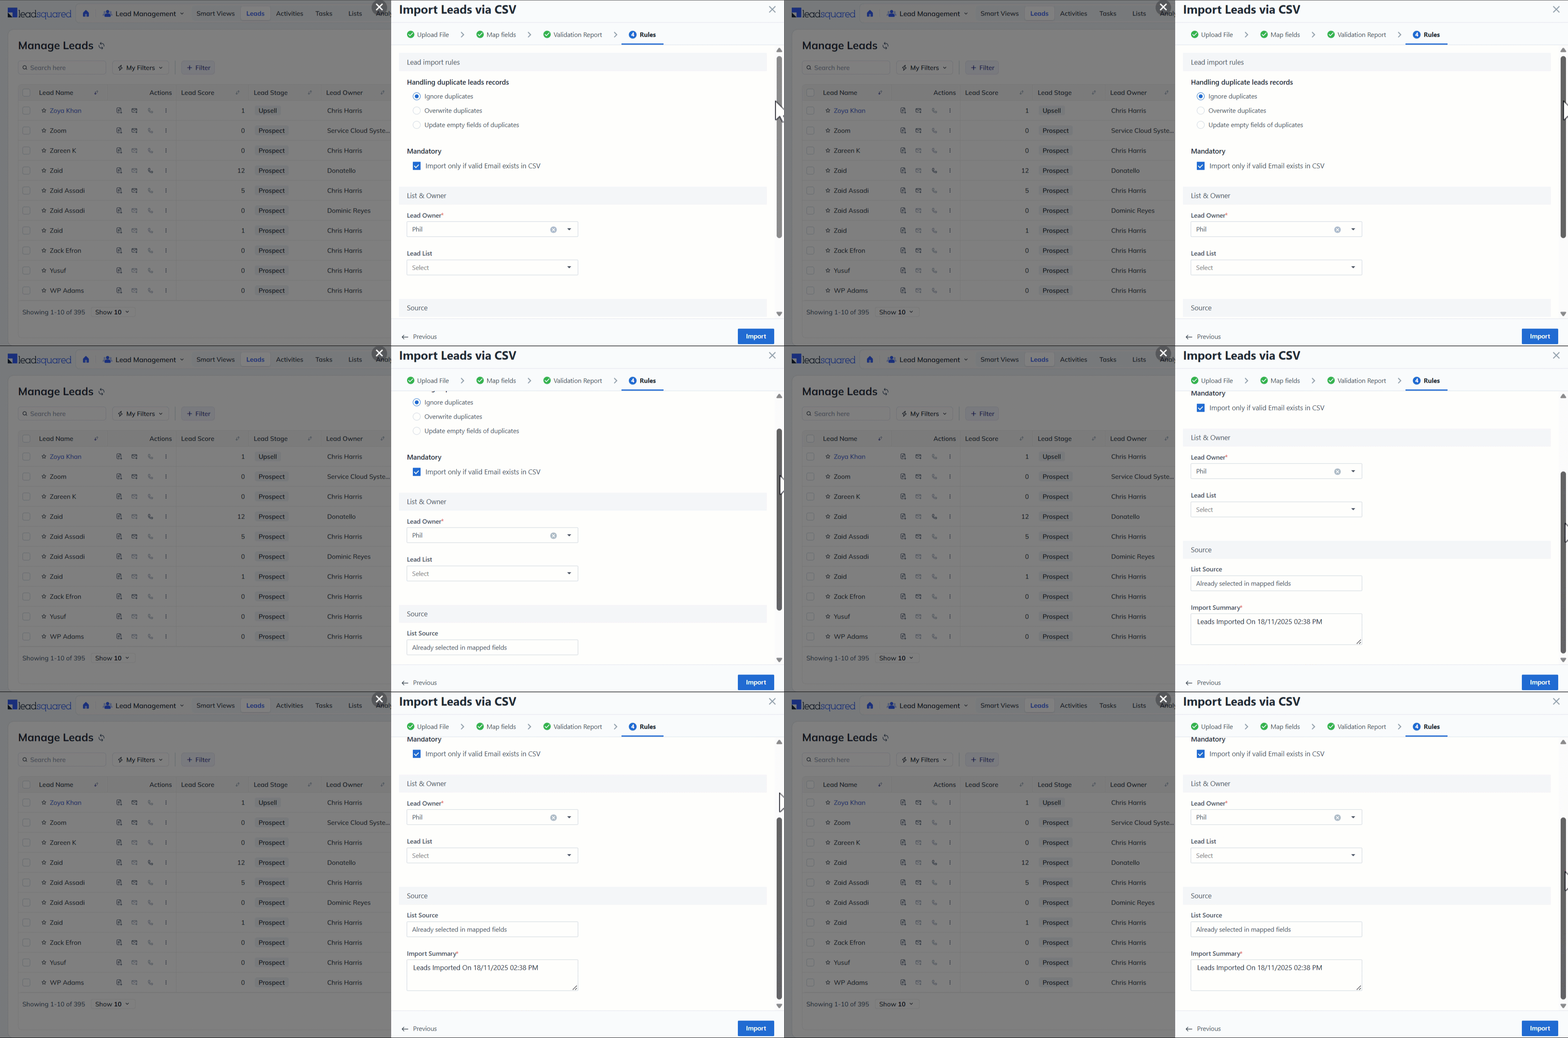
If a CSV file contains a lead with an email address that already exists in your LeadSquared account, the lead is considered to be a duplicate.
You have three options to handle duplicates –
- Ignore duplicates – If you select this option, duplicate records will not be imported. This is the default option that is pre-selected.
- Overwrite duplicates – If you select this option, the CSV file data will overwrite the data in your LeadSquared account. The following checkboxes will also be available for selection.
-
- Import only if valid email exists in CSV
- Do not update owner of existing leads
- Do not create new leads – this will ensure leads are only updated and no new leads are created.
- Update empty fields of duplicates – With this option, only empty fields of the duplicate records in LeadSquared will be updated with the data in the CSV file.
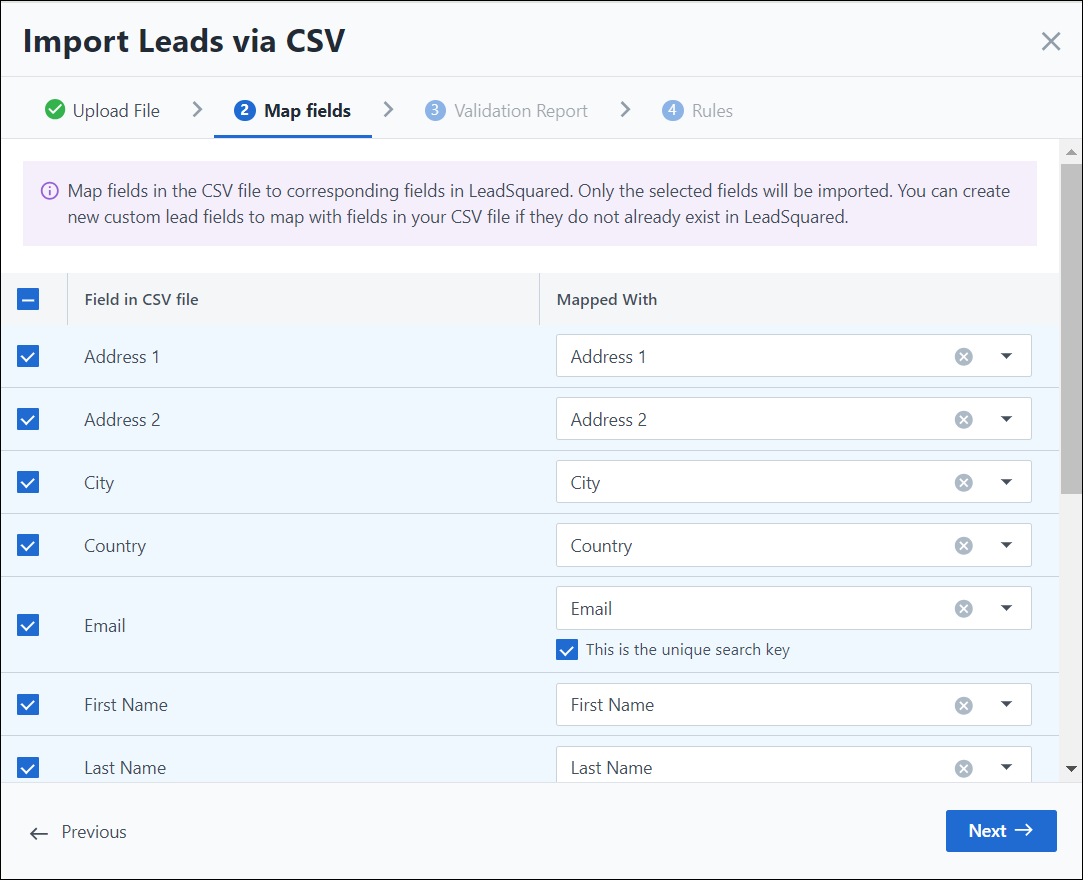
Uncheck the Import only if valid email ID exists in CSV if you want to import leads with invalid email addresses as well.
Here are some examples –
Assume that example@acmecorp.com already exists in your LeadSquared account. The CSV file you’re importing also contains the same Email Id.

- If you select Ignore duplicates, the lead will not be imported.
- If you choose Overwrite duplicates, the lead fields you have chosen to map will update the existing lead in your account.
- For example, if you selected First Name, Company and Lead Stage, only these fields will be updated for the existing record. The new values in LeadSquared will be John, Acme Corp and Prospect.
- If you select Update empty fields of duplicates, lead fields which are empty in your LeadSquared account will be updated.
- For example, if you have chosen to map Lead Stage, and that field is empty for the lead in your account, then only the Lead Stage will be updated to Prospect. The remaining fields will remain the same.
7.2 Select List and Owner
- By default, the logged in user is displayed as the lead owner. You can change the lead owner from the drop-down.
- You can assign the leads to a list you’ve created, or you can create a new list. If you want to create a new list, enter the list name and a description.
7.3 Select Source
- You can specify the source (organic search, referral sites, etc.) from which you obtained your leads.
- The Import Summary Note option lets you enter text to specify details about the CSV file. For example, you could mention where you collected the data (Mall, Kiosk, Office, etc.), a partner you received the data from or even the old system (Zoho CRM, SalesForce, etc.)
8. Send Import Report
You can also view the Import Report by navigating to Settings>Profile>Request History. Alongside the relevant Request Type, click  and select Send Import Report to receive an email with the details of your import.
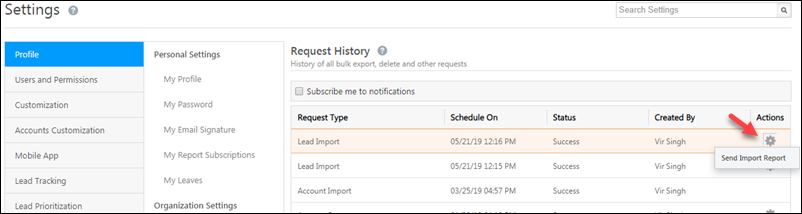
Regardless of the Send Import Report option, once your import is complete, you’ll receive an email with a link to download your original CSV. This CSV will have two additional columns ‘ImportStatus’ and ‘ImportMessage’ to help you understand which records were imported/ignored. Correct the unprocessed records and restart the Import Leads process with the corrected file. 
9. Data Formats
You may encounter some of the following situations –
- When your CSV files contain date fields, example ‘Contacted On’, ‘Followed Up On’, ‘Birthday’, and so on, you should ensure that you’ve created a matching custom field in your LeadSquared account. For more information on how to create a custom field, see How to Create Custom Fields. Also, ensure that date fields have the correct format – dd/mm/yy or mm/dd/yy.
- If your CSV file contains a field which can be represented through a drop-down, you could create a matching custom field to map it to during the import process.
- If the CSV file contains a lead field of type ‘Boolean’, you can create a matching custom field and then map the information during the import process. If the field is empty then, by default it is mapped as ‘NO’ in LeadSquared.
- For example, you may have a lead field for ‘Valid Passport’. If a lead in your CSV file has an empty value for this column, it will get mapped as a ‘No’ in your LeadSquared account.
- If your CSV file contains a field for ‘Do Not Email‘ you can map it to the ‘Do Not Email’ field in your account.
Any Questions?
We hope this article was helpful. Please leave us a comment below if you have more questions.