1. Feature Overview
Webhooks are user-defined HTTP callbacks, which are triggered when a specific event occurs. Webhooks offer simple and efficient server to server communication, without having to depend on long-running connections. When an Event occurs in the source site, webhooks makes an HTTP request to the URL configured. You can use webhooks to integrate your applications with LeadSquared.
Some of the common use cases where you might find Webhooks useful include posting form data to another application, posting lead data to another application and so on.
- To know the best way to implement webhooks, see Webhooks Best Practices.
- To see data posted for each webhook event, see Data Posted by Webhooks.
2. Prerequisites
- You must be an admin user.
- You must have a webhook URL you want to send data to.
3. Create a Webhook
- Navigate to My Account>Settings>API and Webhooks>Webhooks.
- Fill in the webhook details. The Event (triggers the HTTP callback request) and Webhook URL (In most cases HTTP is sufficient, but HTTPS can be useful if your data is sensitive) fields are mandatory.
- Click Save when you’re done.
| Field | Description |
| Type | Select ‘Webhook’ to create a regular webhook. Select ‘Lapp’ to create a new Lapp (see Lapps). |
| Event | The LeadSquared event you want to trigger the HTTP callback request on. Use the checkbox to ‘Notify on failure’ for failed webhook executions. If checked, all administrator users in the LeadSquared account will be notified. |
| Webhook URL | The URL you want to post data to once the event occurs. |
| Content Type | The format you want to post the data in. Choose from ‘application/json’ to post data in JSON format, ‘application/x-www-form-urlencoded’ for simple text/ ASCII data or ‘text/plain’ for plain text. |
| Execution Delay | You can set a delay (in seconds) between the time the event occurs and the data is posted. |
| Custom Headers | Add a name-value pair as a custom header. You can use custom headers for authentication or security purposes. For example, you can enter a custom name-value pair and then reject all webhook calls where the header isn’t present. |
| Description | Describe your webhook. For example, “New Lead Data”. |
4. Enable Webhooks for Opportunities
To enable webhooks for opportunity events (e.g., opportunity create, opportunity delete, etc.) –
- Navigate to My Profile>Settings>Profile>Advanced Configurations.
- Alongside Enable Webhooks for Opportunity, slide the toggle.
To create a webhook for opportunities –
- Alongside Event, click the dropdown and select the relevant opportunity event.
- Alongside Opportunity Event, select the opportunity type and create your webhook.
5. All Webhook Events
- Account Activity Create
- Account Activity Update
- Account Create
- Account Delete
- Account Update
- Landing Page Submission
- Lead Activity Creation
- Lead Activity Update
- Lead Creation
- Lead Delete
- Lead Field Value Change
- Lead Merge
- Lead Ownership Change
- Lead Score Change
- Lead Stage Change
- Lead Update
- Leave Create
- Leave Delete
- Leave Update
- Opportunity Create
- Opportunity Delete
- Opportunity Field Value Change
- Opportunity Stage/Status Change
- Opportunity Update
- Product Create
- Product Delete
- Product Update
- Task Cancel
- Task Complete
- Task Create
- Task Reminder
- Task Update
- User Activate/Deactivate
- User Availability Status Change
- User Create
- User Update
Notes:
- Activities are posted in bulk on the webhook. The activity data for activities happened in one minute is grouped and posted on the webhook. So you will need to check if you receive one activity ID or more than one.
- To see data posted for each webhook event, see Data Posted by Webhooks.
6. Webhook History
You can view the webhook execution history. Hover your cursor over the Actions button and click on View History. You can see the transmission date, its status and data transmitted.
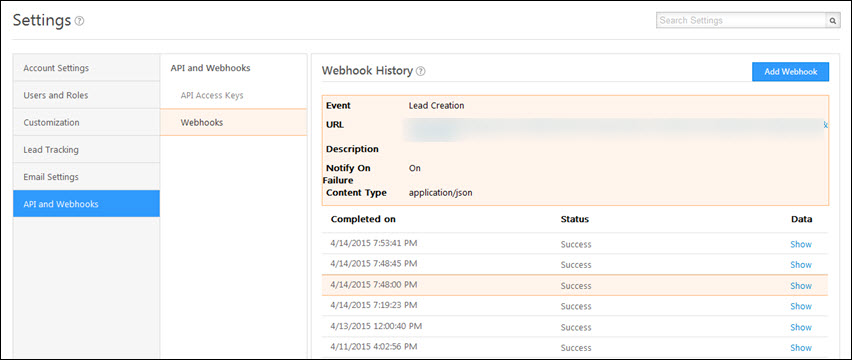
- You’ll see the status as Success if the URL entered returns the HTTP code 200.
- You’ll see the status as Failure if the URL entered returns an HTTP code other than 200. We try 3 times before marking an attempt as a failure. In addition to this, you will see the status as In Queue if the data is not yet posted to the URL.
Note: You can debug a Failure status by doing a manual HTTP post with the input data to the webhook URL.
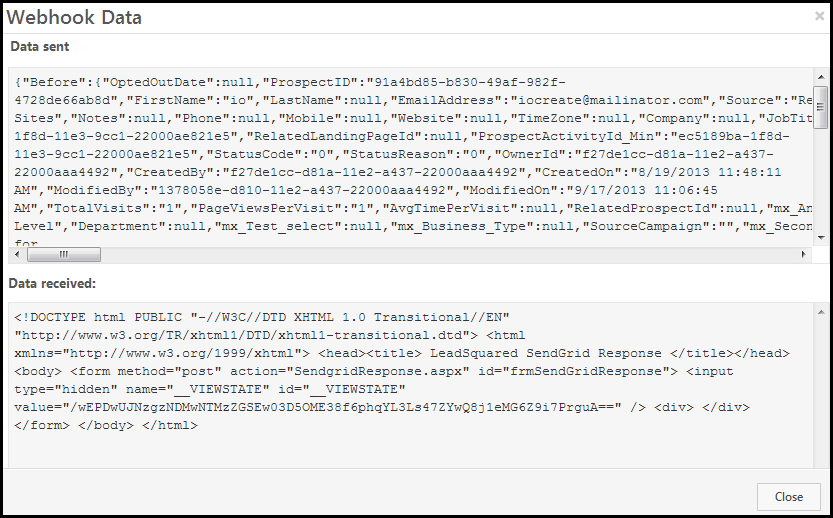
Click on Show to view the data that is transmitted. Webhook Data window opens up. Here, you can view the data sent and received.
FAQs and Troubleshooting
Why is my Activity Webhook trigger delayed?
Activity webhook triggers are processed in batches, not in real-time. There may be a delay as the system collects and posts multiple activity events together. This is expected behavior. If immediate webhook triggers are required, use an automation trigger for activity creation and set up a webhook as an automation action instead.
I’m receiving the following error – Webhook has been disabled due to continuous failures. Please verify the URL and enable.
Webhooks are automatically disabled after ten (10) consecutive failures. You can re-enable the webhook, or create a new one.

Webhook Not Getting Verified in LeadSquared
- Issue: Your webhook is not getting verified in LeadSquared, even though it returns a 200 OK response when tested via Postman.
- Cause:LeadSquared verifies webhooks without sending a payload and instead supports headers for verification. If your webhook is designed to return a 200 OK response only when a payload is included, the verification will fail.
- Solution: Ensure that your webhook URL returns 200 OK even when no payload is passed. If your webhook requires a payload to respond successfully, update its configuration to allow verification without one.
Any Questions
Still have questions? Leave us a comment below and we’ll get back to you ASAP.


I create a url which recives the webhook data in my server now iam going to create a webhook and i pasted my url now which event need to be selected for receiving the every comming lead data in lead square and tell me thats all the process like before adding the url i need to have any get request in that endpoint to conform or any other requirements other than creating post method in that url.
Hi, Sakthi. If I understood your questions correctly –
1. “which event need to be selected for receiving the every comming lead data”
To receive lead data, from the Event dropdown (on the Webhooks page), select the relevant event (Lead Create, Lead Update, Lead Delete, etc.). For e.g., select the Lead Create Event to receive lead data (First Name, Email, Phone, custom fields, etc.) in your endpoint whenever a lead is created.
2. “any other requirements other than creating post method in that url.”
In LeadSquared, select the Event, add the Endpoint, add optional Custom Headers, and Save. Whenever the event occurs in LeadSquared (for e.g., when a lead is created), the data is automatically posted to your endpoint.
I created a webhook URL using Zapier. On Zapier we found the request however the querystring is blank.
Hi, Jovin. We require more details to know what’s going wrong here. Can you please contact your account manager, or write to support@leadsquared.com, and elaborate on this issue. They’ll help you on priority.