


Get Started
Sales Suite
Field Ops
Marketing
Service CRM
Integrations & Apps
FloStack
LeadSquared Getting Started Guide for Administrators
Hello, Admin. Welcome to LeadSquared.
This guide has step-by-step instructions on setting up your LeadSquared account. At the same time, you will learn how LeadSquared can help your organization.
- For Sales Users, see LeadSquared Getting Started Guide for Sales Users.
- For Marketing Users, see LeadSquared Getting Started Guide for Marketing Users
1. Prerequisites
Before we begin, here are a few prerequisites –
- LeadSquared account – You will need a paid LeadSquared account. If you do not have one, you can create one by booking a demo.
- Missing Features – Some of the features listed here may not be available in your current plan. For more information on plans and pricing, visit https://www.leadsquared.com/
- Account Number – Once your sign-up is complete, log into LeadSquared and note down your account number. You will need to quote this number in all communications with us.
2. Setup your Profile
Personal Settings and Organization Settings capture details about you and your organization. Some of these details are used while interacting with your leads, prospects, and customers. Further, as an administrator, you can choose your daily report delivery preferences.
The Billing and Usage section displays your LeadSquared subscription details. You can view all the features of your account and the status of their current usage. Under Manage Subscriptions, you can view the purchase history of all your orders and make further purchases.
 `
`
| Help Article | Description |
| Setup your personal profile | This article will help you set up your personal profile. |
| Setup your company profile | This article will help you set up your company profile |
| Setup your custom logo | This article will help you set up your business/custom logo. |
| View your LeadSquared billing and usage | This article will help you understand and manage your billing and usage, and your recurring and one-time subscriptions. |
3. Configure your Lead Settings
Leads are your potential customers. In LeadSquared, you can track your lead’s journey from creation, through marketing and sales activities, all the way to conversion.
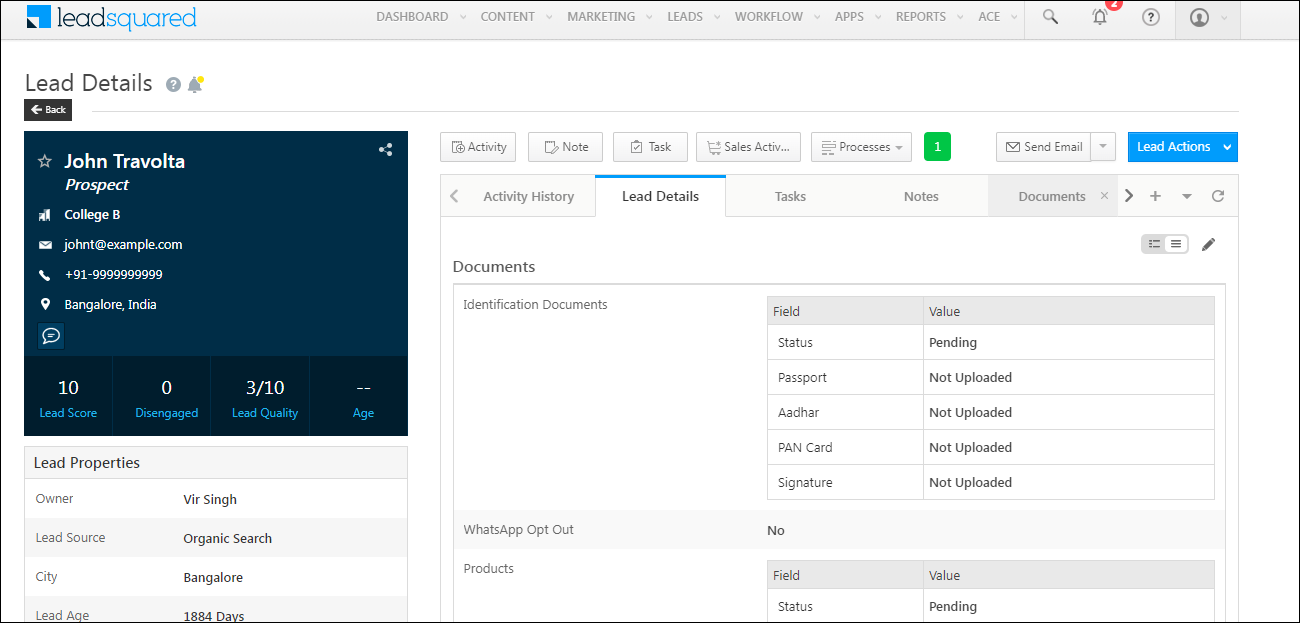
The lead entity is customizable. In addition to system fields (first name, email, etc.,), you can create custom Lead Fields (enrolment Id, passport number, etc.,) to capture details specific to your business use cases. Also, you can create a set of fields (using the Custom Field Sets feature) for your document collection business use cases (KYC documents, education qualifications, etc.,)
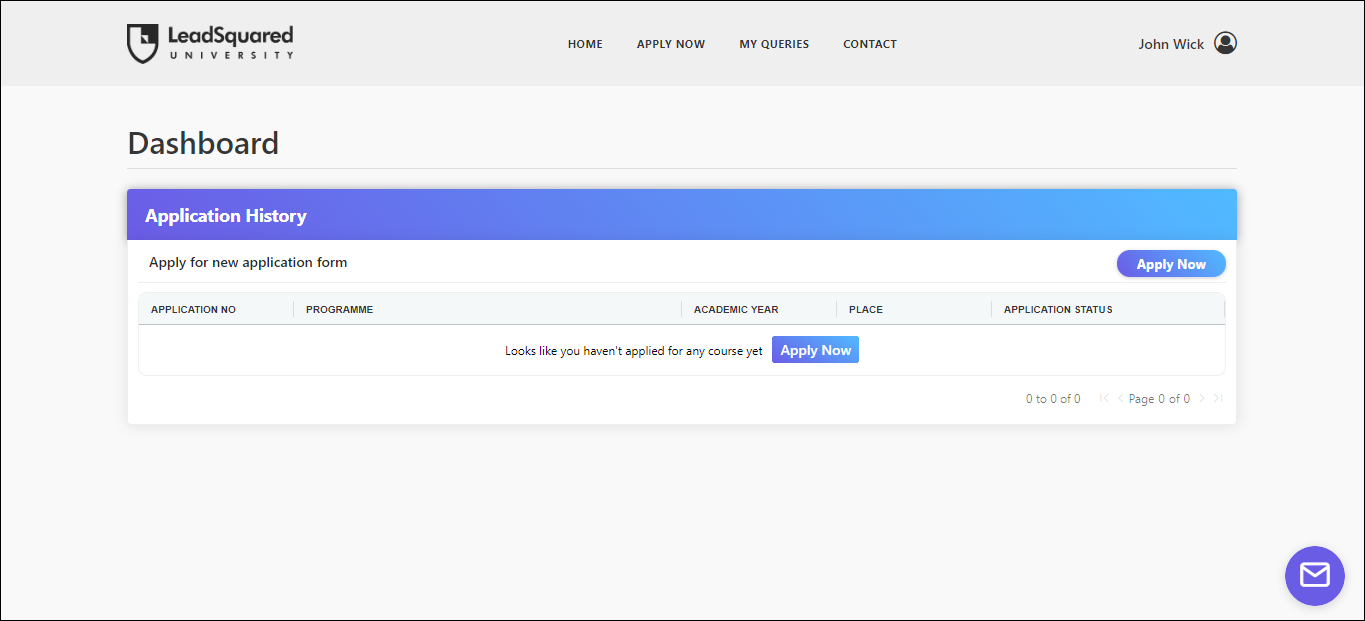
You also have the option to create a custom Lead Form that is easy to set up. It’s a quick way to capture new leads or update existing ones.
Also, when a lead gets captured, you will know the source through which it originated (for example, social media, newsletters, ads, etc.)
| Help Article | Description |
| Lead Management Feature Guide | This article will give you a brief overview of LeadSquared’s Lead Management feature. |
| Customize the Lead Details View | This article will help you understand how to customize your Lead Details page. |
| Create your custom Lead Fields | This article will help you understand how to create custom Lead Fields based on your organization’s requirements |
| Create a dependency between Lead Fields. | This article will help you understand how to create a dependency between 2 Lead Fields. For example, the Campus field is dependent on the Department field for an account created for colleges. |
| Manage your Lead Stages | This article will help you understand how to create different Lead Stages as the lead passes through the sales funnel. |
| Manage your Lead Sources | This article will help you understand how to create and manage Lead Sources. |
| Rename a lead entity to reflect your business terminology | This article will help you understand how to rename the lead entity. For example, rename “lead” to “contact”. |
| Create Custom Field Sets | This article will help you understand how to create Custom Field Sets. For example, a custom field set for KYC Documents with fields Passport, PAN Card, Aadhar Card, and Address Proof. |
| Create a Lead Form | This article will help you understand how to create a Lead Form.
Note: This is a basic version of a Form. You can create more powerful forms through LeadsSquared’s Dynamic Forms. |
4. Lead Prioritization and Scoring
LeadSquared provides three configurable metrics to help you qualify and prioritize leads. Each of these metrics tells you something about the quality of the lead or their propensity to buy your product/service.
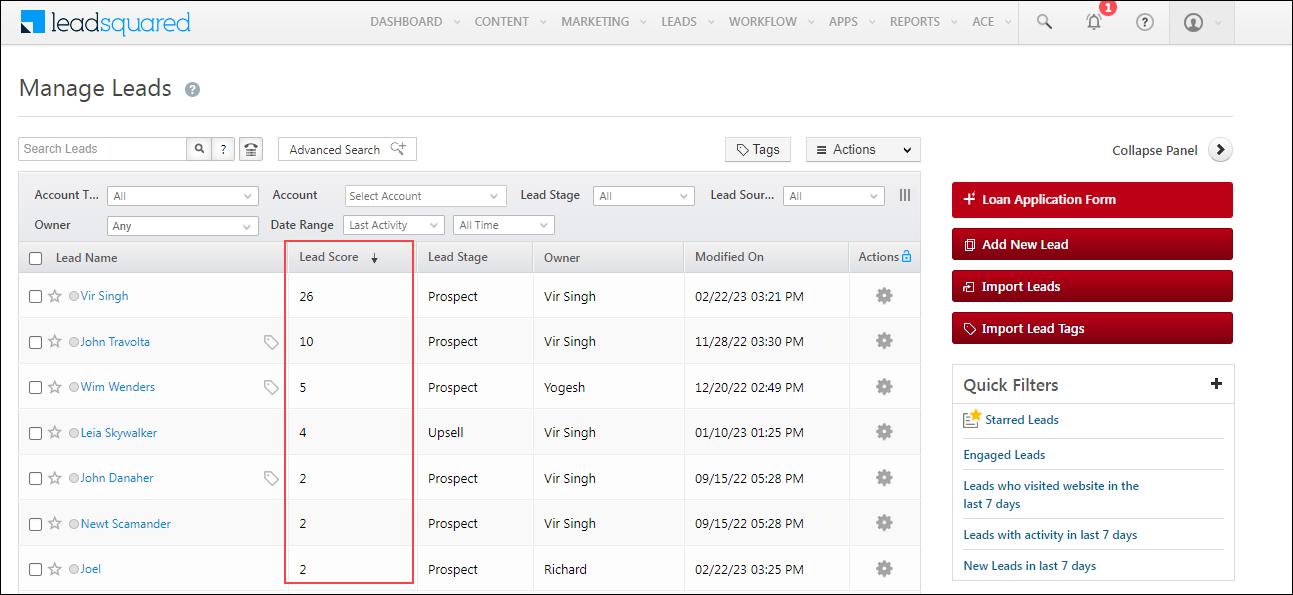
4.1 The Lead Score
Lead scoring helps you understand how active a lead is. LeadSquared tracks system activities (email open/clicked, website visits, etc.,) of your leads and assigns them a score based on these engagements. Higher the Lead Score, the higher the chance of your lead converting. LeadSquared also allows you to customize the lead score, by assigning numerical values to different Custom Activities along your sales pipeline.
| Help Article | Description |
| How does Lead Scoring Work? | This article will help you understand how lead scoring works. |
| Add Custom Activity Types | This article will help you add custom activities for lead scoring. |
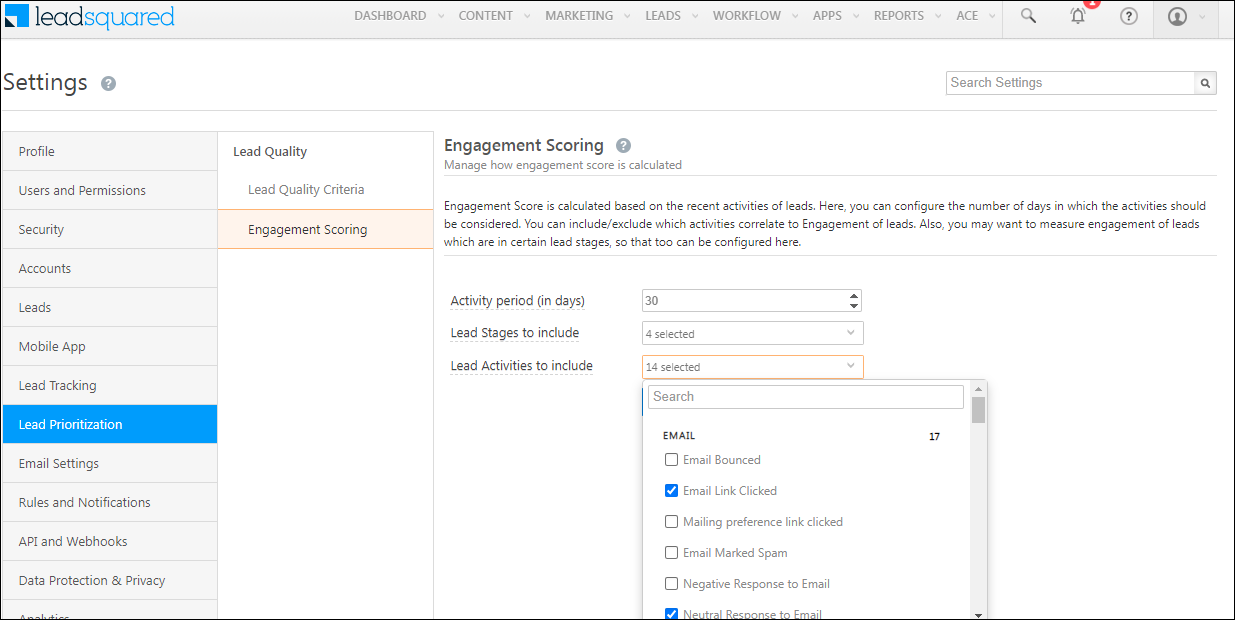
4.2 The Engagement Score
The engagement score is similar to the lead score, but the key difference is that the engagement score looks at specific activities performed by/on the lead within a specified time period.
| Help Article | Description |
| Setup Criteria for Lead Engagement Scoring | This article will help you create Lead Engagement Scoring. |
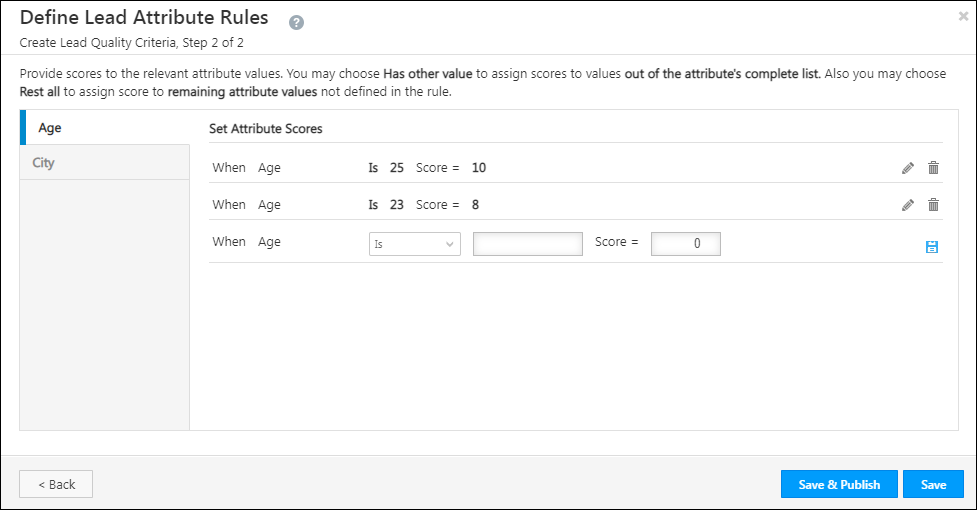
4.3 The Lead Quality Criteria
The Lead Quality Criteria helps you recognize leads that match your ideal customer profile (ICP). You can set up rules to identify your ICP. For example, your ICP could be an age group between 21 and 25, working in particular locations – leads are evaluated against these rules and assigned a score.
| Help Article | Description |
| Setup Lead Quality Criteria | This article will help you create Lead Qualification Criteria. |
5. Capture Activities on Your Leads
Once Leads are captured in your account, you can monitor their progress down the sales funnel by tracking notable interactions and events, or ‘Activities’. Activities help you understand a lead’s position in the conversion funnel, and accordingly automate nurturing and sales processes.
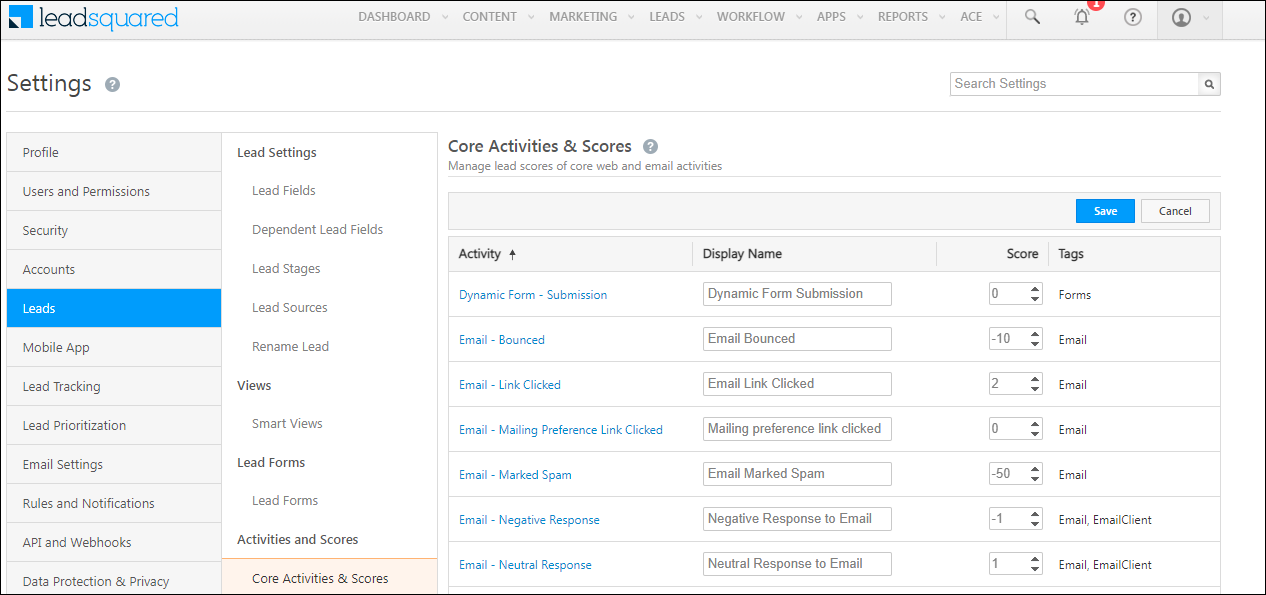
5.1 System/Core Activity
Some activities are available by default on your LeadSquared account. These activities are common across industries. E.g., Emails – Bounced/Link Clicked/Opened, Phone Calls, Website Visits, etc.
| Help Article | Description |
| Activity Management Feature Guide | This article will help you understand LeadSquared’s Activity Management feature. |
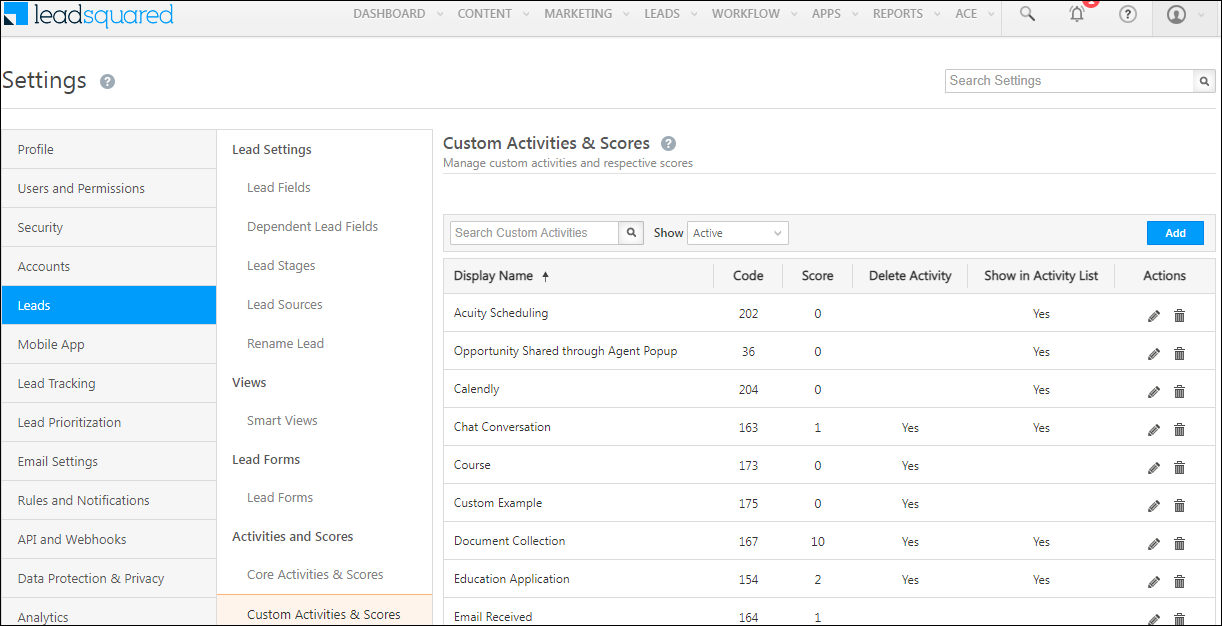
5.2 Custom Activities
You can also add custom activities to your LeadSquared account. This allows you to create and assign scores to new activities specific to your industry. For example, if you’re in the education industry your custom activities may be attending a seminar, completing a payment, campus visit, etc.
| Help Article | Description |
| Add Custom Activities | This article will help you understand how to add Custom Activity Types. |
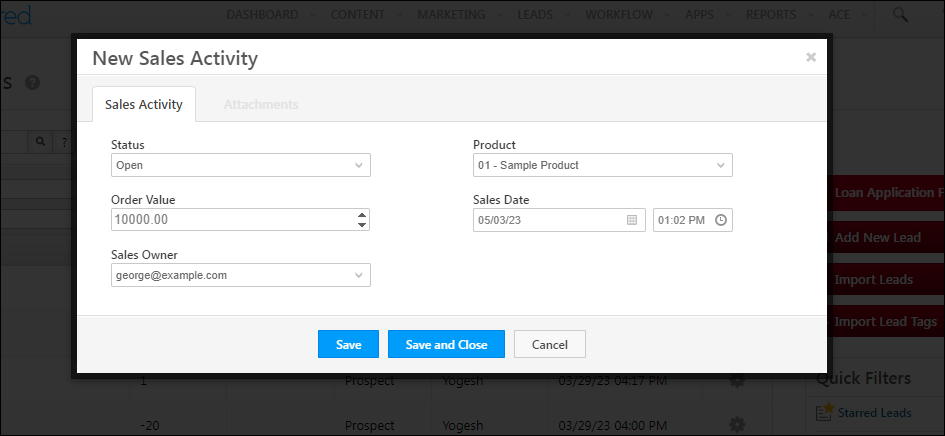
5.3 Sales Activities
The Sales Activity Management feature lets you capture important information related to each sale (e.g., product sold, sales owner, date, order value, etc.,). You can add and manage the revenue generated by your customers for different products and services offered by your organization. You can also cancel or edit sales activities to manage refunds and returns.
| Help Article | Description |
| Sales Activity Management | This article will help you understand how to configure Sales Activities. |
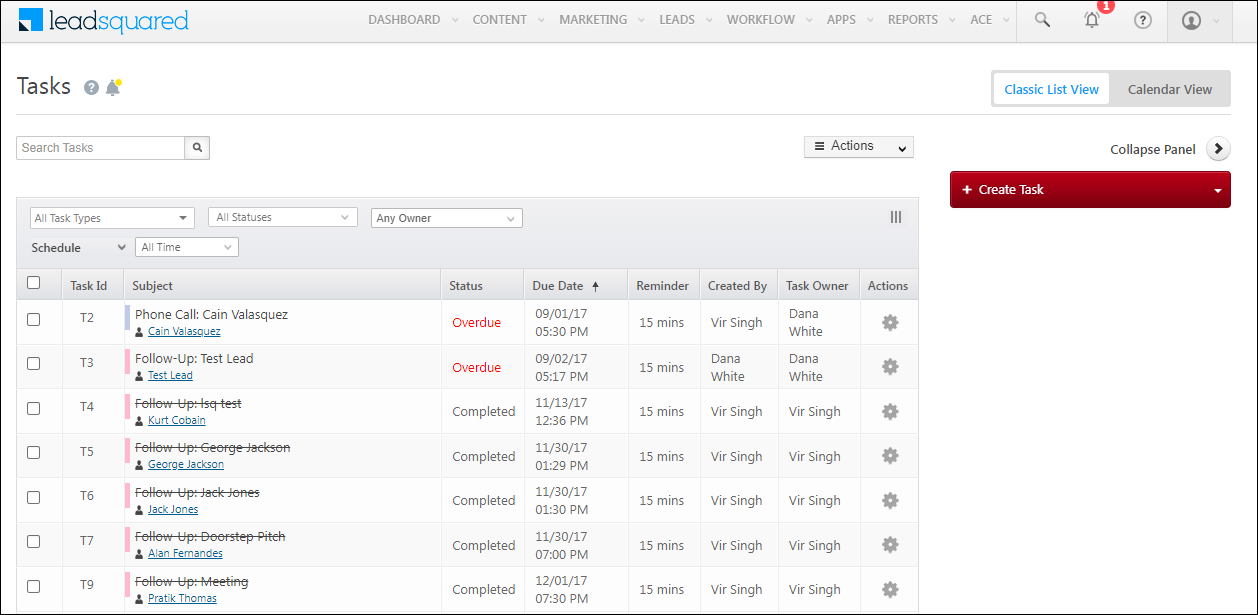
6. Configure Tasks for Users
Once a lead is created in your system, you can assign and manage Tasks among your users (schedule meetings, demos, site visits, etc.), and use a variety of other features to convert them into customers.
| Help Article | Description |
| Tasks – Feature Guide | Understand all the capabilities of the Tasks feature. |
| Configure your Tasks | This article will help you understand and configure Tasks. |
| How to Create Tasks and Schedule Reminders? | This article will help you understand and create Tasks and schedule reminders. |
7. Manage Accounts and Opportunities
7.1 Create and Manage Your Accounts
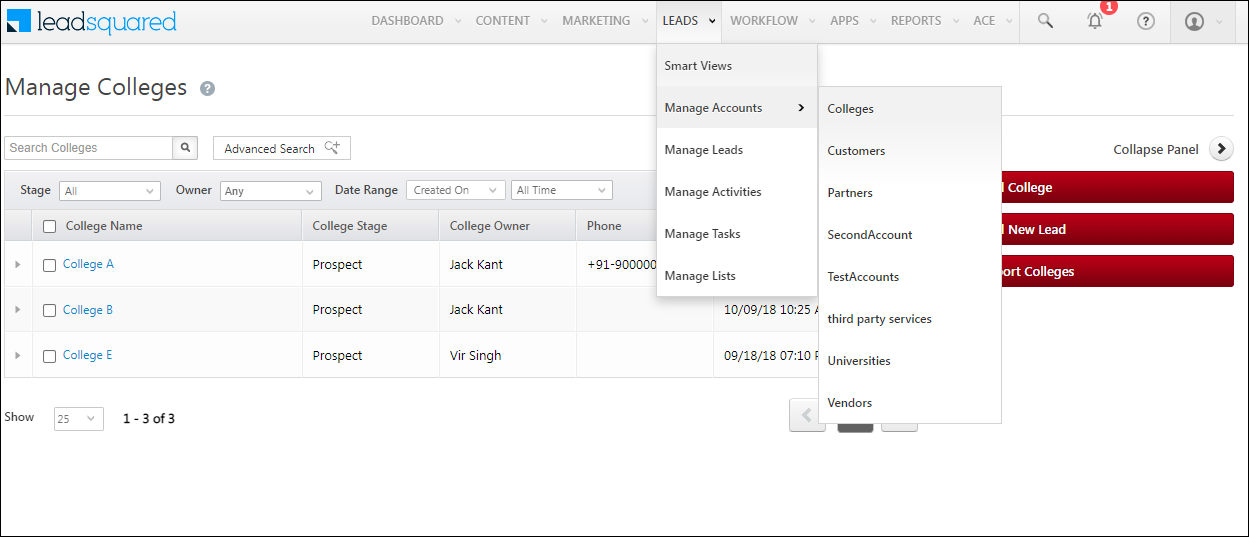
| Help Article | Description |
| Accounts Management Feature Guide | This article will help you understand LeadSquared’s Account Management Feature |
| Account Settings | This article will help you set up LeadSquared’s Account feature. |
| Accounts, Leads, and Opportunities | This article will help you understand the difference between Accounts, Leads, and Opportunities. |
7.2 Create and Manage Your Opportunities
Opportunities in LeadSquared represent potential deals. A lead could be interested in more than one product offered by your company. For example, a lead might be interested in buying car insurance, term insurance, and health insurance. LeadSquared’s Opportunities feature lets you manage different opportunities for the same lead without creating duplicate contacts. You can route the lead to agents specialized in different products, and create separate sales workflows.
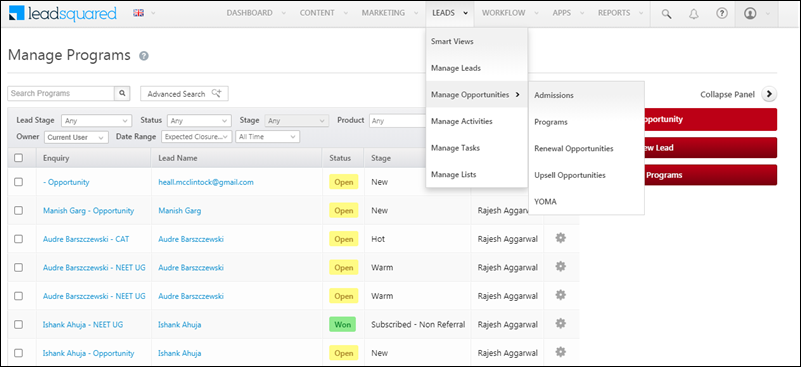
| Help Article | Description |
| Opportunity Management Feature Guide | This article will help you understand LeadSquared’s Opportunity Management Feature. |
| Opportunity Configuration | This article will help you understand how to create forms for multiple opportunity types, configure opportunity types, and add opportunities to your leads. |
| Manage Opportunities | This article will help you understand how to add opportunities to leads, and perform multiple actions on these opportunities such as bulk and grid updates, export opportunities and reset filters. |
| Accounts, Leads, and Opportunities | This article will help you understand the difference between Accounts, Leads, and Opportunities. |
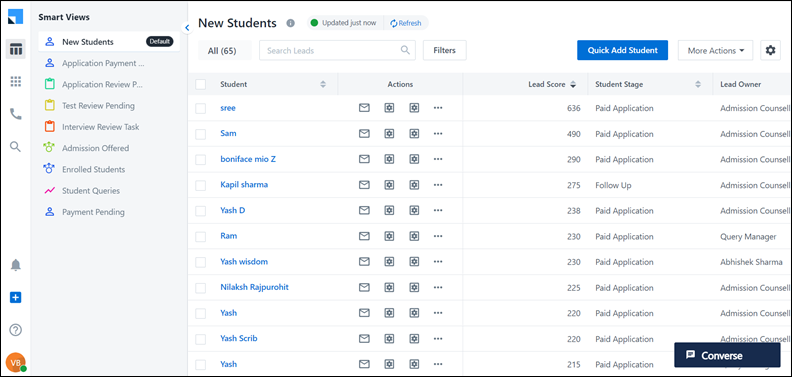
8. Manage Your Leads Through Smart Views
To bring all your important information into one place, LeadSquared launched Smart Views. The Smart Views page gives users a personalized view of your accounts, leads, opportunities, activities, and tasks. Sales users can create their own individual smart views, but as an Admin you create smart views at the organization level and assign them to different teams.

| Help Article | Description |
| Smart Views | This article will help you understand Smart Views. |
| Smart Views for Administrators | This article will help you understand how to create Smart Views as an administrator. |
9. Build Workflows
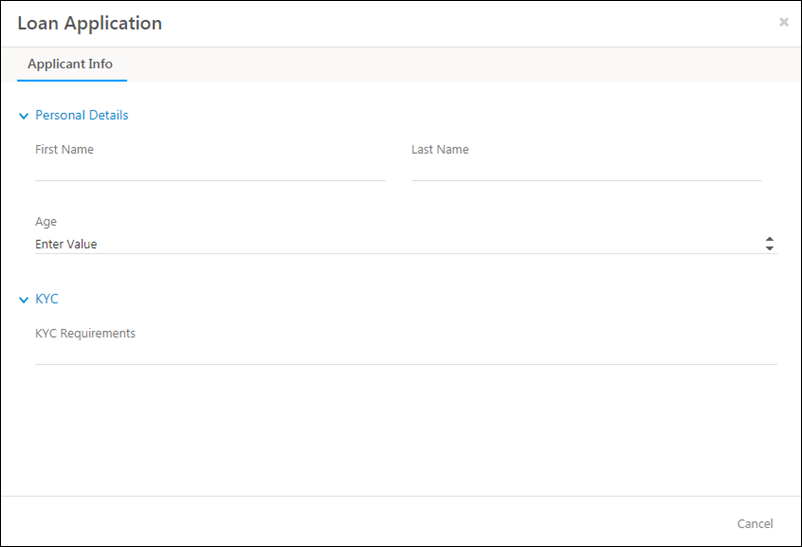
9.1 Creating LeadSquared Dynamic Forms
In addition to the basic lead forms feature, the Dynamic Forms Designer feature helps you create intelligent forms to capture entire application processes (e.g, college admission applications, loan applications, etc.). You can customize forms to behave in ways specific to your use cases, and prompt users to collect the right information based on a lead’s previous inputs.
Once you’ve created a form, the Process Designer helps you choose where, and to which users you want the form to appear. You can also use it to combine multiple forms into processes.
| Help Article | Description |
| LeadSquared Dynamic Forms and Processes – Feature Guide | This article will give you an overview of the Dynamic Forms and Process features |
| LeadSquared Forms | This article will help you understand how to create a LeadSquared Dynamic Form. |
| LeadSquared Process Designer | This article will help you organize your forms into workflows with Process Designer. |
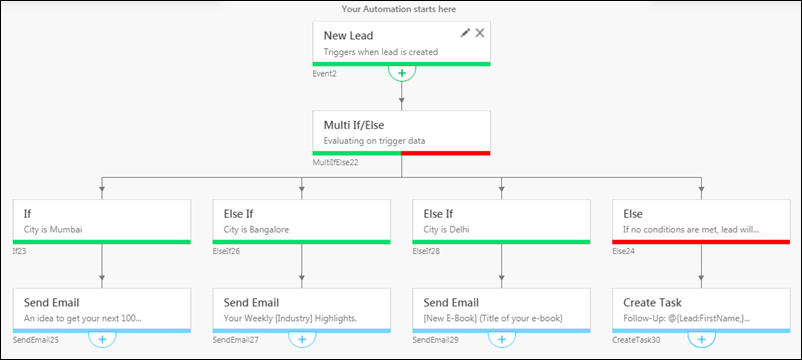
9.2 Create an Automation Workflow
The Automation feature lets you automate your entire workflow using an intuitive and easy-to-use visual designer. It’s a powerful way to push your leads to conversion. Just set it up once and watch your leads trickle down the sales funnel with minimal manual effort.
| Help Article | Description |
| Automation Feature Guide | This feature guide will help you understand LeadSquared’s Automation feature. |
9.3 Create LeadSquared Portals and Widgets
LeadSquared’s Portals are a great way to design a self-service website that helps with lead management like online applications or registration processes. LeadSquared’s Portal feature allows you to build your own online portals to capture leads and opportunities, through online forms, making the entire process paperless.
You can also create and embed Widgets on your website or landing page. An LSQ widget acts as a “lead magnet”. An example of a lead magnet is a special deal offered to customers in exchange for their contact details. It can be a discount code, webinar, white paper, ebook, template, inquiry form, or another resource.
| Help Article | Description |
| Portals Management Feature Guide | This article will help you understand and create a LeadSquared Portal. |
| Capture Leads with LeadSquared Widgets | This article will help you create LeadSquared Enquiry Widget or Registration Widget. |
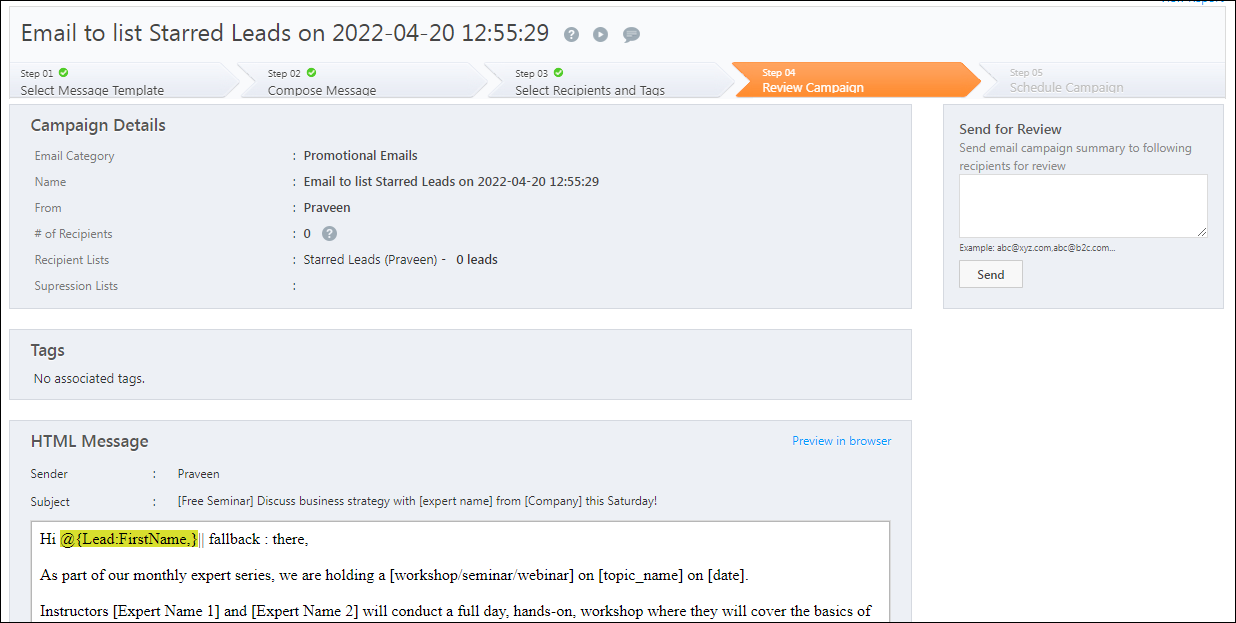
10. Setup Email Campaigns
Communicating with your leads is a breeze with LeadSquared’s Email Campaigns. It’s quick and easy to design and send out email campaigns to engage and nurture leads. You can personalize the content, schedule the timing of the campaigns, and track your lead’s interactions through Campaign Reports and Analytics.
With LeadSquared’s Email Settings, you can manage subscriptions to your email campaigns, set restrictions on which users can send emails, and set restrictions on recipients by blocking email addresses or domains.
Also, LeadSquared’s List Management feature lets you create Static and Dynamic lead lists. You can leverage this feature with your email campaigns to send targeted campaigns. The Manage Lists page allows you to create, edit, and view all your lead lists in one place.
| Help Article | Description |
| Email Settings Feature Guide | This article will help you understand and configure your email settings. |
| Email Campaign Feature Guide | This article will help you set up Email Campaigns through LeadSquared |
| List Management Feature Guide | This article will help you understand and create Lists for your email campaigns. |
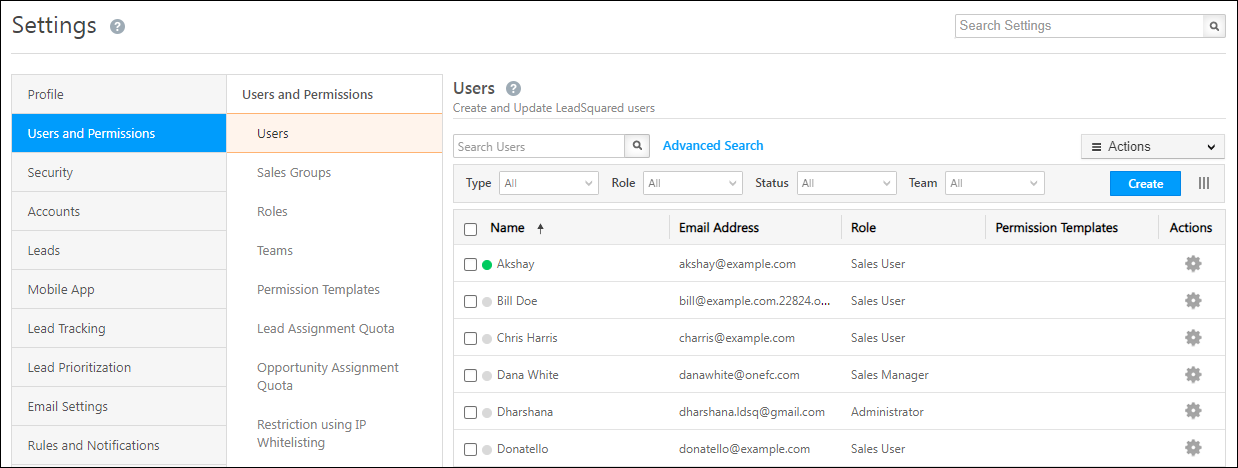
11. Create Users and Permissions
As an administrator, you can create LeadSquared users and grant them permissions based on their role in your organization.
After creating the users, you can group them into different sales groups based on location, business unit, or any other categorization of your choice.
Based on the reporting structure of your users, LeadSquared will also create an organizational hierarchy.
You can also group users into Teams that reflect your organization’s structure. The most powerful merit of the Teams feature is the ability to auto-check in your users. You can configure work-day templates and holiday calendars in accordance with your organization’s work schedule.
| Help Article | Description |
| Manage Users | This article will help you understand how to create and manage LeadSquared Users. |
| Manage User Custom Fields | This article will help you create Custom Fields for your users. |
| Check-in/Check-out Users | This article will help you understand the Check-in/Check-out feature for users. |
| Permission Templates Feature Overview | This article will help you understand LeadSquared’s Permission Templates feature. |
| How to Create a Permission Template | This article will help you understand how to create a Permission Template. |
| How to Apply Permission Templates | This article will help you understand how to apply a Permission Template. |
| Managing Sales Groups | This article will help you understand how to create and manage your LeadSquared Sales Groups. |
| Managing Teams | This article will help you understand how to create and manage your LeadSquared Teams. |
| How to Set Up User/Organization Hierarchy | This article will help you understand how to create and manage your organization hierarchy. |
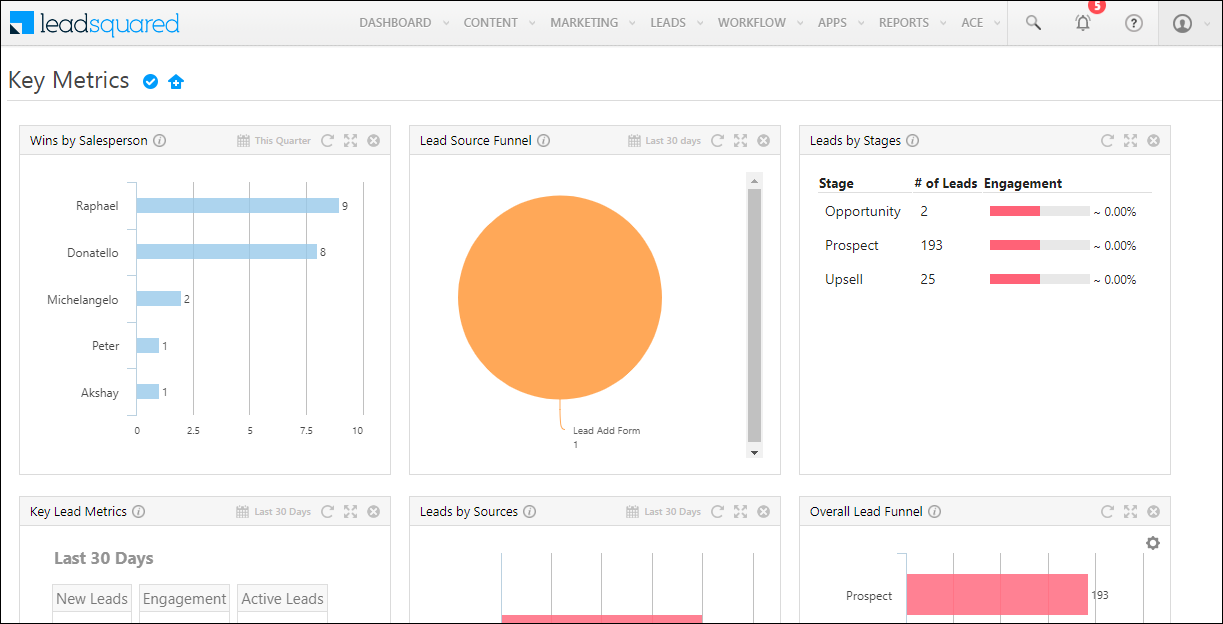
12. Reports and Analytics
LeadSquared provides powerful features to track your reports and dive into analytics –
12.1 Create a Custom Dashboard
Your dashboard is the first page you see when you log in to your LeadSquared account. It displays all the important sales and marketing metrics and reports of your account. The dashboard is completely customizable. And, you can also add third-party reports to your LeadSquared dashboard through an external URL.
| Help Article | Description |
| Create a Custom Dashboard | This article will help you create a Custom Dashboard on LeadSquared to view your reports and metrics. |
| Assign Custom Dashboards to Teams | This article will help you assign Custom Dashboards to your Teams. |
| Set a Dashboard as Default | This article will help you understand how to set a Dashboard as default. |
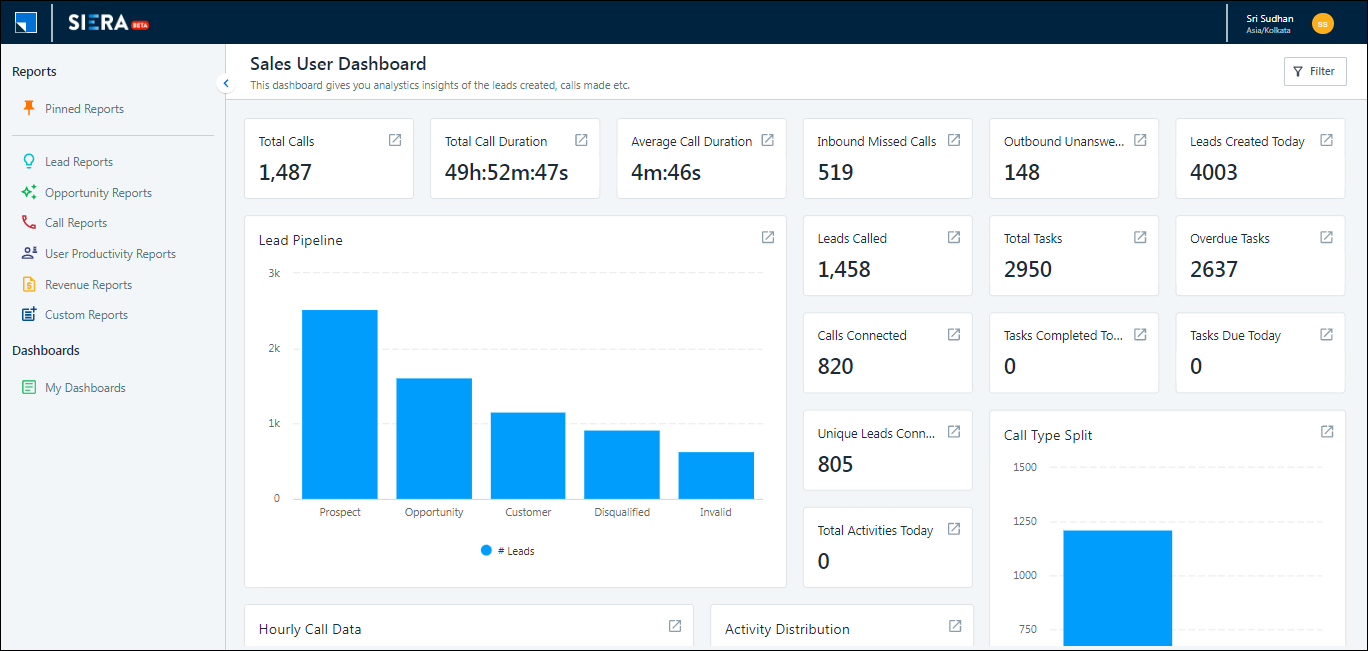
12.2 SIERA
Sales Intelligence and Efficiency through Reports and Analytics (SIERA) is LeadSquared’s new-gen self-service reporting tool. Through SIERA, you can track leads, opportunities, organization revenue, user performance, and more.
| Help Article | Description |
| SIERA Feature Guide | This article will help you understand LeadSquared’s SIERA feature for viewing your reports and analytics. |
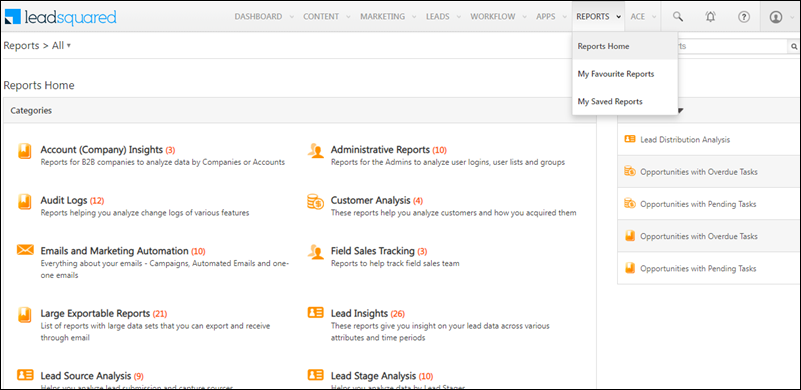
12.3 LeadSquared Reports
You can use the LeadSquared Reports feature to analyze your marketing and sales business processes. It helps you track and manage the activities performed by the lead and your users, across all LeadSquared features.
| Help Article | Description |
| LeadSquared Reports | This article will help you understand and create LeadSquared Reports |
13. Integrate Your Third-Party Apps
The App Marketplace helps you extend LeadSquared’s functionality. If you use an external application that manages lead data, you can sync that data with LeadSquared. Simply download and install the respective application from the App Marketplace and start syncing the data. Once the leads are synced, you can leverage LeadSquared’s CRM features to nurture and convert your leads.
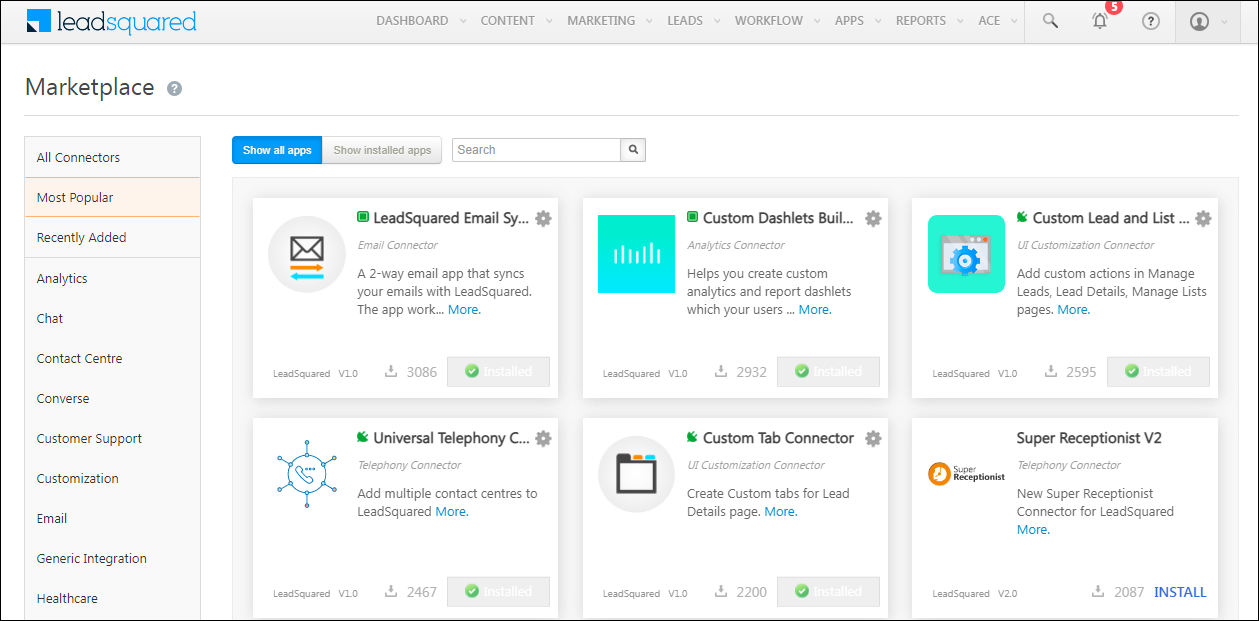
Here are some popular apps on LeadSquared’s App Marketplace –
| Help Article | Description |
| WhatsApp Business Messaging Connector | This article will help you integrate your WhatsApp business account with LeadSquared. |
| Email Sync Connector | This article will help you integrate your Outlook or Gmail account with LeadSquared. |
| Facebook/Instagram Lead Ads Connector | This article will help you integrate your Facebook Ads account or Instagram Ads account with LeadSquared. |
| Custom Lead and List Actions Connector | This article will help you understand how to extend LeadSquared’s functionality and create Custom Actions (in addition to the actions available by default) on a lead, group of leads, or a list. |
| Gupshup SMS Connector | This article helps you set up WhatsApp messaging through your LeadSquared account using Gupshup as your service provider. |
| Kalera SMS Connector | This article will help you integrate your Kaleyra SMS with LeadSquared. |
| Super Receptionist Telephony Connector | This article will help you integrate the Super Receptionist Telephony provider with LeadSquared. |
| Exotel Telephony Connector | This article helps you integrate the Exotel Telephony provider with LeadSquared. |
| Universal Telephony Connector | This article will help you integrate your cloud telephony service provider(s) with LeadSquared. |
| Google Forms Lead Capture Connector | This article will help you integrate your Google Forms with LeadSquared. |
| Universal Lead Capture Connector | This article will help you integrate your custom connectors with LeadSquared. |
14. Setup Website Tracking
You can start tracking your leads by installing the LeadSquared tracking script on your website.
LeadSquared’s lead tracking system helps you understand the sources from where the leads landed on your website (google search, email newsletters, social media advertisements, etc.,). These statistics give you an insight into what channels or mediums are working well for your business, and the ones that need improvement.
You can even track the leads’ web events such as page views, button clicks, and link clicks on your website.
Once you list your website under Website & Landing Page Domains, you can install the tracker. Plus, there are additional options you can use to configure your lead tracking.
![]()
| Help Article | Description |
| Install the LeadSquared tracking script | This article will help you install LeadSquared’s Tracking Script on your website. |
| Add your website and landing page domains | This article will help you link your business/brand domains with your LeadSquared account. |
| Domain settings for email links | This article will help you track links sent to your leads through email campaigns. |
| Control settings for multiple email opens | Enabling Multiple Email Opens may help you in case the emails are forwarded in the same organization, and different people open it to trigger a higher lead score. |
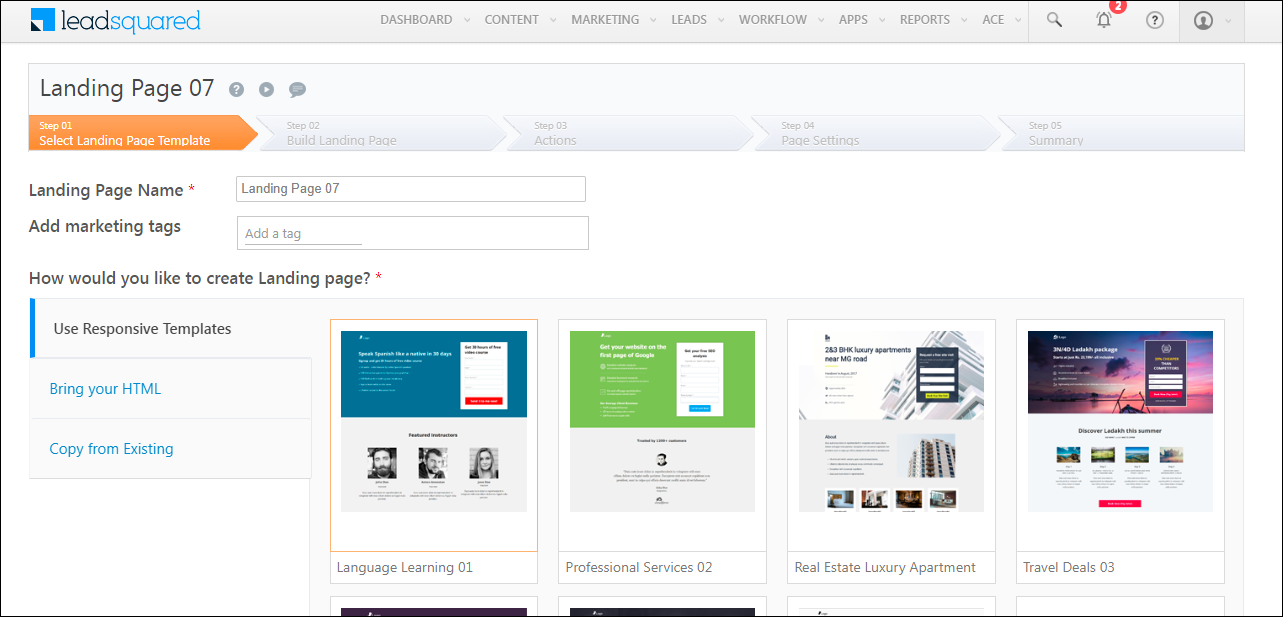
15. Create Landing Pages
LeadSquared’s landing page module offers powerful features to design and publish conversion-optimized Landing Pages. You can use LeadSquared’s built-in templates to easily create Landing Pages.
| Help Article | Description |
| Create and Publish a Landing Page | This article will help you understand how to create and publish a landing page |
| Generate an SSL certificate | If you’ve hosted your landing pages on custom domains (outside of LeadSquared), this article will help you obtain SSL Certificates to support these domains. |
| Create tracking URLs for your landing page | This article will help you create tracking URLs through LeadSquared. |
| Manage reverse IP lookup | This article will help you manage reverse IP Lookup. The Reverse IP Lookup setting allows you to automatically view the location (City, State, and Country) of a lead that’s captured from a landing page. |
16. Security and Privacy
Here is how you can manage the Security and Privacy settings for your LeadSquared account –
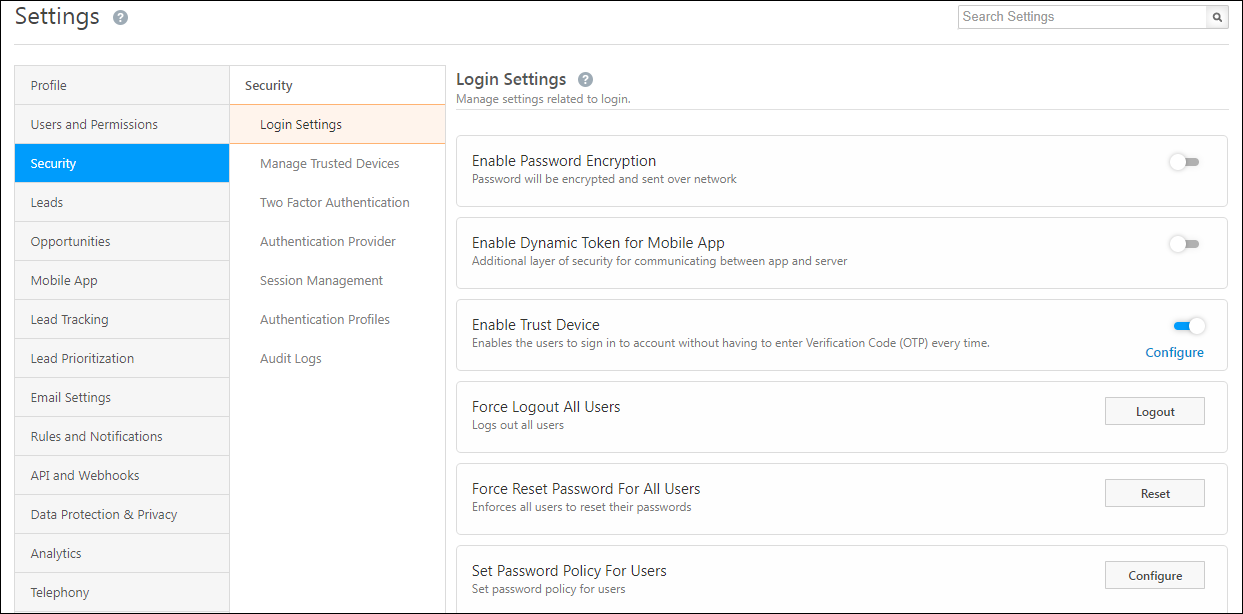
16.1 Manage Your Security Settings
You can secure your account through LeadSquared’s security settings. You can configure the login settings, enable two-factor authentication for all or specific users, enable third-party authentication, manage password policies, manage sessions for users, and more.
| Help Articles | Description |
| Manage Login Settings | This article will help you manage your Login Settings on LeadSquared. |
| Enable Two Factor Authentication | This article will help you enable two-factor authentication on your LeadSquared account. |
| Authentication Profiles | If two-factor authentication is enabled/disabled on your account, it is applied by default to all your users. But if you want to enable or disable this feature for only specific users, it can be done by configuring Authentication Profiles. |
| Enable Third Party Authentication | This article will help you enable third-party authentication through Google, Okta, etc., for your LeadSquared account. |
| Session Management | This article will help you manage login expiration time and session timeout for your LeadSquared users. |
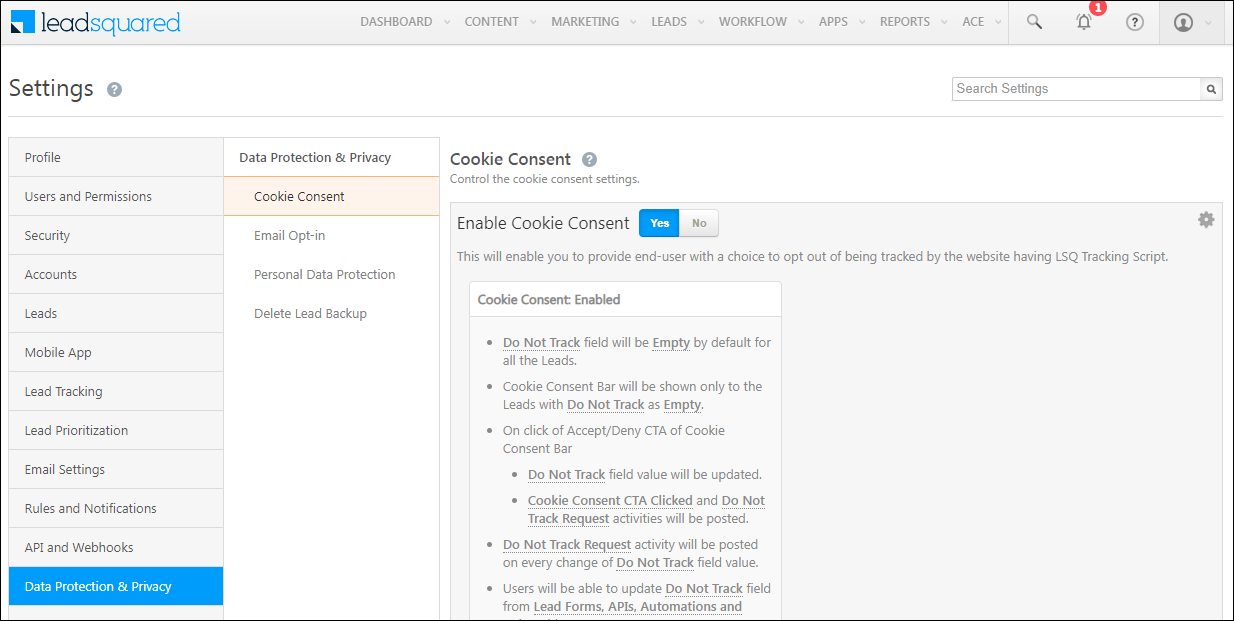
16.2 Configure Data Protection and Privacy
You have the option to configure the data protection and privacy of your lead details. It includes the option to enable cookie consent, request for email opt-in, personal data protection, and deletion of lead data backup.
| Help Article | Description |
| Data Protection & Privacy Settings | This article will help you manage Data Protection & Privacy Settings for your leads. |
17. Marvin
Marvin is LeadSquared’s new Inside Sales Application that features significant improvements in the user experience across the platform. Marvin is designed specifically to increase the productivity of Sales Users and Sales Managers but retains similarities to the existing platform to ensure effortless adoption.
| Help Article | Description |
| Marvin Feature Guide | This article will help you understand the impact Marvin can have on your Organization. |
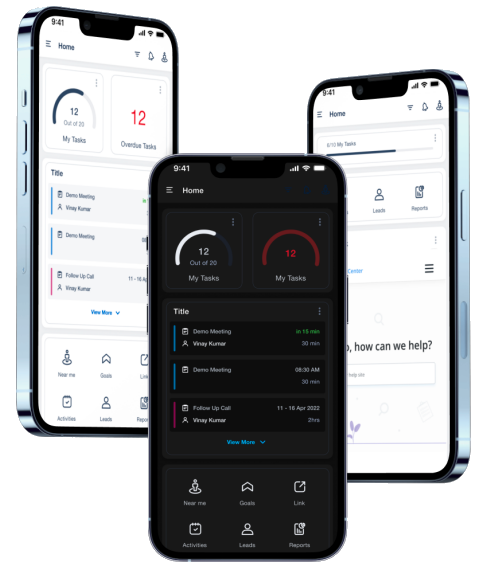
18. Install LeadSquared’s Mobile App
You can efficiently manage your entire field workforce with LeadSquared Mobile App. When new leads come in, you can easily distribute them to your field agents based on their availability, zip code, product, etc. You can also set tasks and meetings for the leads and assign them to your field agents as well. With instant notifications on the app, your agents will know when new leads or tasks are assigned to them and can get in touch with the lead instantly.
Agents can also instantly add leads they meet on the field using the mobile app, and edit and modify the details on the go. You will have complete visibility into your agents’ day. You will know the sales route that your agent has taken for the day, and get reports on the meetings that they have attended and the status of these meetings.
The LeadSquared Mobile App is available on iOS and Android.
| Help Article | Description |
| LeadSquared Mobile App Video Tutorial | This video will help you understand the LeadSquared Mobile App. |
| Features Supported on LeadSqaured Android and iOS | This article will help you understand all the features supported on the LeadSquared Android and iOS App. |
| Casa – Mobile Home Builder | This article will help you create and customize the homepage of the LeadSquared mobile application to reflect your business requirements. |
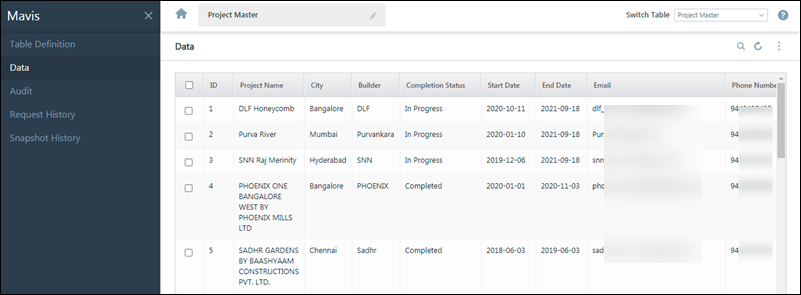
19. Store Your Data on Mavis DB
The Mavis DB lets you create databases where you can store master data (for courses, programs, projects, etc.) right inside your LeadSquared account. Providing an easy-to-use UI, Mavis lets you define table structures, and store and manage data including text, numbers, dates, JSON, coordinates, and more. You can directly import your spreadsheets (CSV format) to create and manage tables within your databases.
In addition to the UI, Mavis API offers a powerful RESTful interface to perform operations, filter, and export your data.
| Help Article | Description |
| Getting Started with Mavis | This article will help you understand and create a Mavis DB. |
20. Improve Your Sales Performance with ACE
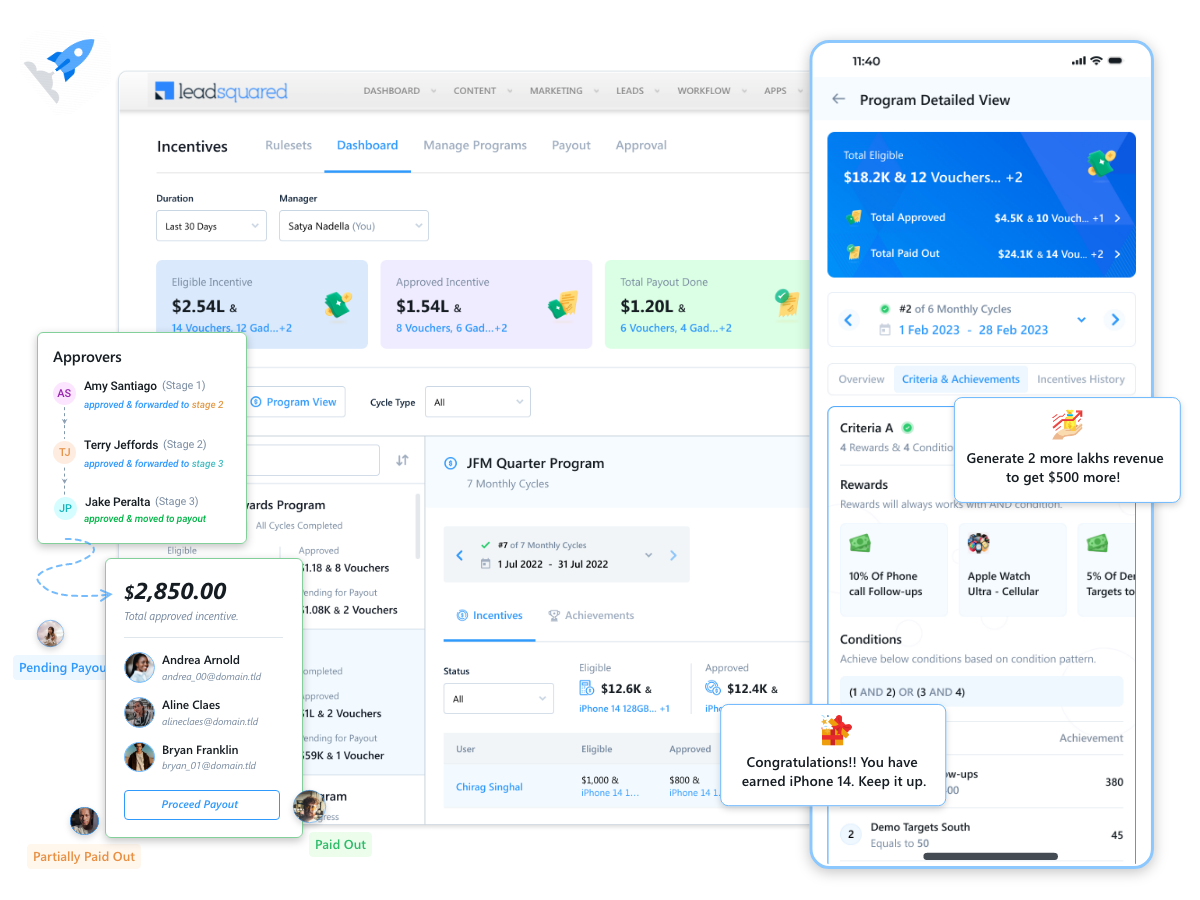
Ace is LeadSquared’s sales performance management suite. If your organization has a revenue goal for the current year, Ace will help you break it down into smaller goals (or targets) for your users. You can set up Goals for different sales teams in your organization and reward them when they reach their targets or exceed them. Users and Managers can track their achievements and gain insights into the best-performing teams and individuals.
| Help Article | Description |
| Goals Feature Guide | This article will help you understand and create Goals for your organization. |
| Create an Incentive Program | This article will help you understand how to create an Incentive Program. |
| View and Manage Incentive Programs | This article will help you view and manage Incentive Programs. |