1. Feature Overview
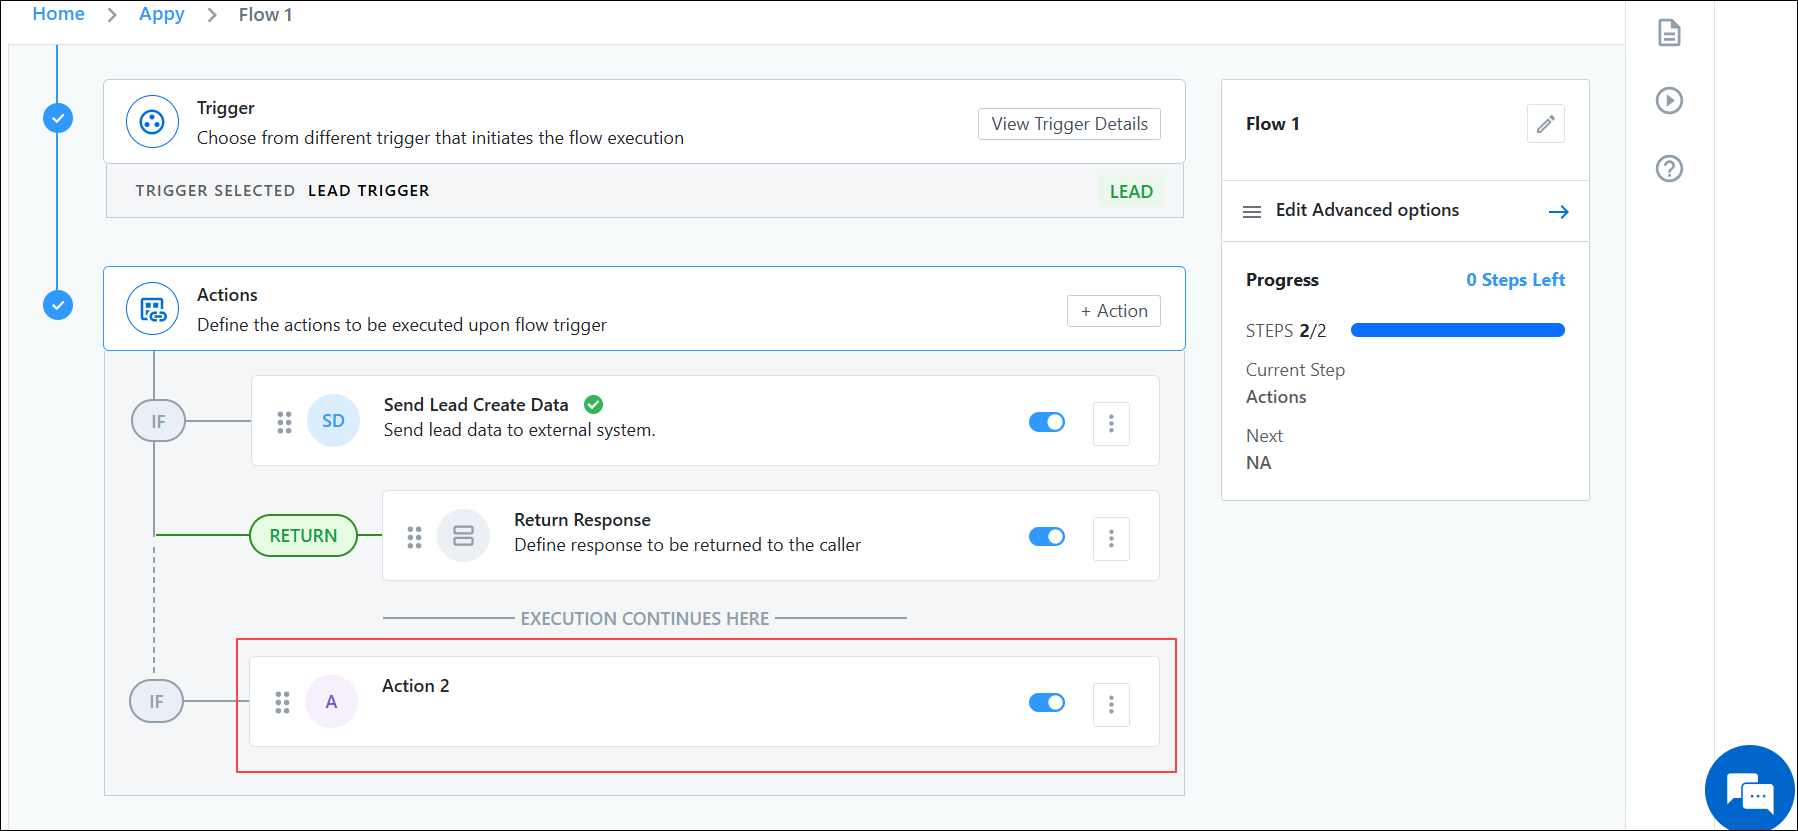
The Return Response action allows UDS workflows to send a custom response back to the API caller. When added, all actions before it run synchronously, while actions after it are queued and processed asynchronously. This is useful when an immediate, dynamic reply is needed.
2. Prerequisites
- You must be an Administrator user, or access must be shared to you by an Admin user
- The Universal Data Sync Connector is a paid feature. To enable it on your account, contact your account manager, or write to support@leadsquared.com.
- Before creating actions, you must select a trigger for your data flow. For more information, see Select a Trigger.
- There are restrictions at the account level for adding a return response card. Please refer to your Plan Details as the following conditions apply –
- The Return Response card can only be added if it is enabled for the account.
- The number of actions allowed before the Return Response is also defined at the account level. Only the permitted number of actions can be added before it.
- Since actions before the return card are executed immediately, a rate limit is enforced to safeguard system performance.
3. Default Behavior Without Return Response Action
If a Return Response card isn’t configured, the following default behavior applies:
- The request is sent to UDS.
- UDS queues the request for processing.
- Based on system bandwidth, queued requests are processed asynchronously.
In such cases, UDS returns a standard response. Here’s an example:
{
"status": "SUCCESS",
"success": true,
"errors": {},
"data": "Request accepted for further processing",
"requestId": "9444df97-0c27-821f-5cc8-ee04ac8c91b7"
}
4. Adding Return Response Actions
All incoming data received on the webhook—including query, body, and headers—as well as the response data from all preceding actions (if response mapping is configured for those actions), can be accessed via the input object in the return response card.
input.<your_action_name> your action response variable data.
Note:
- You cannot access the auth variable in return response action.
- Data returned via return response action cannot be accessed in further actions.
4.1 Return Response Action Use case
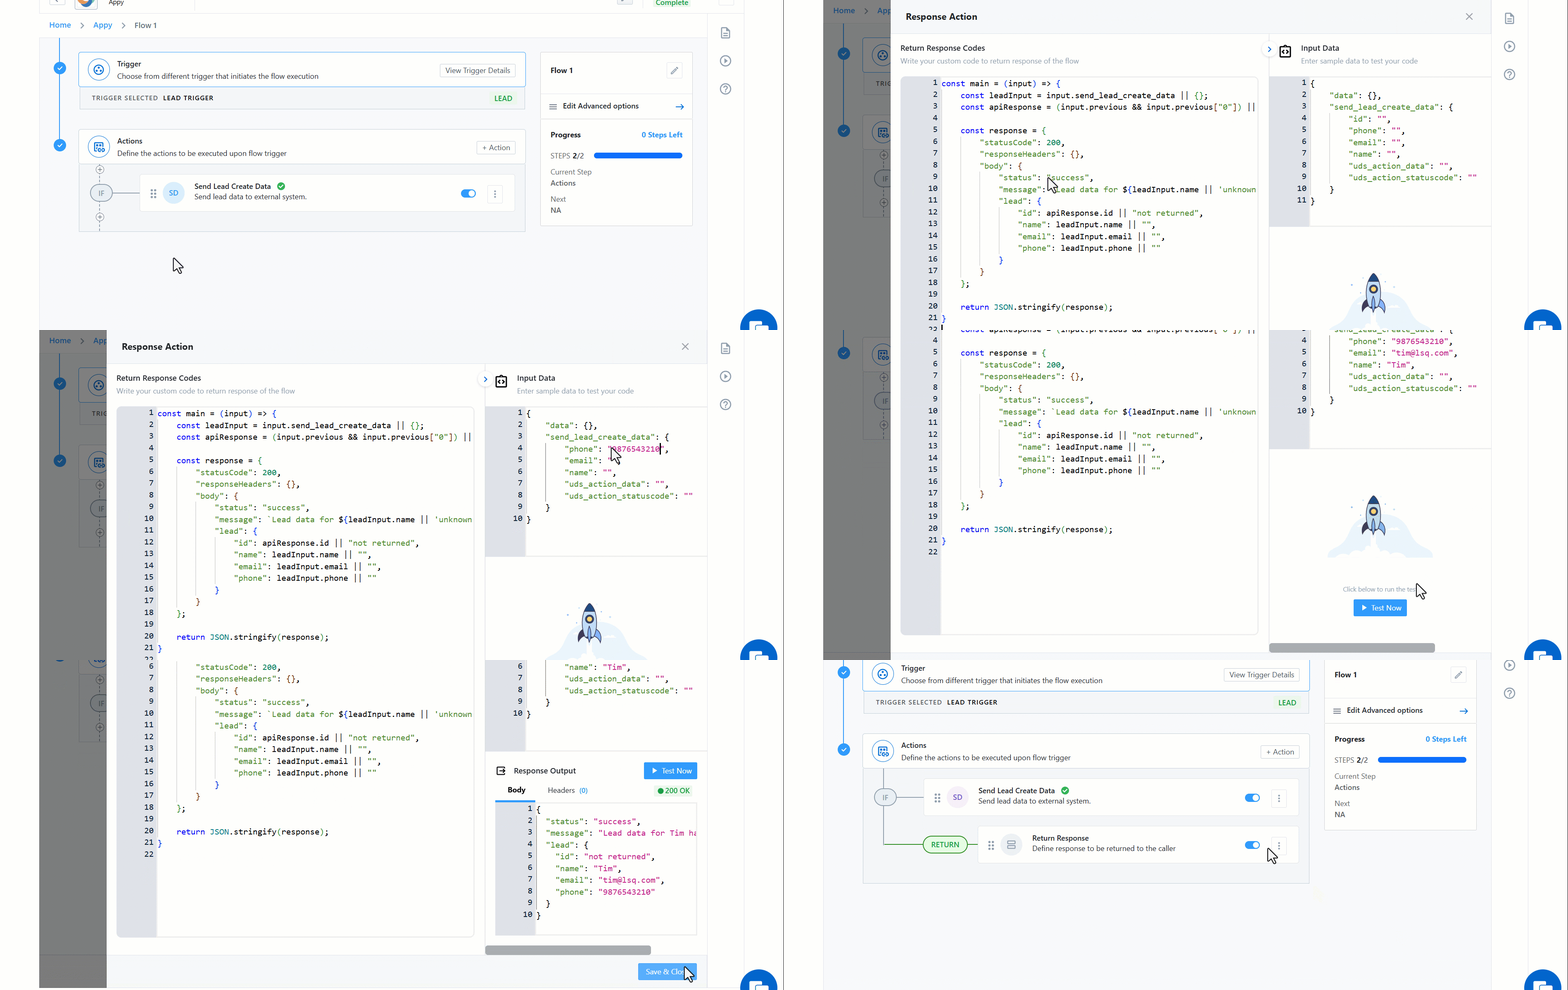
If an action in UDS creates a lead in LeadSquared, and you want to return the Lead ID from the response of the Lead Create action back to the webhook caller, you can do so using the Return Response card.
Make sure the response mapping is completed for the Lead Create action, so that its output is accessible in the return step via the input object.
How to Configure a Return Response Card
1. Add the Return Response Card
Click + Return on the Actions panel (or use the + icon) to add a Return Response card.
2. Add JavaScript Code
Write the JavaScript code that defines the response you want to send back. By default, a sample snippet is populated when you add the Return card — this returns all the data accessible to the Return Response card.
You can modify this snippet or write your own logic to customize the response.
3. Test with Sample Data
Test your code using sample input data. The input data shown is based on the sample data added during your flow configuration. You can modify the values in this data to test your logic, but:
4. Ensure Test Passes
You cannot save the Return Response card unless the test executes successfully.
5. Save & Close
Once the test passes, click Save & Close to complete the configuration.
With this method, an immediate dynamic response is returned to the user.


5. Using a Response from a Previous Action
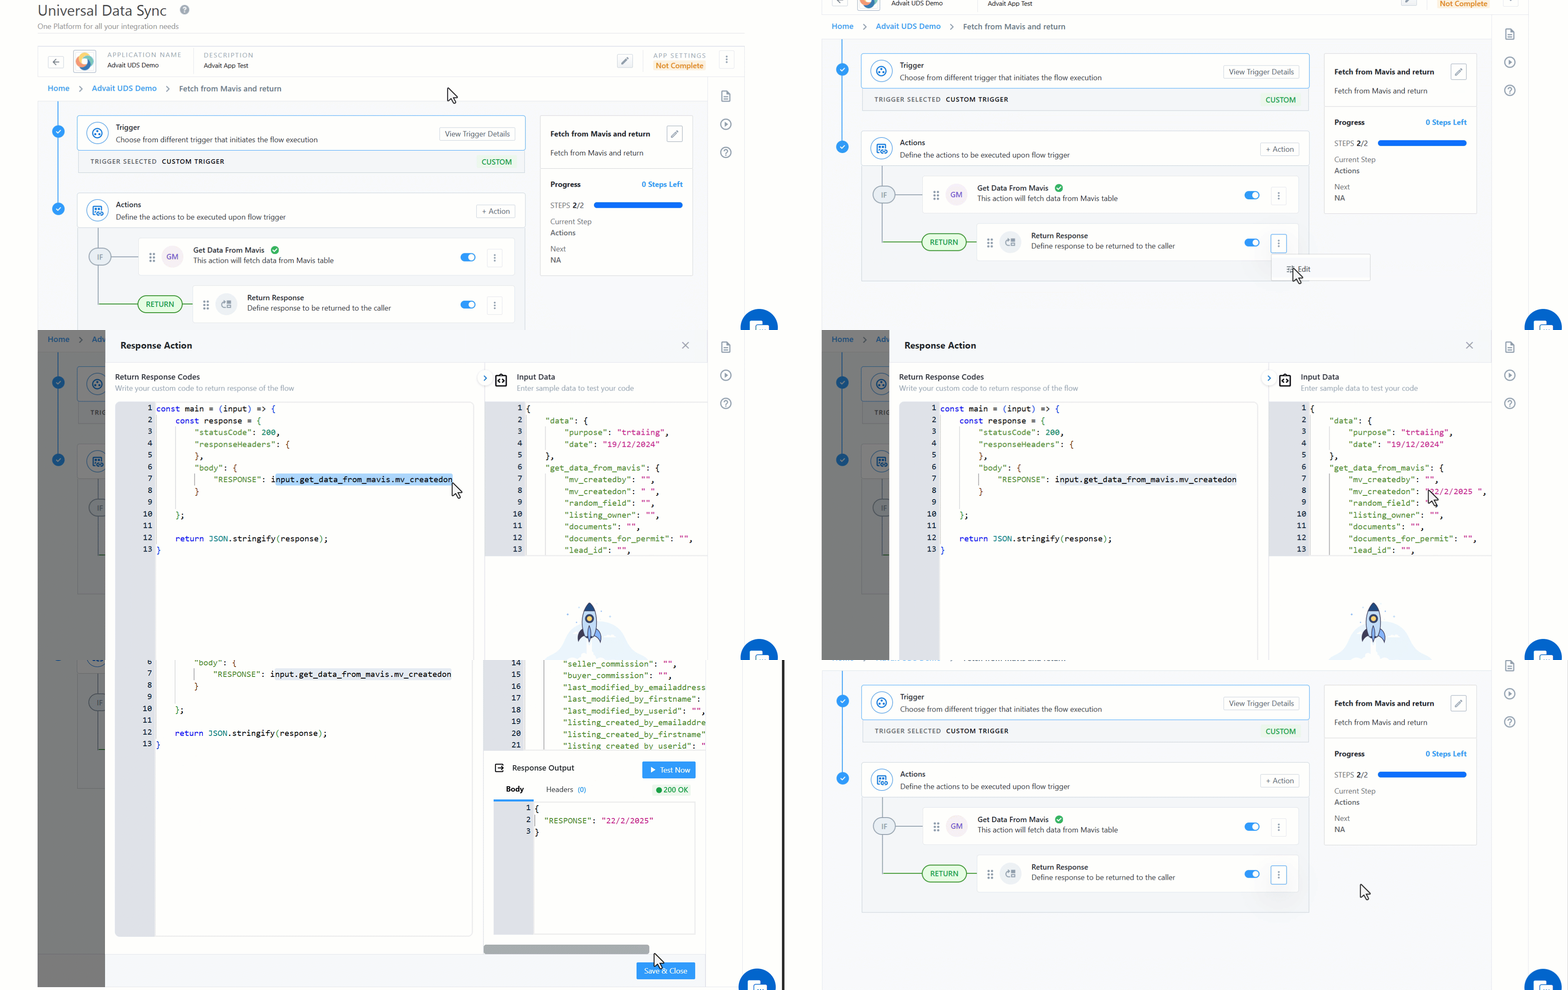
You can configure the Return Response Action to use and return data from a previous action in the workflow. This is helpful when your UDS workflow includes intermediate steps such as API calls, data transformations, or lookups, and you want to return only specific data points back to the API caller.
For example, in a workflow with two actions:
- Fetch Data from a Source – Pulls data based on some predefined logic.
- Return Response – Sends specific fetched data back to the API caller.
To use the response from a previous action:
- Go to the Return Response card in your workflow.
- In the Response Configuration section, you can reference the output of a previous action using the syntax:
input.<previous_action_name> - You can also extract specific fields using dot notation:
input.<previous_action_name>.<specific_field_json_path_from_response> - Optionally, you can structure the response:
{"response": input.<previou_action_name>.<specific_field_json_path_from_response>}
- In the Response Configuration section, you can reference the output of a previous action using the syntax:

6. Viewing Logs for Return Response Actions
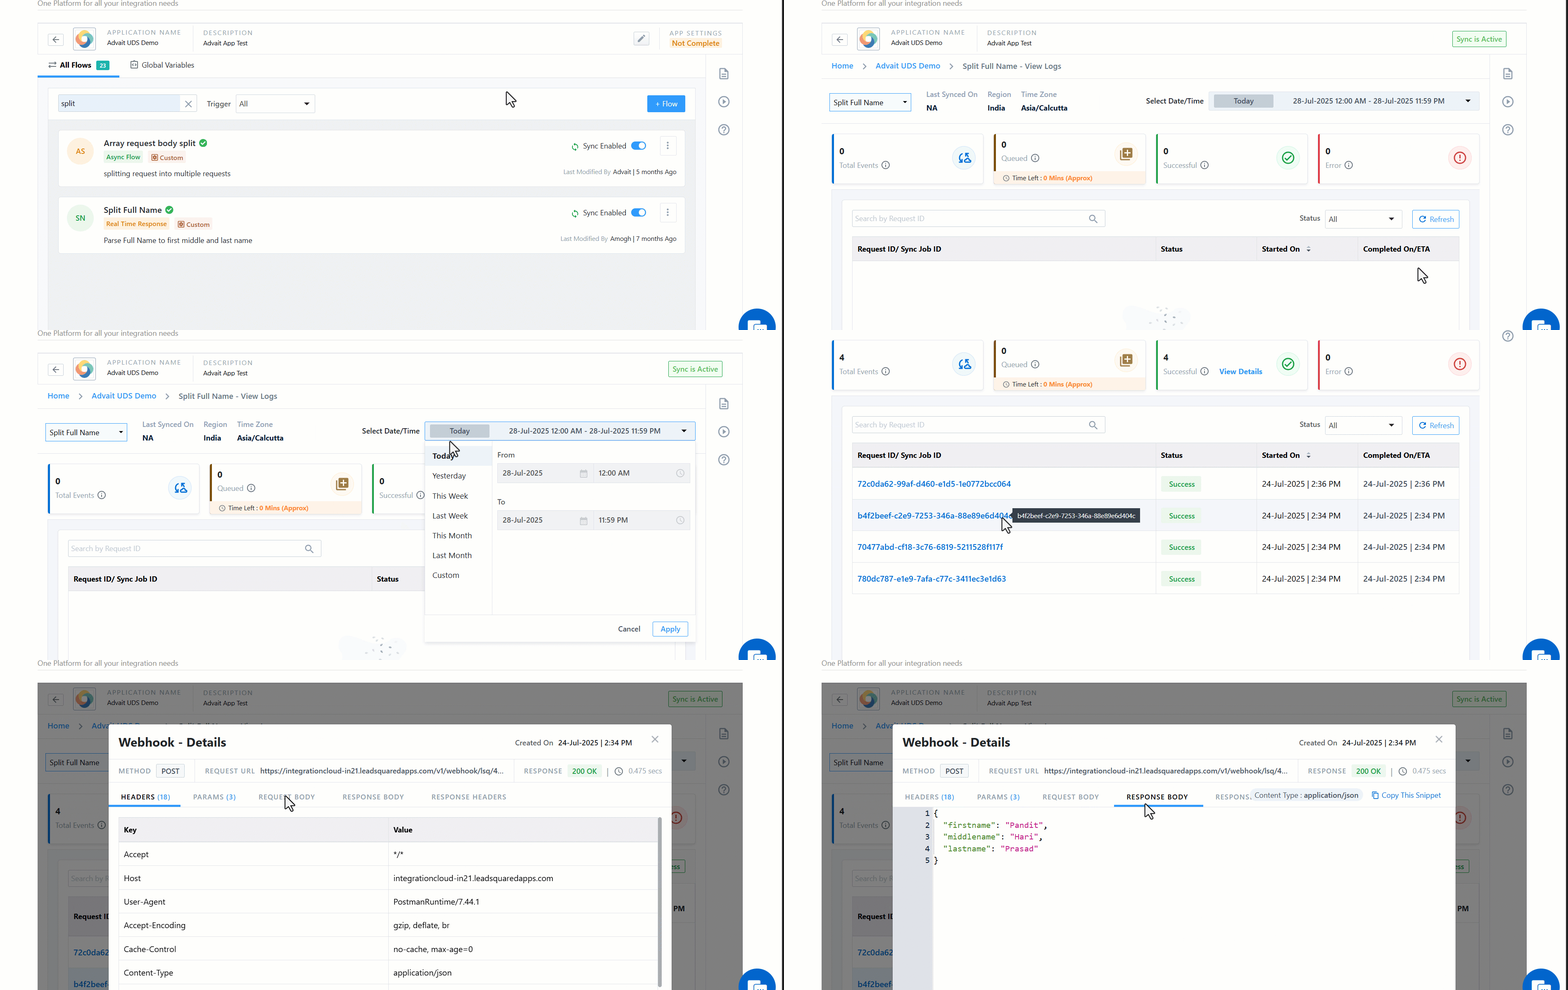
Logs for Return Response Actions can be viewed in the Workflow Logs section of UDS. These logs help you understand how the data flows through the workflow and what is returned to the API caller.
Each execution log shows:
- The input passed to the workflow.
- The response returned by the Return Response action.
Example:
If you passed a name like Pandit Hari Prasad to a workflow with a Split Full Name action followed by a Return Response action:
The Return Response will show the parsed output:
{
"firstName": "Pandit",
"middleName": "Hari",
"lastName": "Prasad"
}
To validate or debug the response:
- Navigate to the Logs for the specific workflow. You can view logs either from the All Flows page by selecting the flow options and clicking the Logs option, or by opening a specific flow and accessing the Logs tab from within the flow details.
- Locate the log entry based on the timestamp or request input.
- Click the
 icon under WEBHOOK RESPONSE to view the data returned by the Return Response action.

Any Questions?
Did you find this article helpful? Please let us know any feedback you may have in the comments section below. We’d love to hear from you and help you out!


