


Get Started
Sales Suite
Field Ops
Marketing
Service CRM
Integrations & Apps
FloStack
Universal Data Sync (UDS) Create Actions – API Action
1. Feature Overview
This action allows you to make a call to any REST API within your UDS workflow.
Configuration Includes:
- Endpoint URL and HTTP method (GET, POST, PUT, etc.)
- Request headers, query parameters, and body
- Dynamic value mapping using variables from previous steps
- Transform data as needed using LiquidJS filters.
- Handling responses and errors
2. Prerequisites
- You must be an Administrator user, or access must be shared to you by an Admin user.
- The Universal Data Sync Connector is a paid feature. To enable it on your account, contact your account manager, or write to support@leadsquared.com.
- Before creating actions, you must select a trigger for your data flow. For more information, see Select a Trigger.
3. Example Data Flow
We’ll be using a public API to set up data flows using UDS connector for an external system, but the same approach can be applied to any provider.
Action – Send leads data to an external system from LeadSquared.
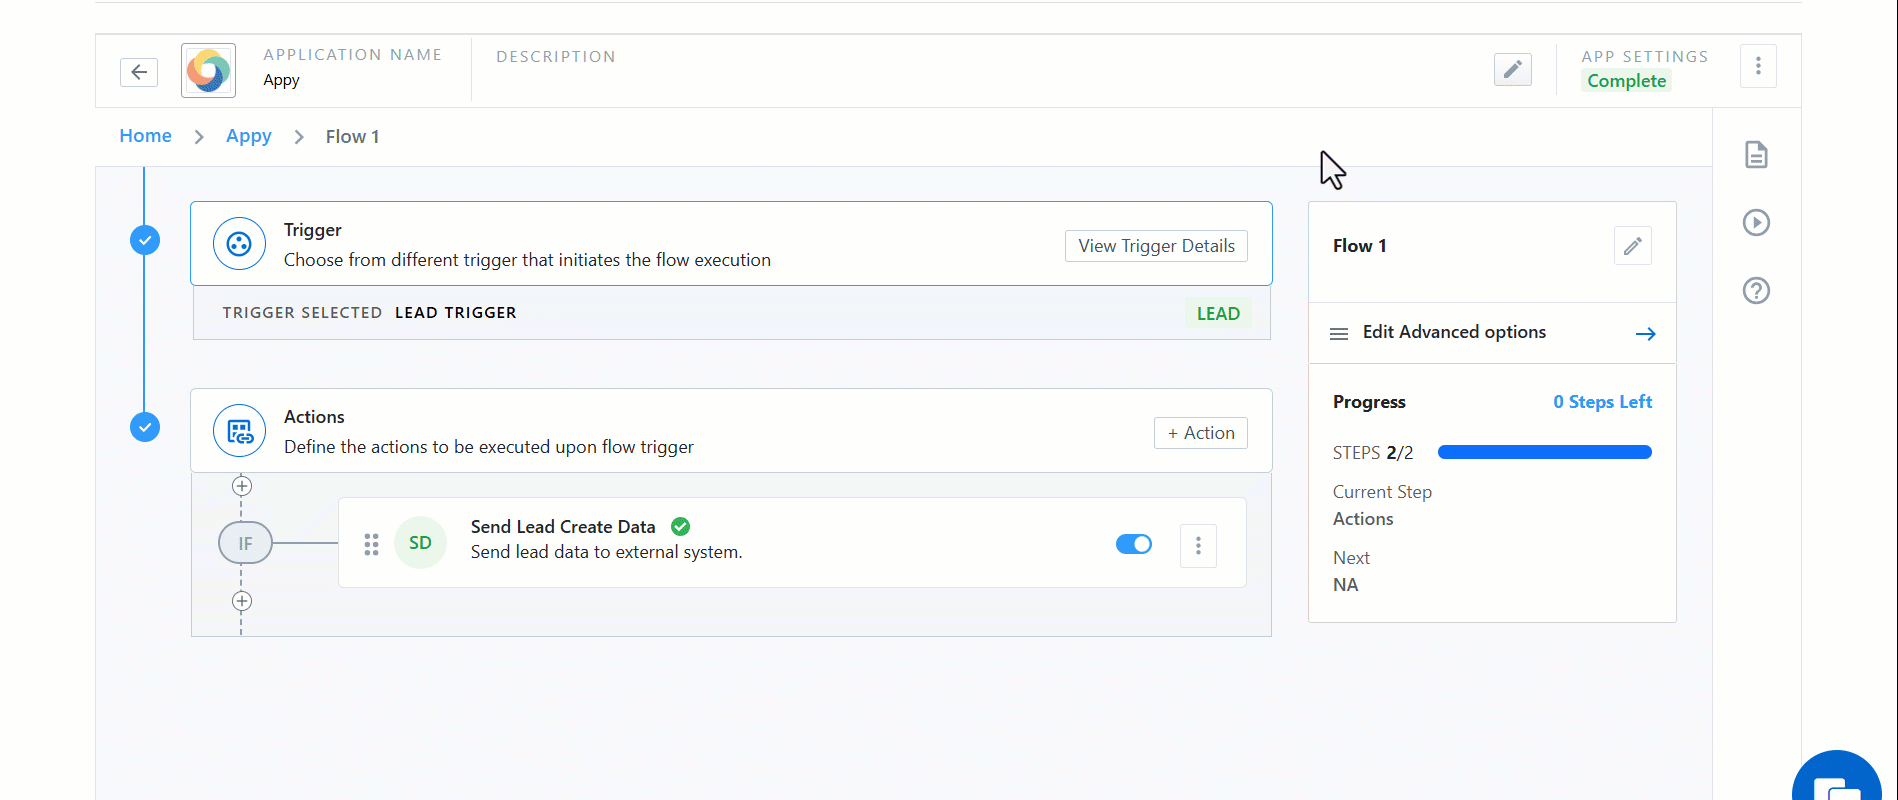
4. Create an Action
- Click + Action.
- Under the Custom action dropdown, select Call Any API of LeadSquared.
- Enter the name and description, then click Save & Next.

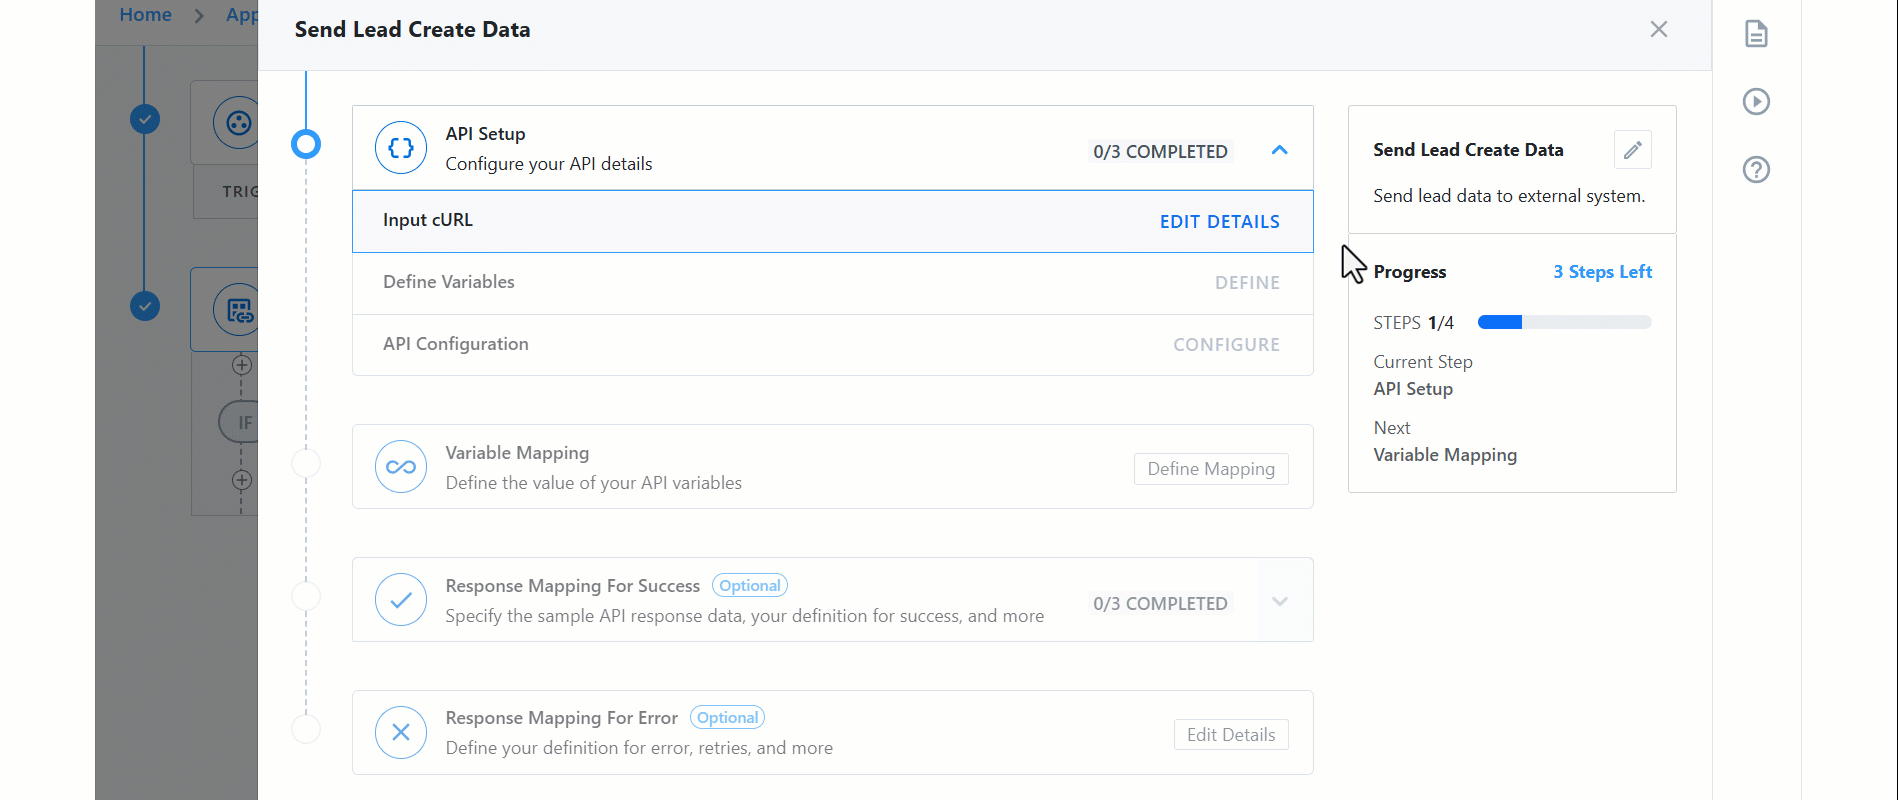
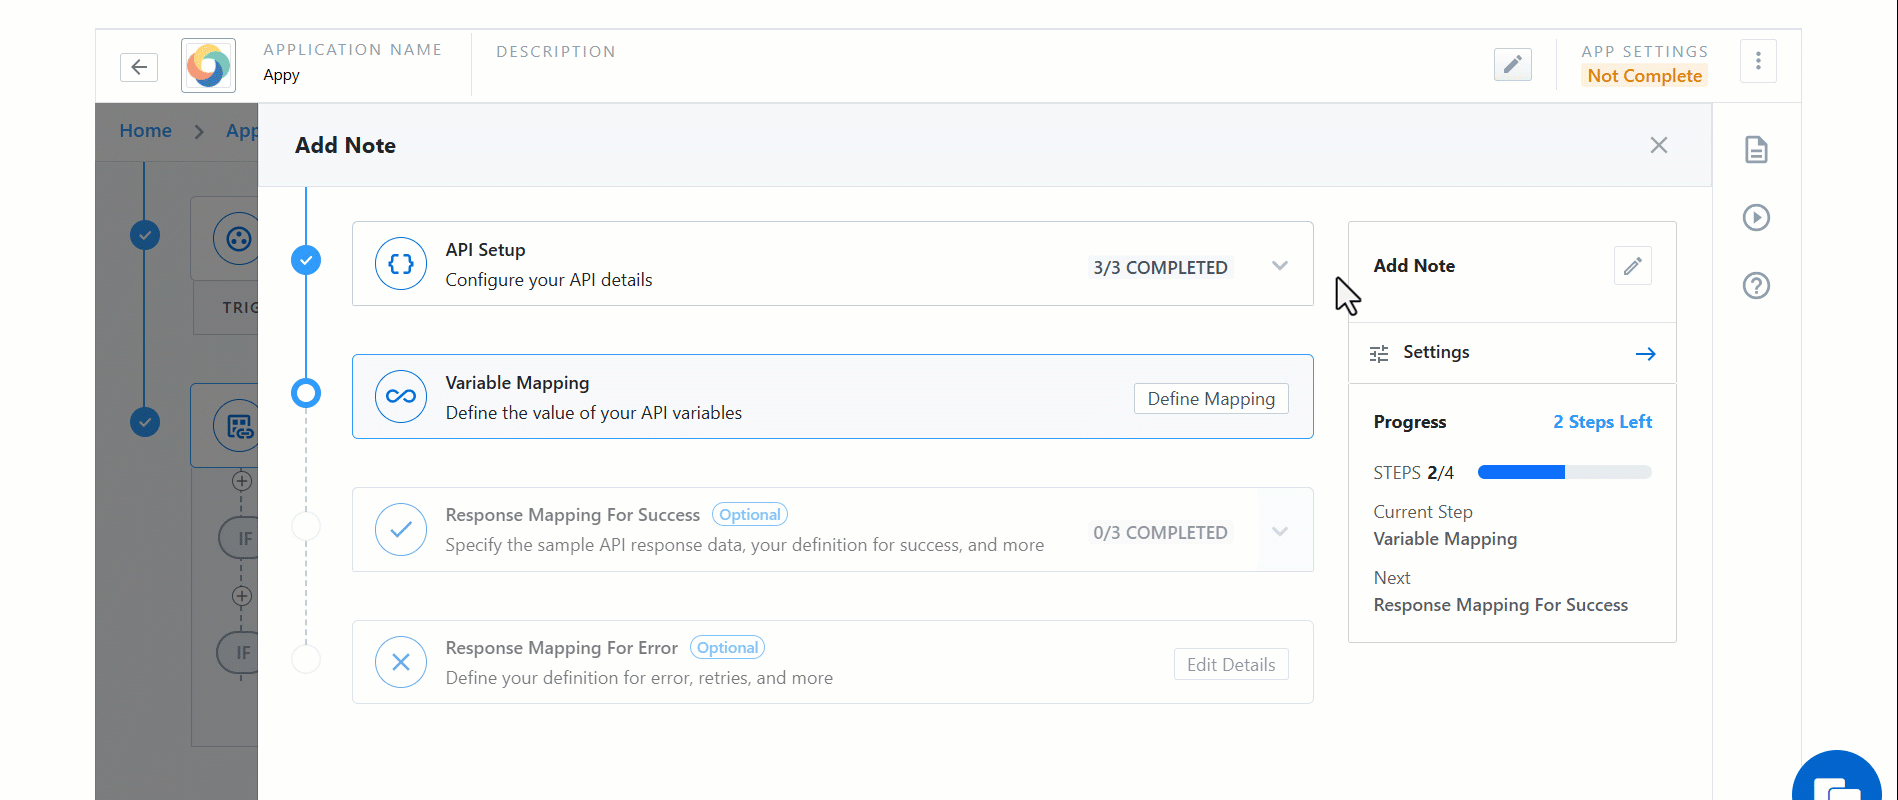
5. API Setup
This section allows you to define the API you want to call. Here, we’ll take an example API and configure it to send data from LeadSquared. This is a 3 steps process:
5.1 Input cURL
If you have a sample cURL request, you can paste it into this window. Using cURL helps automatically identify the required variables, create them, and complete the API setup for you, just in one click.
5.2 Define Variables
This section displays the list of all variables for your API. It refers to a placeholder used in an API request whose value can be dynamically assigned later.
If you’ve used a cURL in the previous step, variables are created automatically. However, you can also manually add, edit, or update existing variables as needed. In the next step (Variable Mapping), you’ll be able to assign values to these variables.
While defining a variable, you also need to select its type and Required for API.
5.2.2 Type
Choosing the correct type is important, as it determines the transformation options available during the Variable Mapping step. For example, if the variable type is set to Date, you’ll be able to configure date format transformations while mapping.
Supported Variable Types:
- String (default): e.g.,
"any text or value" - Boolean:
true/false - Number: e.g.,
1,2.5,100 - Date: e.g.,
2025-08-07,07/08/2025 - DateTime: e.g.,
2025-09-05 02:00:00 - Time: e.g.,
13:01:00 - Phone: e.g.,
+91-98xxxxxxxx
5.2.3 Required for API
This flag gives you control over, when the API call should proceed. If enabled for a variable, and during execution the variable’s value is either missing or null, the API call will not be initiated, and the request will be marked as invalid.
5.3 API Configuration
The API Configuration interface allows you to define all the details of the API, you want to call, such as the endpoint, HTTP method, request body, headers, and query parameters.
You can replace static API parameters with variables, which makes your setup more flexible. These variables can come from:
- Steps you configured earlier in the workflow
- Global variables you’ve defined
- System variables available by default (e.g.,
LEAD_ID,ORG_ID,LSQ_SECRET_KEY,APPLICATION_ID, etc.)
If you used a cURL request in the earlier step, many of these fields will already be pre-populated. You can still edit or remove any of the items as needed.
Steps to Configure:
- HTTP Method – Choose the method for your request (Supported methods: HEAD, GET, POST, PUT, PATCH, DELETE).
- Merge Fields – In the top-right corner, click View Merge Fields to see a list of available variables and keys. You can add these parameters to your query string or request body as required.
- Headers – Go to the Headers tab and click Add New to include additional headers. Enter the required key–value pairs.
- Request Body – Navigate to the Body tab to review and update the request body. You can also change the format (Form Data, x-www-form-urlencoded, Raw JSON/XML, etc.). Use Merge Fields to insert additional variables wherever required.
- Save Configuration – Once done, click Save & Close.
6. Variable Mapping
After configuring the API, the next step is to assign values to the variables used in your request. This ensures the right data flows into your API call.
- Click Define Mapping.
- Next to each variable name, click Select a Field and choose the data source. The available options depend on the trigger you selected for the workflow. Below is the list of available entity options across all triggers:
Entity Availability
- Lead – Map lead-related fields.
- Lead Owner – Map fields related to the lead owner.
- Lead Activity – Map lead activity fields.
- Lead Activity Owner – Map fields related to the lead activity owner.
- Auth Variables – Map global/system authentication variables.
- Previous Steps – Use responses or outputs from earlier workflow steps.
- Request Data – (For Custom Triggers only) Map data from the sample request payload.
- Custom Variables – Define your own mappings by specifying JSON paths.
When all parameters are mapped, click Save & Close.

7. How To Do Custom Mapping With Trigger Data
When you want to map trigger data manually, you can use the JSON path of the field you need. This lets you directly access specific values from the request payload.
When you are trying to do custom mapping for variables then you can use the json path of data which you are using.
Example Trigger Data:
{
  "name": "leadsquared",
  "email": "xyz@leadsquared.com"
}
Here, the mapping for name would be {{ data.name }}.
In this case:
datais the root node, because the entire request payload is stored inside a key named data.nameis the field being accessed.- So,
{{ data.name }}will return leadsquared.
If you’re unsure about the correct JSON path for your data, you can use JSON path identifier tool (available in the interface) to quickly locate the exact path. If the path for the parameter (from the JSON Pathfinder) is x.name, pass it here as {{data.name}}

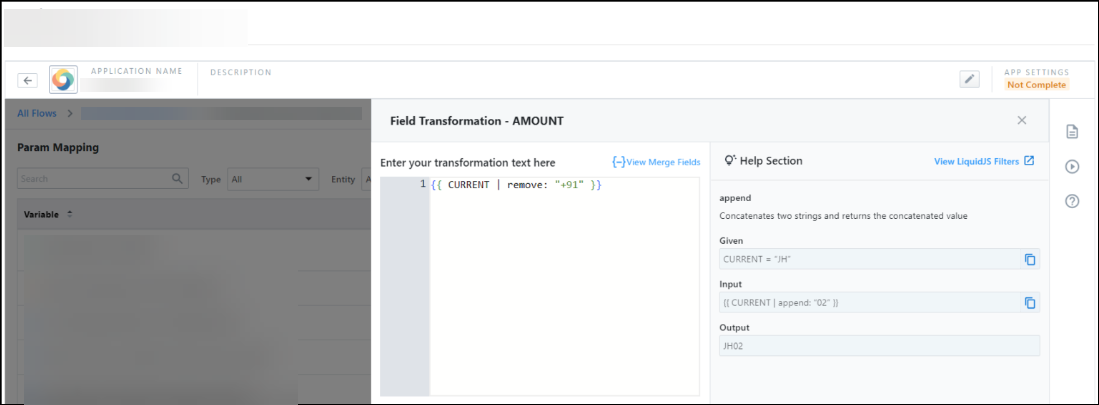
8. Transform Data
Transformation lets you manipulate mapped data before passing it to the API.
The available transformation options depend on the variable or field type you selected (e.g., String, Number, Date, etc.).
If a predefined transformation option isn’t available, you’ll get access to a playground where you can write your own LiquidJS code to transform the data as needed.
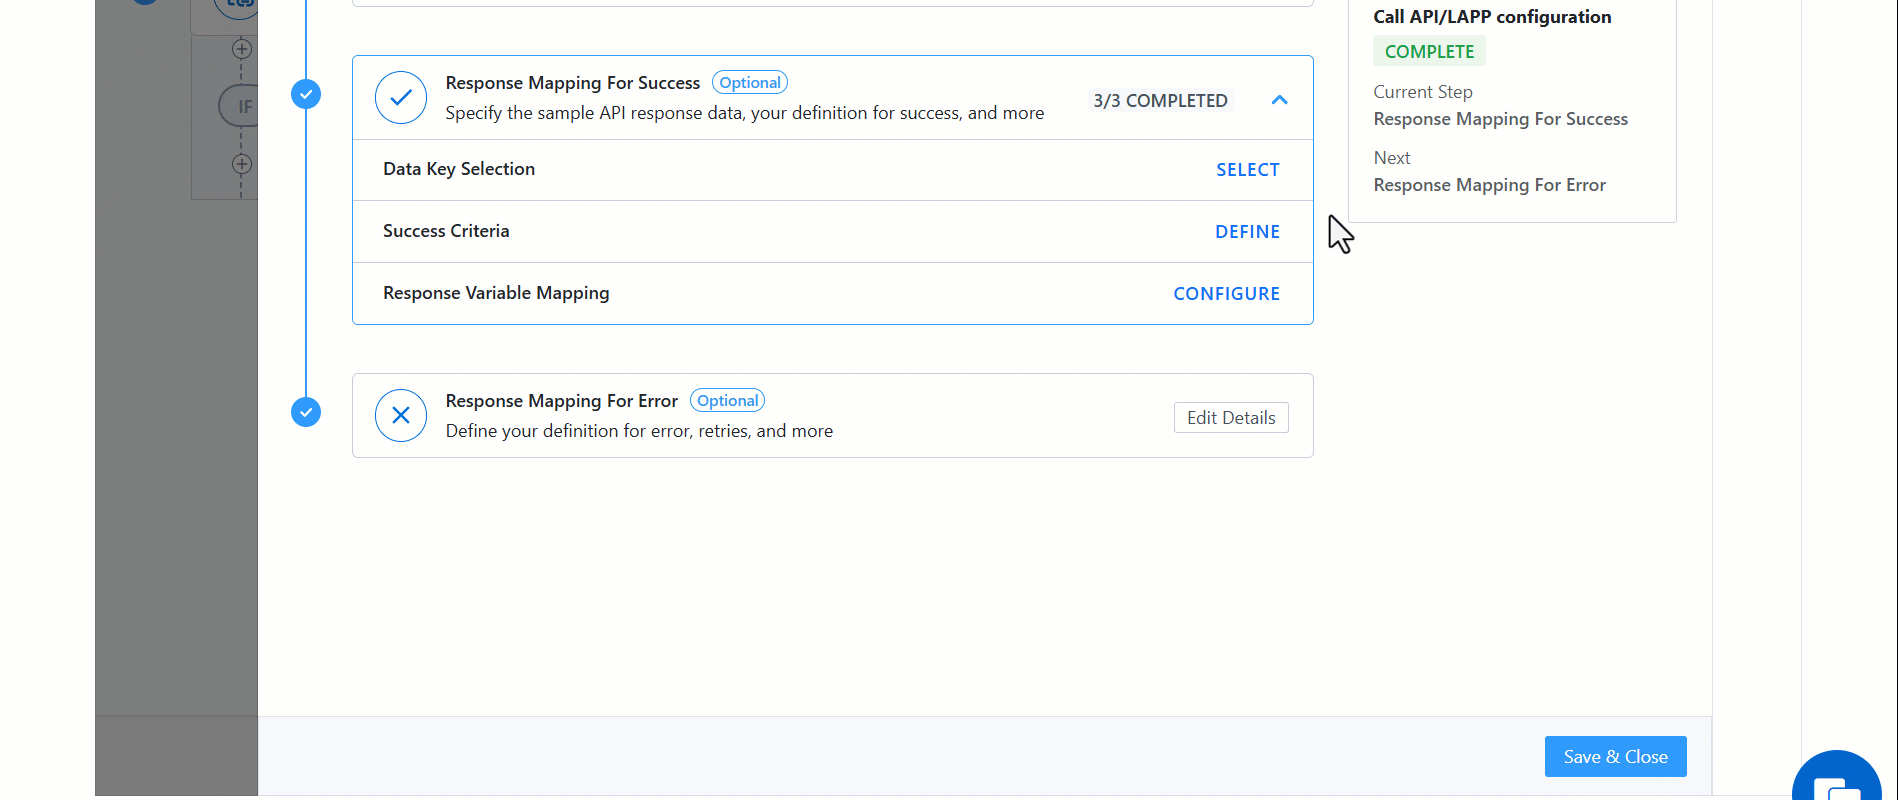
9. Response Mapping For Success
Response Mapping for Success allows you to define the structure of your API’s success response, specify which key’s value from the response should be stored in the defined variable, and set how long this value should be cached to avoid multiple calls (if required in case of time bound token expiry).
9.1 Data Key Selection
Here, you need to provide a sample response for the configured API, so the system understands the response structure. And then specify the exact key or path in the response that holds the value you want to extract and store in the global variable.
9.2 Success Criteria
This section allows you to customize what success means for your API requests. By default, any response with a 2xx status code is treated as successful.
While this works for most standard scenarios, it may not be sufficient for all APIs. In some cases, an API might return a 4xx or 5xx status code even when the operation was actually successful from your workflow’s perspective. Alternatively, the response body may contain specific keywords or flags that indicate success, regardless of the status code.
With custom success conditions, you can define logic that evaluates both the status code and content of the response. This gives you complete control over how success is interpreted within your workflow.
Example:
Let’s say your API returns following response body with response status code as 400
{
"status": 400,
"message": "Previous token is not expired",
"AuthToken": "xxxxxxxxxxxxxxxxxx"
}
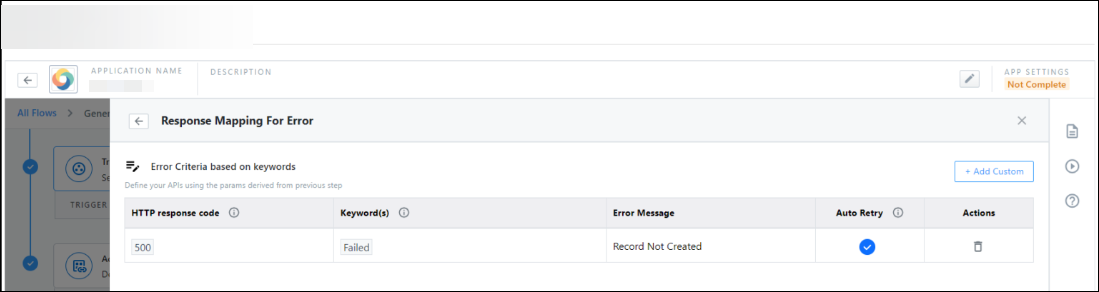
10. Response Mapping For Errors
This section allows you to set the definition of error for your workflow and retry logic.
By default, any response outside the 2xx status code range is considered an error.
While this works for most standard scenarios, some APIs may return a 2xx status even when the operation has actually failed. In such cases, relying solely on status codes may not accurately reflect the true outcome.
Custom Error Conditions let you define logic that evaluates both the response status code and the content. This gives you complete control over how errors are identified within your workflow.
2xx range. This ensures your retry behavior remains accurate and intentional.Example:
Lets say your API returns following response body with response status code as 200
{
"status": 200,
"message": "error"
}
11. Chaining Actions
In this section, we’ll demonstrate a simple example of how to use the response of a previous action in subsequent actions and handle more complex workflows.
We’ll use the LeadSquared Create a Note API to post the ID received in the response of the previous action as a note on the lead.
First, we’ll create the action and configure the API.
Next, we’ll map the response received from the previous action as the value for the NOTE field.
12. Next Steps
Now that you’ve set up an app, a data flow with actions, you can create more apps or data flows if required.
Any Questions?
Did you find this article helpful? Please let us know any feedback you may have in the comments section below. We’d love to hear from you and help you out!