1. Feature Overview
Marking a custom field as unique helps you easily identify and differentiate leads from one another. Unique custom fields also prevent duplicate leads in the system.
As an example, assume you run an educational institution, and every student in your database has a unique student Id. In this case, you create a custom field called “Student Id”. This custom field can be used to uniquely identify students in your LeadSquared account.
Similar to student Id, a driving license number, Aadhaar number, a Social Security Number, and so on can be marked as a unique field in your LeadSquared account.
2. Prerequisite
You should be an administrator of your LeadSquared account.
3. Process
3.1 Create a Custom Field
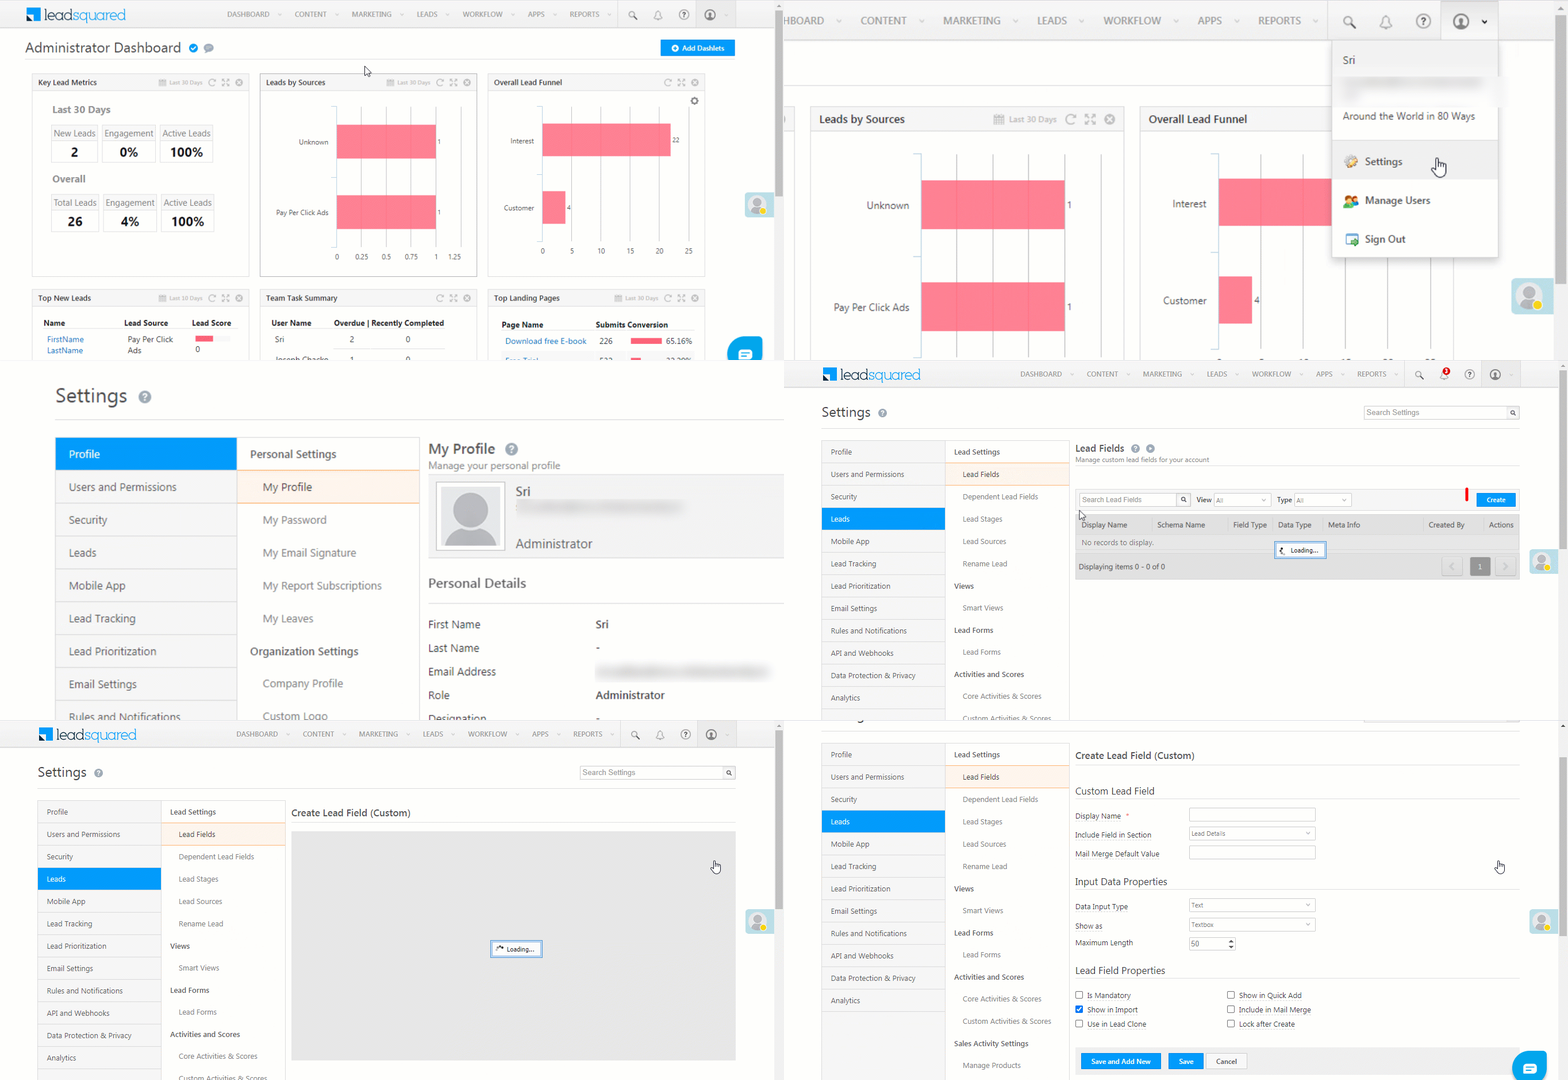
To create a new custom field –
- From your main menu, navigate to My Profile>Settings>Leads>Lead Settings>Lead Fields.
- On the top-left corner, click the Create button.
- Enter the following details –
| Property |
Description | |
| Display Name | The name of the field (first name, second name, email Id, etc.). This field is compulsory. | |
| Include Field in Section | The section in which the lead field will be visible. The options available are Lead Details, Additional Details and Hidden Fields. | |
| Mail Merge Default Value | The default value that’ll be used when the mail merge value is not provided for this field. | |
| Data Input Type | The data type of the lead field. Some of the options available are number, email Id, website, dropdown, boolean, etc. | |
| Show As | The way in which the input field will appear on the LeadSquared user interface. The options are either as a text-box or text-area. | |
| Maximum Length | The maximum number of characters which can be included in the field is 256 characters. | |
| Lead Field Properties | The additional properties which determine how the lead field behaves. Hover your cursor over each option to know more about the field. | |
| Is Mandatory | Marks the field as mandatory. Users won’t be able to create a new lead record without filling this field. | |
| Show in Import | Makes this field available for mapping during lead import through CSV. | |
| Use in Lead Clone | Makes the field available when users try to clone a lead. | |
| Show in Quick Add | Makes this field available when a user uses the Quick Add form to add a lead. | |
| Include in Mail Merge | Includes this field as a mail merge option for email personalization or automation. | |
| Lock after Create | Non-admin users won’t be able to update this field once a lead is created. | |
Once you’re done, click Save. Your custom field is created successfully.
3.2 Mark as Unique Field
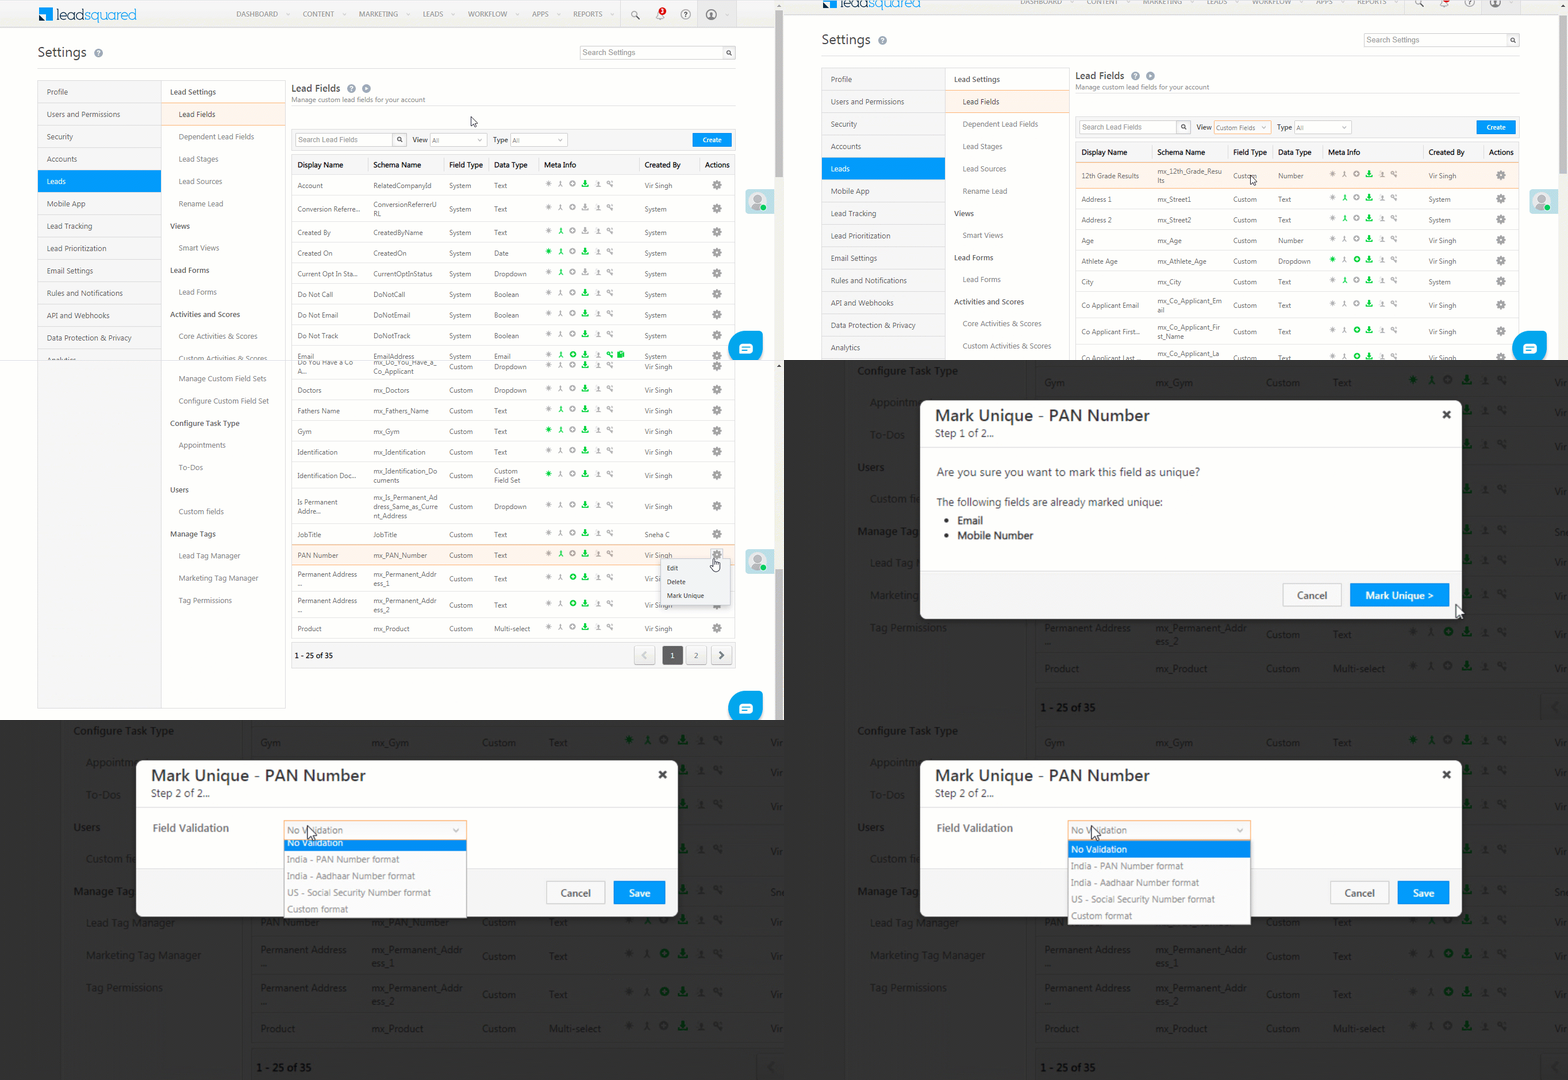
To mark an existing field as a custom field –
- From your main menu, navigate to My Profile>Settings>Leads>Lead Settings>Lead Fields.
- Change the View filter from All to Custom.
- Against an existing custom field, hover your cursor over the
 icon, and click Mark Unique.
 - On the pop-up, click Mark Unique.
- You can either save the field with No Validation, or add a Validation Format.
- Once you’re done, click Save.
3.3 Validation Format
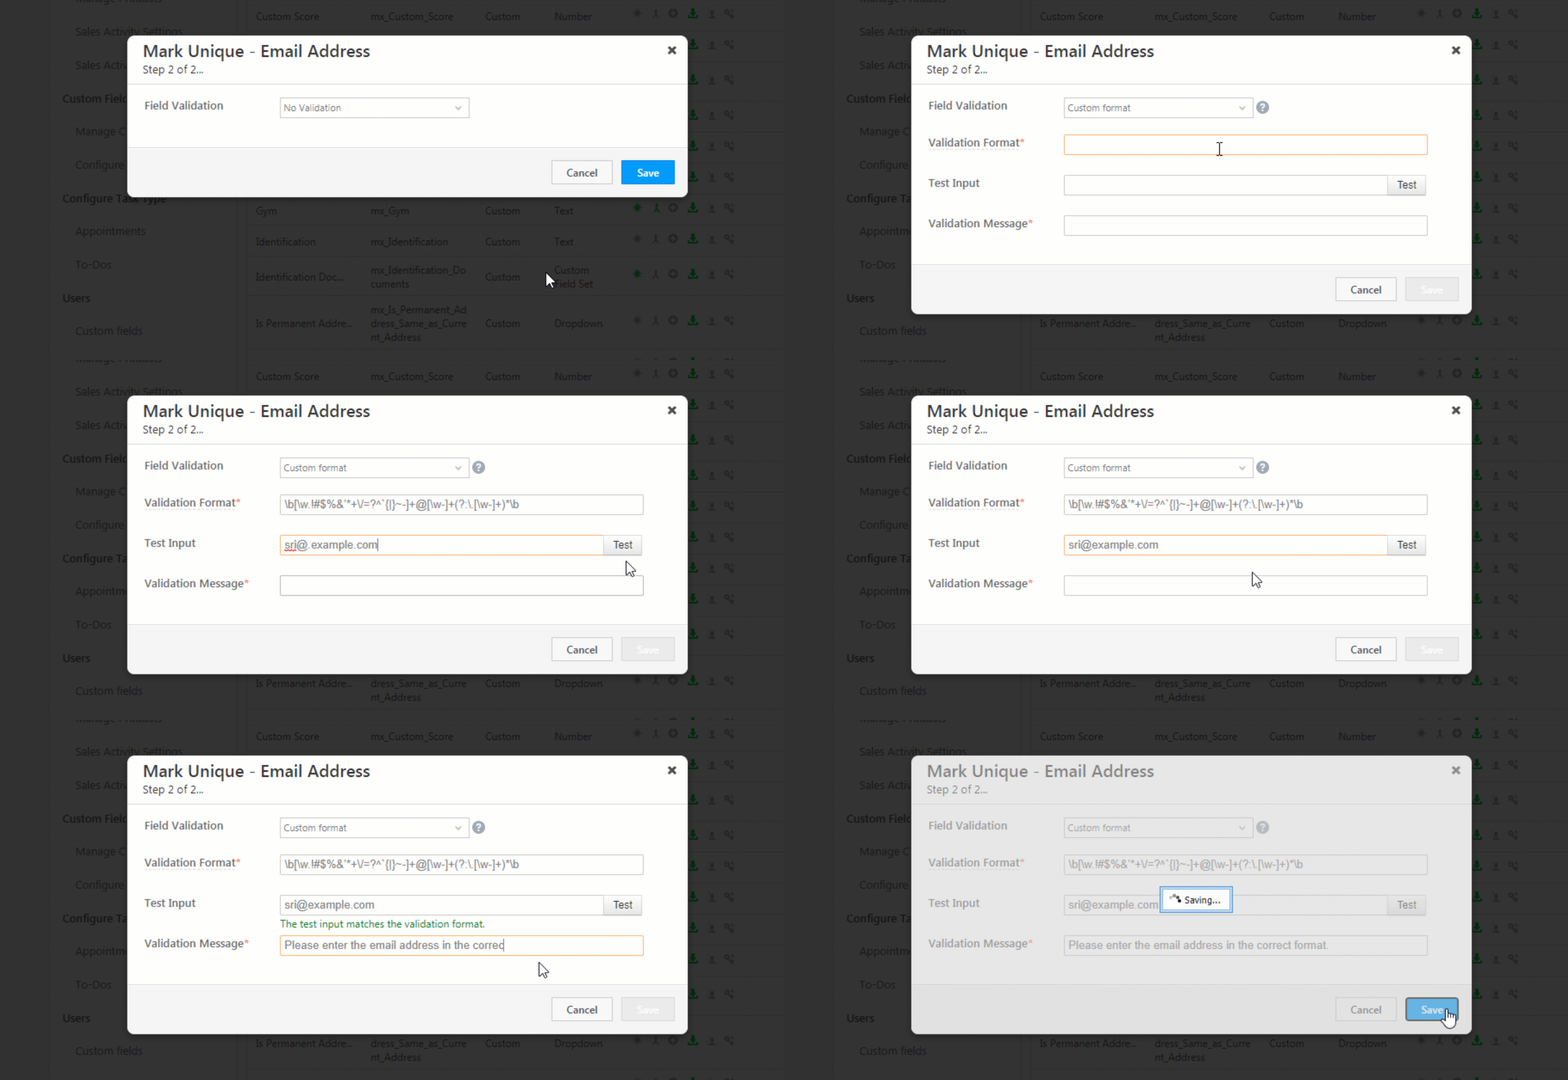
If you chose to have a Validation Format –
- From the Field Validation dropdown, select a format from the available options (such as PAN, Aadhaar or Social Security number) if applicable, or select Custom format.
- If you select either PAN, Aadhaar or Social Security format, enter an appropriate Validation Message to show when an incorrect entry (due to a wrong number format) is made.
- If you select Custom format –
| Property | Description |
| Validation Format | To create your custom validation format, enter a correct regular expression (regex) format. |
| Test Input | Input an entry to test if the regex format is correct. |
| Validation Format | Enter a validation error message for when the entry is incorrect (due to incorrect format). |
Once you enter the above details, press Enter. Now, click on Save.
Note:
- You can only mark up-to three fields as unique.
- You can only mark a custom field as unique.
- You can only mark a field as unique once a day.
In the below example, we’re creating a custom field for email addresses –
4. Custom Actions
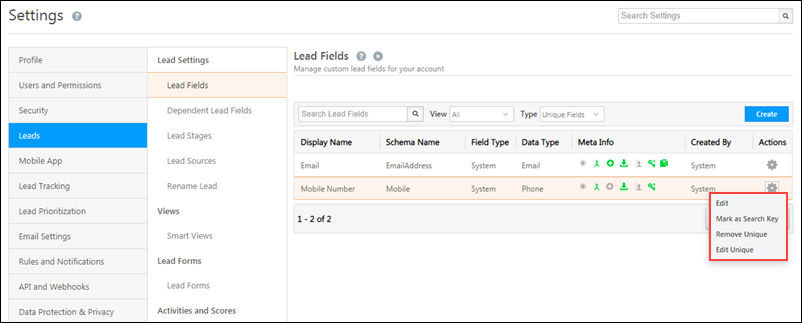
You can perform the following actions on a unique custom field –
4.1 Delete Uniqueness
To delete the uniqueness of an existing unique field –
- Change the Type filter to Unique Fields.
- Against the field for which you want to delete the uniqueness, hover your cursor over the
 icon, and click Remove Unique.
 - On the confirmation screen, click Yes.
4.2 Mark Field as Search Key
- Change the View filter to Custom Fields.
- Against the field for which you want to delete the uniqueness, hover your cursor over the
 icon, and click Mark as Search Key.
 - On the confirmation screen, click Yes.
4.3 Edit Uniqueness
- Change the Type filter to Unique Fields.
- Against the unique field for which you want to delete the uniqueness, hover your cursor over the
 icon, and click Edit Uniqueness.
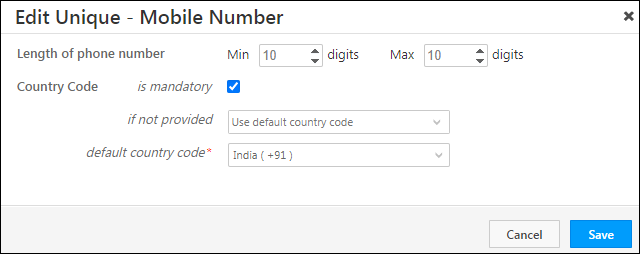
 - On the Edit Unique pop-up, change the fields as per your requirements.
- Once you’re done, click Save.
Any Questions?
Did you find this article helpful? Please let us know any feedback you may have in the comments section below. We’d love to hear from you and help you out!


Nicely explained. Only validation format is bit confusing. I didn’t find the validation formatting option in the interface. Please add the screen shot of the same
Hi Ocean,
The validation format option is only available for ‘Text’ type fields. It won’t show up if you try and mark a ‘Number’ type field unique. When marking a text type field unique, on the Mark Unique pop-up, you’ll see an arrow ‘>’ alongside the mark unique button. When you click the button, it’ll take you to the validation format step where you can enter a Regular Expression (Regex) to control the format.
Hope this was helpful.