1. Feature Overview
IP whitelisting is a security enhancement feature that enables you to regulate and limit LeadSquared product and LeadSquared APIs access only to trusted users. By whitelisting user IP addresses, you’ll be creating a list of trusted and secure IP addresses from which your users will be able to access their LeadSquared accounts.
Additionally, you can also create and add a list of IP addresses of your users who are authorized to pass LeadSquared APIs.
Note:
- This feature is only supported on the LeadSquared web app.
- Logins through suspect IPs (tors/anonymous proxies) are automatically disabled.
- You cannot also whitelist IP addresses only for specific users in your organization. IP whitelisting can only be carried out at the account level.
2. Prerequisite
To set up IP Whitelisting, you must be an Administrator user of your LeadSquared account.
3. IP Whitelist for LeadSquared Login
To add a list of users who are authorized to log in to their accounts through the LeadSquared web app –
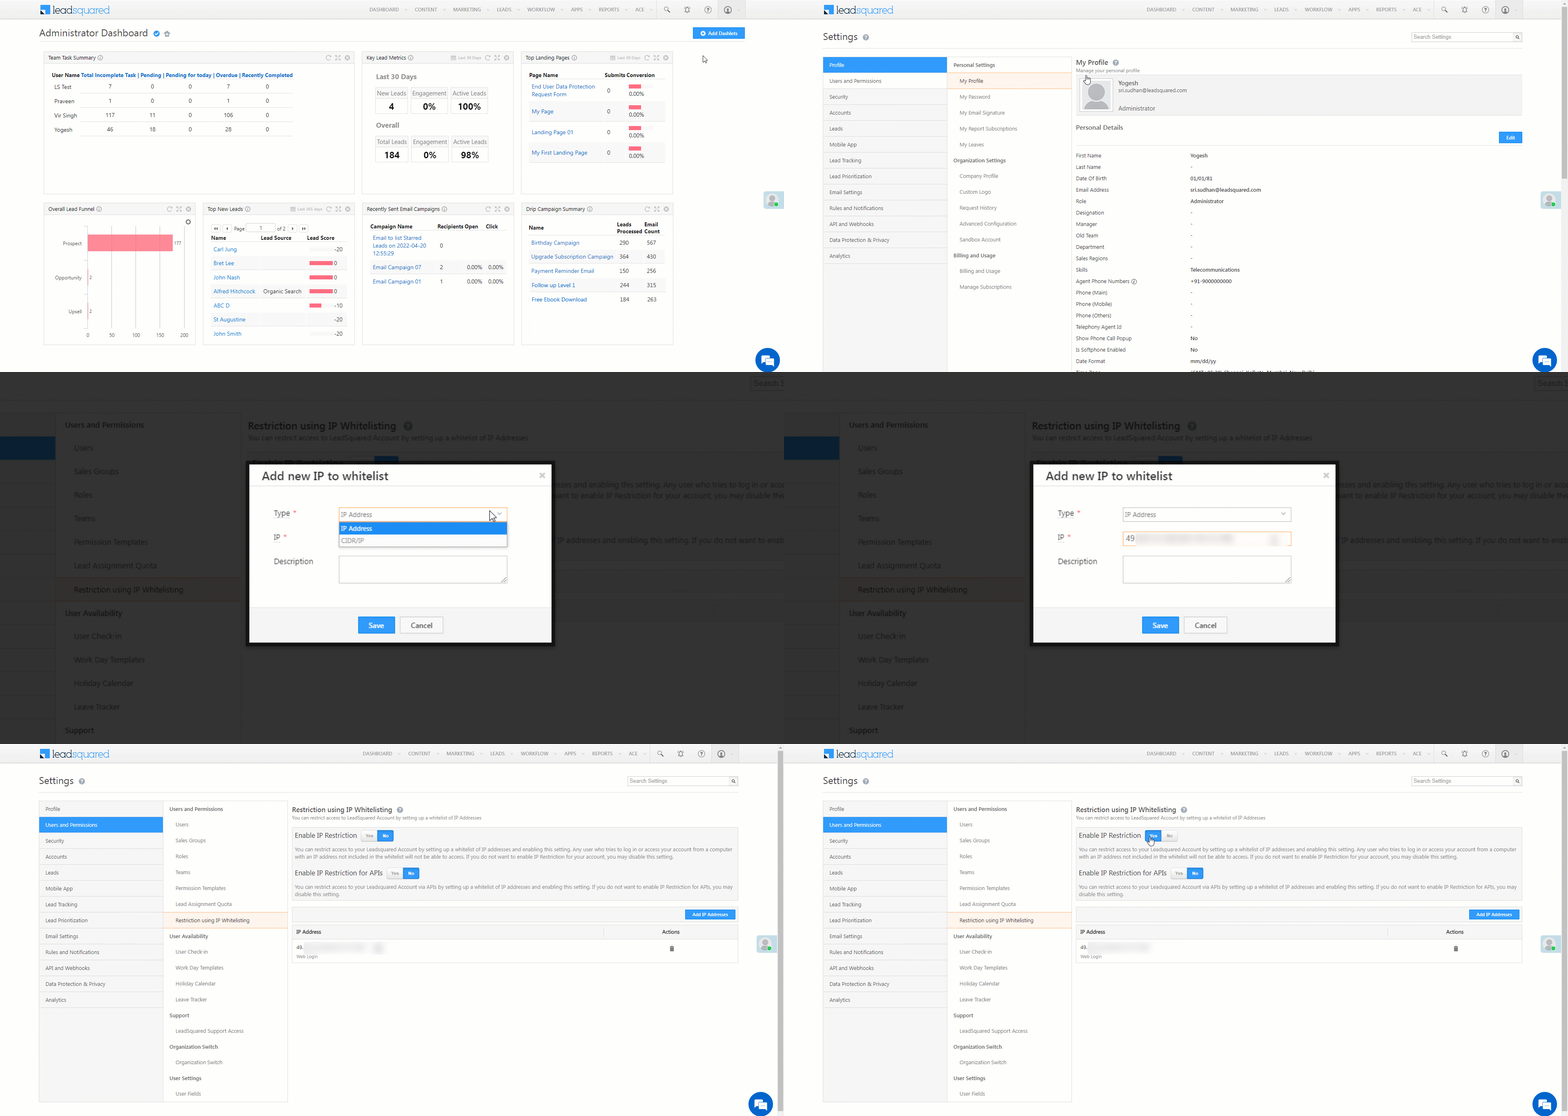
- Navigate to My Profile>Settings>Users and Permissions>Restriction using IP Whitelisting.
- On the bottom-right of your screen, click the Add IP Addresses button.
- On the Add new IP to whitelist pop-up, enter the following details –
- Type – Select the IP method you want to follow when adding your users’ IPs. You can either select IP Address or CIDR/IP.
- IP – Enter the list of user IPs you want to whitelist. If you’ve chosen the method as IP Address, then you can add multiple IP addresses at one go. Ensure each IP address is separated by a comma. For example, if the IP addresses 69.89.31.226 and 98.139.180.149 is added to the IP whitelist, only users using these IP addresses will be able to access your LeadSquared account through the web app. All other IP addresses are blocked from accessing LeadSquared.
- Description – Enter a description for the list of IPs (e.g., Bangalore Users, Admin Users, etc.). This step is optional.
- Alongside Enable IP Restriction, click Yes*.
- Once you’re done, click Save. Only the user’s who’s IP is listed here will now be able to log in to their LeadSquared accounts from the web.
Note:
- *If you do not want IP restriction enabled on your account, alongside Enable IP Restriction, click No.
- Please ensure you add your own IP address to the Whitelist before enabling IP Restrictions. Enabling IP restrictions without adding your own IP address to the whitelist will block your own access to LeadSquared.
- To delete existing IPs, under Actions, click
 .
.

4. IP Whitelist for LeadSquared APIs
To add a list of users who are authorized to use and work with LeadSquared APIs –
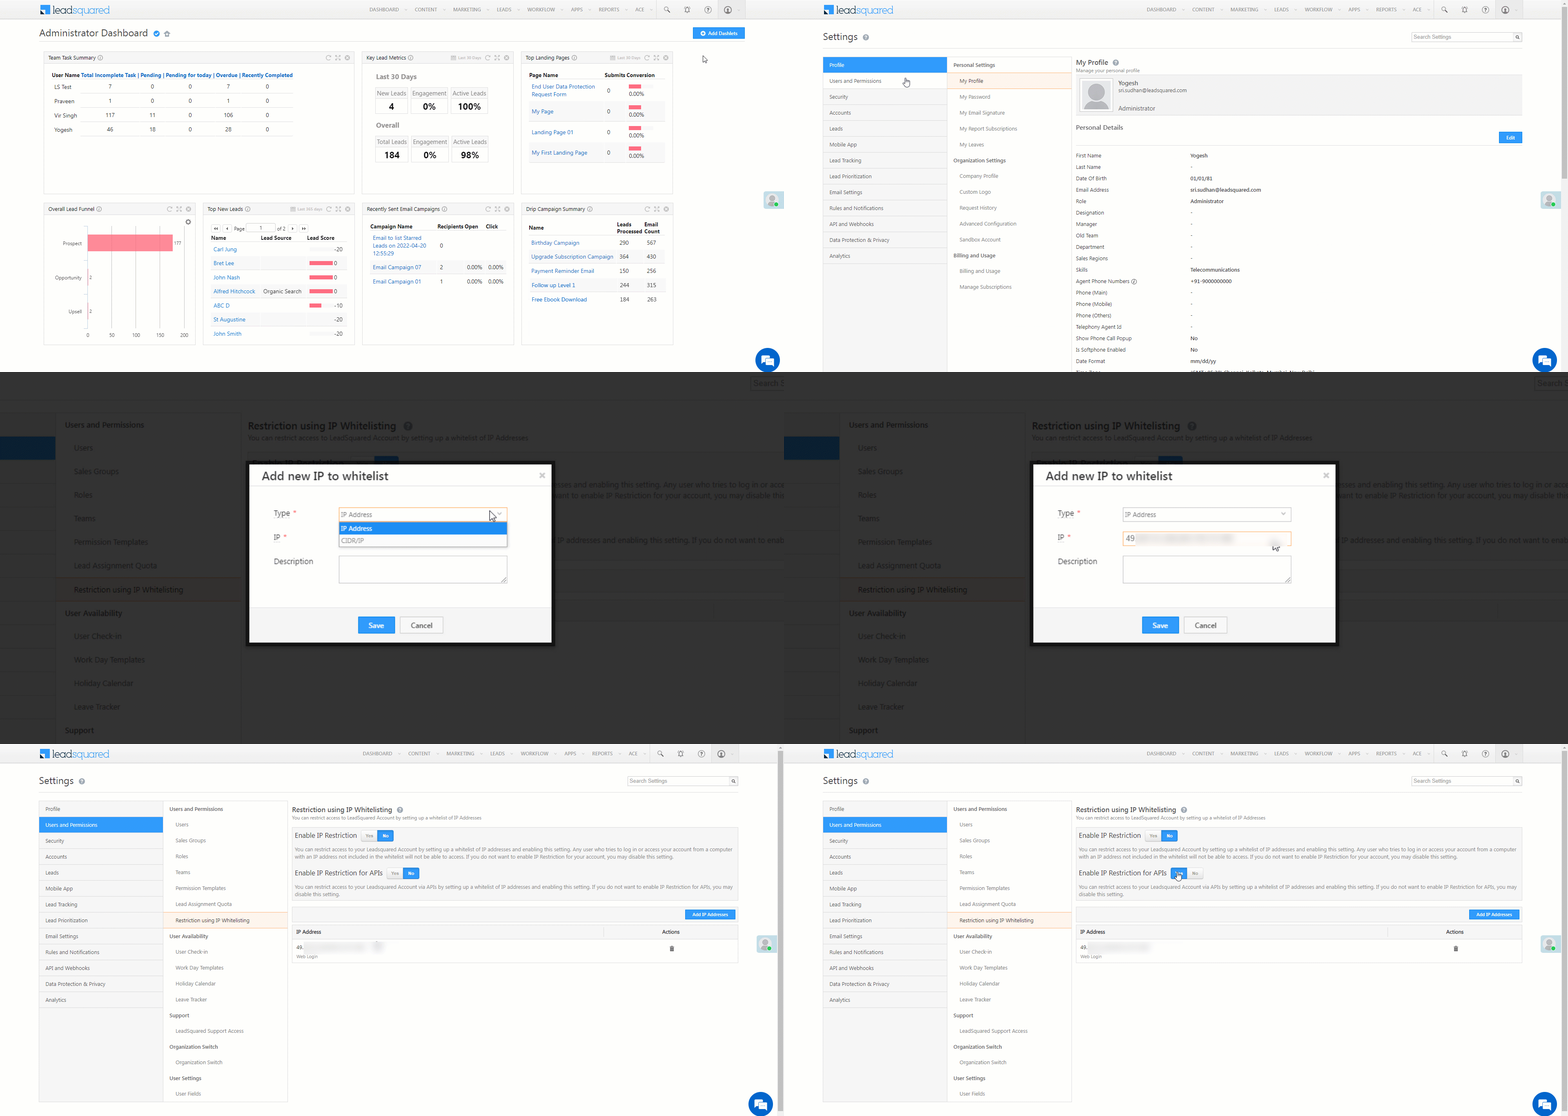
- Navigate to My Profile>Settings>Users and Permissions>Restriction using IP Whitelisting.
- On the bottom-right of your screen, click the Add IP Addresses button.
- On the Add new IP to whitelist pop-up, enter the following details –
- Type – Select the IP method you want to follow when adding your user’s IPs. You can either select IP Address or CIDR/IP.
- IP – Enter the list of user IPs you want to whitelist. If you’ve chosen the method as IP Address, then you can add multiple IP addresses at one go. Ensure each IP address is separated by a comma. For example, if the IP addresses 69.89.31.226 and 98.139.180.149 are added to the IP whitelist, only users using these IP addresses will be able to access your LeadSquared account through the web app. All other IP addresses are blocked from accessing LeadSquared.
- Description – Enter a description for the list of IPs (e.g., API Users, etc.). This step is optional.
- Alongside Enable IP Restriction for APIs, click Yes*.
- Once you’re done, click Save. Only the user’s who’s IP is listed here will now be able to log in to their LeadSquared accounts from the web.
Note:
- *If you do not want IP restriction for LeadSquared APIs enabled on your account, alongside Enable IP Restriction for APIs, click No.
- Please ensure you add your own IP address to the Whitelist before enabling IP Restrictions. Enabling IP restrictions without adding your own IP address to the whitelist will block your own access to LeadSquared.
- To delete existing IPs, under Actions, click
 .
.

Any Questions?
Did you find this article helpful? Please let us know any feedback you may have in the comments section below. We’d love to hear from you and help you out!


Hi Team,
If a user can access to 2 LSQ accounts using organization switch method and if ip whitelisting is done for one account and ip restriction is enabled as well for login, will the user be able to login the other account?
Hi, Jayendra. You can log into the second account from any IP, but access to the first account is restricted to a whitelisted IP. Also, even if you have access to both tenants via org switch, the tenants won’t appear in the top navigation (org switch) unless you log in from the whitelisted IP.
Can we enable these settings to all users?.
Hi, Praveen. Referring to the third note in the feature overview section: “You cannot whitelist IP addresses only for specific users in your organization. IP whitelisting can only be carried out at the account level.”
So, once IP whitelisting is configured, it applies to all users in the account.
Does this address your question?
What is the better option to the people who works from home and the people who works from sub branches of org?. is there a better approach to restrict by role wise?
Currently, there isn’t an option to restrict access by role. However, I’ve communicated this as a feature request to the team. If you need further assistance, please reach out to support@leadsquared.com.
Are these settings valid for mobile-only users as well?
No, these settings are applicable across user roles, and across the mobile app and web app.Apologies for the previous comment, it is incorrect. IP whitelisting is NOT supported on the mobile app.
Good Article !!
Thank you, Atul!