1. Feature Overview
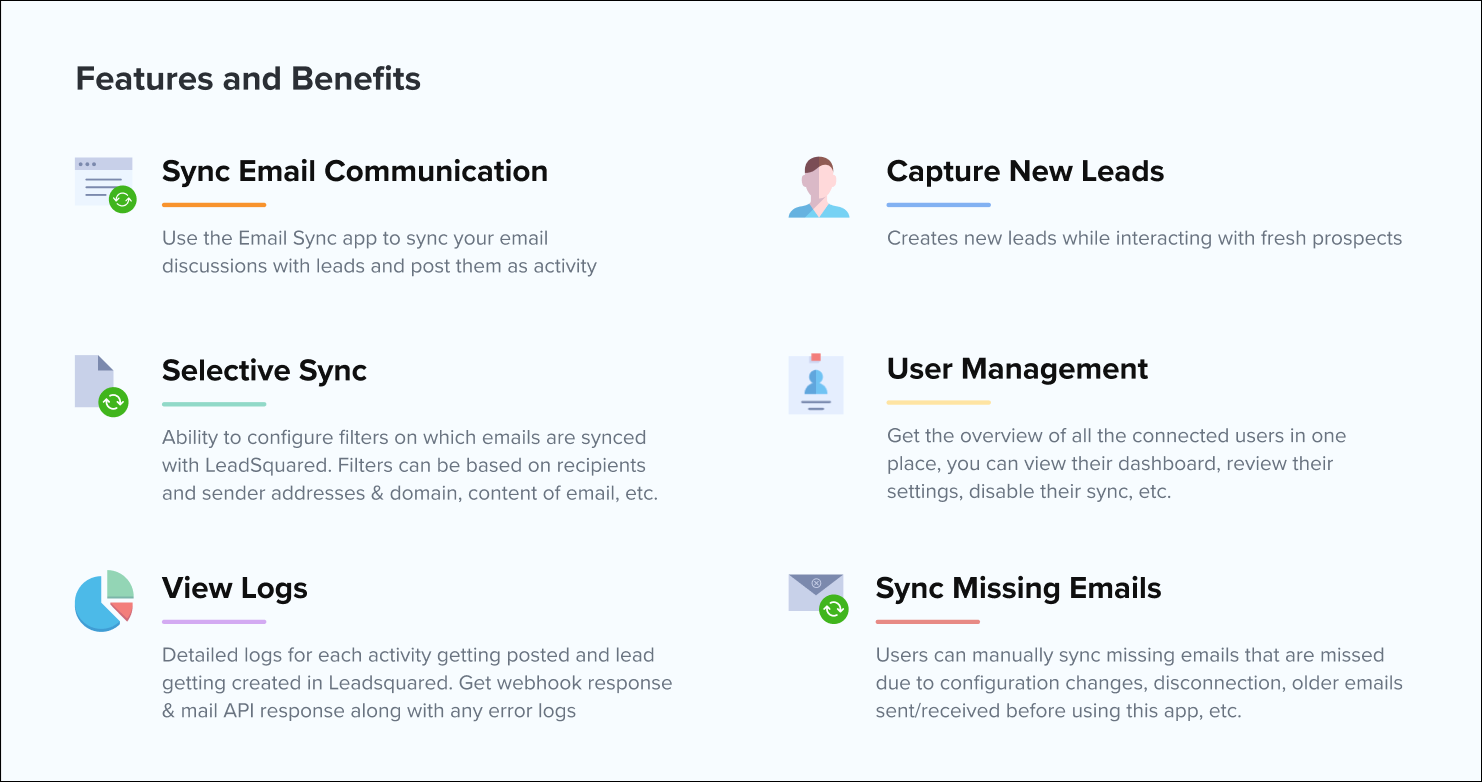
This connector captures sent and received emails from your Outlook/Gmail accounts and posts them as activities in LeadSquared. It also creates new leads for emails sent to/received from contacts not present in your LeadSquared account. This ensures you can view important emails in your LeadSquared account, without having to navigate between different apps.
Note:
- Only the emails in the “Inbox” and “Sent” folders will be synced. No other email folder will be considered for synchronization.
- This article is to help any user sync their email account with the Email Sync Connector. If you’re an Admin User looking to install and configure this connector, refer to Outlook/Gmail Email Sync Connector Set-up for Admin Users.
2. Prerequisites
- Admins must install and configure the Outlook/Gmail Email Sync Connector Set-up for Admin Users in the LeadSquared account.
- Admins must enable access for Sales Users to use this connector. To know how to do this, refer to Connect My Inbox Access.
3. Sync Your Email Account with LeadSquared
To connect your Outlook/Gmail account to LeadSquared –
- From the main menu, navigate to Apps>Connect My Inbox v2.0.
- Click Get Started.
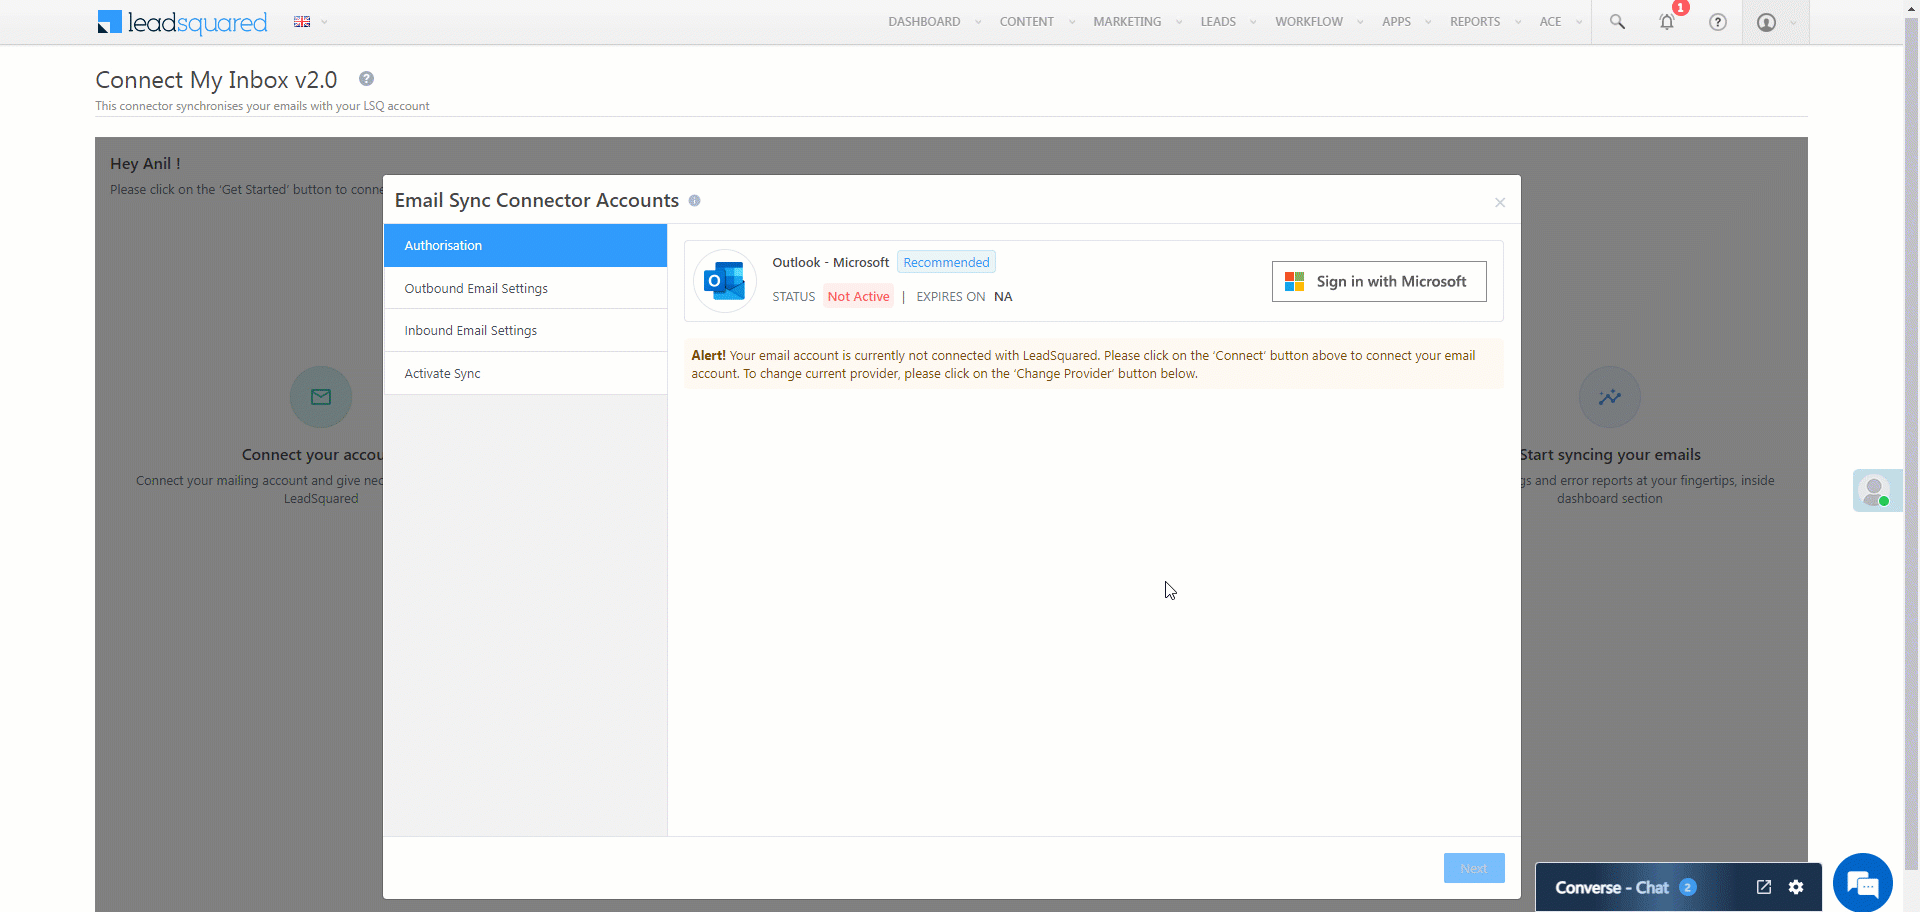
4. Authorisation
Authorize your email provider to connect with LeadSquared.
- Next to the email provider’s name, click the Sign in button.
- Enter your login details, and Accept the necessary permissions. Your email provider is synced to the connector.
- Click Next.
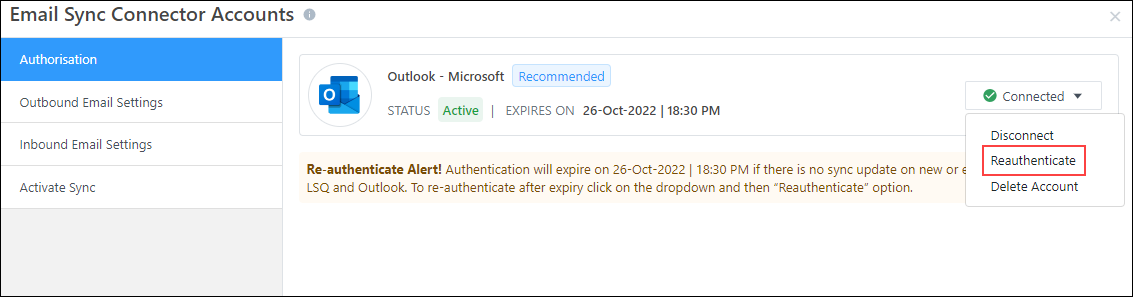
If you’re signing in using Outlook, you will have to reauthenticate the sign-in when you change your Outlook account’s password.
5. Outbound Email Settings
Select which outbound (sent) emails should be captured and synced with your LeadSquared account.
Note:
- For Activity Details, the activity will get posted as Email Sent.
- The Activity Details and Capture New Leads are read-only settings, and users (including Admins) will NOT be able to make any changes there.
5.1 Sync Behaviour
As a Sales User, you will not be able to edit any of the Admin settings under this section. For e.g., if your Admin has selected Outbound Email with Specific keywords, then you (the Sales User) cannot change it to All Outbound Emails.
But if Outbound Email with Specific keywords is selected, while you cannot edit the Admin Defined Keywords, you can add your own keywords under User Defined Keywords. This is applicable only to you, and NOT to any other user in your account.
- Admin Defined Keywords – Only those sent emails that contain at least one of the keywords entered here (e.g., Offer, Marketing, etc.) by your Admin, will get synced to your LeadSquared account. If you’re an Admin looking to define keywords, refer to Admin Sync Behaviour. As a Sales User, you will NOT be able to add, remove or edit these keywords.
- User Defined Keywords* – In addition to the Admin Defined Keywords, Sales Users can add their own set of keywords which will be used to sync mails. If an email contains any one Admin or User Defined keyword, we’ll sync it with your LeadSquared account. After you enter the keywords, hit ENTER. You can enter a single (Festival), or multiple keywords (Diwali Festival). In case of multiple keywords, separate each keyword by hitting the ENTER or TAB key.
- Check Keywords In – Choose in which part of the email (Subject or Body) the keyword should be present for the email to get synced. It’s mandatory to select at least one of the options listed below. If required, select both options –
- Subject – When selected, only if at least one keyword is present in the email’s subject line, the email is synced to LeadSquared.
- Body – When selected, only if at least one keyword is present in the email’s content body, the email is synced to LeadSquared.
- All Outbound Emails – All the emails sent from your account will get automatically synced to your LeadSquared account, without having any dependency on keywords.
- Check Keywords In – Choose in which part of the email (Subject or Body) the keyword should be present for the email to get synced. It’s mandatory to select at least one of the options listed below. If required, select both options –
Note:
- *You’ll be able to add keywords only if your Admin has configured the connector using the Outbound Email with Specific Keywords setting.
- If you enter a statement as a keyword (“Festive Offer 2022” in the example below), then all the words in that statement should be present in the email in order for it to get synced with LeadSquared. The statement is considered as case-insensitive (e.g., festive offer 2022 would also be considered), but the words, order and spaces in the statement must be an exact match. In case you want individual words in the statement to be considered when syncing emails, we recommend you enter each word in the statement as a separate keyword (e.g., “Festive”, “Offer”, “2022”, etc.)
- You can add special characters when entering your Keywords.

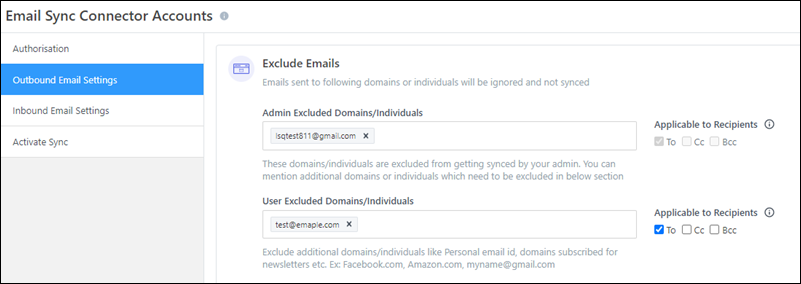
5.2 Exclude Emails
You can exclude syncing emails sent to certain domains (such as service request emails to domains like LeadSquared.com, Zoho.com, etc.) and individuals (such as emails to internal employees, senior management, employees from other teams, etc.). This is to ensure that only relevant emails are captured and synced in your LeadSquared account.
As a Sales User, you will not be able to add or edit the list of domains under Admin Excluded Domains/Individuals, or the corresponding settings. However, you can add your own list of domains under User Excluded Domains/Individuals. This is applicable only to you, and NOT to any other user in your account.
- User Exclude Domains/Individuals – To exclude emails sent to individuals, enter their email Id (e.g., CEO@example.com, etc.), and to exclude emails sent to certain domains, enter only the domain name (e.g., leadsquared.com, etc.). Add multiple email Ids and domain names. Once you’ve entered them, hit the ENTER key.
- Applicable to Recipients* – Select if the email Ids and/or domains you’ve entered should be in the “To”, “Cc” or “Bcc” fields for the email to get excluded. For e.g., if you’ve entered CEO@example.com and selected “Cc” as the Applicable to Recipients option, then every time you add CEO@example.com in a mail’s Cc field, that mail will NOT get synced to your LeadSquared account. If you’re choosing to Exclude Emails, then it’s mandatory to select at least one Applicable to Recipients option.
Note:
- You’ll be able to add domains under User Exclude Domains/Individuals only if your Admin User has enabled the User Excluded Domains/Individuals setting.
- *Note that if you choose to exclude emails sent to CEO@example.com, and under Applicable to Recipients, you chose “Cc”, then in instances when you include the CEO@example.com email Id in the “To” or “Bcc” fields, these emails WILL get synced to your LeadSquared account. If you want the Exclude Emails option to apply to all the emails sent to the email Id/domains entered, select all three options available – “To”, “Cc” and “Bcc”.
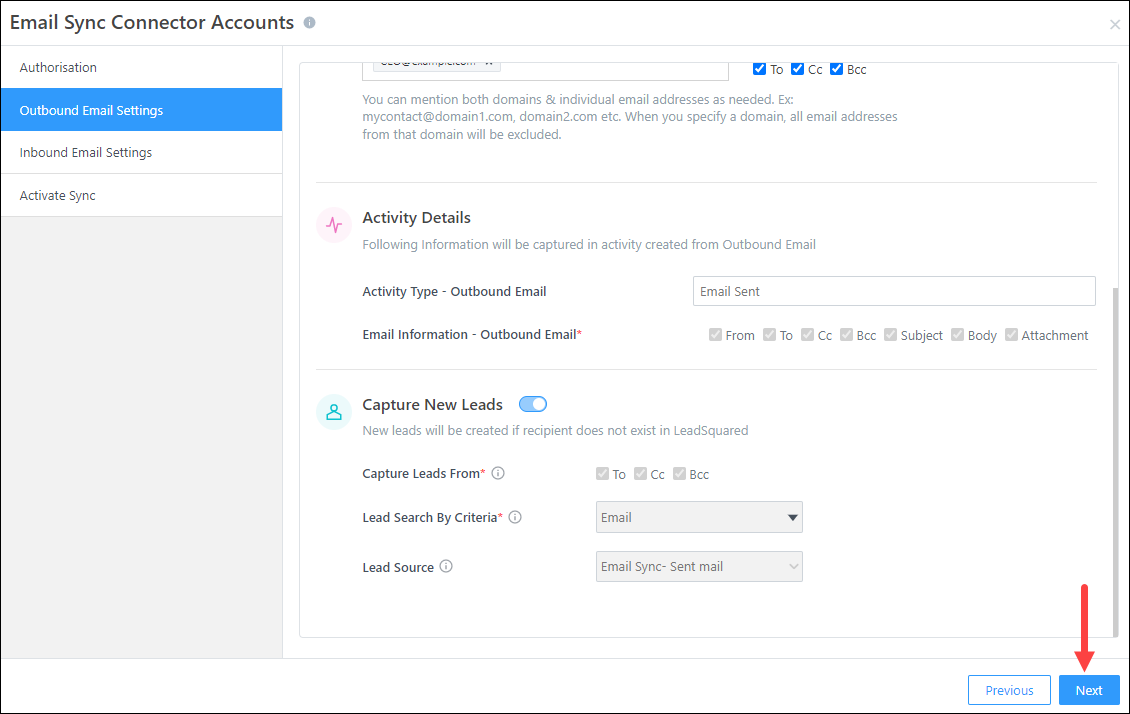
5.3 Activity Details
This is a read-only setting. This setting can only be configured by your Admin. To know more about this setting, refer to Activity Details. To change these settings, contact your Admin.
5.4 Capture New Leads
This is a read-only setting. This setting can only be configured by your Admin. To know more about this setting, refer to Capture New Leads. To change these settings, contact your Admin. To continue with the set-up, click Next.
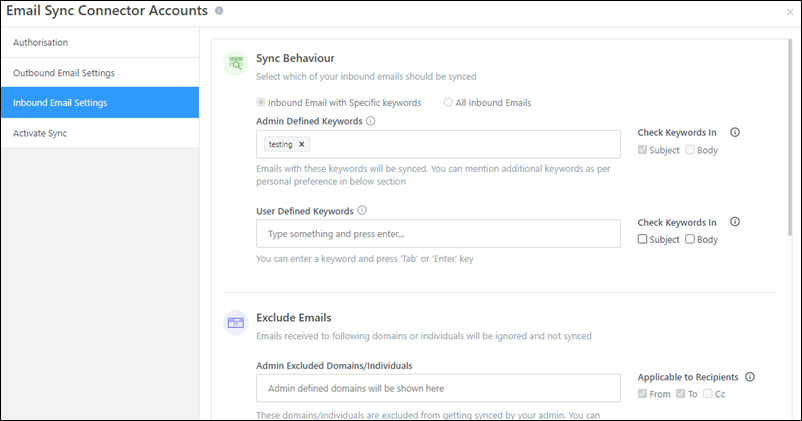
6. Inbound Email Settings
These settings govern the connector’s behaviour when you get inbound (receive) emails. The steps to configure the Inbound Email Settings are the same as the previous section. To know more, refer to Outbound Email Settings. Once you’re done, click Next.
Note:
- For Activity Details, the activity will get posted as Email Received.
- For Applicable to Recipients, Email Information – Inbound Email and Capture Leads From, the “Bcc” option won’t be applicable.
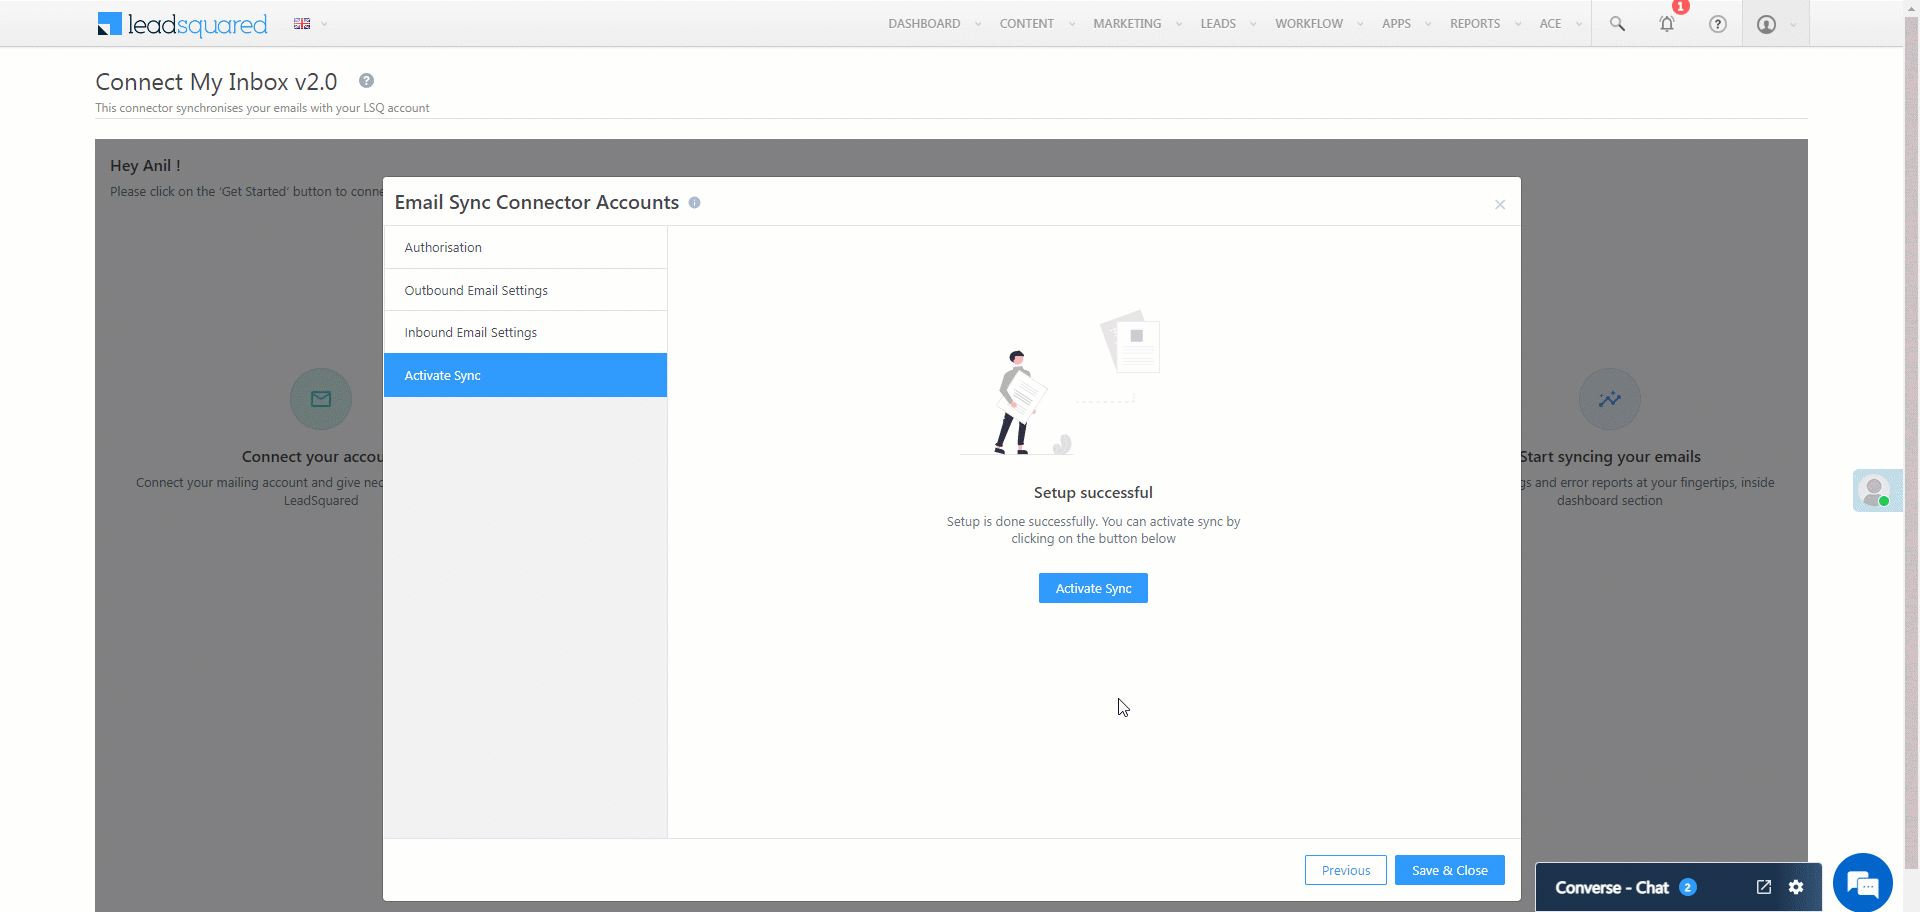
7. Activate Sync
Once all the settings are configured, to sync your LeadSquared and email provider account, click Activate Sync, and to complete the set-up, click Save & Close.
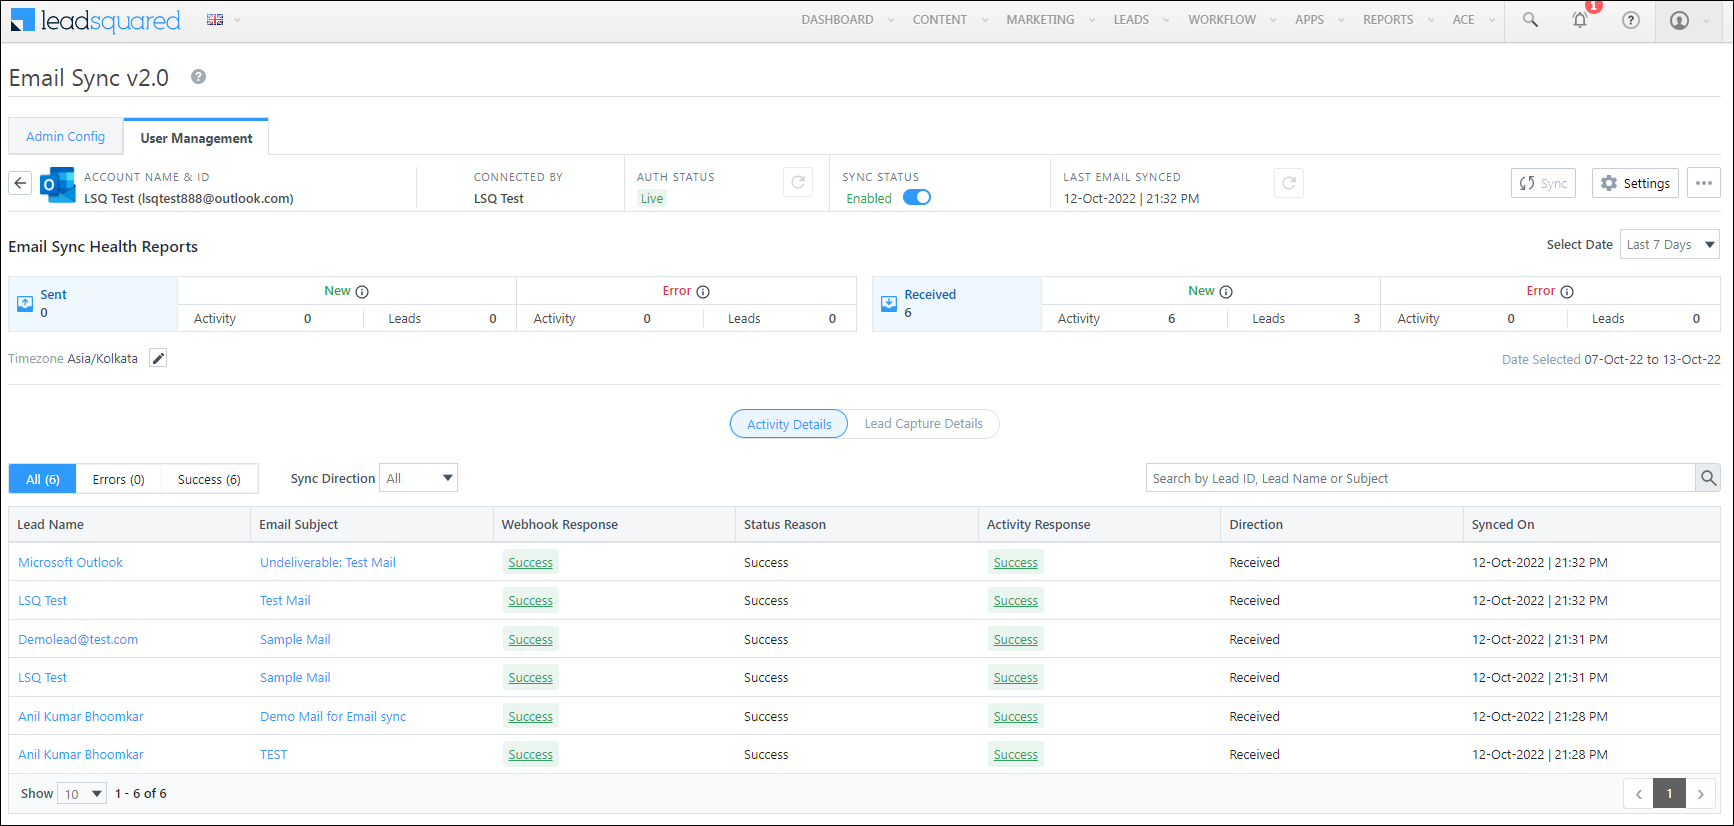
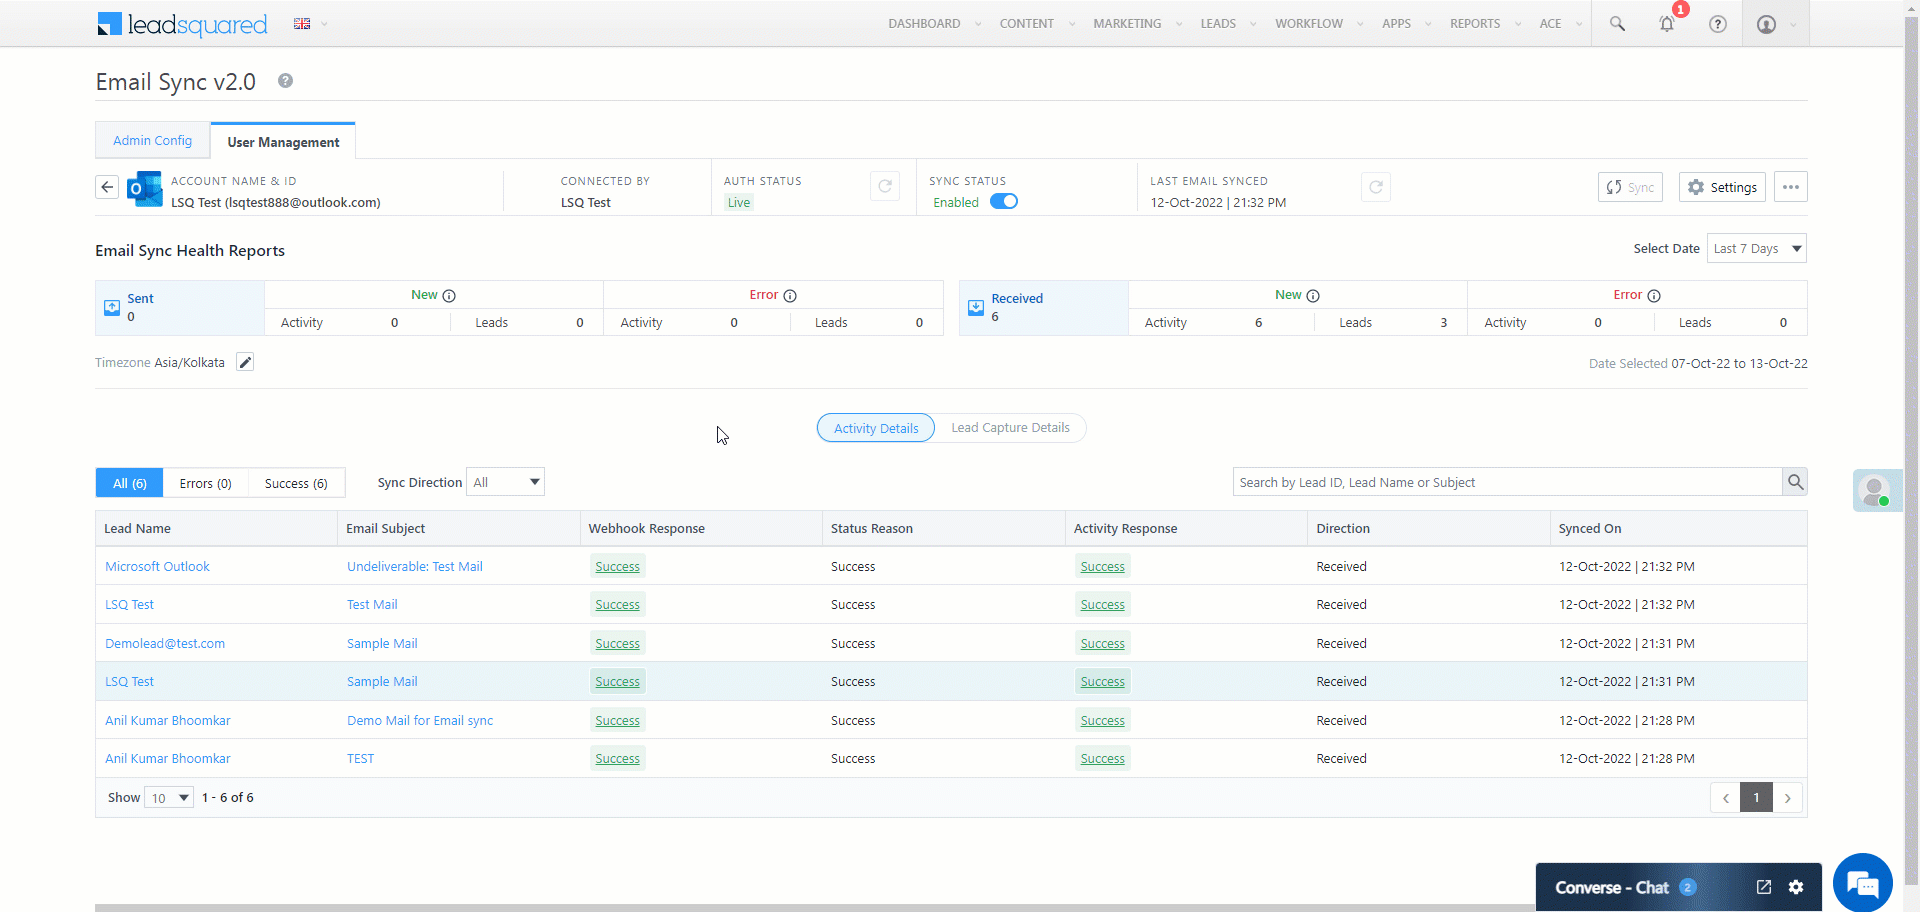
8. Email Logs
Once your connector is synced, you can view logs of all the emails that have been synced between LeadSquared and your email provider’s accounts. You can filter these logs by Activity Details or Lead Capture Details.
- Date Range Filter – You can filter the logs by Today, Yesterday, Last 7 Days, Last 30 Days and Custom Date. If you select Custom Date, you can select up to a maximum of 60 days in the past.
- Use the search bar to find a lead or activity using the Lead Id, Lead Name or email Subject.
- To delete your synced account within the connector, click
 , and click Delete Account.
 - To disable sync for your account, under SYNC STATUS, disable the
 slider. This ensures that while the sync is disabled, your email account is still connected to LeadSquared.
 - To edit your account’s sync settings, click the Settings button.
9. View Synced Emails
To view the email sync activities, navigate to Leads>Manage Leads, and click on an existing lead on which the activity is posted. On the Lead Details page, you can view the activity under the Activity History tab.
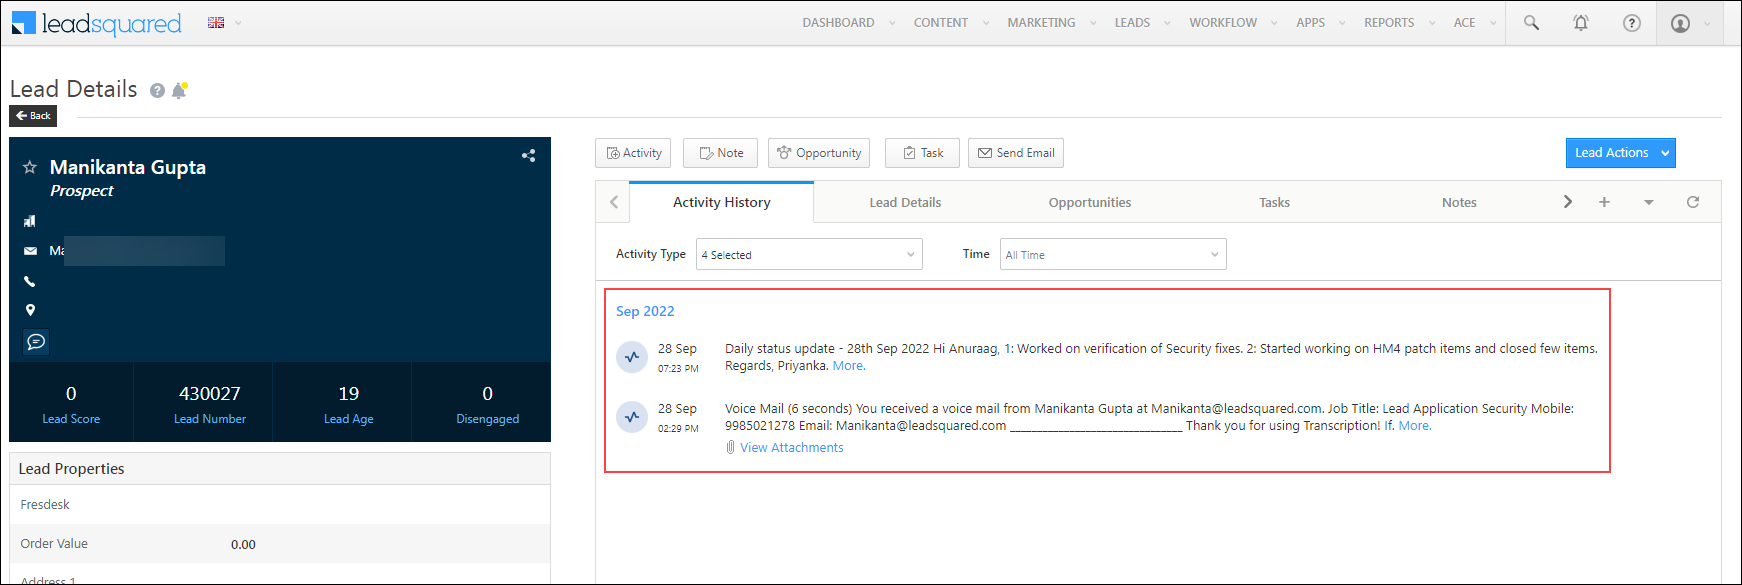
9.1 Activity Details
To view the Activity Details that are posted on a lead, under Email Subject, click on the email’s name for which you want to view the details. To know how to capture the details on the mail as an activity, refer to Activity Details.
9.2 Lead Details
To view a lead (either an existing one or a new one), under Lead Name, click the lead you want to view. This will redirect you to the Lead Details page, where you can view the Email Sent/Email Received activity that’s posted on the lead.

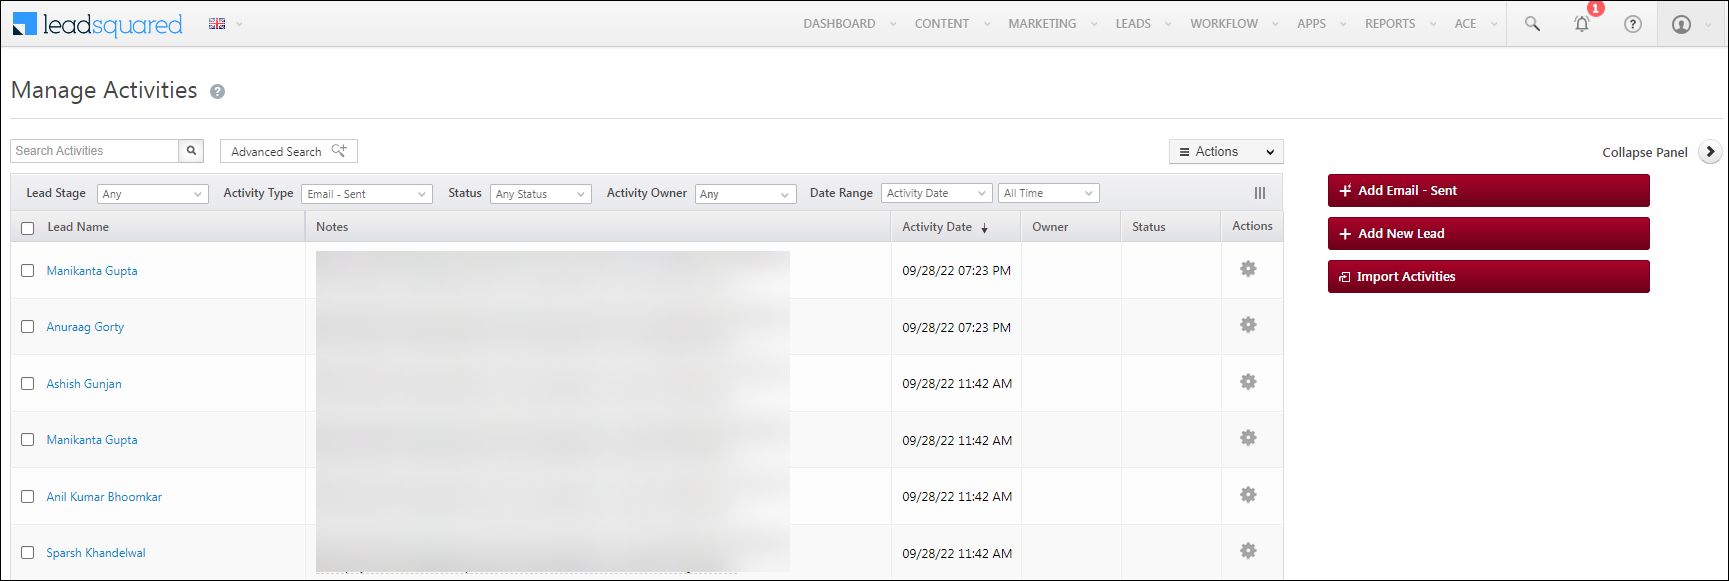
9.3 Manage Activities Page
You can also view the activities from the Manage Activities page. To do this, navigate to Leads>Manage Activities, and filter the Activity Type by Email Sent or Email Received.
Any Questions?
Did you find this article helpful? Please let us know any feedback you may have in the comments section below. We’d love to hear from you and help you out!


