


Get Started
Sales Suite
Field Ops
Marketing
Service CRM
Integrations & Apps
FloStack
Email Sync Connector Set-up for Admin Users
Important: Through this connector, you can only sync emails from GSuite (under Gmail) and Office 365 (under Outlook) with your LeadSquared account. You CANNOT connect your personal Gmail and Outlook accounts.
1. Feature Overview
This connector syncs emails (sent and received) in your Outlook/Gmail with your LeadSquared account. It posts emails between your users (sales reps) and leads as activities against existing leads. When you send or receive an email from a contact that doesn’t exist in LeadSquared, the connector creates them as new leads in your account. All of this ensures you can view important emails in your LeadSquared account, without having to navigate between different apps. This connector –
- Sync Emails with Leads – Capture and sync emails with leads, capture email attachments, and view them as activities on the Lead Details page.
- Capture New Leads – Creates new leads for emails sent to/received from contacts not present in your LeadSquared account.
- Selective Sync – Ability to configure filters (such as recipient and sender address, email domain, subject line, etc.) based on which sent and received emails are synced with LeadSquared. For e.g., you choose to not sync emails received from a “linkedin.com” domain.
- User Management – Ability to view, disable sync and view the logs of all the users who’ve synced their email accounts with LeadSquared.
- View Logs – View detailed logs for each lead & mail sent.
Note:
- Only the emails in the “Inbox” and “Sent” folders will be synced. No other email folder will be considered for synchronization.
- This article is to help Admin Users install and configure the Email Sync Connector. If you’re a Sales User who’s looking to sync your Gmail/Outlook account with LeadSquared, refer to Connect your Outlook/Gmail Account with LeadSquared.
2. Prerequisites
- You must be the Administrator of your LeadSquared account to install and configure this connector.
- You must have an existing Microsoft Outlook or Gmail account.
- This is a paid feature. To enable it, reach out to your account manager, or write to support@leadsquared.com.
3. How it Works
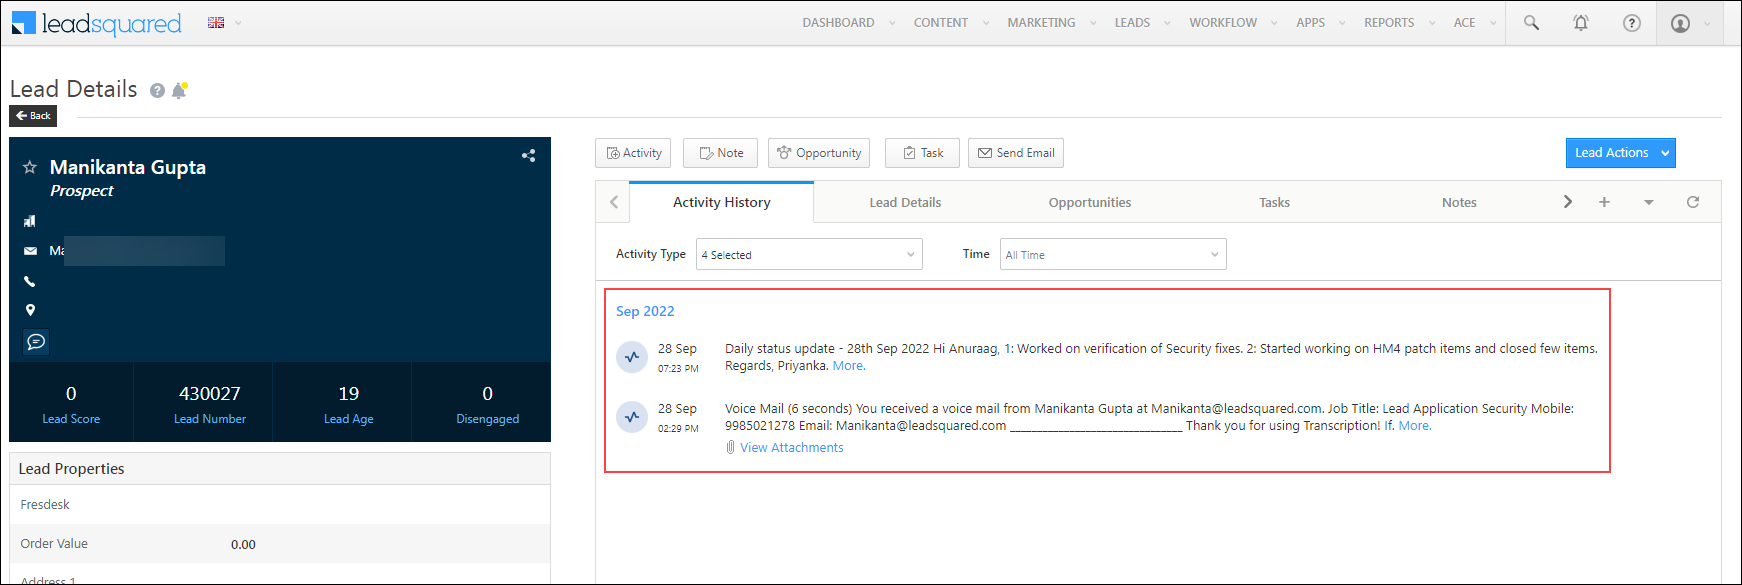
This connector syncs emails sent and received from your email provider’s account (either Outlook or Gmail) with your LeadSquared account. These emails are posted as activities on your leads. For e.g., when you send an email to the lead John Smith, this email is posted as an Email Sent activity on John’s Lead Details page. And similarly, when John sends an email to you, this email is posted as an Email Received activity on John’s Lead Details page.
The Admin user must complete the following steps –
- Install the connector.
- Select the list of users that can access the connector settings, and grant permissions to these users.
- Select the email provider you want to sync emails from.
- Configure the actions the connector performs when emails are sent (outbound) and received (inbound) by your users.
- Configure additional connector settings, and grant access to users who can sync and connect their email accounts with LeadSquared
- Once you’ve selected the users who can sync their email accounts, to know how to connect their accounts, your sales users can refer to Connect your Outlook/Gmail Account with LeadSquared.
Once configured by the admin, each user in the account must –
- Connect their email account with the connector.
- Activate the Sync.
4. Install the Connector
- Navigate to Apps>Apps Marketplace.
- Search for Email Sync, and click Install.
- Alternatively, you can find the connector on the left panel, under Email.
- Once installed, hover your cursor over
 , and click Configure.
5. Configure the Connector
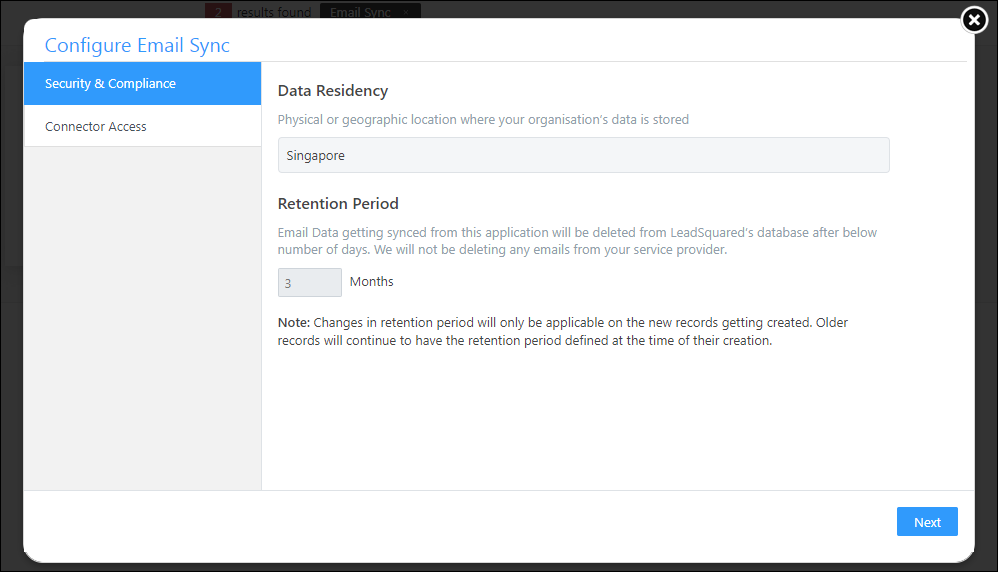
5.1 Security & Compliance
This is a read-only screen, and you won’t be able to change any of the details displayed here. This screen displays the region in which your LeadSquared account is hosted and the email Retention Period for which the synced emails are stored in LeadSquared. Once you’ve verified the details, click Next.
5.2 Connector Access
Once you’ve installed the connector, on the Connector Access tab, configure the connector settings access for the non-Admin users in your account.
Users (e.g., sales managers) you grant access to can select the list of other users (e.g., sales reps/agents) that can sync their email accounts with LeadSquared.
- Select if you want to grant Connector Access that’s Based on Role or Advanced (User Level).
- Based on Role – From the Specify Roles dropdown, select the LeadSquared user roles that can access the connector settings.
- Advanced (User Level) – From the Advanced (User Level) dropdown, select a user boolean field. Based on the value entered in the selected boolean field, the user can access the connector (e.g., for the user Sam, if the “Is Employee” boolean user field contains the value “Yes”, then this user can access the connector).
- Once you’re done, click Save & Next. To continue the configuration, refer to the below sections.
Note:
- By default, all Admin users will have access to configure the connector settings.
- Connector Access does NOT have to be granted to Sales Users who want to sync their email accounts with LeadSquared. Instead, to select the list of users that can sync their email account, see Connect My Inbox access.
6. Admin Configuration
To continue the connector configuration, navigate to Apps>Email Sync v2.0.
7. Provider Selection
Select, sync and configure your email provider.
- From the options listed under Choose Email Provider, select your preferred provider.
- Once you’re done, click Next.
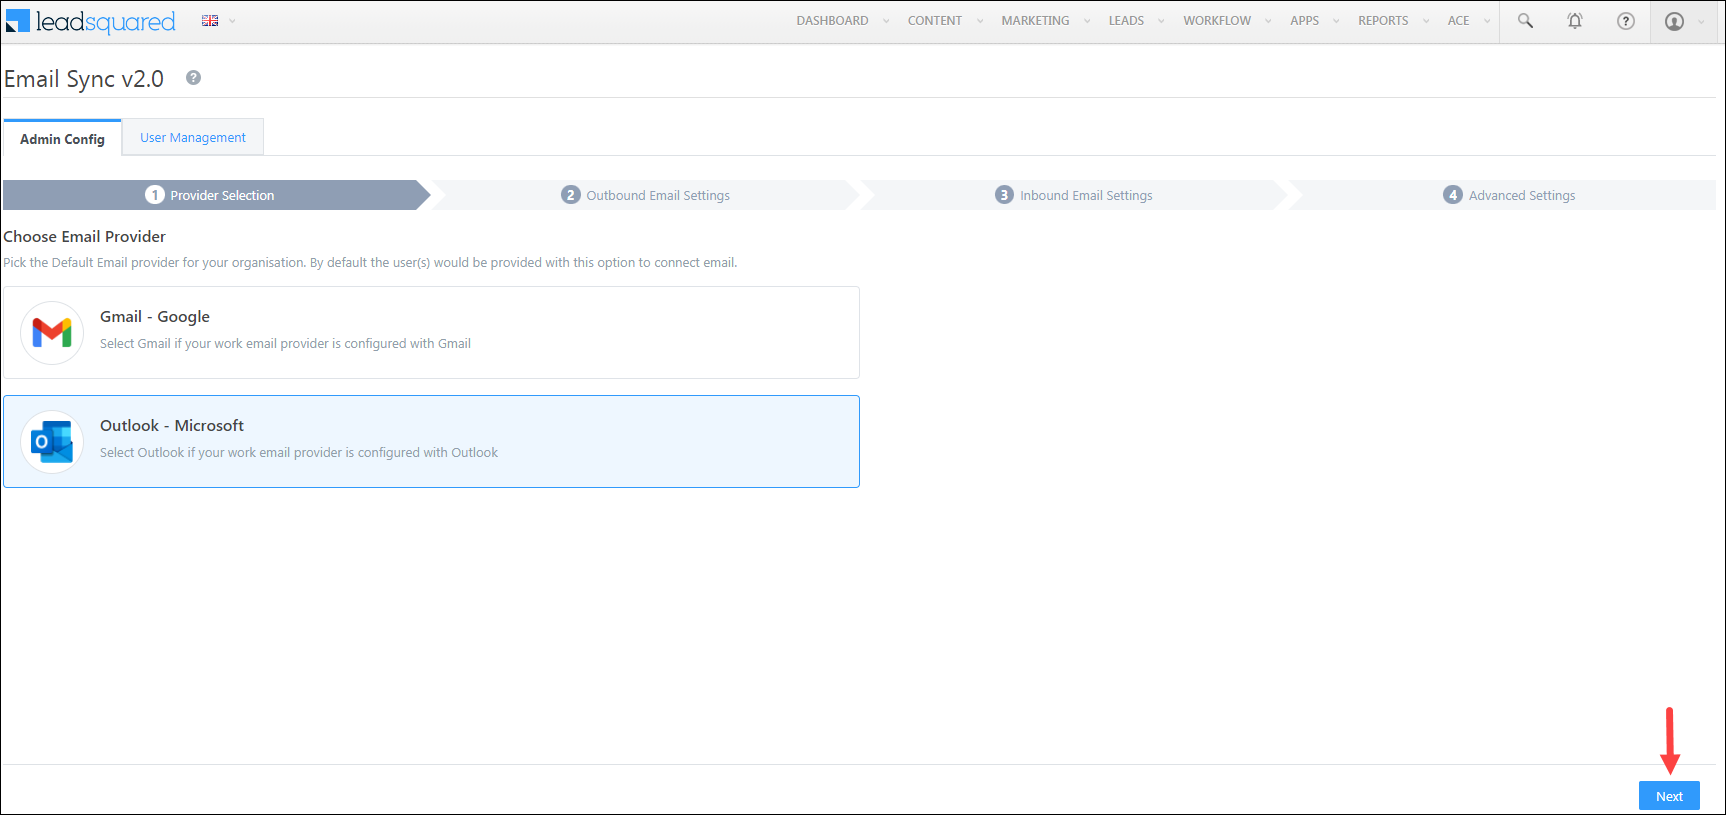
If you’ve selected Gmail, then ensure you mark the LeadSquared Email Sync connector as a trusted application in your organization’s Google Workspace. To know how to do this, refer to Control which third-party & internal apps access Google Workspace data. Once the connector is authorized, in your LeadSquared account, click Mark as Complete, and then click Next.
8. Outbound Email Settings
These settings govern the connector’s behaviour when users send emails (outbound) from their Gmail/Outlook accounts.
Note:
- Sales Users in your organization cannot edit the Outbound and Inbound Email settings. Keep in mind the settings configured here are final for all your Sales Users, and only Admin users can edit existing settings.
- You can choose to disable the Sync Outbound Emails setting. To do this, disable the slider
 , and on the Warning pop-up, click Yes. This will NOT sync any of the sent emails to your LeadSquared account.
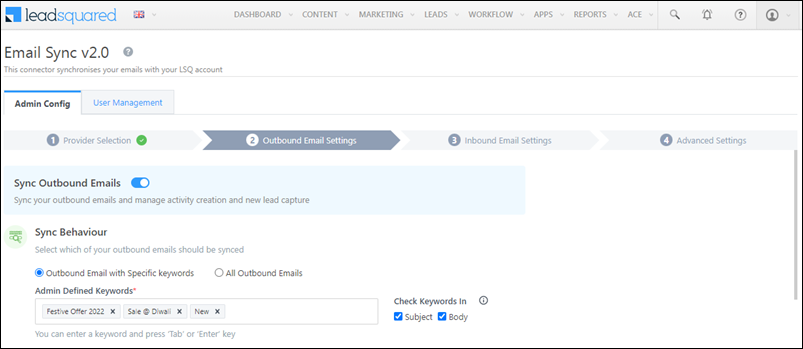
8.1 Sync Behaviour
Select which emails your users send should be captured and synced with your LeadSquared account.
- Outbound Email with Specific keywords – Only those sent emails that contain at least one of the keywords entered here (e.g., Offer, Marketing, etc.) will get synced to your LeadSquared account.
- Admin Defined Keywords – After you enter the keywords, hit ENTER. You can enter a single, or multiple keywords. In case of multiple keywords, separate each keyword by hitting the ENTER or TAB key. Your users will NOT be able to edit the Admin Defined Keywords, and these keywords will be applied to all your users. If you’ve selected this option, by default your users can view the User Defined Keywords tab when they’re syncing their email accounts with LeadSquared. This enables your users to add their own list of keywords.
- Check Keywords In – Choose in which part of the email (Subject or Body) the keyword should be present for the email to get synced. It’s mandatory to select at least one of the options listed below. If required, select both options –
- Subject – When selected, only if at least one keyword is present in the email’s subject line, the email is synced to LeadSquared.
- Body – When selected, only if at least one keyword is present in the email’s content body, the email is synced to LeadSquared.
- All Outbound Emails – All the emails sent from your user’s account will get automatically synced to your LeadSquared account, without having any dependency on keywords.
Note:
- If you enter a statement as a keyword (“Festive Offer 2022” in the example below), then all the words in that statement should be present in the email in order for it to get synced with LeadSquared. The statement is considered as case-insensitive (e.g., festive offer 2022 would also be considered), but the words, order and spaces in the statement must be an exact match. In case you want individual words in the statement to be considered when syncing emails, we recommend you enter each word in the statement as a separate keyword (e.g., “Festive”, “Offer”, “2022”, etc.)
- You can add special characters when entering your Keywords.
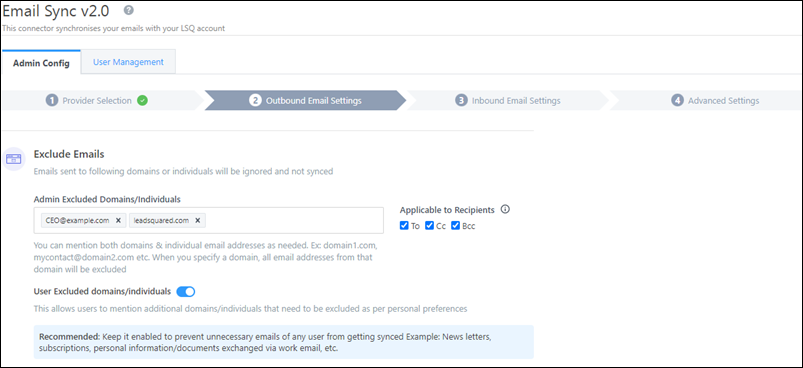
8.2 Exclude Emails
You can exclude syncing emails sent to certain domains (such as service request emails to domains like LeadSquared.com, Zoho.com, etc.) and individuals (such as emails to internal employees, senior management, employees from other teams, etc.). This is to ensure only relevant emails are captured and synced in your LeadSquared account.
- Admin Excluded Domains/Individuals – To exclude emails sent to certain domains, enter only the domain name (e.g., leadsquared.com, etc.). To exclude emails sent to individuals, enter their email Id (e.g., CEO@example.com, etc.). Add multiple email Ids and domain names. Once you’ve entered them, hit the ENTER key.
- Applicable to Recipients* – Select if the email Ids and/or domains you’ve entered should be in the “To”, “Cc” or “Bcc” fields for the email to get excluded. For e.g., if you’ve entered CEO@example.com and selected “Cc” as the Applicable to Recipients option, then every time you add CEO@example.com in a mail’s Cc field, that mail will NOT get synced to your LeadSquared account. If you’re choosing to Exclude Emails, then it’s mandatory to select at least one Applicable to Recipients option.
- User Excluded Domains/Individuals – When enabled, your Sales Users will be able to add their own set of domains for which they wish to exclude email sync.
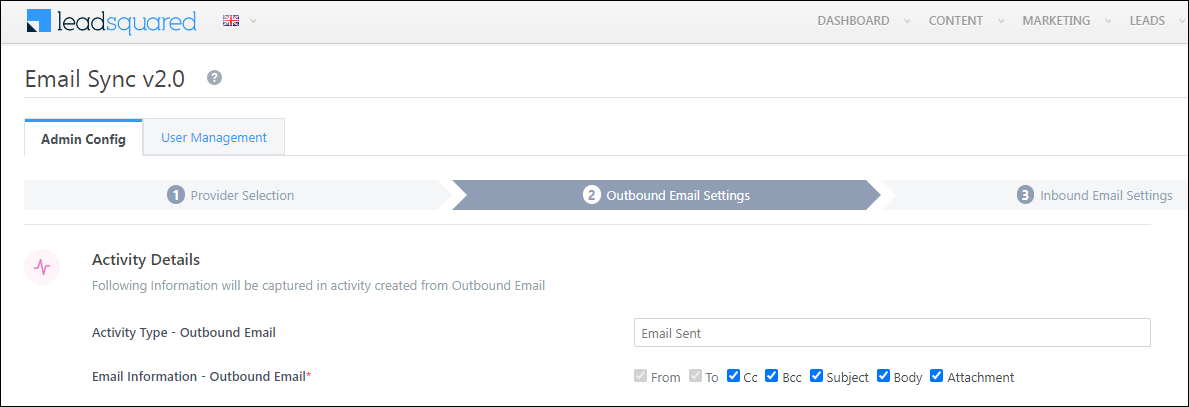
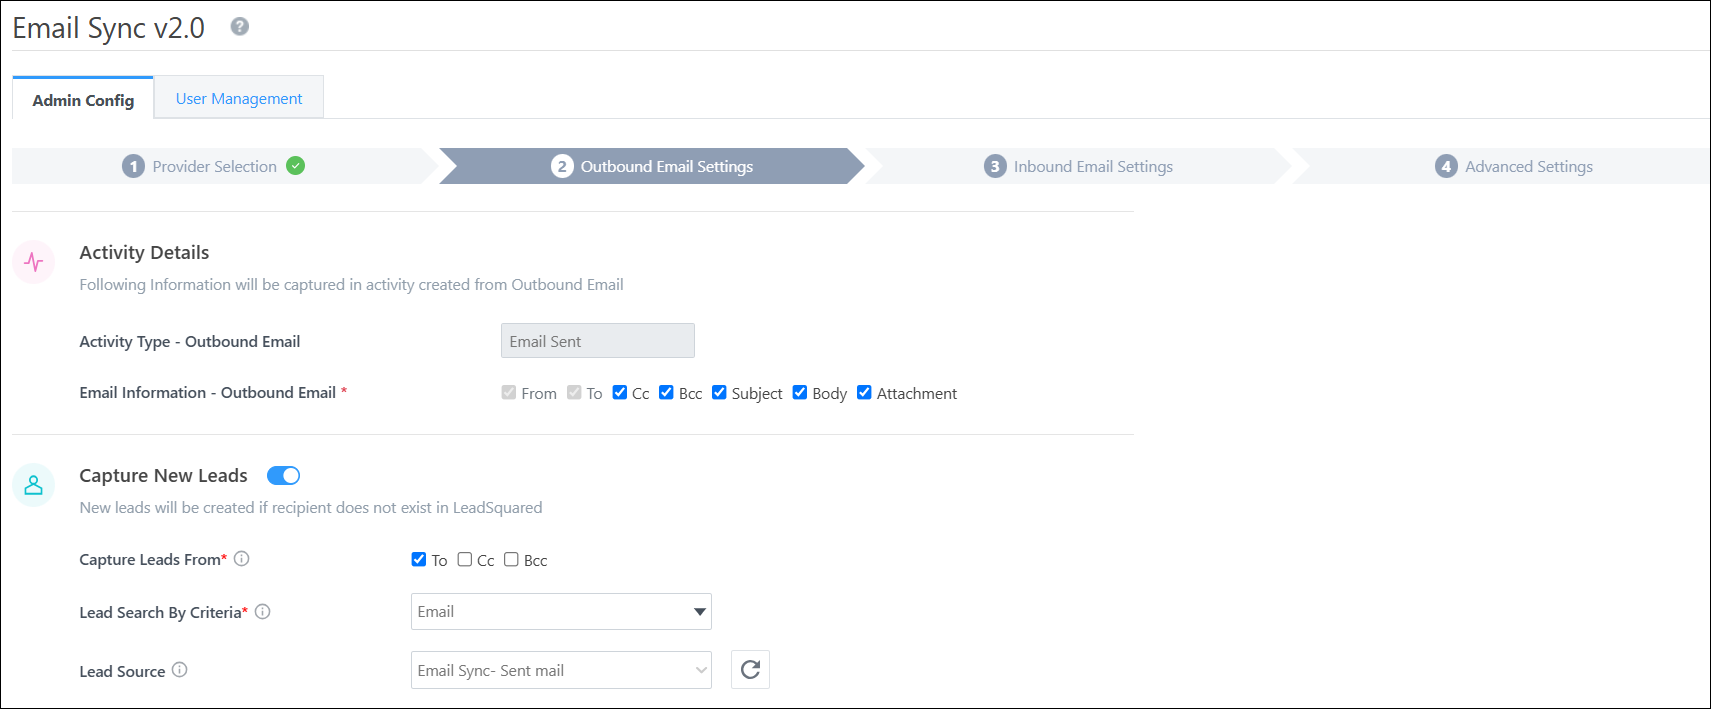
8.3 Activity Details
Each outbound email is posted as an Email Sent activity against the lead (on the Lead Details page) in your LeadSquared account. You can view the details of the email in this activity. By default, the From (sender) and To (receiver) details are posted under the Email Sent activity. In addition to these two fields, you can choose to capture details and email content from the following email elements –
- Cc – Recipients in the Cc field.
- Bcc – Recipients in the Bcc field.
- Subject – The subject line of the email.
- Body – The email body’s content.
- Attachment – If the email contains an attachment file, then this file is posted under the Email Sent activity. The following file types are supported –
- Inline
- Word
- JPG
- PNG
- HTML
- Excel
- Zip
- JSON
- MKV
- MPG
- MP3
- MP4
- Rich Text Format
- AVI
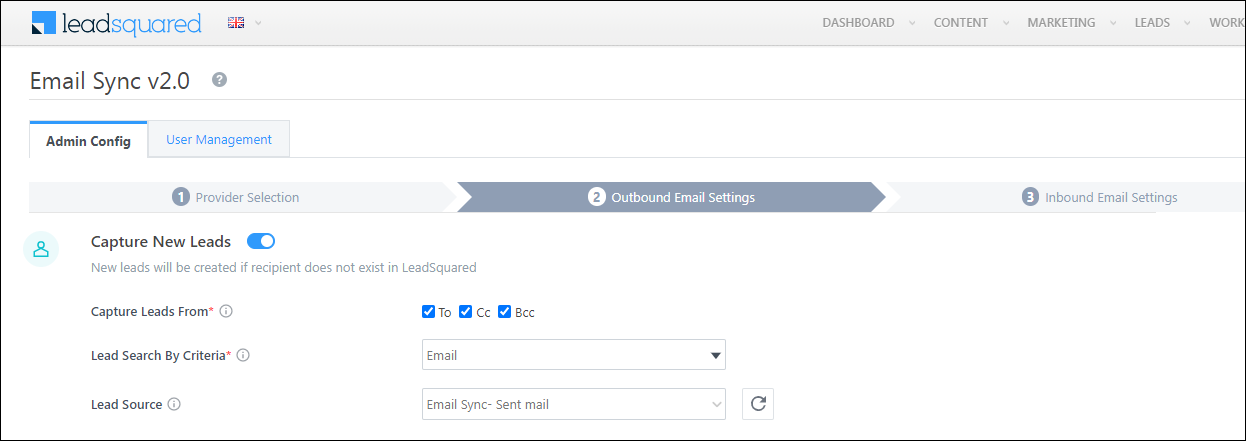
8.4 Capture New Leads
Emails sent to addresses that don’t exist in your LeadSquared account are captured and created as new leads. To capture new leads, enable the ![]() slider, and configure the following settings –
slider, and configure the following settings –
- Capture Leads From* – If the email Id present in any of the selected options – “To”, “Cc” and “Bcc”, does not exist in LeadSquared, then a new lead gets created. If the Capture New Leads option is enabled, then it’s mandatory to select at least one option here.
- Lead Search By Criteria – By default, Email is selected as the search key. If necessary, you can update the search criteria to an email-type custom lead field created in your account. Note that only one search criteria can be configured in your account at any given time.
- Lead Source – From the list of default and custom lead sources available in your account, select the lead source through which the leads were captured (e.g., Inbound Email, Email Sent, etc.). This detail will be used to identify the source on the Lead Details page, under Lead Source. To create a new lead source, enter the name of the new lead source, and hit ENTER. This lead source will start reflecting once an email sync activity is posted against a lead.
Once you’re done, click Next.
9. Inbound Email Settings
These settings govern the connector’s behaviour when users receive emails (inbound) in their Gmail/Outlook accounts.
The steps to configure the Inbound Email Settings are the same as the previous section. To know more, refer to Outbound Email Settings. Once you’re done, click Next.
Note:
- You can choose to disable the Sync Inbound Emails setting. To do this, disable the slider, and on the Warning pop-up, click Yes. This will NOT sync any received emails to your LeadSquared account.
- For Activity Details, the activity will get posted as Email Received.
10. Advanced Settings
Configure the following settings before you start using the connector –
10.1 Connect My Inbox access
Grant access to users to connect and sync their email accounts with LeadSquared. Only users for whom access is granted can view and access the connector (under the Apps main menu).
- Based on Role – From the Specify Roles dropdown, select the LeadSquared user roles that can connect their email accounts to LeadSquared. By default, all the Sales and Marketing users are selected here. If required, the Admin user can remove the user type to whom they don’t want to give Connect My Inbox access.
- Advanced (User Level) – From the Advanced (User Level) dropdown, select a user boolean field. Based on the value entered in the selected boolean field, the user can connect their email accounts to LeadSquared (e.g., for the user Sam, if the “Is Employee” boolean user field contains the value “Yes”, then this user can access the connector).
10.2 Disable Sync for All Users
When enabled, email sync will be disabled for all the users who have connected their email accounts to LeadSquared, and no new users will be able to connect and sync their email accounts either. To enable this setting, enable the ![]() slider, and on the Warning pop-up, click Yes. This setting can be used in instances where the Admin is testing the connector, if there’s a security breach, etc.
slider, and on the Warning pop-up, click Yes. This setting can be used in instances where the Admin is testing the connector, if there’s a security breach, etc.

10.3 Disable Sync for Internal Emails
When enabled, emails sent and received internally within your organization will not be synced with the connector. Your organization is identified based on the email domain you enter. This is to ensure only lead-related emails are synced with your LeadSquared account. Once enabled, enter your organization’s email domain (e.g., leadquared.com, etc.), and hit ENTER. You can add multiple domains.
10.4 Complete Set-up
Once you’re done, click Save & Complete. This complete’s the Admin set-up and configuration process, and your users can now sync their email accounts with LeadSquared.

11. User Management
Once your users have synced their email accounts to LeadSquared, alongside a user, click the![]() icon to perform the following actions –
icon to perform the following actions –
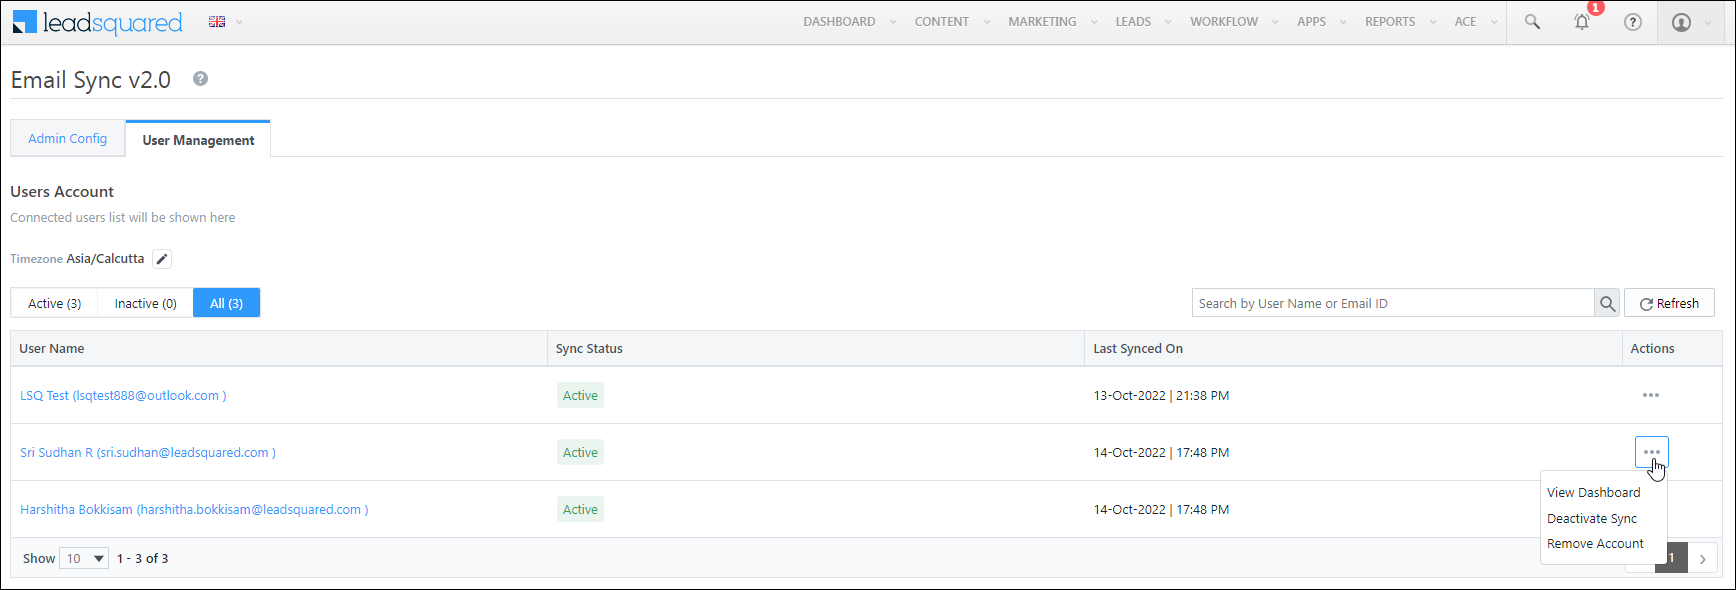
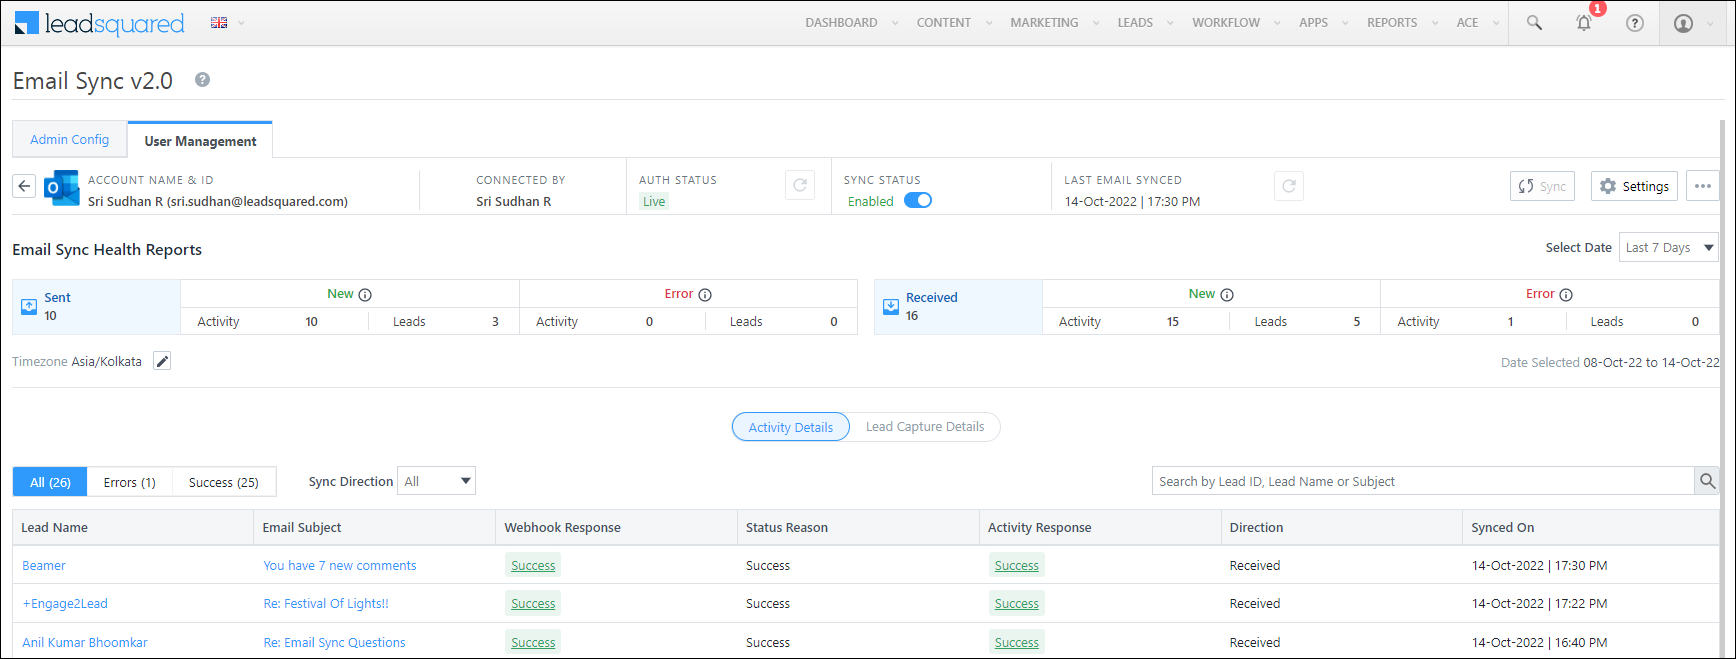
11.1 View Dashboard
The dashboard contains the logs of all the user emails that have been synced between LeadSquared and your user’s email account. You can filter these logs by Activity Details or Lead Capture Details.
- Date Range Filter – You can filter the logs by Today, Yesterday, Last 7 Days, Last 30 Days and Custom Date. If you select Custom Date, you can select up to a maximum of 60 days in the past.
- Use the search bar to find a lead or activity using the Lead Id, Lead Name or email Subject.
- To delete your synced account within the connector, click
 , and click Delete Account.
 - To disable sync for your account, under SYNC STATUS, disable the
 slider. This ensures that while the sync is disabled, your email account is still connected to LeadSquared.
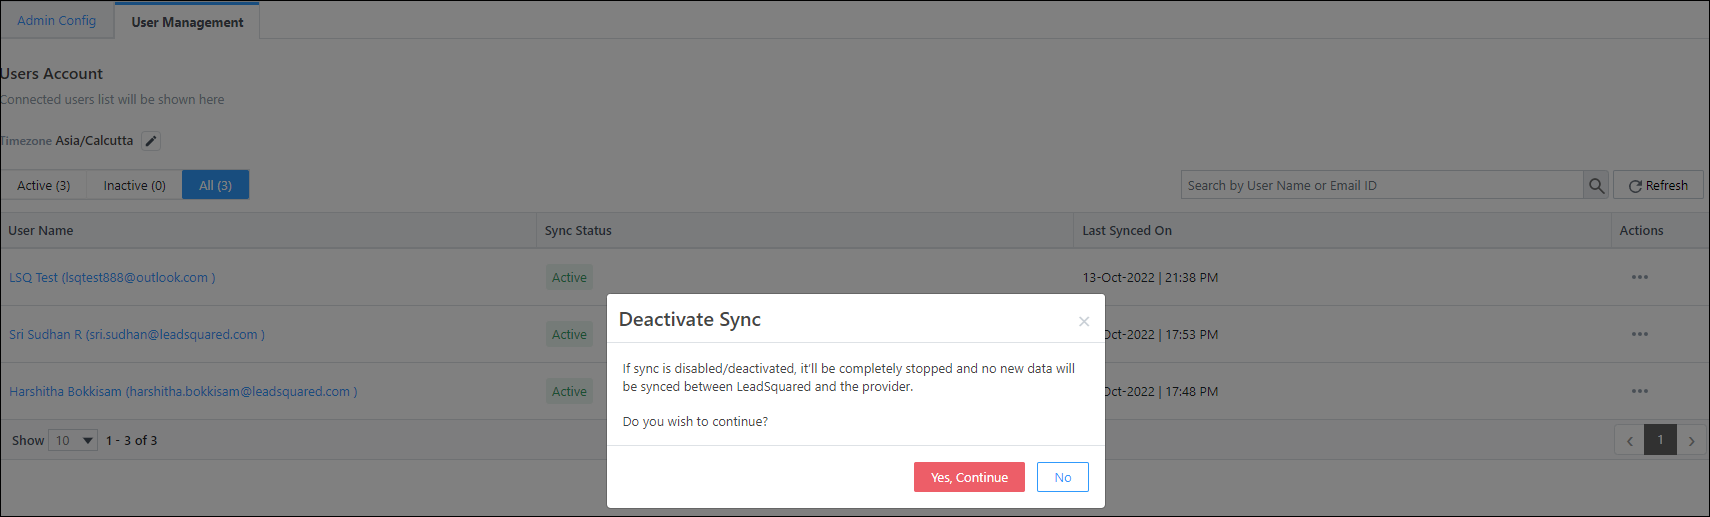
11.2 Deactivate Sync
To deactivate email sync between your user’s email account and LeadSquared, click Deactivate Sync, and on the confirmation pop-up, click Yes, Continue. This will only temporarily deactivate the user’s account, and they can activate the sync (Sync Staus) whenever they choose to.
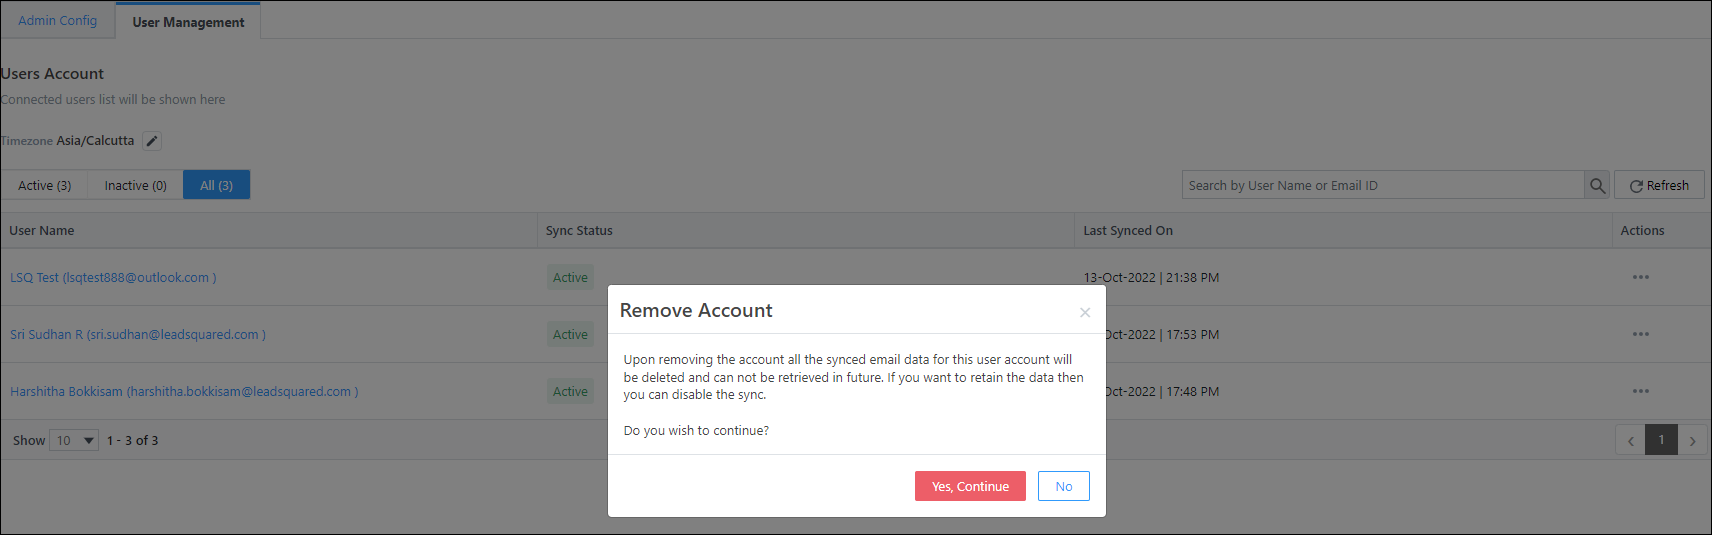
11.3 Remove Account
This action deletes a user’s email account from the connector. Click Remove Account, and on the confirmation pop-up, click Yes, Continue.
FAQs
I’m currently using the legacy Email Sync App. Should I migrate to this connector?
Yes, it is highly recommended you migrate to this connector, for an enhanced user experience. Note that Outlook support is soon to be discontinued on the legacy connector, and if you’re looking to sync your Outlook account with LeadSquared, then it’s mandatory that you migrate to the new connector. To know more, refer to Outlook’s Basic Authentication Deprecation in Exchange Online – September 2022 Update.
What happens if I send or receive an email from someone that doesn’t exist as a lead in my LeadSquared account?
If the Capture New Leads setting is enabled, this contact gets created as a new lead in your account.
Does this connector support bi-directional email sync between my email provider and LeadSquared accounts?
No. Currently, the connector only supports email sync from your email account to your LeadSquared account. Emails sent from your LeadSquared account will NOT get synced with your email provider’s account. If this changes in the future, we’ll update the article accordingly.
Is email sync supported for other email providers (such as Yahoo, ProtonMail, iCloud Mail, etc.)?
No. Email sync is currently only supported for Gmail and Outlook.
How will my lead be identified by the LeadSquared system?
We’ll use the Lead Search By Criteria (and in extension, the lead’s Email Address) to identify and capture leads.
How do I control which users can connect their email account’s to LeadSquared?
Let’s look at the following example –
- Bob is an Admin user.
- John and Paul are Sales Managers, and George and Ringo are Marketing Users.
- Frodo, Samwise, Aragorn and Legolas are Sales Users reporting to John.
- When configuring Connector Access, Bob grants access to only Sales Managers. This means that only the selected users (the Sales Managers in this example, John and Paul) can carry out the connector’s Admin Configuration and subsequent steps.
- When carrying out the configuration, on the Connect My Inbox access screen, John can select the users who can sync their email accounts with LeadSquared. Here, he selects Sales Users. This allows Frodo, Samwise, Aragorn and Legolas to now sync their email accounts with LeadSquared. Similarly, Paul (Sales Manager) can also carry out this configuration for his team.
Will internal emails get captured?
Yes, internal emails will get captured, as long as the Disable Sync for Internal Emails setting is disabled.
Can sales users edit the Activity Details and Capture New Leads settings?
No. Sales users cannot edit any of the Inbound and Outbound Email settings.
Troubleshooting
- Issue: I want to enable the “Allow non-lead email address(es) in the CC field” setting, but I don’t want junk or unwanted leads to be created in my LeadSquared account.
The screenshot shows the “Allow non-lead email address(es) in the CC field” setting under Settings>Email Settings>Email Recipients.
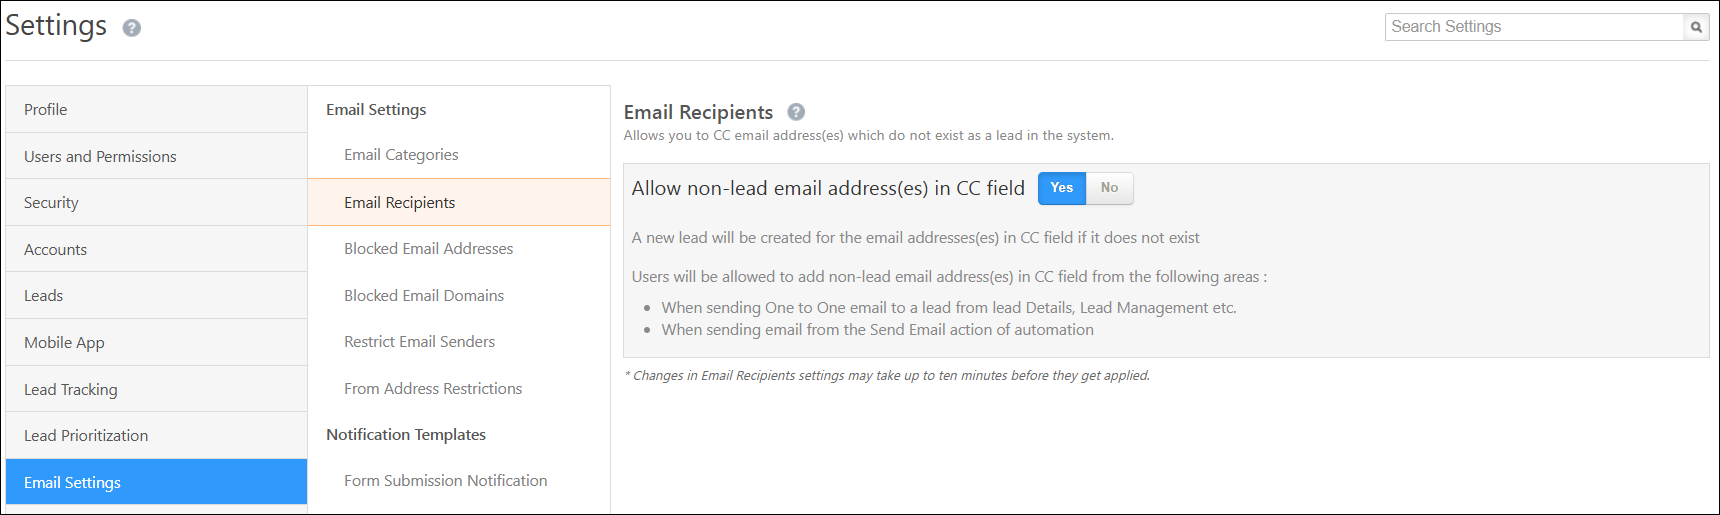
- Solution: To prevent this, make sure the “Cc and Bcc” options are unchecked under the “Capture New Lead” setting for both outbound and inbound emails in the Email Sync configuration.
Any Questions?
Did you find this article helpful? Please let us know any feedback you may have in the comments section below. We’d love to hear from you and help you out!
How do we have the connector check to sync against the email field of both the lead and the lead’s Point of Contact?
Hi, Zak. I’m sorry, I’m not sure I understand this query. Could you please elaborate?
For our leads who do not have email, but their primary point of contact does, we have separate fields “mx_Account_Point_of_Contact_Email” or “mx_Financially_Responsible_Contact_Email” which ensures we know which party we are speaking with. Is the email sync connector able to sync the email from those fields as well?
Got it, Zak. This feature is currently in our product roadmap. Once it goes live, we’ll annouce it through our product updates.
Any news on this? 🙂
Hey, Zak. We’ve not yet started to work on this feature. Could you please reach out to your account manager for further updates.
Hi! Any news on this? 🙂
Hi Zak, currently, the Lead Search By Criteria is limited to only one unique email-type Lead field. You can update this option from Email to your custom lead field. However, at present, you cannot add a secondary Lead Search By Criteria. I’ll keep you informed if this changes in the future.
Thank you for the update. Where is the setting to choose which email field to use for the sync?
Hi, Zak. It can be achieved by updating the Lead Search By Criteria.
How do we setup the app so only emails to/from leads already in the system are synced? We do not want every email to create a new lead.
Hi, Zak. Yes, this is possible by navigating to the Admin Configuration screen, and turning off (disabling) the option to Capture New Leads under both Outbound and Inbound Email Settings. Hope this helps!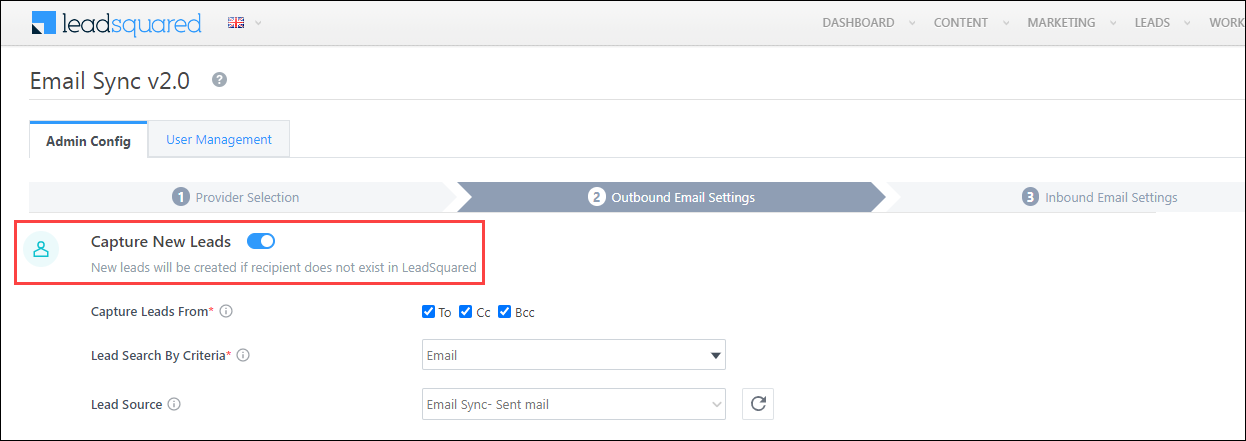
We are DITM College, Delhi Sonipat, Ganour. We want to purchase LeadSquared CRM for our Admissions Department.
Our Requirements:
1. Total Users: 5 Admission Counsellors
2. Purpose: To manage student leads from College Dekho, Shiksha, and our website
3. Key Features Needed:
– Bulk lead import from Excel/College Dekho
– Call tracking & recording
– WhatsApp automation for follow-ups
– Admission pipeline & conversion reports
– Integration with College Dekho CRM via API
Please share:
1. Best pricing for 5 users – 1 Year Plan
2. One-time implementation/setup cost, if any
3. Free trial/demo access for 14 days
4. Any special discount for educational institutes
You can reach me at 8076536108 for a quick discussion.
Regards,
Dipali Gupta
Admissions Head
DITM College, Delhi
College Email ID: Documentatditm@gmail.com
Hi, Dipali. Thank you for showing interest in LeadSquared. Someone from our sales team will reach out to you soon and help you out with your queries.