1. Feature Overview
From your LeadSquared account, you can schedule Google Meet meetings through the Google Meet Connector. With the LeadSquared Google Meet connector, you can directly create meetings with your leads, as well as add internal and external users to your meetings. Additionally, this connector will help you –
- Join Google Meet meetings with your leads from anywhere, on any device
- Automatically add meeting details to your Google Calendar, with all the necessary details such as meeting date and time, meeting URL, etc.
- Get notifications from LeadSquared about your Google Meet meetings
2. Prerequisites
- The Google Meet Connector is a paid feature. To enable it on your account, please write to support@leadsquared.com.
- You must be the administrator of your LeadSquared account.
- You must have an active Google account.
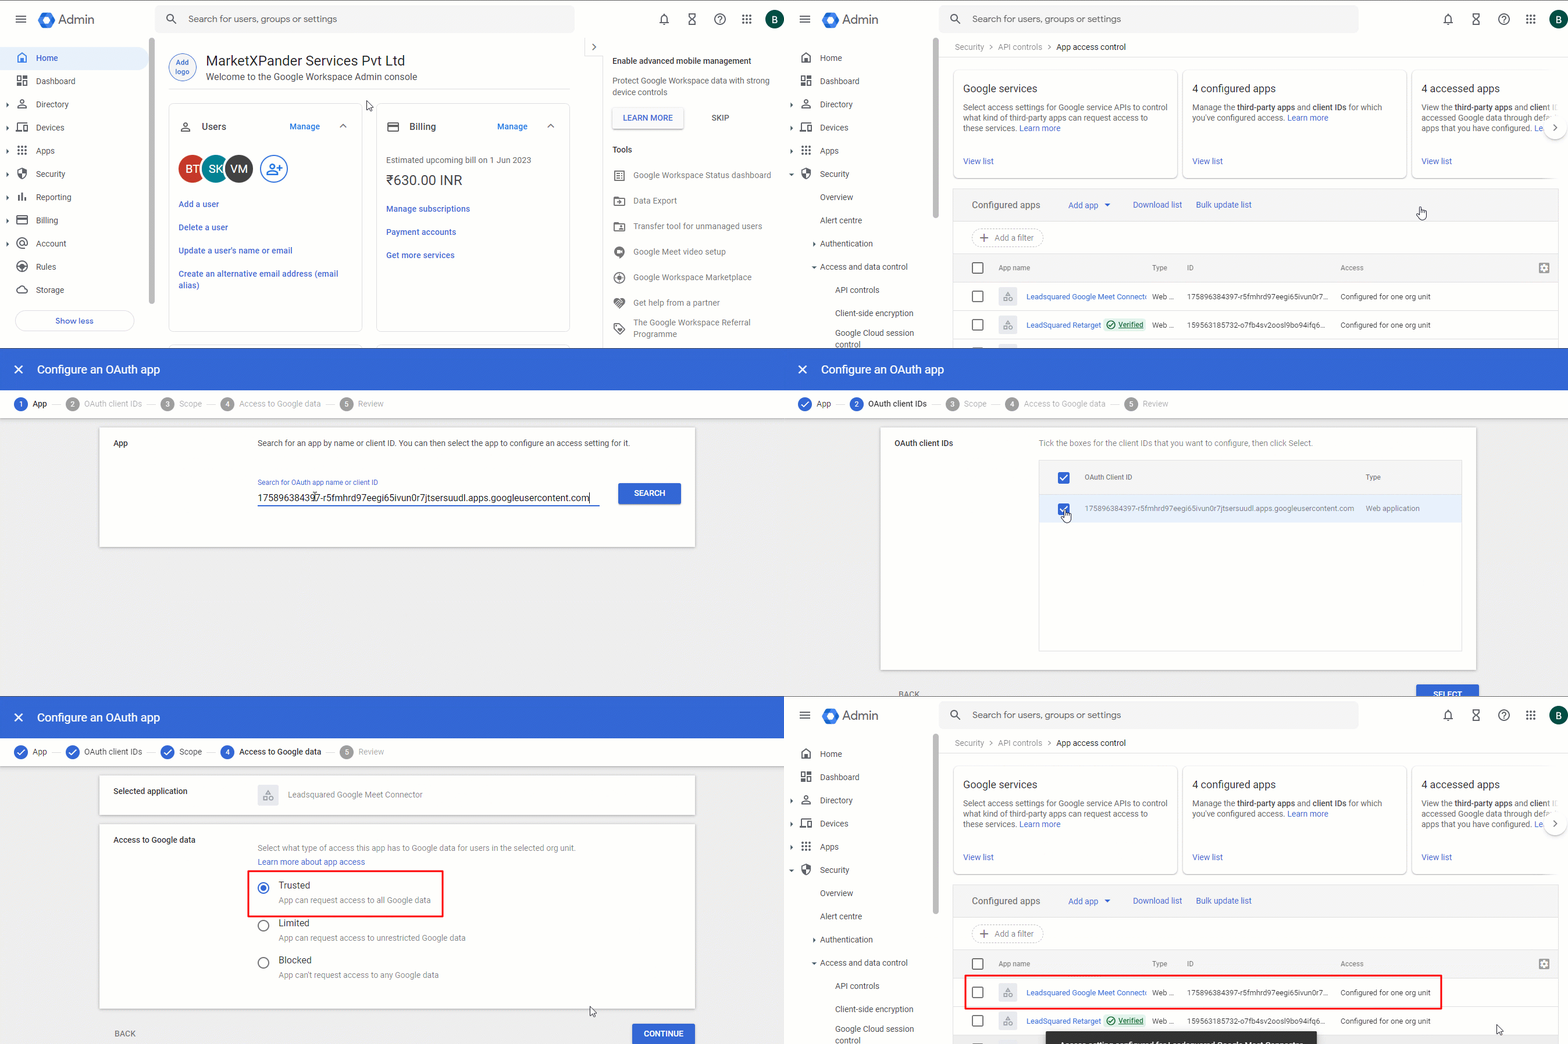
Before you connect your Google account with this connector, in your organisation’s Google Workspace, please grant access to the LeadSquared Google Meet Connector by marking it Trusted. If you don’t complete this step, you won’t be able to connect your Google Meet account with the LeadSquared app.
The steps to grant access are –
- Sign in to your organization’s Google Workspace as a Super Administrator, and go to Google Admin Console
- Navigate to Security>Access and Data Control>API Controls, and click on Manage Third-Party App Access.
- Click on Add New App, and search using the Client ID provided below. Once you find the LeadSquared Google Meet Connector, mark it as Trusted. To know more about this process, refer to Control which third-party & internal apps access Google Workspace data.
3. How it Works
Once set up, you can create and schedule Google Meet meetings with your leads and users, directly from LeadSquared.
- Install the connector – Begin by first installing the Google Meet Connector on your LeadSquared account.
- Configure the connector – Post installation, you’ll have to configure the connector with your Google account.
- Schedule meetings – After configuration, you can schedule Google Meet meetings with your leads and users.
- View Activities – After the Google Meet meeting is scheduled, you can view the meeting details.
4. Install the Connector
To install the Google Meet Connector on your LeadSquared account –
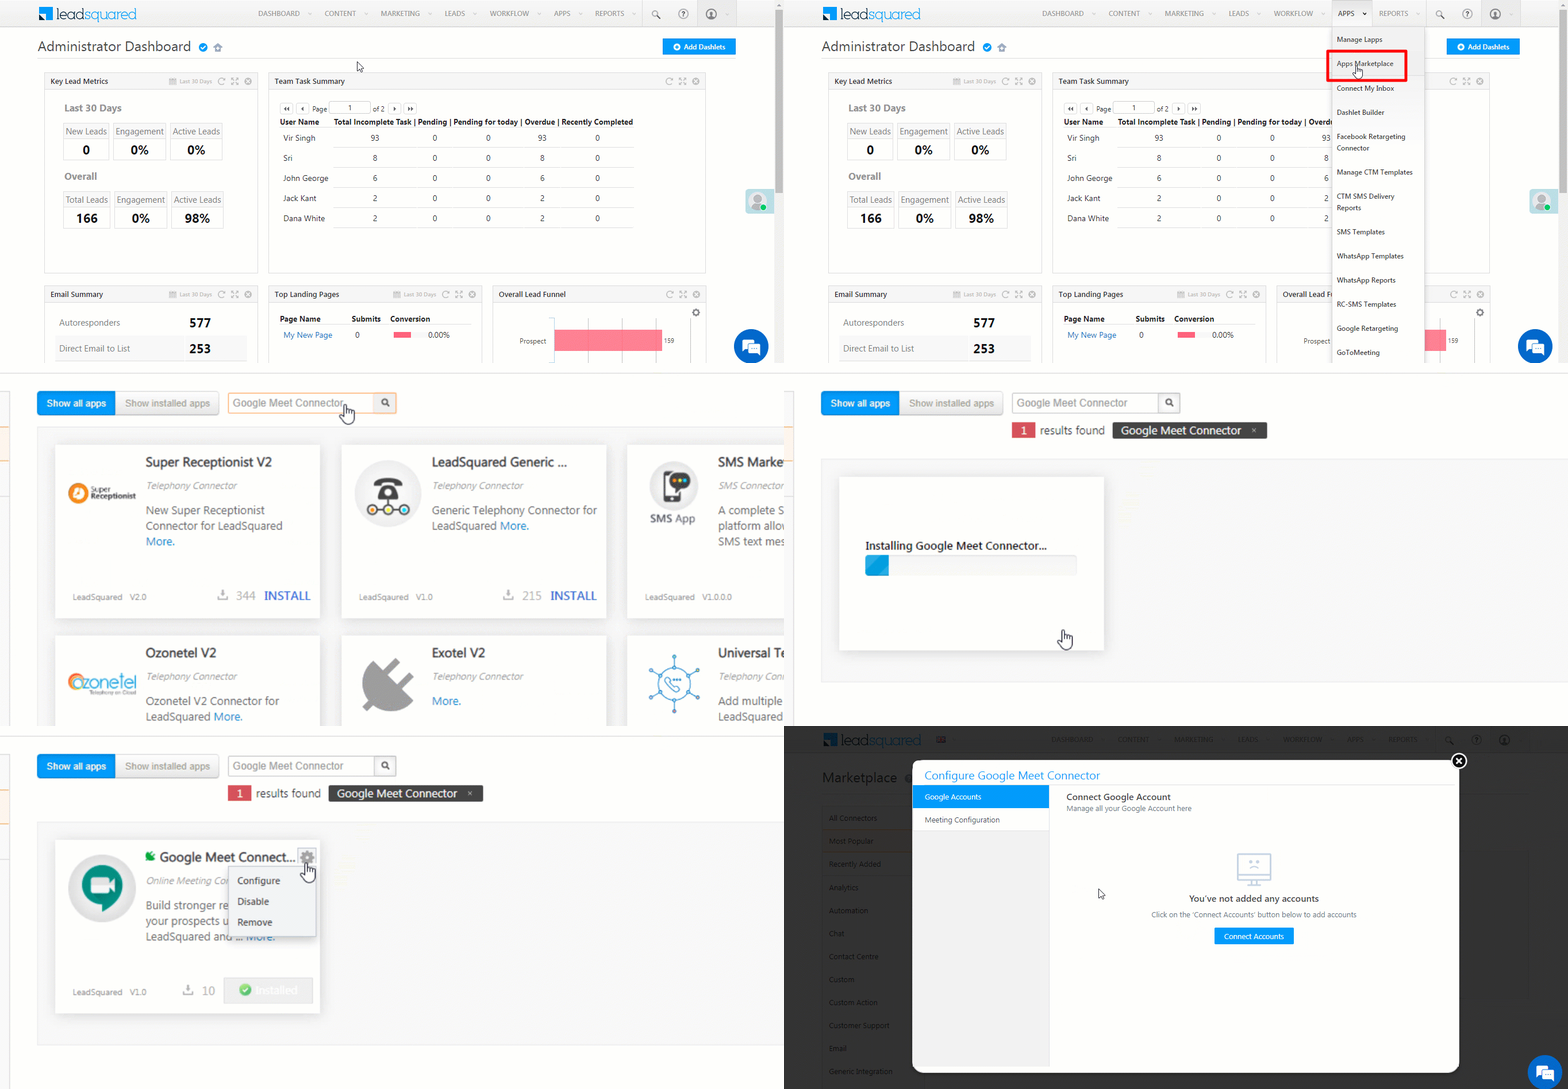
- From the main menu, navigate to Apps>Apps Marketplace and search for Google Meet Connector. On the connector, click Install.
- Alternatively, you can find the connector on the left panel, under Online Meeting.
- Once the connector is installed, hover your cursor over the
 icon, then click Configure.
5. Configure the Connector
5.1 Google Accounts
Once the connector is installed, connect your Google account(s) to LeadSquared.
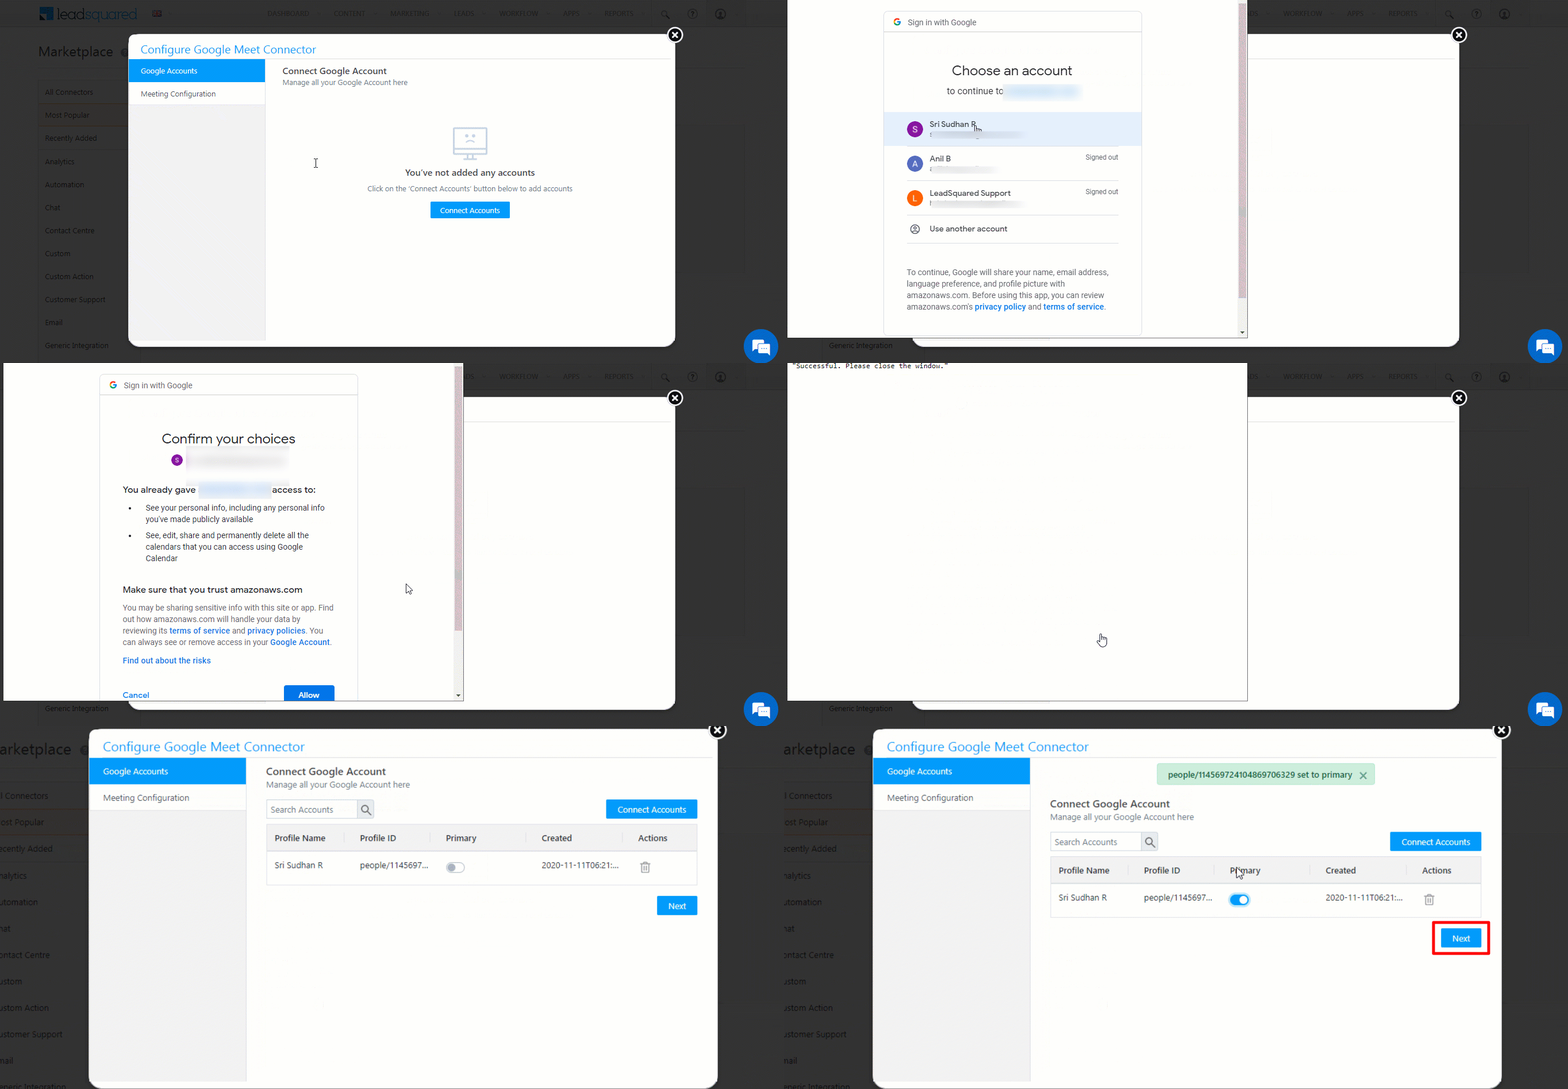
- On the Google Meet Connector screen, click Connect Accounts.
- On the Sign in with Google screen, select the Google account through which you want to set-up the connector.
- On the permission screens, grant access to your personal information as well as your Google calendar information.
- Once you’ve granted permission, click Allow. You’ll get the following message: “Successful. Please close the window.”
- Once your account is linked, on the Configure Google Meet Connector screen, under Primary, toggle the
 . This will ensure your Google account is the primary account.
- To delete an existing account, against the account name, click the
 icon, and on the Delete Account pop-up, click Yes.
- To delete an existing account, against the account name, click the
- Once you’re done, click Next.
5.2 Meeting Configuration
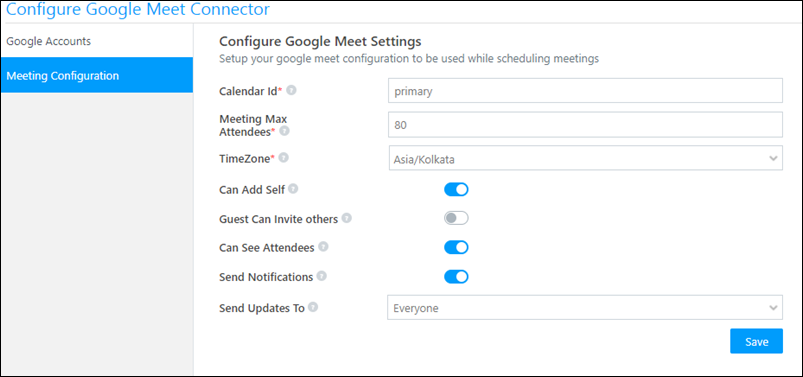
Configure the Google Meet settings that will be used while scheduling meetings –
| Field | Description |
| Calendar Id | The calendar Id of your Google Account. This the primary email Id you’ve used to configure the connector in the previous step. |
| Meeting Max Attendees | The maximum number of attendees (up to 100 attendees) that can be added to a Google Meet. |
| TimeZone | The time zone in which the meetings will be scheduled. |
| Can Add Self | Enable this setting to grant permission to attendees (other than the organizer) to add themselves to an existing meeting. |
| Guest Can Invite others | Enable this setting to grant permission to attendees (both internal and external) to be able to add anyone to the meeting. |
| Can See Attendees | Enable this setting to grant permission to attendees (other than the organizer) to be able to view the attendees in the meeting. |
| Send Notifications | Enable this setting to send notifications to attendees, from LeadSquared, about the creation of a new meeting. Even if this setting is disabled, some form of notification is sent from Google. |
| Send Updates To | From the dropdown, choose to whom you want to send a notification about the update in meeting details. You can choose from Everyone, Non Calendar Guests Only or None. |
Once you’ve configured the settings, click Save.
6. Schedule Google Meet Meetings
To schedule a Google Meet with your leads –
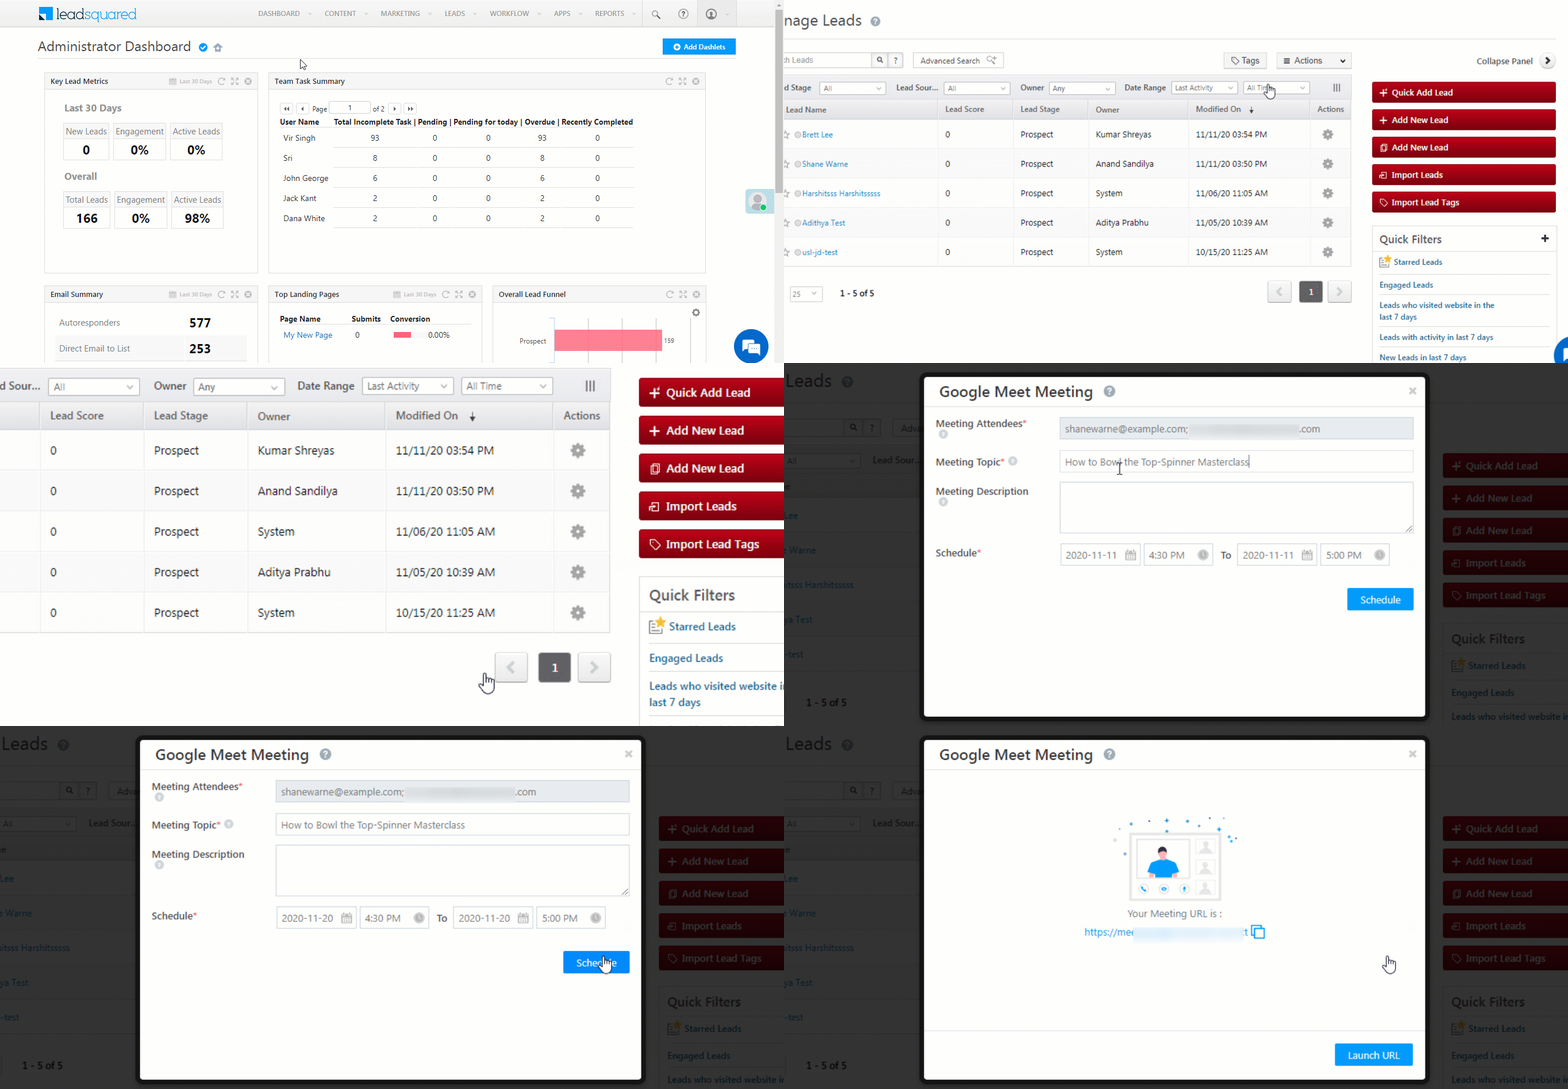
- From the LeadSquared main menu, navigate to Leads>Manage Leads.
- On a lead, hover your cursor over the
 icon. From the dropdown list, hover your cursor over Online Meeting, and then click Google Meet Meeting.
 - On the Google Meet Meeting pop-up, enter the following details –
- The email Ids of the attendees are added by default in the Meeting Attendees field.
- In the Meeting Topic field, enter a relevant name for the meeting. This is mandatory.
- In the Meeting Description field, enter a brief description about the meeting.
- Against Schedule, pick a from and to date and time for the meeting. This is mandatory.
- Once you’re done entering the details, click Schedule.
- Your Google Meet meeting URL is generated. You can share this URL with your leads and other external participants.
7. View Google Meet Meeting Details
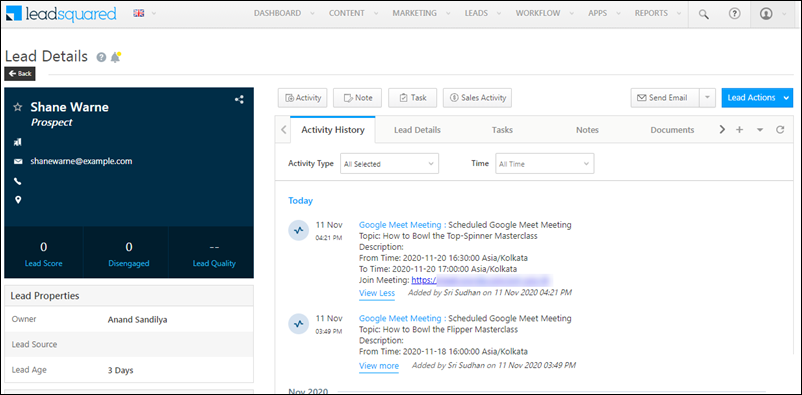
After you have scheduled a Google Meet meeting, an activity gets automatically posted against the invited lead. You can view the meeting details in the Lead Details page.
- From the LeadSquared main menu, navigate to Leads>Manage Leads.
- Click on the lead on whom the meeting is scheduled.
- On the Lead Details page, under the Activity History tab, you can view the meeting details.
- You can edit the meeting details by clicking the
 icon.
icon.
8. FAQs
1. Can we edit/cancel a meeting once it’s created?
No. Once a meeting is created, it cannot be edited or cancelled.
2. Can we change the host’s email Id while creating a meeting?
By default, the email Id of the admin who installed and configured the connector is used as the host email Id. This cannot be changed. The user’s email Id is passed as an attendee.
3. Should a user be logged into their Gmail account when scheduling a meeting?
No. The user is not required to be logged in to their Gmail account when scheduling a meeting.
Any Questions?
Did you find this article helpful? Please let us know any feedback you may have in the comments section below. We’d love to hear from you and help you out!


Now the Organiser is the Admin. and client is receiving Meeting invite from Admin ID
Would it be possible for the Organiser will be the Agent or Lead Owner, who is scheduling the Meeting?
Hi, Subrat. No, this is not possible.
Hi Sri Sudhan,
I have bunch of questions to ask:
Hi, Tejas.
1. No, you cannot record meetings through this connector.
2. Your users need to have a Google email address, in order to schedule Google Meet meetings. If they’re looking to sync Outlook meetings, I’d suggest you check out Google/Outlook Calendar Sync Connector Set-up for Admin Users.
All my staffs have separate G-Suite Logins. Can each User host meetings via their logins?
Hi, Sakhetram. This is currently not supported on the connector. If this changes in the future, we’ll keep you posted.
Can we send bulk google meet to our leads?
Hi, Tejas. Are you referring to sending one Google Meet link to multiple leads? If so, then yes, you can send it. Please let me know if your query was about something else. Thanks.
Can google calendar be synced?
Hi, Manish. Thank you for your question. Please send a feature request email to support@leadsquared.com. It will help prioritize this enhancement for future updates.