


Get Started
Sales Suite
Field Ops
Marketing
Service CRM
Integrations & Apps
FloStack
Facebook Retargeting Connector
1. Feature Overview
The Facebook Retargeting Connector enables you to push lists of leads (interested in a particular product or service) directly to your retargeting campaign on Facebook Ads. This will help you identify the lead’s Facebook profile, and show relevant ads through Facebook Remarketing. The features of this connector are –
- Create Audience List – Enhance existing audience lists on Facebook Ads with new leads, and create new lists as well with the data captured through the connector.
- Target Your Leads – Reach out to leads who are already aware of your product and service. Reconnect with them on Facebook after they leave your website.
- Field Mapping – Sync custom lead data along with standard fields to Facebook to improve your campaign’s effectiveness.
- Campaign Statistics – Reports of how your campaigns are performing, where your ads are showing up, and what’s the cost-split of your campaign.
- Sync Logs – Enables debugging, and lets you view sync status along with the list of errors and error details.
To know more about what the Facebook Retargeting Connector offers, please refer to Facebook Retargeting with LeadSquared.
2. Prerequisites
- You must have an active Facebook Ads account.
- You must be an Administrator of your LeadSquared account and your Facebook Ad account.
- This is a paid feature. To enable it, please write to support@leadsquared.com.
3. How it Works
To push leads from LeadSquared to your Facebook Ads account, using the Facebook Retargeting Connector connector, complete the following steps –
- Install the connector in LeadSquared
- Configure the connector in LeadSquared
- Connect your Facebook Ads account(s)
- Create an empty audience list
- Map relevant fields to the empty list
- Push leads to the list you’ve created, and sync the list with Facebook Ads
- View the list on your Facebook Ads account
4. Installing the Connector
To install the Facebook Retargeting Connector on your LeadSquared account –
- From the main menu, navigate to Apps>Apps Marketplace and search for Facebook Retargeting Connector v2.
- Alternatively, you can find the connector on the left panel, under Online Ads.
- Click Install.
- Once the connector is installed, hover your cursor over the
 icon, then click Configure.
 - On the Connector Access screen, you can choose to give access to all your marketing users, or only specific marketing users.
- If you choose Specific Marketing Users, from under Specific Users, you can select the marketing users from the dropdown list.
- Once you’re done, click Save.
5. Configuring the Connector
5.1 Connect Ad Accounts
Once the connector is installed, connect your Facebook Ads account(s) to LeadSquared.
- Navigate to Apps>Facebook Retargeting Connector.
- On the Connect Ad Accounts page, click Connect Accounts.
- Click Login with Facebook, and on the login window, click the Facebook Business account through which you want to login.
- You can also choose to login with a different account by clicking Log in to another account.
- On the Select Account(s) to be added pop-up, click the
 against accounts from the list of accounts linked to your Facebook Business account, that you want to add. You can add multiple accounts.
 - Once you’re done, click Connect, and then click Next.
- To delete an existing account, against the account name, click the
 icon, and on the Delete Account pop-up, click Yes.
- To delete an existing account, against the account name, click the
5.2 Create Audience List
After configuring the connector, you must either create an empty audience list from LeadSquared, or sync an existing list. After creating a list, you will then have to push lead data from LeadSquared to this list. To create an audience list from LeadSquared–
- On the Connect Ad Accounts page, click Audience List.
- Under Select Account, from the available dropdown, select the Facebook Ad account under which you want to create the list, then click Create Audience.
- On the Create Audience List pop-up, enter a name and description for the list.
- From the Customer File Source dropdown, select the source from which you want to capture lead details. You can choose from the following options –
- User_Provided_Only – Under this option, you can upload lead data captured through internal channels, such as when a user captures lead details manually, or the system captures a lead’s deatils automatically (such as when a lead visits website, lead opens emails, lead clicks on a link, etc.).
- Partner_Provided_Only – Under this option, you can upload lead data captured through external channels, such as third-party websites and partners who’ve provided lead data.
- Both_User_And_Partner_Provided – Under this option, you can upload lead data captured through both internal as well as external channels.
- Once you’re done, click Create. You’ll get a message stating, “Audience List Synced successfully”.
- To sync an existing or new list from LeadSquared with Facebook, click Sync Now.
- To delete an existing list, against the list name, click the icon, and on the Delete Audience pop-up, click Yes.
5.3 Field Mapping
To map lead fields from LeadSquared to the lead fields on the Facebook Audience List –
- On the Connect Ad Accounts page, click Field Mapping, and then click Add Custom.
- By default, Email and Phone fields are selected.
- Under Facebook Audience List fields, click the dropdown to select a Facebook field from the list of available fields.
- Similarly, under Lead Field, select a corresponding field in LeadSquared from which you want to push data.
- Once you’re done, click the
 icon, and then click Save. You’ll receive a “Field Mapping saved Successfully” message.
- To edit an existing field, click the
 icon.
icon. - To delete an existing field, click the icon.
- To edit an existing field, click the
6. Sync Lists
There are two ways by which you can sync your LeadSquared list with your Facebook Ads account. You can do this manually, from the Manage Lists page, or you can do this by setting up an automation.
6.1 Manage Lists Page
After successfully mapping lead fields to the empty list that you created, you will then have to push lead details to this list. Once the list is populated, you will then have to sync your LeadSquared lists to your Facebook Ads audience list –
- Navigate to Leads>Manage Lists.
- Against the list from which you want to pull the lead details, hover your cursor the
 icon, and click Facebook Retargeting.
 - On the Facebook Retargeting pop-up, select the Facebook Ad account, and the Custom Audience List that you created, and then click Sync Now.
- On the confirmation pop-up, click Yes. You will receive a message stating your request has been submitted successfully.
- It will take between 6-12 hours for the leads to reflect in your audience list on your Facebook Ads account.

6.2 Automation
Alternatively, you can push the list from LeadSquared to Facebook Ads, by setting up an automation. An example of when you can use the automation feature is when a lead is created after visiting your landing page. Here, you can automatically add the lead to a list, and retarget the lead with the Facebook Ad of the product or service they’ve shown interest in.
You cannot configure the Facebook Retargeting Automation for the following triggers –
- Activity Create on Activity
- Activity Update on Activity
- Task Created on Opportunity
- Task Completed on Opportunity
- Task Reminder on Opportunity
To set-up this automation –
- Navigate to Workflow>Automation, and click Create Automation. To know how to create an automation, please refer to Automation Home.
- You can also Live Edit a published automation.
- After you’ve set-up an automation trigger, click
 .
. - From the dropdown, click Online Ads, and then click Facebook Retargeting Automation.
- On the Facebook Retargeting pop-up, from the Select Facebook Ad Account dropdown, select the Facebook Ads account to which you want to push the list.
- From the Search and select audience from the list dropdown, select the LeadSquared lead list to which you want to add the leads to.
- Once you’re done, click Save. On the Attention pop-up, click Yes.
- Then, click Publish. The automation is live.
7. View Reports
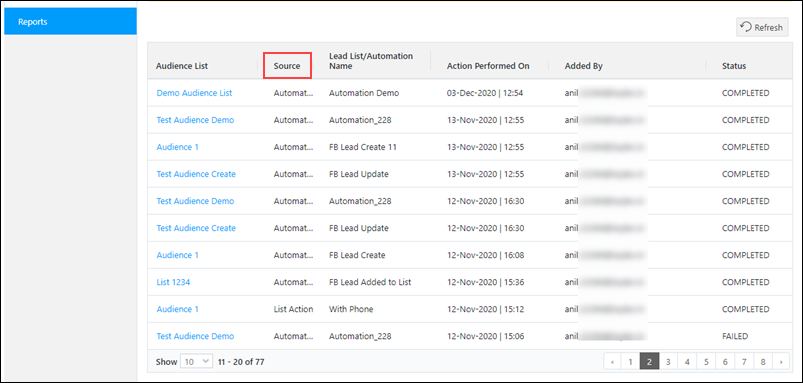
To view the Facebook Retargeting Connector’s reports, navigate to Apps>Facebook Retargeting Connector, and click Reports.
Under Reports, you can view the details of a list that’s been pushed from LeadSquared to your Facebook Ads account. You can also view the source through which the lists were pushed to Facebook Ads, either through Automation or through a List Action.
8. View the List on Facebook
After you’ve successfully created the list, you can view it on your Facebook Ads account. To do this –
- Login to your Facebook Business Account.
- Select the Facebook Ad account to which you’ve pushed the lead data from LeadSquared.
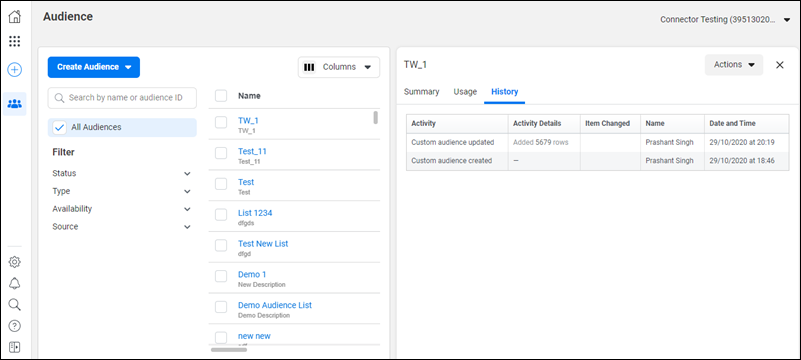
- Here, you can view the list created. To view the list summary and other details, click the list. You can find the Summary, Usage and History tabs here.
9. Possible Errors and Troubleshooting Steps
9.1 User Permissions Error
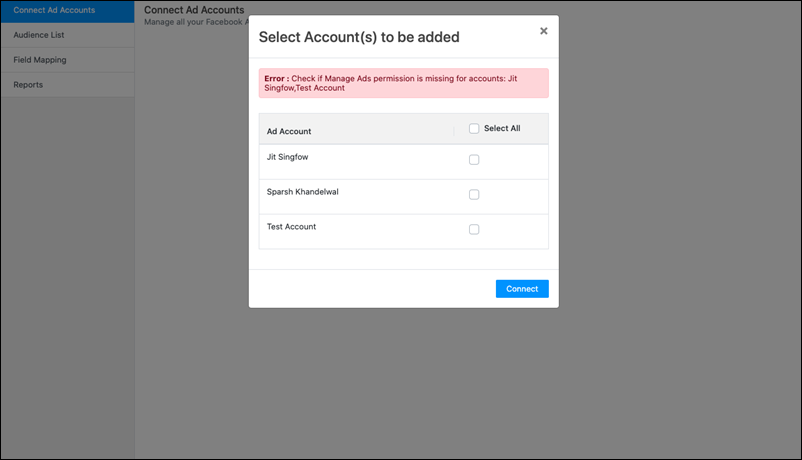
In case you get the following error messages while setting-up your account –
- “Check if Manage Ads permission is missing for accounts” – This error shows up in LeadSquared while connecting a Facebook Ad account, when “Manage Ads Permission” is disabled for a user on that particular Facebook Ad account.
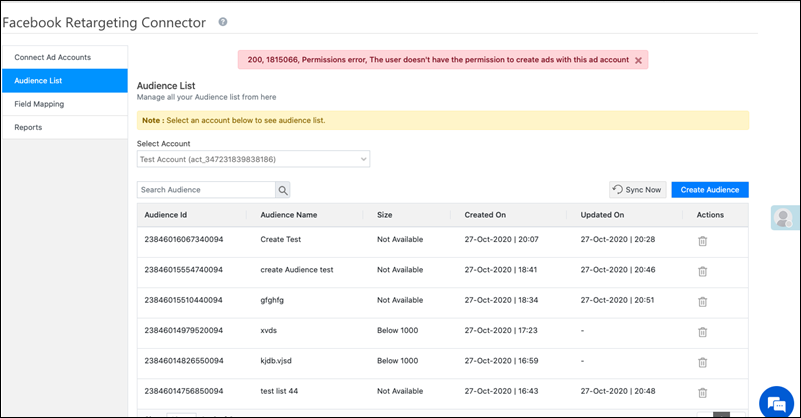
- “200,1815066, Permission error. The User doesn’t have the permission to create ads with this ad account” – This error shows up in LeadSquared while creating Audiences, when “Manage Ads Permission” is disabled for a user on that particular Facebook Ad account.
The troubleshooting steps for both the errors are the same –
- Login to your Facebook Business Account.
- Select the Facebook Ad account on which the error occurred.
- Click the
 icon to open the Business Settings page.
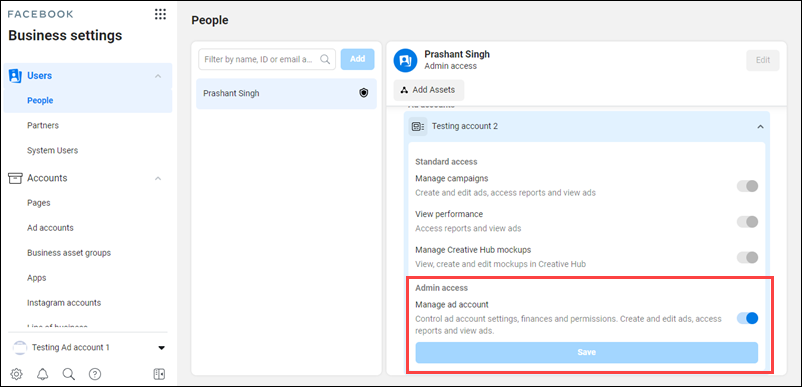
 - On the Business Settings page, select the user who faced this error, and click the Ad account listed under the user.
- Under Manage ad account, toggle
 the slider. Once it’s enabled, click Save.
9.2 Terms of Service Error
In the instance where a user in LeadSquared has not yet accepted Facebook’s Terms of Service, then the following error comes up, “200, 1870090, Permissions error. To create or edit a saved audience with an uploaded customer list, please agree to the Custom Audience terms”. To resolve this error, you can –
- Click on the link listed in the error message, and in the new TOS tab, click Accept.
- Or, accept the TOS in your Facebook Business account, by navigating to Audiences>Create Audience>Custom Audience>Customer list, and click I Accept.

9.3 New Business Error
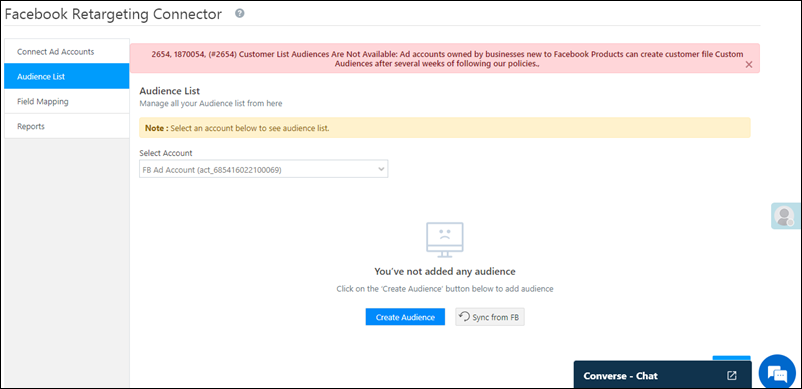
If you’re facing the following error message, “2654, 1870054, (#2654) Customer List Audiences Are Not Available: As accounts owned by businesses new to Facebook Products can create customer file Custom Audiences after several weeks of following our policies.” Once the wait-period is over, the issue is fixed automatically.
Notes:
- On any of your Facebook Ad accounts, if only Manage Campaign permission is enabled, then your users should still be able to create audience lists and push leads.
- If the same Facebook Ad account is accessed by multiple users, then the permissions and TOS for that account will get automatically configured on the user who most recently connected to the account.
Any Questions?
Did you find this article helpful? Please let us know any feedback you may have in the comments section below. We’d love to hear from you and help you out!
If we do ads with existing LSQ leads for retargeting if again the use registered, how will the source record?
Hi, Ganesh. For this connector, we don’t capture any new leads in LeadSquared. We only push the lead data from LeadSquared to Facebook for targeting. Hope this helps.
Can it be used as an Instagram retargeting connector as well?
Hey, Spoorthi. Sorry for the delayed response. Yes, this can be done. Please contact your account manager, and they’ll guide you with the steps required here.