


Get Started
Sales Suite
Field Ops
Marketing
Service CRM
Integrations & Apps
FloStack
Integrate APIs with the Chatbot
1. Feature Overview
This article helps you integrate LeadSquared APIs and external APIs with the Chatbot. Through the Chatbot, you can leverage these APIs to perform a variety of actions like capturing lead and opportunity details, creating tasks, posting activities, displaying lists of cities, clinics, products, etc.
2. Prerequisites
- Install the Chatbot connector. To enable it on your account, contact your account manager, or write to support@leadsquared.com.
- You must be an Admin user of your LeadSquared account in order to access the API access keys.
3. How it Works
In this article, we’re using the Create a Lead API as an example to illustrate how to integrate a LeadSquared API with the chatbot. When integrating the LeadSquared APIs with the chatbot –
In the chatbot API menu –
1. Add the API to the chatbot API menu
-
- Once you add the API details (Parameters, Headers, Authorization and Body when available), test the API.
- When you’re adding the API Request Body, ensure it follows the same order in which you’re capturing details in the chatflow. For e.g., if you’re capturing lead details in the order of Phone Number, First Name and Email Address in the chatbot, then the API Request Body should also be in this sequence.
2. After you add and test the API, map a response attribute as the Response Variable.
-
- The response variable can be used to set up conditions in a chatbot node. You can configure the chatbot to present different responses based on each condition.
- In our example, using the Create a Lead API, we’ve added the Id from the API response as the Response Variable. We’ve used it to set up a condition where we verify if a new lead was created, and present different chatbot responses for a new lead and an existing lead.
Return to the bot builder –
3. Create an API Node and test if the chatbot works as intended.
Return to the chatbot API menu –
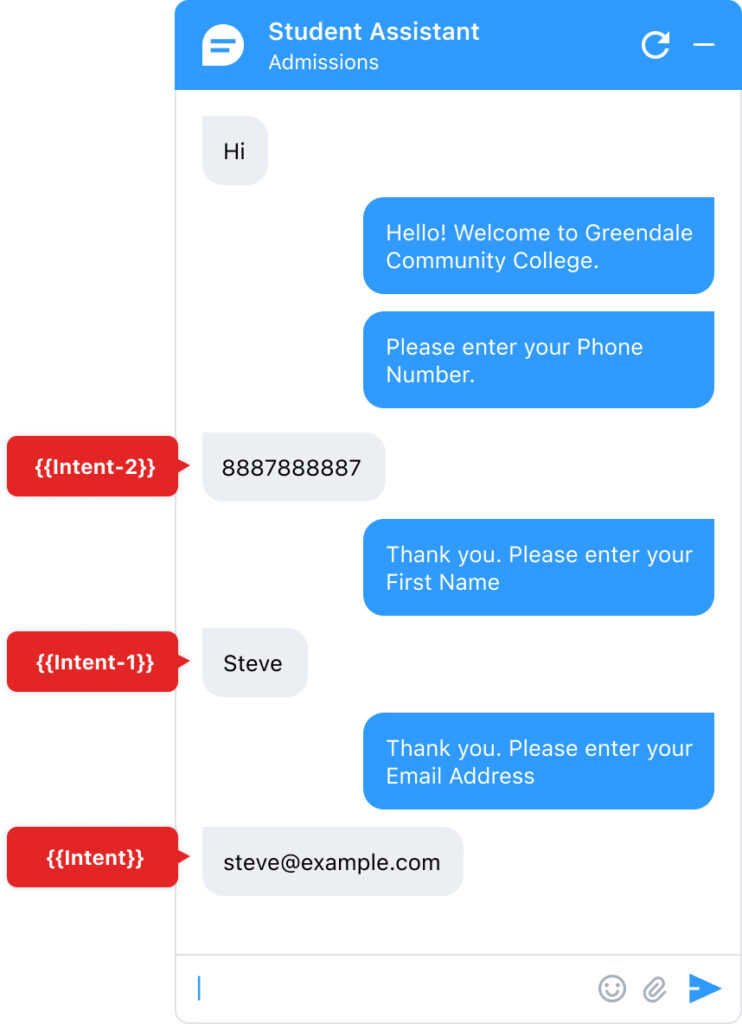
4. Map the chatbot intents (lead inputs – Email Address, First Name, Phone, etc.) to the corresponding API request attributes.
Edit the API request body and replace the values with {{intent}}, {{intent-1}}, {{intent-2}}, depending on where the intents (lead inputs) are configured in the chatbot flow.
In our example, we’ll replace the “Value” of “Attribute”:”EmailAddress” with {{intent}}. Similarly, we replace the “Value” of “Attribute”:”FirstName” with {{intent-1}}, and replace the “Value” of “Attribute”:”Phone” with {{intent-2}}. This maps the chatbot intent to the corresponding attributes in the API request body.
4. Add APIs to the Chatbot API Menu
We’re using the Create a Lead API as an example here.
- On your LeadSquared account, navigate to Apps>Chatbot, and click Get Started.
- On the Dashboard screen, from the left panel, click API, and on the top right corner, click Add API.
- Enter the following details –
- API Name – An identifier for the API. This will be used to identify the API when you’re creating Nodes. This is mandatory.
- Request Details – The API URL. Ensure you pass the correct API host along with the request URL. Append the Access Key and Secret Key to the URL. This is mandatory.
- API Method – Set GET or POST as the API method. This is mandatory.
- Params – Enter the API (the Access Key, Secret Key, etc.).
- Authorization – Enter the authorization tokens if available.
- Headers – Enter the API header key as Content-Type, and set the value as application/json. This is mandatory.
- Body – Enter the API body if available. In the body, ensure you pass all the fields you’re capturing data for through the chatbot. We’re passing the following attributes, which you can modify according to your requirements –
[
{
“Attribute”:”Phone”,
“Value”:”8887888887″
},
{
“Attribute”:”FirstName”,
“Value”:”Steve”
},
{
“Attribute”:”EmailAddress”,
“Value”:”steve@example.com”
}
]
- Once you’ve entered all the necessary details, click Test API.
- When the response is successful, under Response Variables, use”$” to access the response attribute to map as the Response Variable. For e.g., if you’re choosing “Id” as the variable in the Create a Lead API, it should be mapped to “$.Message.Id”.*
- Once you’re satisfied with the API, click Save.
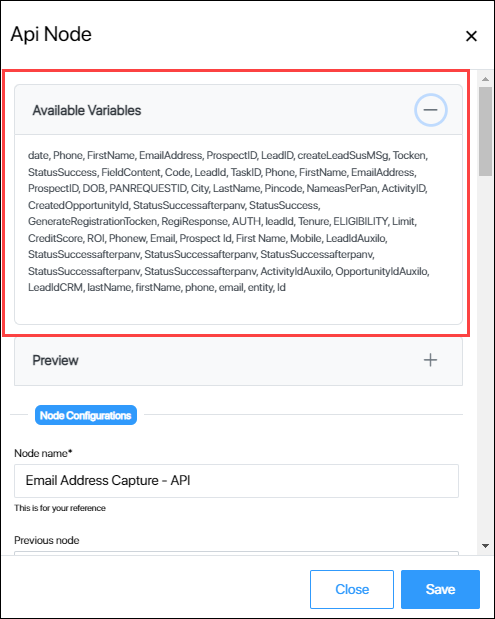
Next, go ahead and set up the API node in the bot-builder. When configuring a node, you can view the list of all the API variables added to the chatbot.
5. Map the Chatbot Intents to the API Request Attributes
Once you’ve set up the API Node, map the intents configured in the chatbot (phone, first name, and email address) to the corresponding API request attributes. In the example we’ve used, we’re capturing the following lead details in sequential order –
- Phone Number
- First Name
- Email Address
To map these attributes –
- On the Chatbot Dashboard screen, from the left panel, click API.
- Search for the API you’ve selected when creating the API Node. We’ve created our API node using the Create a Lead API (which we named “Lead Capture”).
- You can also search and filter by the Request Type and Request URL.
- You can click
 to apply conditions (Contains, Equals, etc.) when searching for the API.
- Alongside the API, under Actions, click
 edit, and on the Add New API pop-up, navigate to Body.
 - When adding and testing the API (in the previous section), we added dummy values for each attribute. Replace these values with the following –
- For the intent captured through the API node (Email Address), replace the existing value with {{intent}}. In our example, we added the API Node when capturing the EmailAddress, so we’ll replace the dummy email Id value with {{intent}}.
- For the previous intent (minus 1) from the API node, replace the existing value with {{intent-1}}. In our example, the intent captured before the email Id is FirstName, so we’ll replace the dummy name with {{intent-1}}.
- For the previous intent (minus 2) from the API node, replace the existing value with {{intent-2}}. In our example, the intent captured two levels before the email Id is Phone, so we’ll replace the dummy phone number with {{intent-2}}.
- Do this for subsequent key-value pairs ({{intent-3}}, {{intent-4}}, etc.) present in your API. This is done to ensure that we’re dynamically capturing the lead details for all the leads entering the system.
- Once you’re done, click Save.
Next Steps
Return to the Bot-Builder to learn how to continue building a chat bot.
Any Questions?
Did you find this article helpful? Please let us know any feedback you may have in the comments section below. We’d love to hear from you and help you out!