


Get Started
Sales Suite
Field Ops
Marketing
Service CRM
Integrations & Apps
FloStack
Build a Journey Based Chatbot (v1)
1. Feature Overview
Once you’ve installed the Chatbot connector in your account, set up chat flows using the bot builder.
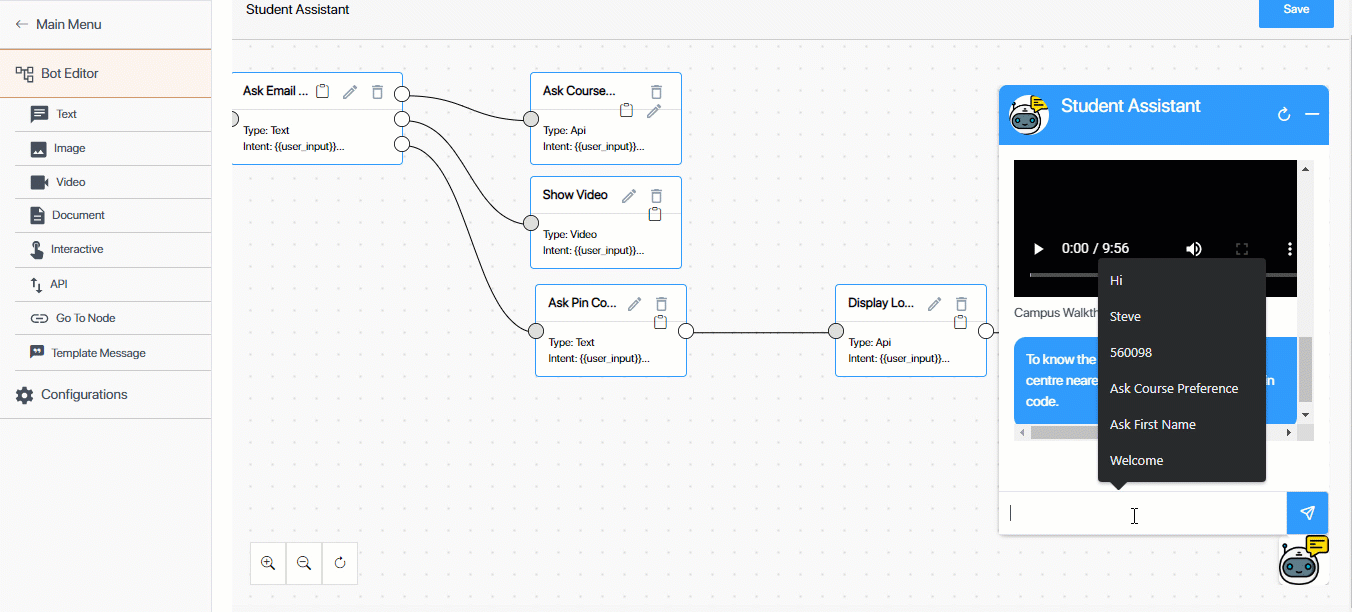
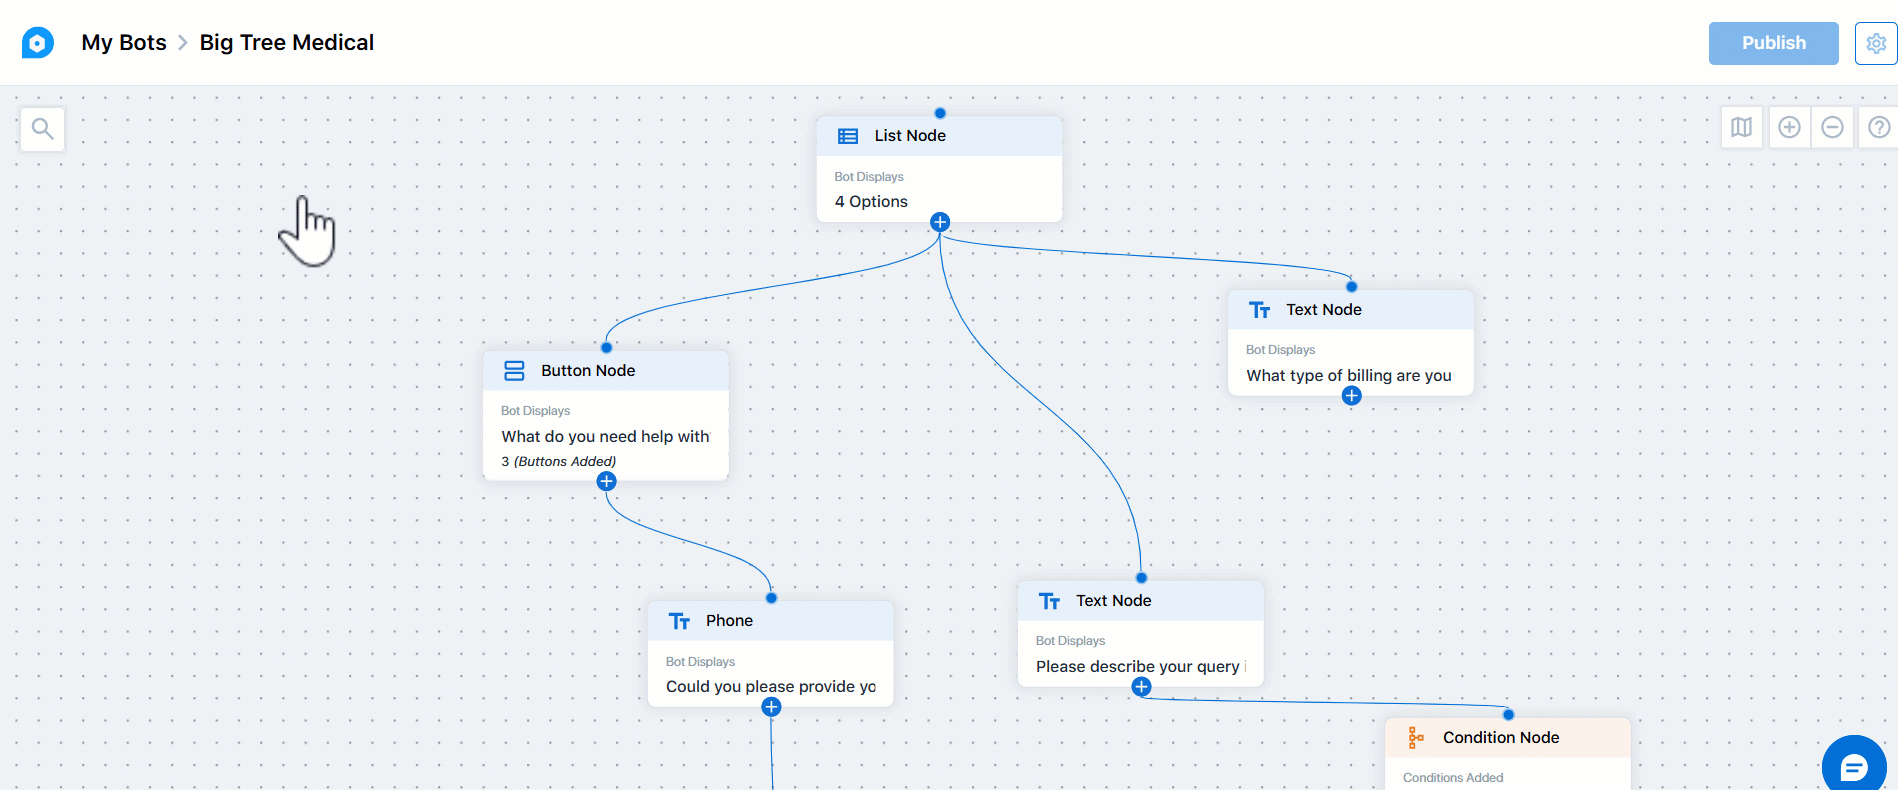
There are multiple components involved in creating a chatbot and you can customize each component down to a granular level for your use case. In the chat flow created below, we’ve utilized all the available components (different types of nodes, APIs, buttons, etc.).
The set-up process and chat flow differ from use-case to use-case. To show you how to build and use the chatbot feature, we’ve taken a generic education industry use case to build a website chatbot. Even if the use case you’re looking to solve is different from the one listed here, you can still understand the function of each component, and use this document as a reference when building your own chatbot.
Note:
- This article helps you create a Journey Based chatbot flow that can be integrated with a website. The steps to integrate the Chatbot with WhatsApp are also similar (unless stated otherwise). You can use this article as a reference to build your Chatbot integration with WhatsApp.
- To know how to create an AI Help Bot, refer to Chatbot – AI Help Bot.
2. Prerequisites
- You must install the Chatbot connector. To enable it on your account, contact your account manager, or write to support@leadsquared.com.
- You might come across a few terms for the first time in LeadSquared, so it’s important to familiarize yourself with the Glossary list for the Chatbot.
- Before you configure the Handover Node, ensure LeadSquared Converse is enabled on your account.
3. How it Works
While you can create chat flows to cover multiple use cases, in this article, we’re looking at how you can create a flow for education institutes to display their courses and other offerings to potential students on their website/portal.
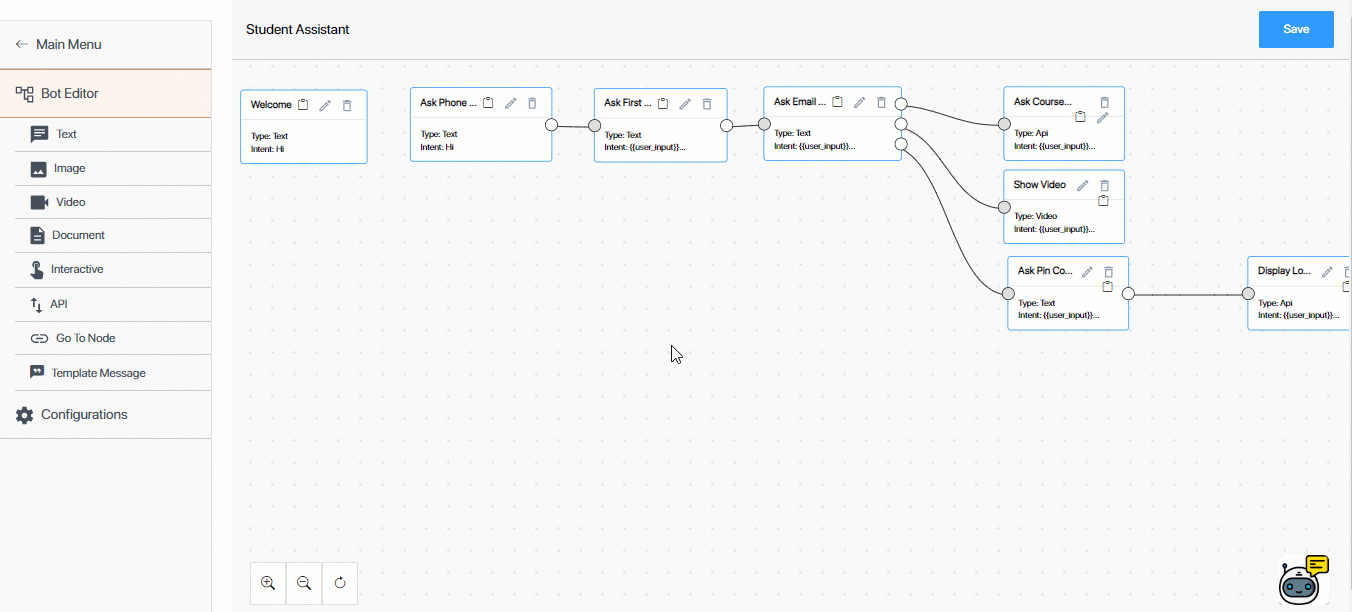
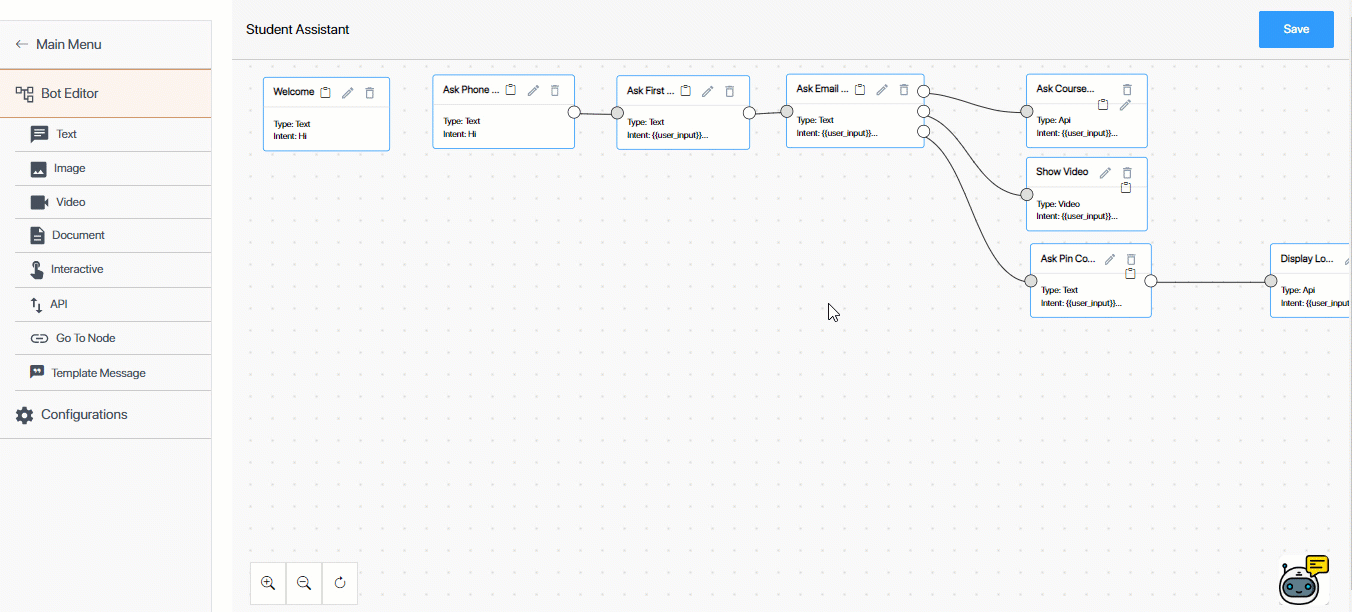
Example Use Case – Student Assistant Chat Flow
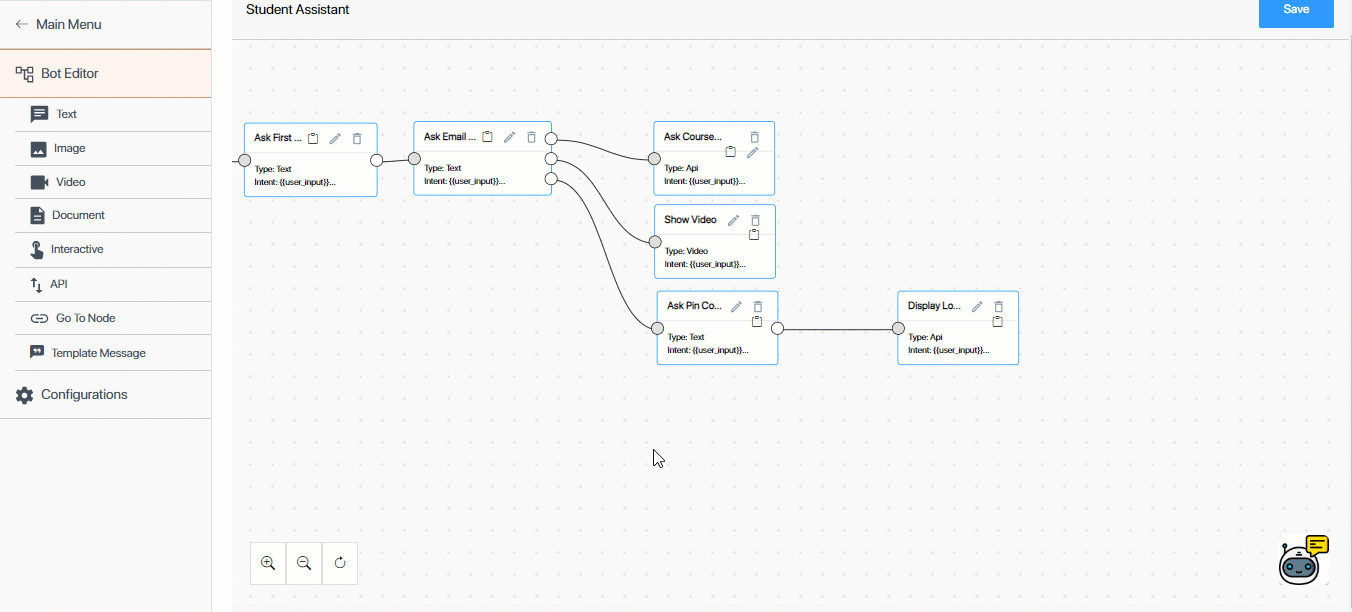
In this article, we’ve built a Journey Based Chatbot, and we’ve covered a scenario where new leads interact with the chatbot on an education portal/website. Through the chatbot (by integrating the Create a Lead API), we’ll capture the student’s phone numbers, names and email addresses, and use these details to create a new lead in our LeadSquared account.
Once these details are captured, the chatbot sends a list of courses that are available. From the given options, students select the courses they’re interested in. For the selected courses, the chatbot sends website links where the students can learn more about the course. Along with these links, the chatbot also sends a campus walkthrough video to the lead.
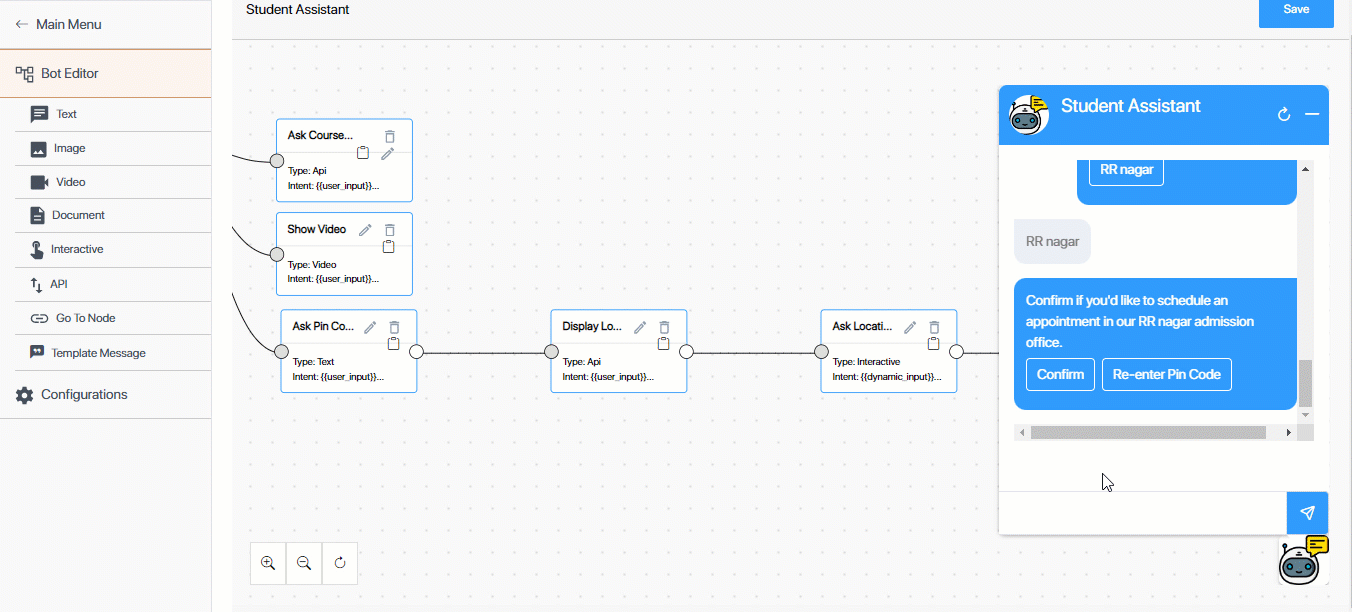
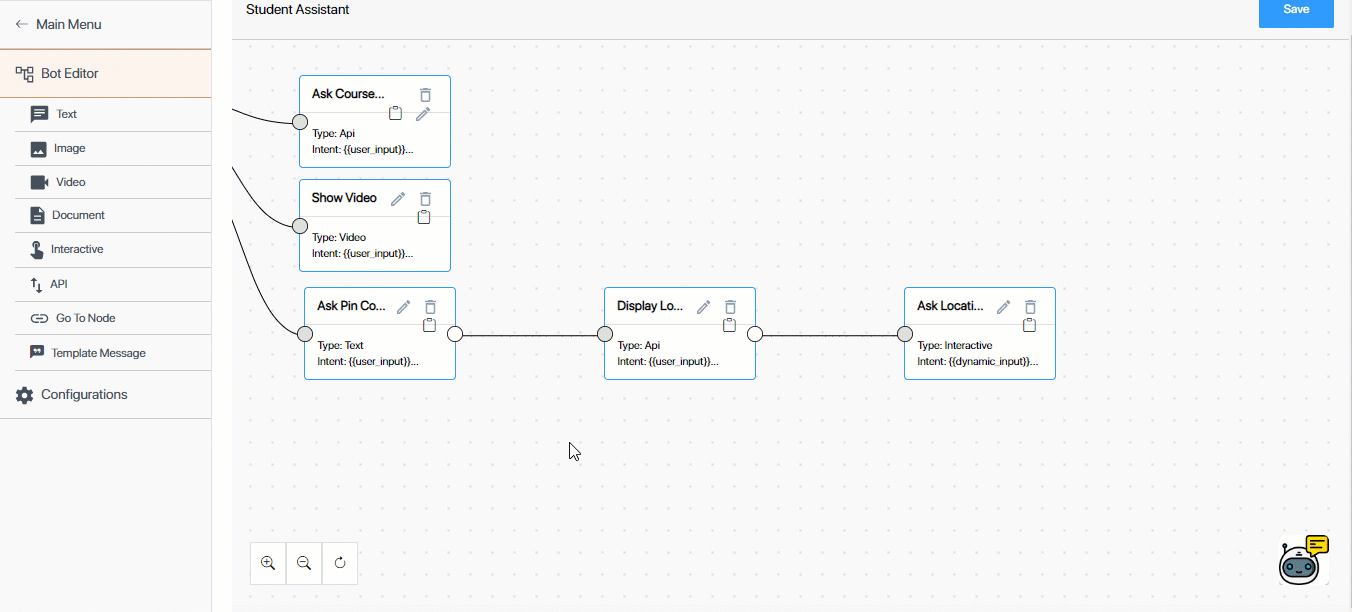
Then, the chatbot captures the lead’s pin code to show the nearest admission office to the lead (for which we’ve integrated an external API), where the lead can schedule an appointment with the admission officer. Once the lead confirms their admission center, the flow comes to an end, with the chatbot informing the lead that someone will soon get in touch with them to schedule an appointment.
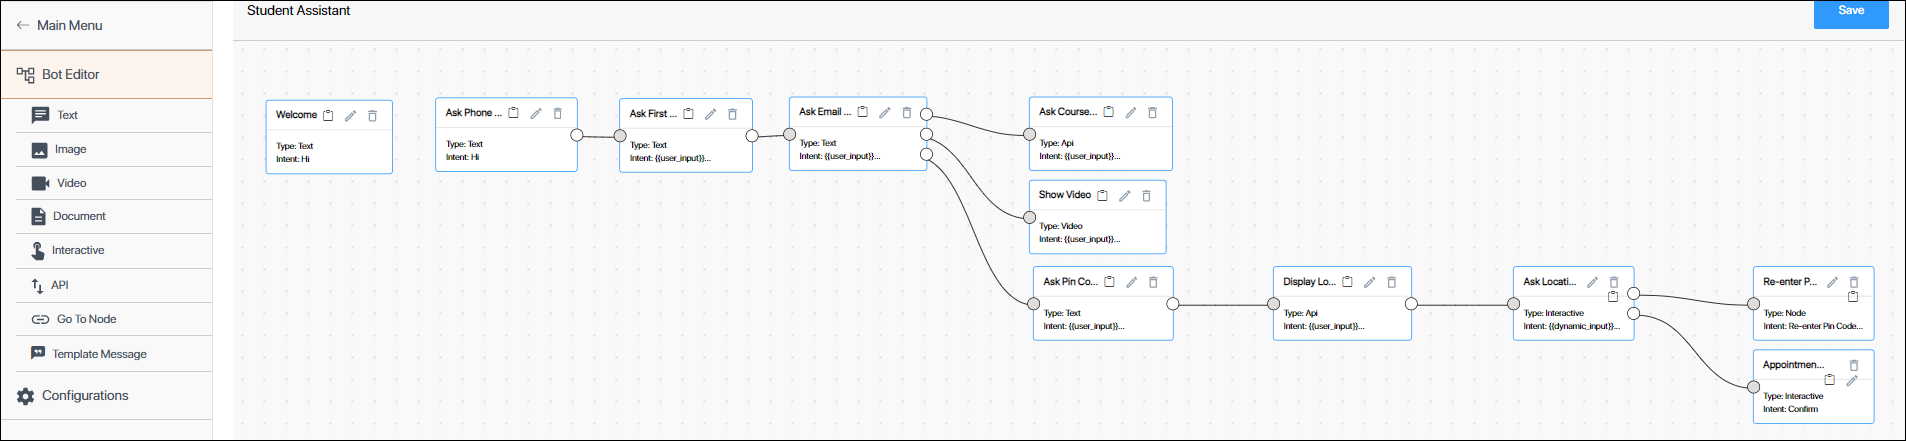
The steps we’ve followed to create the chatbot for the above use case are –
- Create a bot by providing a name and description.
- Create a Text Node to ask for the lead’s Phone Number.
- Create a Text Node to ask for the lead’s First Name.
- Set up validation to validate the phone number captured in the previous step.
- Create a Text Node to ask for the lead’s Email Address.
- Create an API Node to capture the lead details in your LeadSquared account.
- Set up validation to validate the Email Address captured in the previous step.
- Before you do this, ensure you’ve added LeadSquared APIs to the chatbot. For this article, we’re using the Create a Lead API as an example to demonstrate how to create an API Node.
- Create an Image/Document/Video Node to share marketing material with the lead.
- Create a Text Node to ask for the lead’s pin code.
- Create an API node using an external API to display the locations under the pin code entered.
- Create an Interactive Node to confirm lead’s location.
- Create a Go To Node, and re-direct the lead back to the Ask Pin Code Node where the lead enters their pin. If required, the lead can change their pin code in this step.
- Create a Final Interactive Node where the appointment confirmation is sent to the lead. On this node, we’ve also given the lead an option to call the admission office from the chatbot.
4. Create a Bot
Begin by creating a chatbot. This is the bot your leads will interact with when they visit your website/portal. To create a bot –
- On your LeadSquared account, navigate to Apps>Chatbot, and click Get Started.
- On the Dashboard screen, from the left panel, click Bots, and then click Create New Bot.
- On the Select Type pop-up, under Journey Based Bot, click Select.
- On the Create New Bot pop-up, enter a relevant Bot Name and Description for the bot.
- This name is only for internal identification, and NOT the actual display name of the bot. We will set the display name in a later step.
- Once you’re done, click Save.
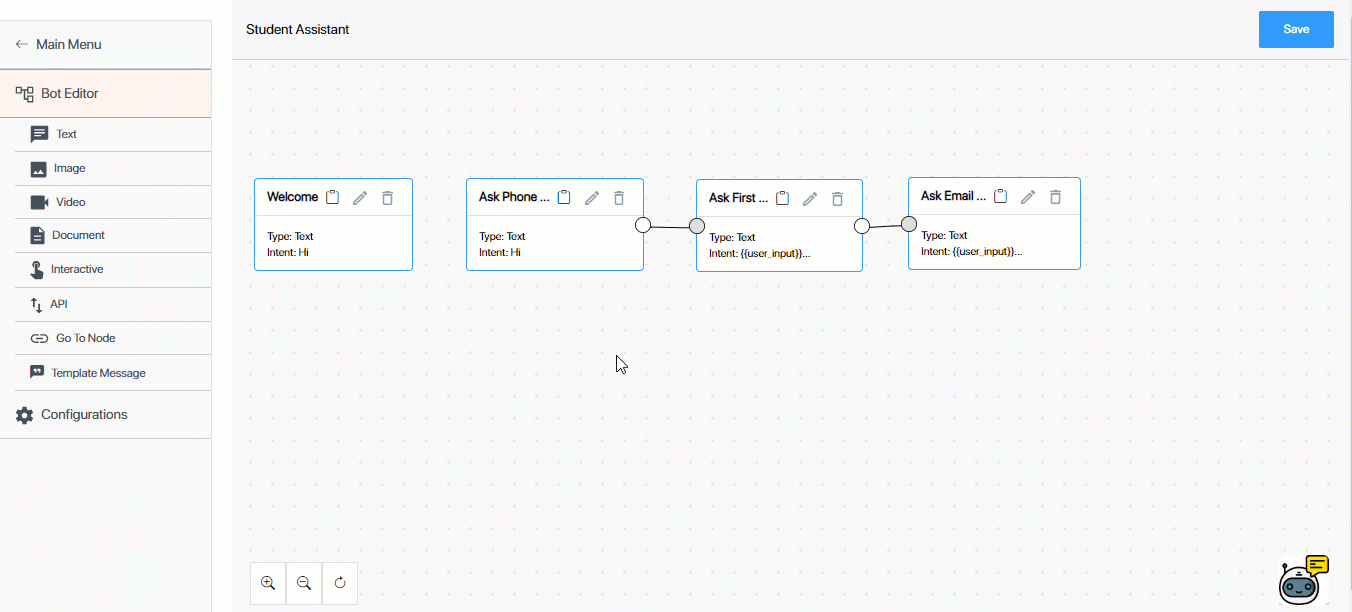
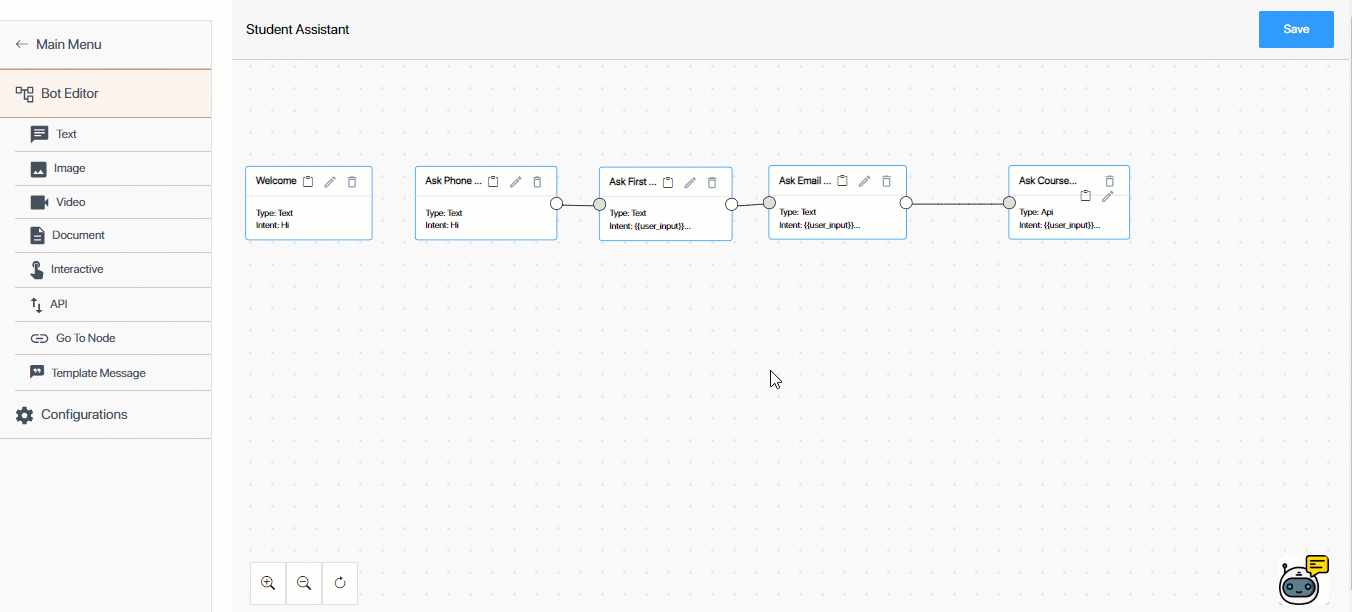
5. Create Text Nodes to Collect Lead Details
Once the chatbot is created, we’ll create the chat flow. A chat flow is a set of nodes (messages) grouped together in sequential order. A node is a single message that’s part of the chat flow.
A Text node is when the response to the lead is sent in the form of a simple text message.
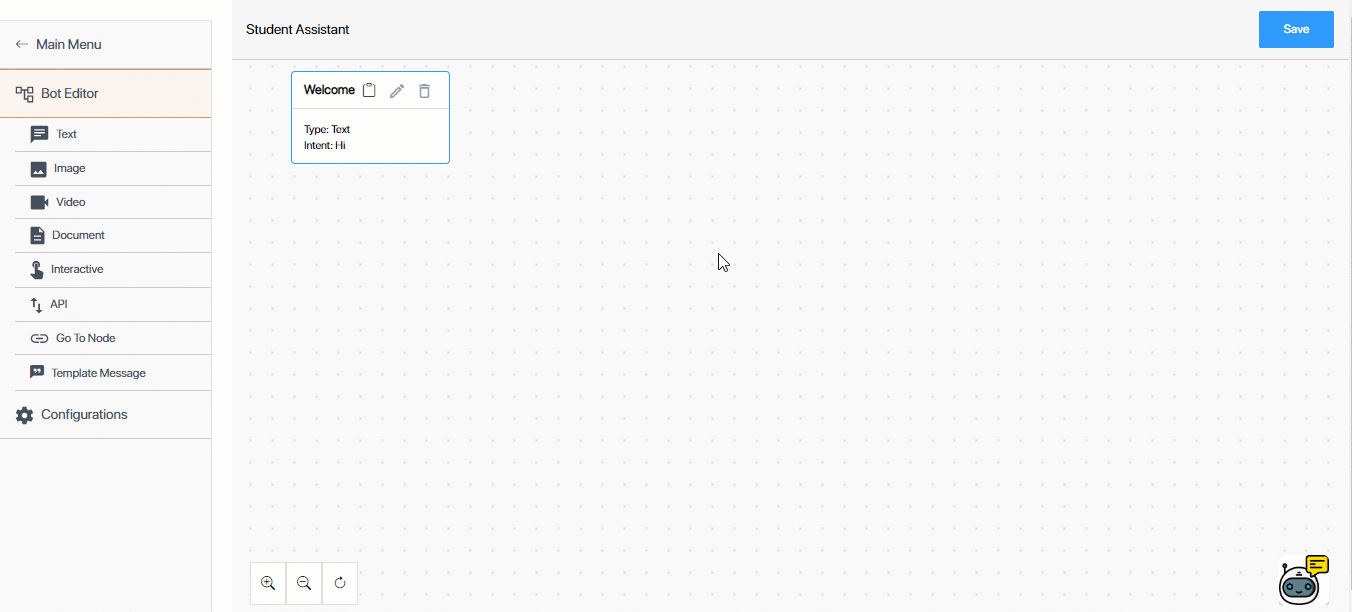
5.1 Create a Welcome Text Node
In this step, we’re creating a Text Node (message) to greet the lead when they interact with the chatbot for the first time.
Aim – To greet the lead when they use the chatbot.
- Lead Input Message – Hi
- Chatbot Response – Hello! Welcome to Greendale Community College.
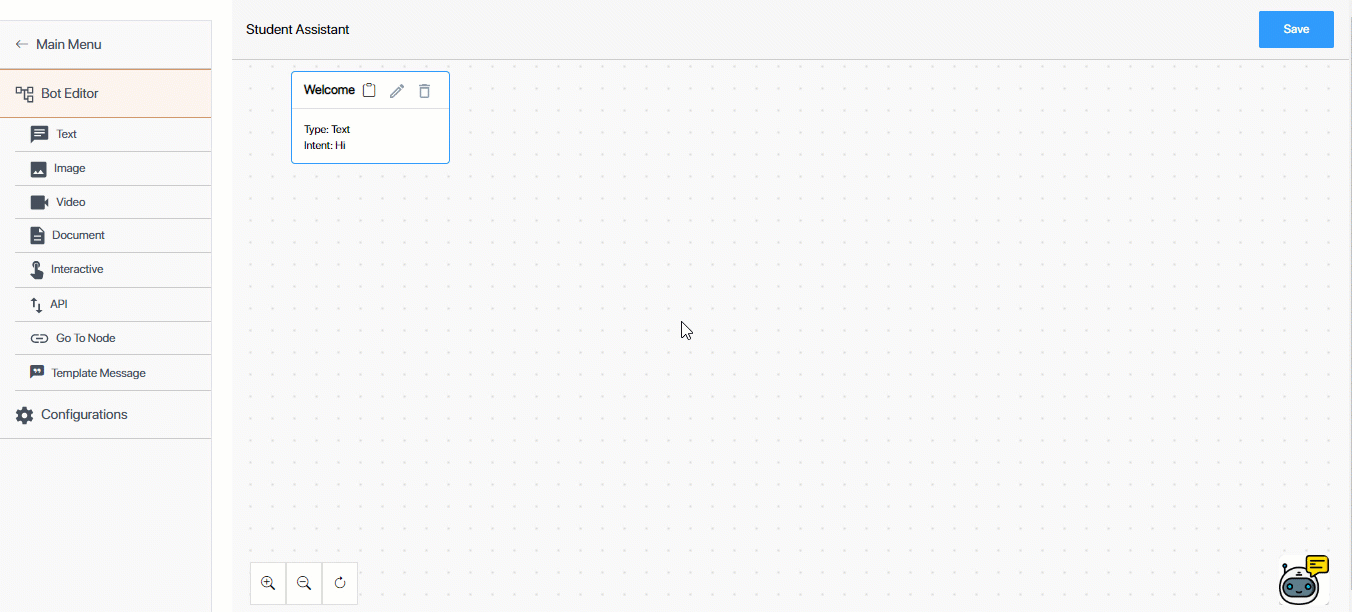
- From the Bot Editor screen, click Text.
- On the Text Node right panel, enter the following Node Configurations –
- Node name – Provide an internal display name for the node. We’re calling it “Welcome”.
- Previous node – Since this is the first node we’re creating in the chat flow, we won’t select anything here.
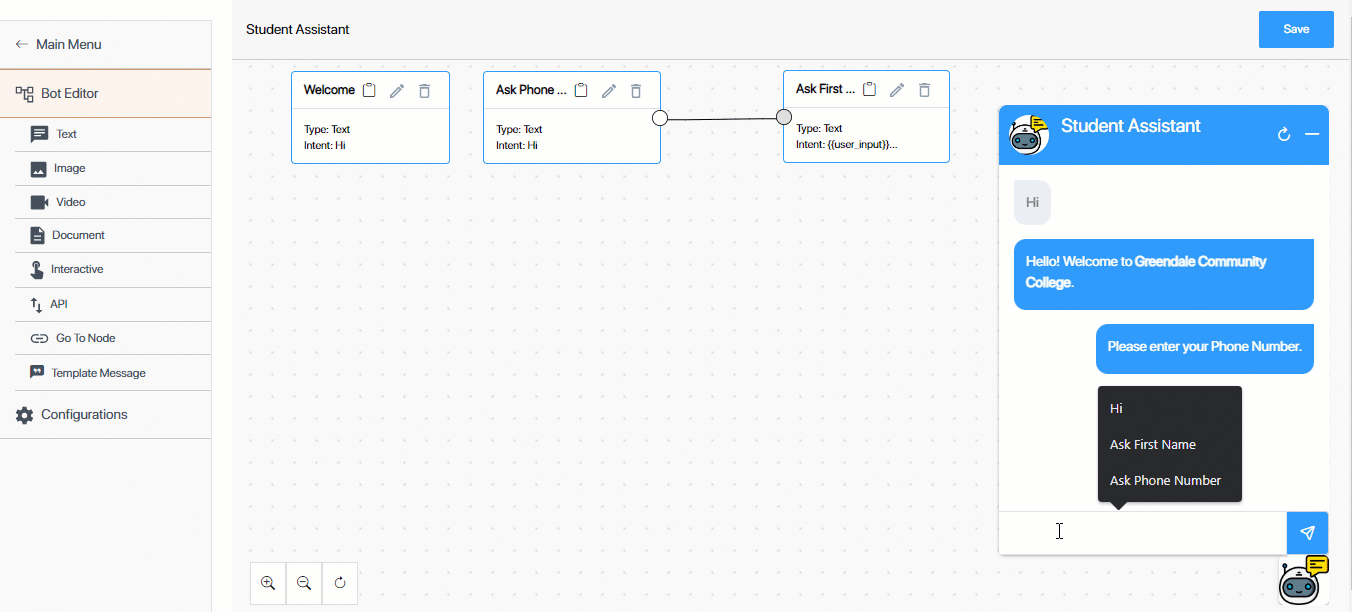
But if you’re creating a node further down the chat flow, you can select a previous node. An example of a sequence of two text nodes would be if the first node’s response is, “Welcome to Greendale Community College”, and the second node’s response is, “Greendale Community College (GCC) is an open-admissions college located in Greendale County, Colorado.” - Intent – The inputs (messages) received by the chatbot are known as intent. These inputs can be sent by a lead or by an API. Examples of intent sent by a lead could be “Hi”, “My order number is 445”, etc. Since we’re creating the first node in a sequence, we’ll hardcode* our intent as “Hi”. This means every time a lead sends “Hi” on the chatbot, the response we configure in the next step will be sent as a reply to the lead. To know about the other intent types available, refer to the Glossary.
- Final Node – Since this is the first node in our chat flow, we won’t be checking this box.
- Multi Node Response – A multi-node response is when you send a sequence of responses to a single message from the lead. For example, the lead sends the message ‘Hi’ and the bot responds with two messages – ‘Welcome’ and ‘Please enter your Phone Number’.
We’ll check this box, because for the intent ‘Hi’, we’re sending a greetings message, along with a follow-up message asking for the lead’s phone number.
Since this is the first node in the multi-node sequence, once you select the checkbox, ensure the value is set to 1.
- Once you’ve set up the Node Configurations, configure the Bot Response. This is the response your lead receives when they message the bot. In our example, we’re going to enter the following response – “Hello! Welcome to Greendale Community College.”
- To preview this response, click Preview. After you preview the response, make changes if required. Once you’re done, click Save.
- To check if the Intent and Response are set up correctly, click the emulator
 . Then, enter the Intent message. If the Response is the same as the one you configured, the node is working fine.
Note:
- *When you want to hardcode the intent, you have to enter the value in the box under Intent. You’re NOT required to tick any of the other options (Dynamic Intent and User Input) that are available.
- You can configure the chatbot to send a greeting message to the lead as soon as the chatbot is launched (and without the lead having to input a message). To configure this feature on your account, contact your account manager, or write to support@leadsquared.com.
- You can stylise the response using Italics, Bold and
Strikethrough.
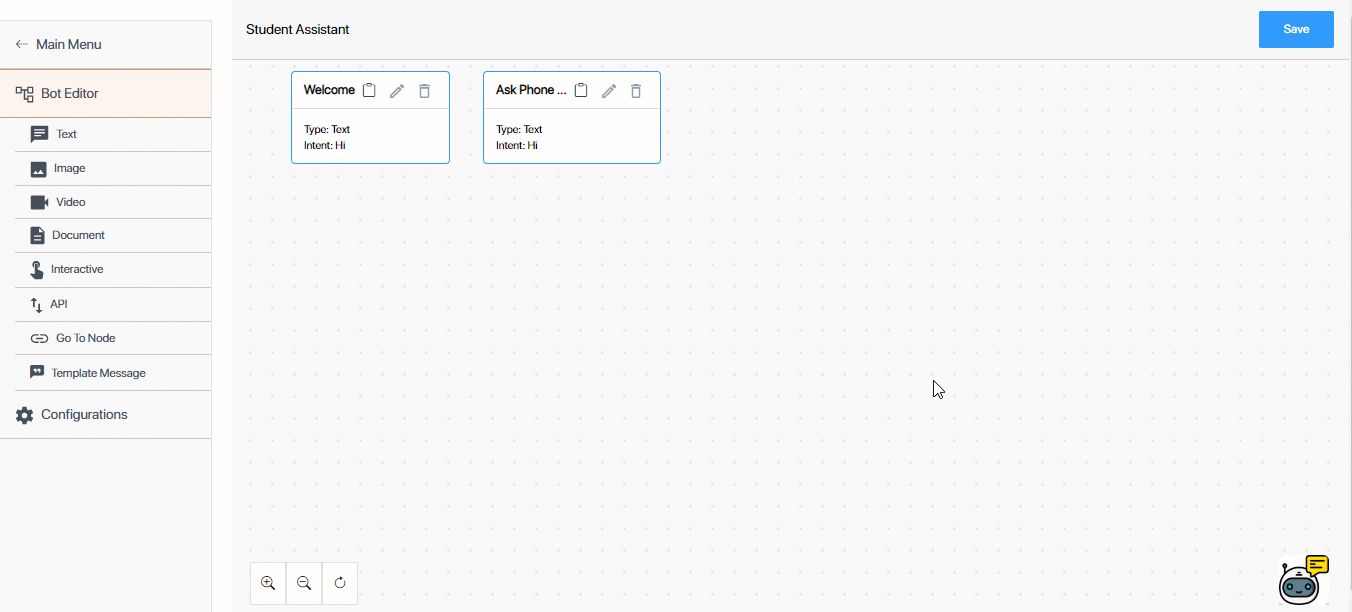
5.2 Ask for Phone Number
Through this Text node, we’ll ask the lead for their Phone Number. This node is the second in the line of multi-response nodes, and the Response message will be sent on the same Intent message the lead enters (‘Hi’) in the previous step.
Aim – To ask the lead for their Phone Number.
- Lead Input Message – Hi
- Chatbot Response – Please enter your Phone Number.

- From the Bot Editor screen, click Text.
- On the Text Node right panel, enter the following Node Configurations –
- Node name – Provide an internal display name for the node. We’re calling it “Ask Phone Number”.
- Previous node – We will not be selecting a previous node because this node is part of the Multi Node sequence that we’re setting up on the first intent message (“Hi”).
- Intent – We will continue to use “Hi” as the Intent.
- Final Node – We won’t be checking this box.
- Multi Node Response – We will be checking this box, and entering the value 2. This is because it’s the second response to the Intent message. Number subsequent multi node responses in sequential order (3, 4, 5, and so on).
- Once you’ve set up the Node Configurations, configure the Bot Response. In our example, we’ll enter the following response – “Please enter your phone number.”
- To preview this response, click Preview. After you preview the response, make changes if required. Once you’re done, click Save.
- To check if the Intent and Response are set up correctly, click the emulator . Then, enter the Intent message. If the Response is the same as the one you configured, the node is working fine.
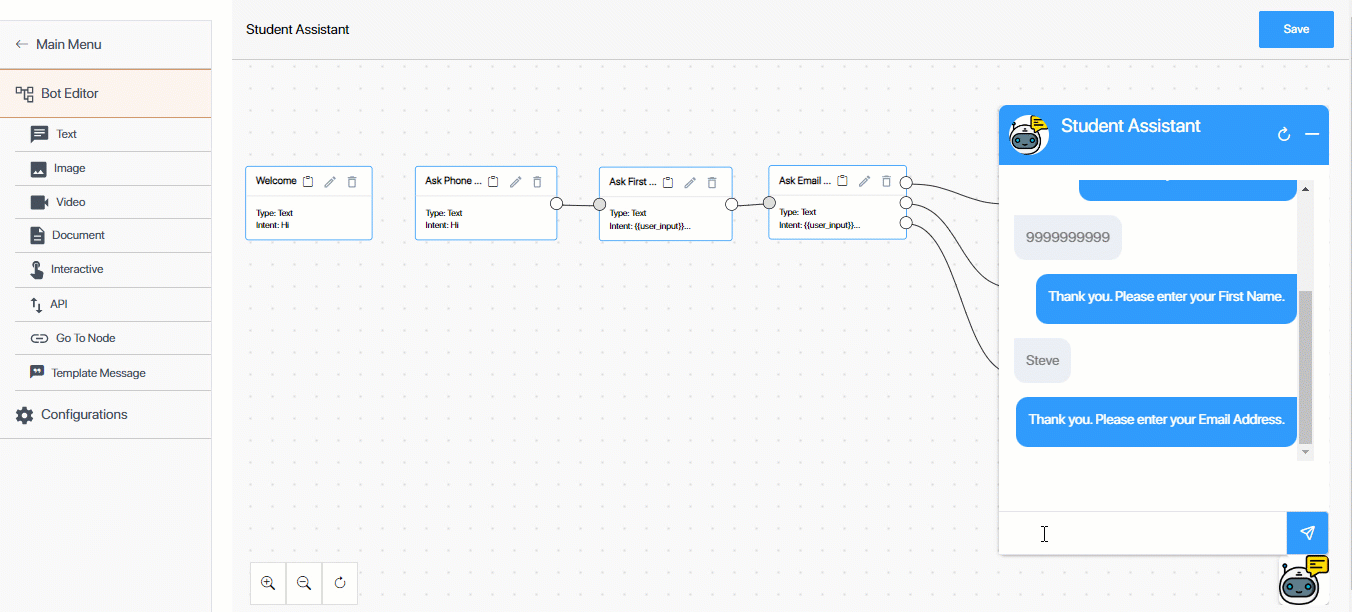
5.3 Ask for First Name
Through this Text node, we’ll ask the lead for their First Name. The Intent message for this node is the Phone Number {{user_input}} the lead input in the previous step. In this node, we’ll also validate the phone number the lead provided.
Aim – To validate the Phone Number captured in the previous step, and ask the lead for their First Name.
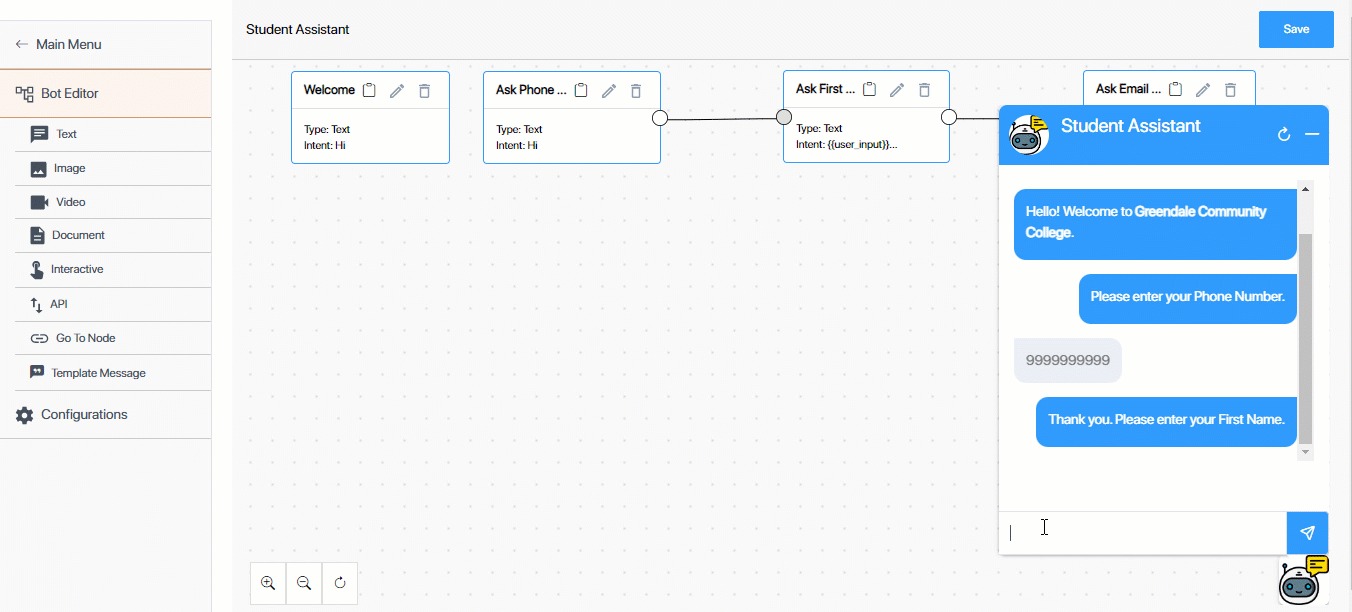
- Lead Input Message – 9999999999 (in our example)
- Chatbot Response – Thank you. Please enter your First Name.
- From the Bot Editor screen, click Text.
- On the Text Node right panel, enter the following Node Configurations –
- Node name – Provide an internal display name for the node. We’re calling it “Ask First Name”.
- Previous node – Since the lead would’ve responded (Intent) with their phone number in the previous step, we’ll now select the Previous Node as “Ask Phone Number”. This means the response we configure in this step will only be sent after the lead responds to the previous message.
- Intent – Since the phone number entered is going to be unique to each lead, we’ll select User Input. This means that any value the lead provides will be considered as user intent.
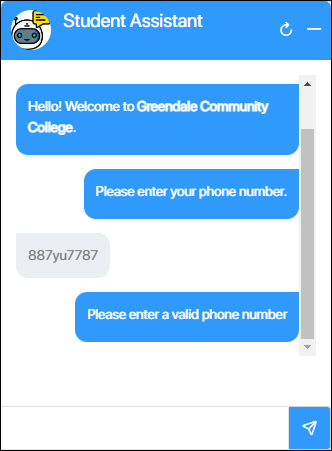
- Validate User Input – For phone numbers, email, and other unique lead fields, select this checkbox to validate the lead’s response, to ensure you’re not collecting junk values. Since we’re validating the phone number in this step, from the validator dropdown, select PHONE. This validator is available by default. To view the regex that defines a phone number, and to know more about validators, refer to Create Custom Validators for the Chatbot.
- Final Node – We won’t be checking this box.
- Multi Node Response – We won’t be checking this box.
- Once you’ve set up the Node Configurations, configure the Bot Response. In our example, we’re going to enter the following response – “Thank you for your response. Please enter your First Name.”
- To preview this response, click Preview. After you preview the response, make changes if required. Once you’re done, click Save.
- To check if the Intent and Response are set up correctly, click the emulator . Then, enter the Intent message. If the Response is the same as the one you configured, the node is working fine.
If the lead enters an invalid phone number, they’ll get the following error message –
5.4 Ask for Email Address
Through this Text node, we’ll ask the lead for their Email Address. The Intent message for this node is the First Name {{user_input}} the lead provided in the previous step.
Aim – To ask the lead for their Email Address.
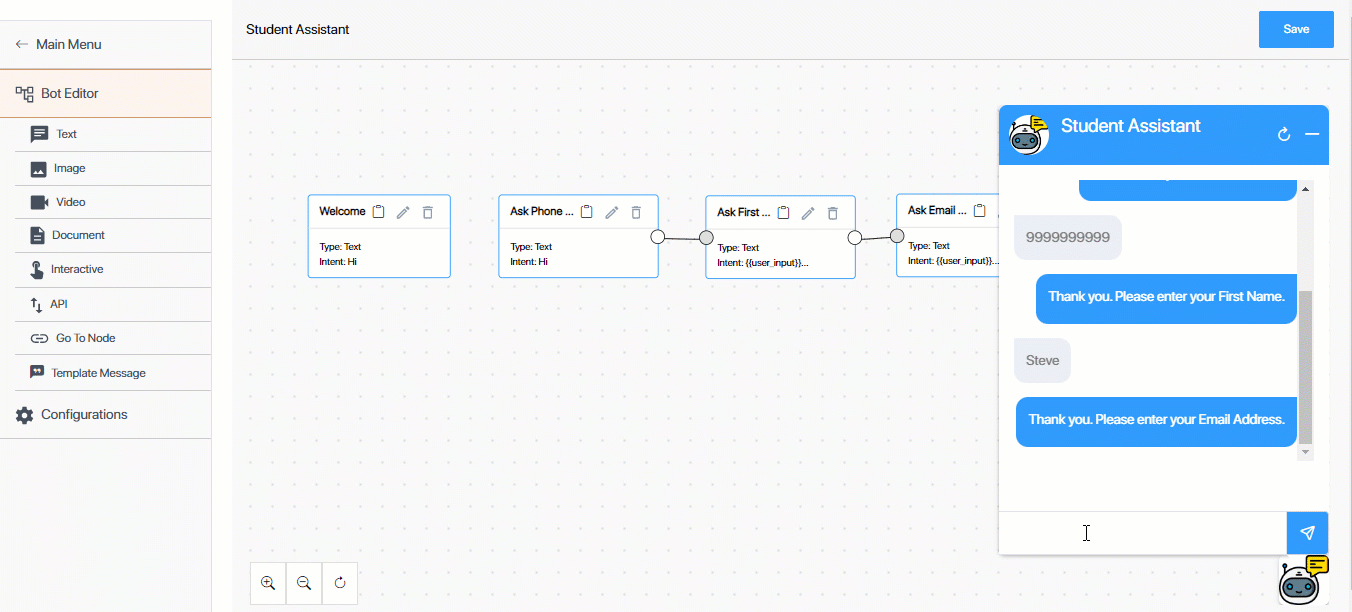
- Lead Input Message – Steve (in our example)
- Chatbot Response – Thank you. Please enter your Email Address.
- From the Bot Editor screen, click Text.
- On the Text Node right panel, enter the following Node Configurations –
- Node name – Provide an internal display name for the node. We’re calling it “Ask Email Address”.
- Previous node – Since the lead would’ve responded (Intent) with their First Name in the previous step, we’ll now select the Previous Node as “Ask First Name”.
- Intent – Since the name entered is going to be unique to each lead, we’ll select User Input. This means that any value the lead provides will be considered as user intent.
- Validate User Input – We won’t tick this box (because a name doesn’t contain any validations).
- Final Node – We won’t be checking this box.
- Multi Node Response – We won’t be checking this box.
- Once you’ve set up the Node Configurations, configure the Bot Response. In our example, we’re going to enter the following response – “Thank you. Please enter your Email Address.” We’re asking for the lead’s email address, for which we’ll set up an API node to capture all the lead’s details (phone, name, and email address) we’ve gathered thus far.
- To preview this response, click Preview. After you preview the response, make changes if required. Once you’re done, click Save.
- To check if the Intent and Response are set up correctly, click the emulator . Then, enter the Intent message. If the Response is the same as the one you configured, the node is working fine.
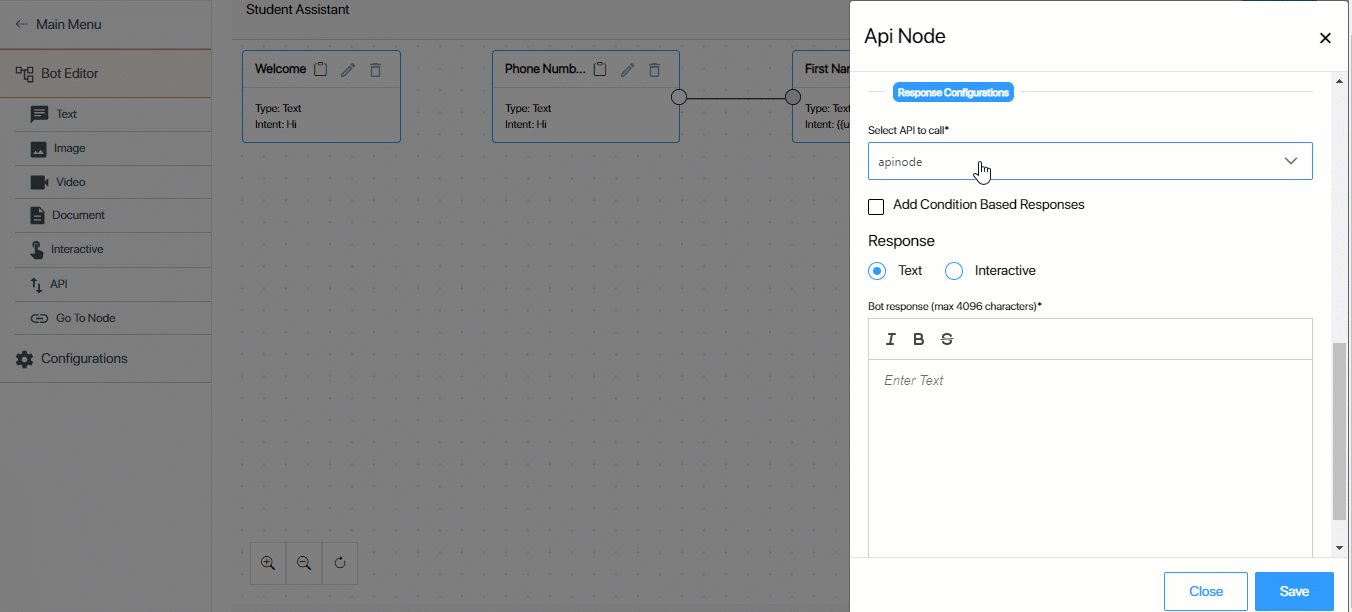
6. Create an API Node using a LeadSquared API
An API node contains an API (either LeadSquared APIs or any external APIs) integrated either to capture details from the chatbot (e.g., Lead Name, Lead Number, etc.), or display details to the lead (e.g., Pincodes, List of Hospitals, etc.). The Response you set up through an API node can be a simple Text response, or an Interactive Response, under which you can display Button options or List options.
Here, we’re creating an API node to create a lead in our LeadSquared account (through the Create a Lead API). In this node, we’ll add an interactive response that displays the courses offered as buttons (which will direct the lead to the landing page URL for each course).
The Intent message for this node is the Email Address {{user_input}} the lead input in the previous step, which we’ll also validate in this step.
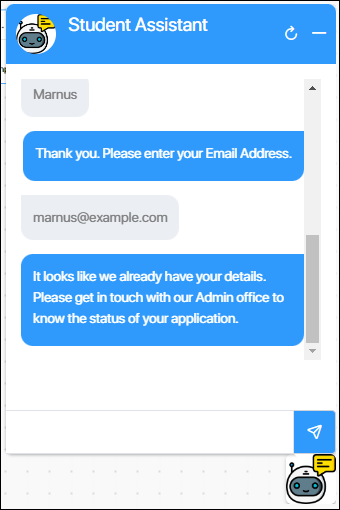
Aim – To validate the Email Address captured in the previous step. To integrate the Create a Lead API with the node and display the courses offered.
- Lead Input Message – steve@example.com (in our example)
- Chatbot Response –
- For a new lead* – “Click the course you’re interested in.”
- For an existing lead – “It looks like we already have your details. Please get in touch with our Admin office to know the status of your application.”
Note:
- The Create a Lead API returns an Id only when a new lead is created. So we’re using the response variable ‘Id’ from the Create a Lead API to set up a condition to verify if a new lead was created or if the lead already exists in our LeadSquared account.
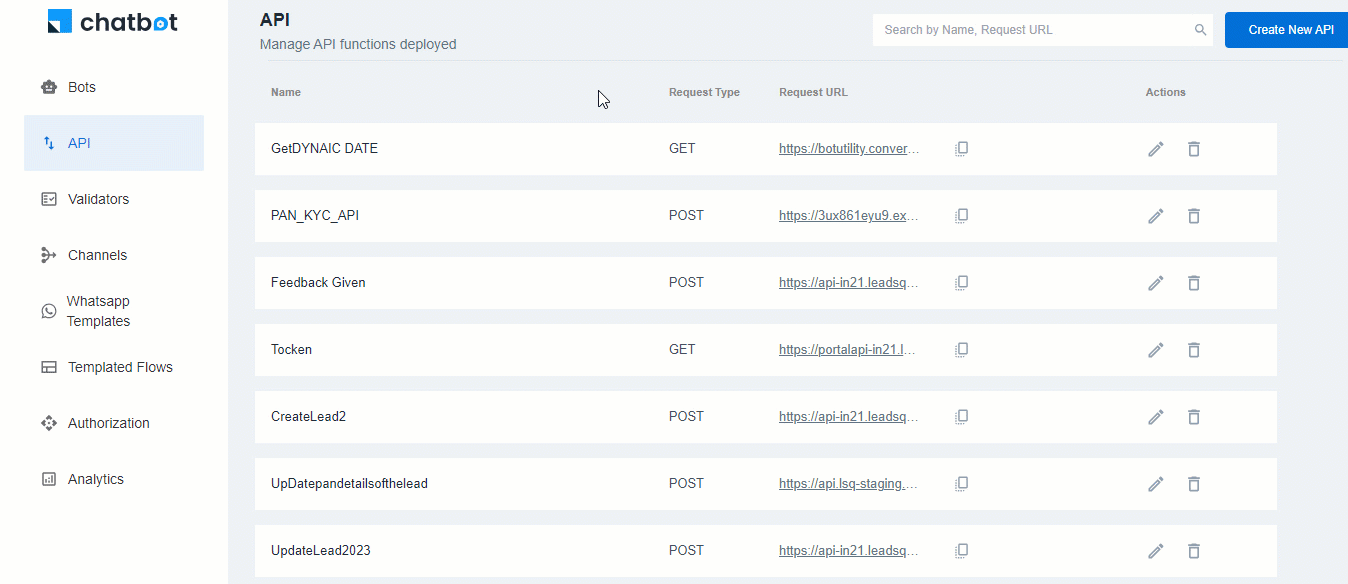
- Before creating an API node, adding and setting up APIs (both LeadSquared APIs and external APIs are supported) on the Chatbot is mandatory. To know how to do this, refer to Integrate APIs with the Chatbot.
6.1 Node Configurations
In this step, we’re configuring how the node behaves when the user inputs their email Id.
- From the Bot Editor screen, click API.
- On the API Node right panel, enter the following Node Configurations –
- Node name – Provide an internal display name for the node. We’re calling it “Ask Course Preference”.
- Previous node – Since the lead would’ve responded (Intent) with their email Id in the previous step, we’ll select the Previous Node as “Ask Email Address”.
- Intent – Since the email Id entered is going to be unique to each lead, we’ll select User Input. The chatbot will accept a valid email Id as the response here.
- Validate User Input – For phone numbers, email, and other unique lead fields, select this checkbox to validate the lead’s response, to ensure you’re not collecting junk values. From the validator dropdown, select EMAIL. This is available by default. To view the regex that defines an email address, and to know more about validators, refer to Create Custom Validators for the Chatbot.
- Final Node – We won’t be checking this box.
- Multi Node Response – We want to share our marketing materials and set up a CTA in the subsequent nodes. So, we’ll select this box, and set the value to 1. This is because this node is the first in a new multi-node sequence.
- Once you’ve set up the Node Configurations, complete the Response Configurations.
6.2 Response Configurations
In this step, from the list of APIs you’ve integrated with the chatbot, select the API you want to call when this node fires. Once the API is selected, we’re configuring a response using text and interactive nodes.
If required, you can add conditions based on the API response. In our example, we’re configuring –
- An interactive response if the lead doesn’t exist in our LeadSquared account.
- Text response if the lead exists in our LeadSquared account.
- From the Select API to call dropdown, select the API you want to integrate with this API node. We’re selecting the Create a Lead API (which we’ve named “Lead Capture” on the chatbot).
- If required, you can select Add Condition-Based Responses. We’re selecting the checkbox to identify if a lead already exists in our account, and for these leads, we’ll display a different response.
- From the Variable Name dropdown, we’re selecting Id. The Id here is the lead Id generated when a new lead is created. This is the response variable we added when integrating the API with the chatbot.
- To view the list of variables configured in the Chatbot, click Available Variables.
- From the Conditions dropdown, we’re selecting Exists. To add multiple Conditions, click Add Condition.
- From the Variable Name dropdown, we’re selecting Id. The Id here is the lead Id generated when a new lead is created. This is the response variable we added when integrating the API with the chatbot.
- Response (If the conditions are true) – The response your lead sees when the API response fulfills the Conditions set in the previous step. This means if the API response returns a lead Id (which means the lead was created through the API call), we’ll display this chatbot response. In our example, we’re going to select Interactive, and then select Buttons and configure actions the lead can perform.
- Header – The response header that’ll be displayed. This is optional. You can set an Image, Document, Video or Text as the response header.
- Body – Enter the text response that’ll be sent to your leads. We’re entering – “Click the course you’re interested in -“
- Under Button Configurations, select the button action (Text, Visit Website, Call Phone Number, or Download), and enter a display name for the button. We’re entering the names of courses we offer, and a Visit Website action for each course, which will redirect the lead to the corresponding landing page.
- If you’ve selected the action Visit Website or Download, enter a valid URL link.
- If you’ve selected the action Call Phone Number, enter a valid phone number.
- Footer – You can display any relevant text information in the footer. This is optional.
- Response (If the conditions are false) – The response your lead sees when the API response does not fulfill the Conditions set in step 2 (of this section). This means if the API response does not return a lead Id (which may indicate that the lead already exists in our account), we’ll display this response. In our example, we’re going to select Text.
- Under Bot Response, we’re entering the following response – “It looks like we already have your details. Please get in touch with our Admin office to know the status of your application.”
- To preview this response, click Preview. After you preview the response, make changes if required. Once you’re done, click Save.
- To check if the Intent and Response are set up correctly, click the emulator . Then, enter the Intent message. If the Response is the same as the one you configured, the node is working fine.
Note:
- It is optional to Add Condition Based Responses. If you don’t add conditions, only one chatbot response will be shown to leads.
- When you’re entering a website URL (for Visit Website buttons), ensure the URL contains “https://”. For e.g., the URL should be – “https://www.leadsquared.com/”.
- If you configure an Interactive response, and then select Buttons, you can add up to three buttons. If you select Lists, you can add up to 10 lists.
- If you set an Interactive response, and then select List, you’ll get the Action Button Text field.
- If you’re integrating the chatbot with WhatsApp, it’s mandatory to input a value here (e.g., “Select an option”), since this is a prerequisite from WhatsApp’s end.
- But, if you’re integrating the chatbot on web, then you can input a dummy value here, since the button won’t be displayed to your lead on the chatbot.
The Response (If the condition are false) sent to a lead will look like this –
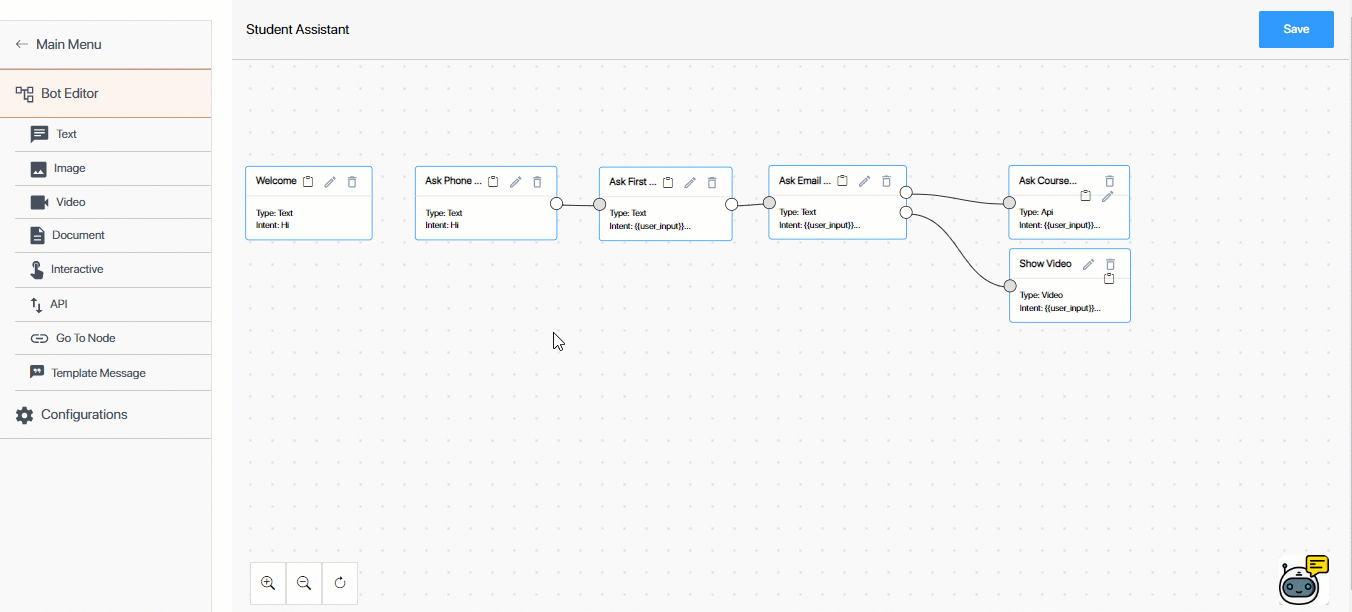
7. Create an Image/Document/Video Node
An Image/Document/Video node shares the URL of these three media types as the chatbot response. The steps to set up an Image Node, Video Node and Document Node are the same.
We’re setting up a Video Node to share a campus walkthrough video. We’ll send this response once the lead successfully inputs their Email Id. We’re setting up this node as the 2nd node in the multi-response sequence.
Aim – To share a video/image/document with the lead.
- Lead Input Message – steve@example.com (in our example)
- Chatbot Response – Video/image/document.

- From the Bot Editor screen, click Video.
- On the Video Node right panel, enter the following Node Configurations –
- Node name – Provide an internal display name for the node. We’re calling it “Show Walkthrough Video”.
- Previous node – Since we’re building this node based on the lead’s response when we ask their email Id, we’ll select the Previous Node as “Ask Email Address”.
- Intent – Since the email Id entered is going to be unique to each lead, we’ll select User Input.
- Validate User Input – We won’t select anything here, since the email validation happened in the Node Configurations step.
- Final Node – We won’t be checking this box.
- Multi Node Response – Since the Input for this node to trigger continues to be the lead’s email Id, we’ll select this box, and we’ll set the value to 2.
- Once you’ve set up the Node Configurations, configure the Bot Response URL. Enter the document/video/image URL.
- If required, you can add a Caption. This is optional.
- To preview this response, click Preview. After you preview the response, make changes if required. Once you’re done, click Save.
- To check if the Intent and Response are set up correctly, click the emulator . Then, enter the Intent message. If the Response is the same as the one you configured, the node is working fine.
Note:
- The following image formats are supported –
- PNG
- JPEG
- JPG
- GIF
- Only video URLs with .mp4 extensions are supported.
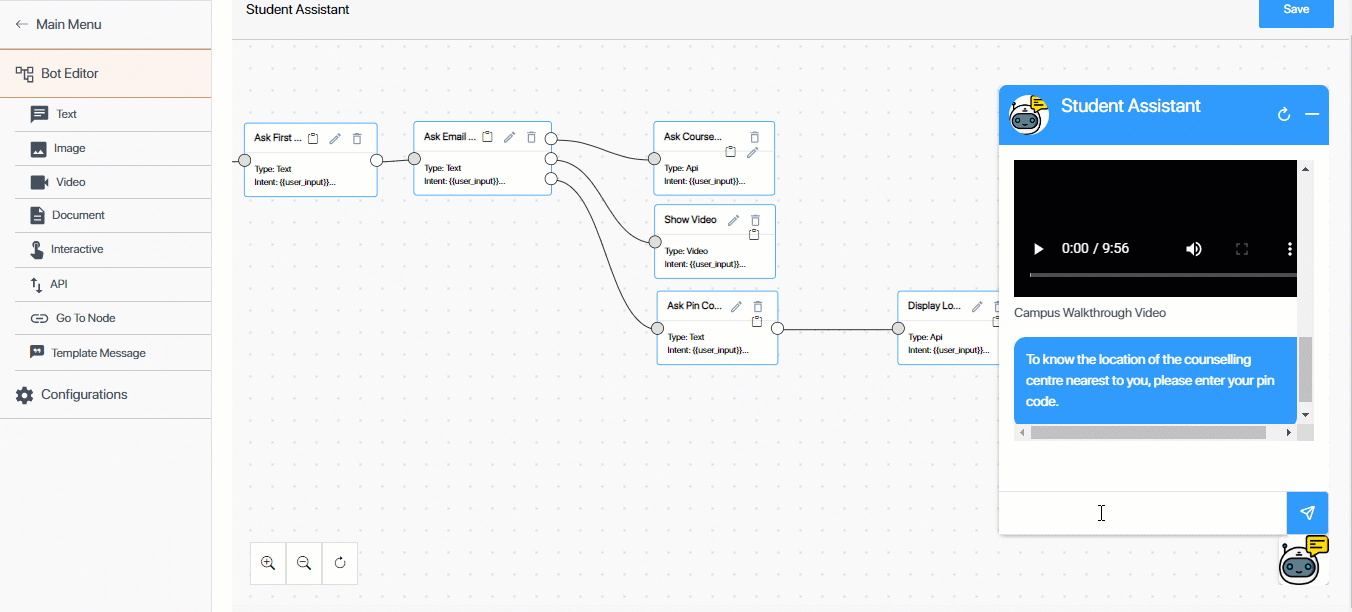
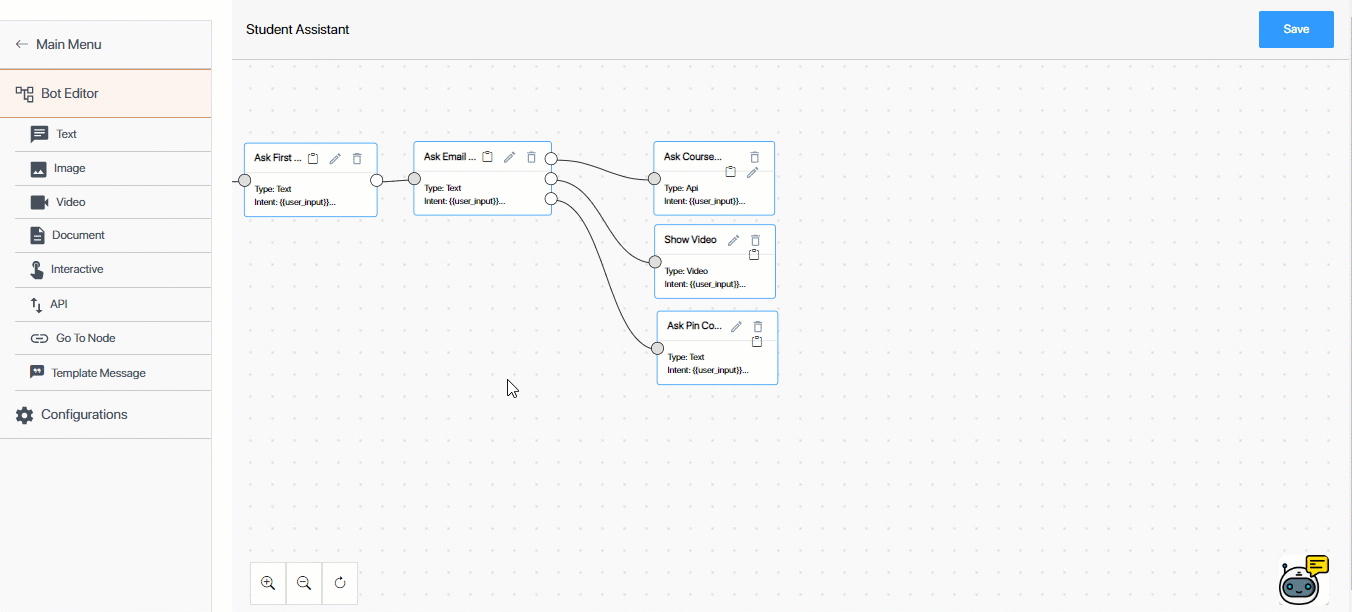
8. Create a Text Node to Collect Lead Pin code
Next, we’re creating a Text node to ask for the lead’s pin code. Based on the pin code, we’ll show the nearest counselling centre.
Aim – To ask the lead for their pin code.
- Lead Input Message – steve@example.com (in our example)
- Chatbot Response – To know the location of the counseling center nearest to you, please enter your pin code.
- From the Bot Editor screen, click Text.
- On the Text Node right panel, enter the following Node Configurations –
- Node name – Provide an internal display name for the node. We’re calling it “Ask Pin Code”.
- Previous node – Since the lead would’ve responded (Intent) with their email Id in the previous step, we’ll now select the Previous Node as “Ask Email Address”.
- Intent – Since the email Id entered is going to be unique to each lead, we’ll select User Input.
- Validate User Input – We won’t select anything here, since the email validation happened in the Node Configurations step.
- Final Node – We won’t be checking this box.
- Multi Node Response – Since the Input for this node to trigger continues to be the lead’s email Id, we’ll select this box, and we’ll set the value to 3.
- Once you’ve set up the Node Configurations, configure the Bot Response. In our example, we’re going to enter the following response – “To know the location of the counselling centre nearest to you, please enter your pin code.” We’re asking for the lead’s pin code, for which we’ll set up the API node to show the nearest location in the next section.
- To preview this response, click Preview. After you preview the response, make changes if required. Once you’re done, click Save.
- To check if the Intent and Response are set up correctly, click the emulator . Then, enter the Intent message. If the Response is the same as the one you configured, the node is working fine.
9. Create an API Node using an External API
Here, we’re creating an API node to display location based on the pin code entered in the previous step. We’re using an external (non-LeadSquared) API to pull this data.
The Intent message for this node is the Pin Code {{user_input}} the lead input in the previous step. We’ll set up an Interactive Response in this step, through which we’ll ask the lead to pick their location.
Aim – To display locations based on the pin code captured in the previous step, and get confirmation if the location is accurate.
- Lead Input Message – 560098 (in our example)
- Chatbot Response (If the condition are true) – Select and confirm your location.
- Chatbot Response (If the condition are false) – Invalid pin code.
In this step, we’re configuring how the node behaves when the user inputs their pin code. The steps listed here are the same as the Configure an API Node section. You can skip reading the steps if you’re familiar with the API node set-up process.
- From the Bot Editor screen, click API.
- On the API Node right panel, enter the following Node Configurations –
- Node name – Provide an internal display name for the node. We’re calling it “Display Location”.
- Previous node – Since the lead would’ve responded (Intent) with their pin code in the previous step, we’ll select the Previous Node as “Ask Pin Code”.
- Intent – Since the pin code entered is going to be different for each lead, we’ll select User Input.
- Validate User Input – If you’ve created a custom validation, you can select it here. We’ve created a validator for Pin Codes. To know how to set up regex validations, refer to Create Custom Validators for the Chatbot.
- Final Node – We won’t be checking this box.
- Multi Node Response – We won’t be entering anything here.
- From the Select API to call dropdown, select the API you want to integrate with this API node. We’re selecting an external API that we added to the chatbot.
- If required, you can select Add Condition-Based Responses. We’re selecting the checkbox to identify if the pin code is valid.
- From the Variable Name dropdown, we’re selecting Pincode, and from the Conditions dropdown, we’re selecting Exists. To add multiple Conditions, click Add Condition.
- Response (If the conditions are true) – The response your lead sees when the API response fulfills the Conditions set in the previous step. This means if the API returns a location for the pin code, we’ll display this location as our response. In our example, we’re going to select Interactive, and then select Buttons to list down the pin code location.
- Header – The response header that’ll be displayed. This is optional. You can set an Image, Document, Video or Text as the response header.
- Body – Enter the text response that’ll be sent to your leads. We’re entering – “Select and confirm your location -“.
- Under Button Configurations, select the button action (Text, Visit Website, Call Phone Number, or Download), and enter a display name for the button. We’re entering – “{{Pincode}}”. We’re doing this to pull the location data from the API response, and dynamically display this on the chatbot.
- Footer – You can display any relevant text information in the footer. This is optional.
- Response (If the condition are false) – The response your lead sees when the API response does not fulfill the Conditions set in step 2 (of this section). This means if the API response does not return the pin code, we’ll display this response. In our example, we’re going to select Text.
- Under Bot Response, we’re entering the following response – “Invalid pin code.”
- To preview this response, click Preview. After you preview the response, make changes if required. Once you’re done, click Save.
- To check if the Intent and Response are set up correctly, click the emulator . Then, enter the Intent message. If the Response is the same as the one you configured, the node is working fine.
10. Create an Interactive Node
As the name suggests, an Interactive node presents multiple options to the lead, and propmts them to select an option to continue the chat flow process. Interactive nodes allow you to give the lead options to Call, Visit a Website and View an Image.
The following data types can be displayed on an Interactive node –
- Text
- Image
- Video
- Document
And the following Button actions can be configured –
- View Text
- Visit a Website
- Call a Phone Number
- Download (a file)
You can also add up to 10 Lists as options.
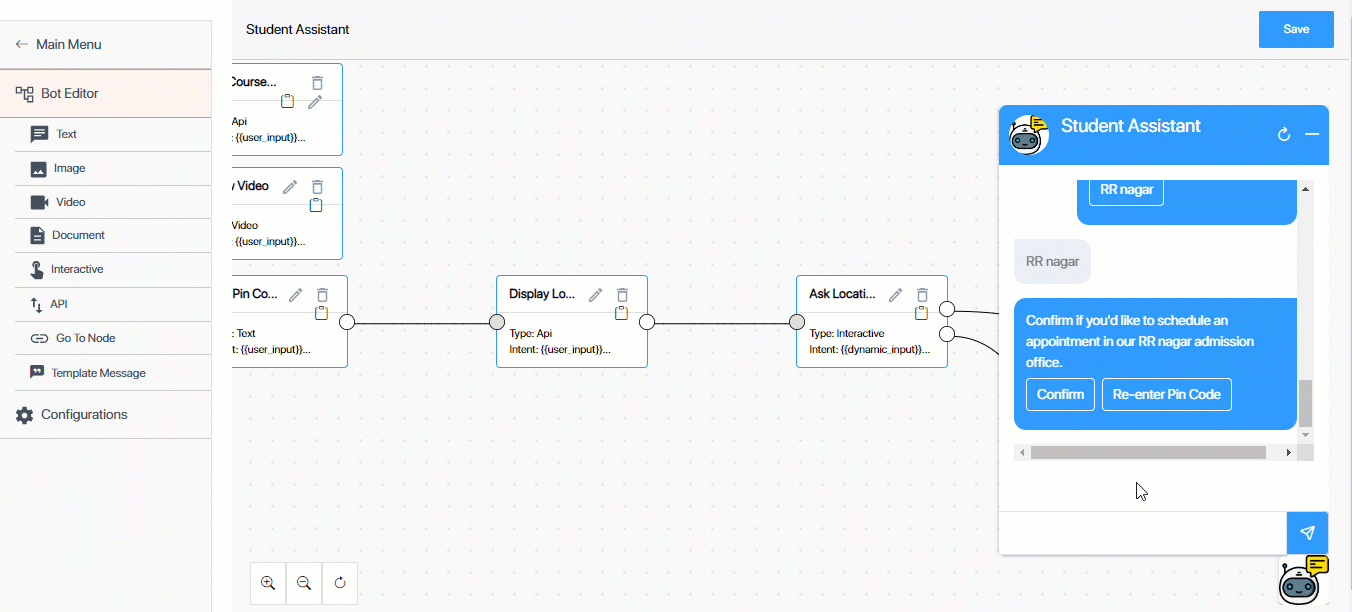
In our Interactive node, we’re creating two Text buttons, and dynamically display the location based on the lead’s pin code. We’ll also give the lead an option to either confirm and schedule their appointment or to re-enter a different pin code.
Aim – To give the lead the option to confirm their location, or re-enter their pin code.
- Lead Input Message – 560098 (in our example)
- Chatbot Response – Confirm if you’d like to schedule an appointment in our {{intent}} admission office.
- Button 1 – Confirm.
- Button 2 – Re-enter Pin Code.
- From the Bot Editor screen, click Interactive.
- On the Interactive Node right panel, enter the following Node Configurations –
- Node name – Provide an internal display name for the node. We’re calling it “Ask Location Confirmation”.
- Previous node – Since the lead would’ve selected their location preference in the previous step, we’ll select the Previous Node as “Display Location”.
- Intent – To dynamically display the lead’s location as part of your text response, select Dynamic Intent. This displays data present in an API as part of the response (e.g., Confirm if you’d like to schedule an appointment in our {{RR Nagar}} admission office.)
- Final Node – We won’t be checking this box.
- Multi Node Response – We won’t be entering anything here.
- Under Response Configurations, configure the response to your lead –
- Header – The response header that’ll be displayed. This is optional. You can set an Image, Document, Video or Text as the response header.
- Body – Enter the text response that’ll be sent to your leads. We’re entering – “Confirm if you’d like to schedule an appointment in our {{intent}} admission office.” Over here, {{intent}} is the location name (RR Nagar in our example) that’ll be dynamically pulled from the API response and displayed to the lead.
- Footer – You can display any relevant text information in the footer. This is optional.
- Under Button Configurations, select the button action (Text, Visit Website, Call Phone Number, or Download), and enter a display name for the button. You can add up to three buttons.
We’re creating two Text buttons – “Confirm” and “Re-enter Pin Code”. - To preview this response, click Preview. After you preview the response, make changes if required. Once you’re done, click Save.
- To check if the Intent and Response are set up correctly, click the emulator . Then, enter the Intent message. If the Response is the same as the one you configured, the node is working fine.
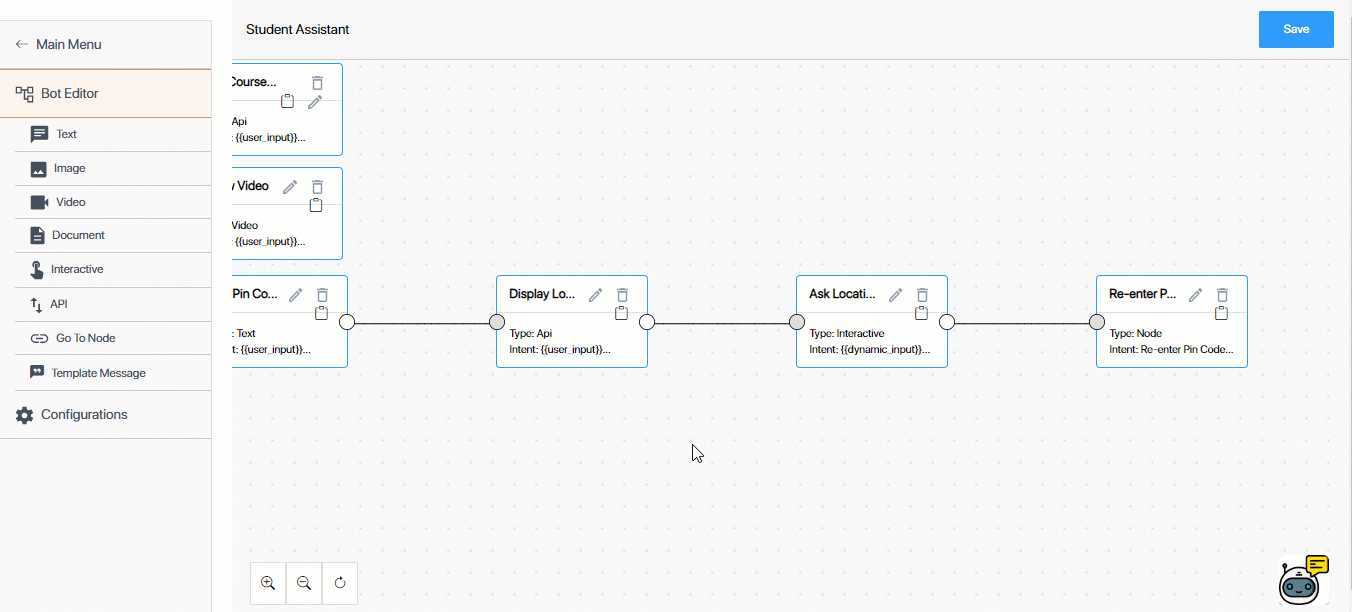
11. Create a Go To Node
A Go To Node redirects to a different node in the chat flow process (for example, if you want the node to restart and go to the first message). This is useful when you want to take the lead back to the main menu, or to re-enter certain details.
We’re creating a Go To Node to redirect the lead back from the “Ask Location Confirmation” (when they select Re-enter Pin Code) to the “Ask Pin Code” node, where they can re-enter their pin code.
Aim – To give leads the option to re-enter their pin codes.
- Lead Input Message – 560098 (in our example)
- Chatbot Response – Redirects to the “Ask Pin Code” node.
- From the Bot Editor screen, click Go To Node.
- On the Interactive Node right panel, enter the following Node Configurations –
- Node name – Provide an internal display name for the node. We’re calling it “Re-enter Pin Code”.
- Previous node – Since this node is built on the lead’s selection in the previous node, we’re selecting the “Ask Location Confirmation” node.
- Intent – Both the buttons configured in the previous node are visible here. We’re selecting “Re-enter Pin Code” as the intent.
- Final Node – We won’t be checking this box.
- Under Response Configuration, from the Go To Node dropdown, we’re selecting “Ask Pin Code”. This will redirect the lead to the selected node.
- Once you’re done, click Save.
- To check if the Intent and Response are set up correctly, click . Then, enter the Intent message. If the Response is the same as the one you configured, the node is working fine.
12. Create a Final Interactive Node
This is the final node in our chat flow. We’re creating a Text node to inform our leads about the next step in their admission process.
Aim – To inform leads about the next steps in their admission process.
- Lead Input Message – Confirm button click.
- Chatbot Response – Your application has been successfully received. Our admission officer will get in touch with you to schedule your appointment. To make changes to your application, click Contact Us.
- From the Bot Editor screen, click Interactive.
- On the Interactive Node right panel, enter the following Node Configurations –
- Node name – Provide an internal display name for the node. We’re calling it “Appointment Confirmation Final Node”.
- Previous node – Since the lead would’ve confirmed their location preference in the previous step, we’ll select the Previous Node as “Ask Location Confirmation”.
- Intent – Since we’re displaying this node’s message only when the lead confirms their location (in the previous node), from the intent dropdown, select “Confirm”.
- Final Node – Since this is the last node in the chat flow, we’ll be checking this box.
- Multi Node Response – We won’t be entering anything here.
- Under Response Configurations, configure the response to your lead –
- Header – The response header that’ll be displayed. You can set an Image, Document, Video or Text as the response header. This is optional.
- Body – Enter the text response that’ll be sent to your leads. We’re entering – “Your application has been successfully received. Our admission officer will get in touch with you to schedule your appointment. To make changes to your application, click Contact Us.”
- Footer – You can display any relevant text information in the footer. This is optional.
- Under Button Configurations, select the button action (Text, Visit Website, Call Phone Number, or Download), and enter a display name for the button. You can add up to three buttons.
We’re creating one Call Phone Number button – “Contact Us”, and we’re entering our contact details. - To preview this response, click Preview. After you preview the response, make changes if required. Once you’re done, click Save.
- To check if the Intent and Response are set up correctly, click the emulator . Then, enter the Intent message. If the Response is the same as the one you configured, the node is working fine.
Once you’ve set up the nodes, carry out the Configurations to complete the chat flow creation process.
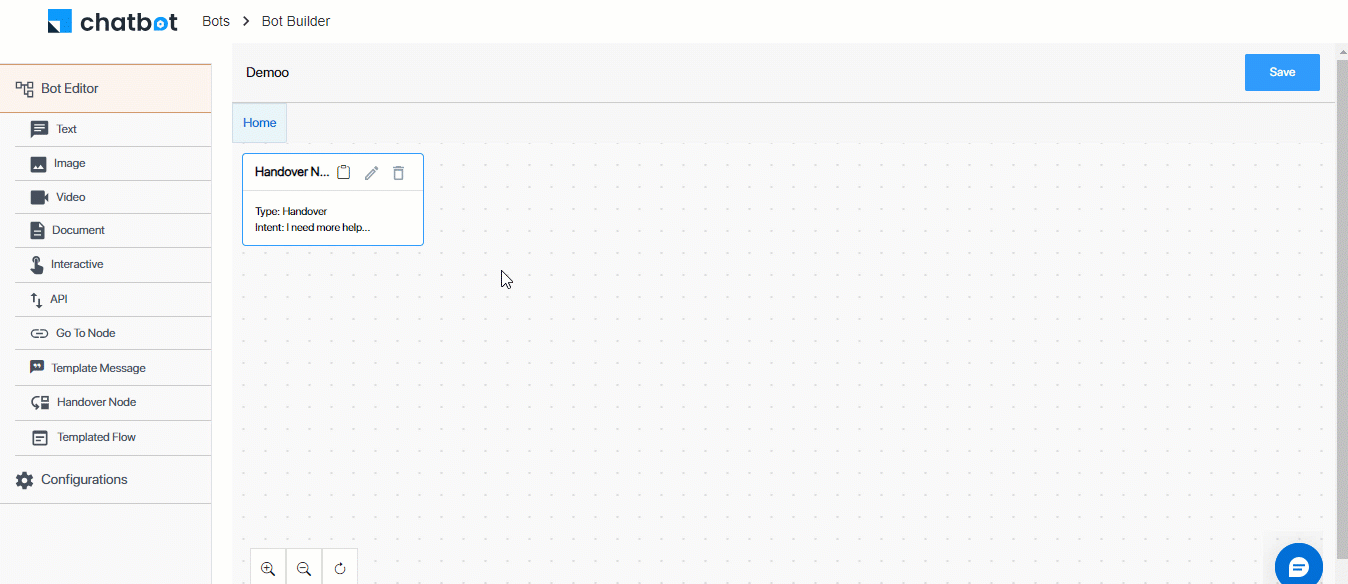
13. Create a Handover Node
The handover node transfers the chat conversation to an agent in your organization, using LeadSquared Converse. This allows direct communication with an agent, especially when the chatbot can’t address certain queries, or when a lead requests to speak with an agent. This section isn’t included in the example flow from the previous sections because a lead can request agent assistance at any point during the conversation.
Aim – To hand over the chat to a live agent.
- Lead Input Message – Talk to the counsellor.
- Chatbot Response – An agent will shortly address your concerns.
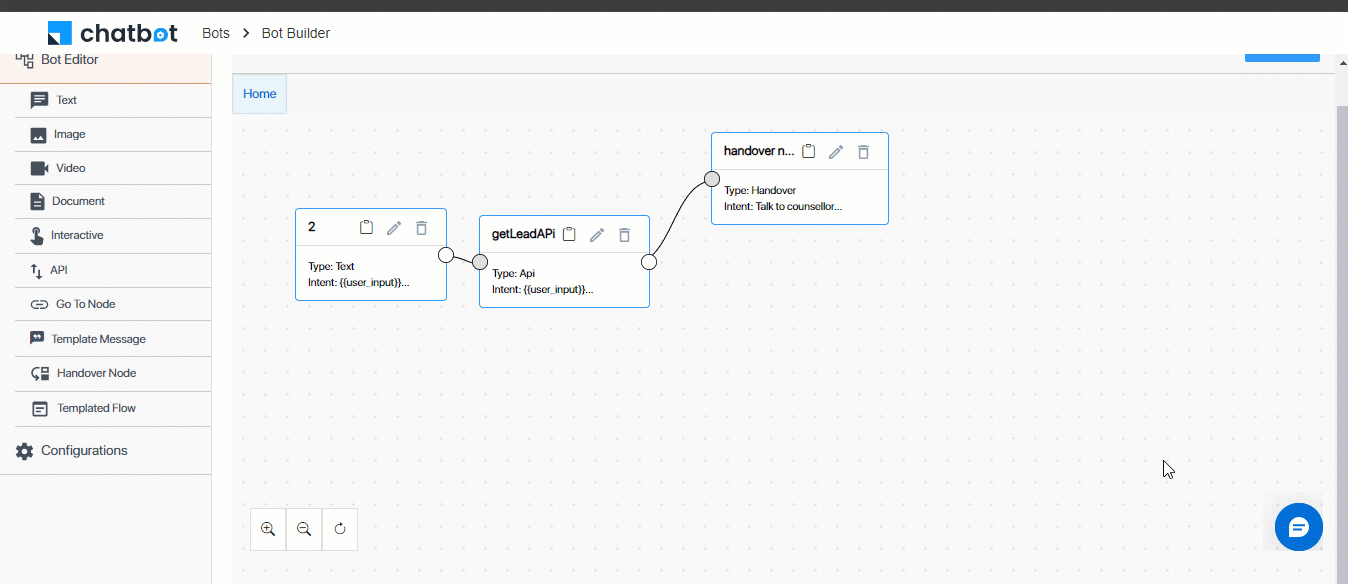
- From the Bot Editor screen, click Handover Node.
- On the Handover Node right panel, enter the following Node Configurations –
- Node name – Provide an internal display name for the node. We’re calling it “Handover Node”.
- Previous node – Depending on when you want to hand the conversation to a live agent, select a relevant node from the list of previous nodes.
- Intent* – Enter a relevant hardcoded intent message (like, “Talk to an agent”, etc.).
- Final Node – Depending on where you’re inserting this node into your chat flow, you can choose to select it as the Final Node.
- Multi Node Response – We’re not entering anything here. But depending on the use-case you’re looking to solve, you can chose to configure this, or skip it.
- Select a Routing Rule – From the list of routing rules available in your account, select a rule based on which you want to hand over the chat to an agent.
- If you haven’t previously created a rule, click Create routing rule to create a new rule.
- Add Condition Based Responses – You can set-up conditions based on when you want to hand over the chat to an agent. For e.g., you can set-up a condition to ensure the handover is done only during your business days (Monday-Friday), and during your working hours (9 AM to 6 PM). Once you enable the checkbox –
- Select Work Days – Select the days of the week during which you want the agent handover to take place.
- Time Range Picker – Select the time range between which you want the agent handover to take place.
- Add Conditions – You can use the AND/OR operators to add multiple conditions to determine when the handover happens.
- Under Response, configure the response to your lead –
- Response (If the conditions are true) – If the conditions are met (e.g., the lead sends the intent message within the working hours you’ve configured), the response you configure here is sent to your lead. The response we’ll send is “An agent will shortly address your concerns.”
- Response (If the conditions are false) – If the conditions are not met (e.g., the lead sends the intent message outside the working hours you’ve configured), the response you configure here is sent to your lead. The response we’ll send is “To get your concerns resolved, please contact us Monday to Friday, between 9 AM to 6 PM.”
- You can also send an interactive response. To know more about the options available when you chose this, refer to Create an Interactive Node.
- To preview this response, click Preview. After you preview the response, make changes if required. Once you’re done, click Save.
- To check if the Intent and Response are set up correctly, click the emulator . Then, enter the Intent message. If the Response is the same as the one you configured, the node is working fine.
14. Template Message
This option allows you to create a node using a Web or WhatsApp message template. When creating the node, choose a template from the list of templates available in your account. Creating this node follows a process similar to that of a Text Node. Instead of entering the response content, select a relevant template from the Select Template dropdown.

15. Templated Flow
From the list of template flows available in your account, choose a relevant template you want to use when building the chatbot. After choosing the template, you can modify both the flow and the nodes in it to suit your use case.
16. Configurations
To complete the chatbot set-up, navigate to the Configurations screen.
16.1 Session Timeout
Configure the message you’ll send to the lead when the chat session ends because the lead hasn’t sent any message for a specified time period.
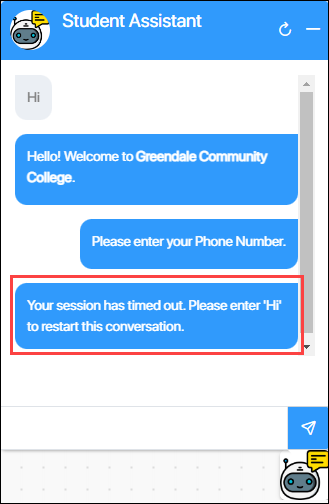
Click Edit to –
- Set the hours and minutes of inactivity after which you want to display the message to your lead.
- Add the timeout message the lead receives after the session times out.
- To add multiple timeout messages, click
 .
.
Once you’re done, click Save.
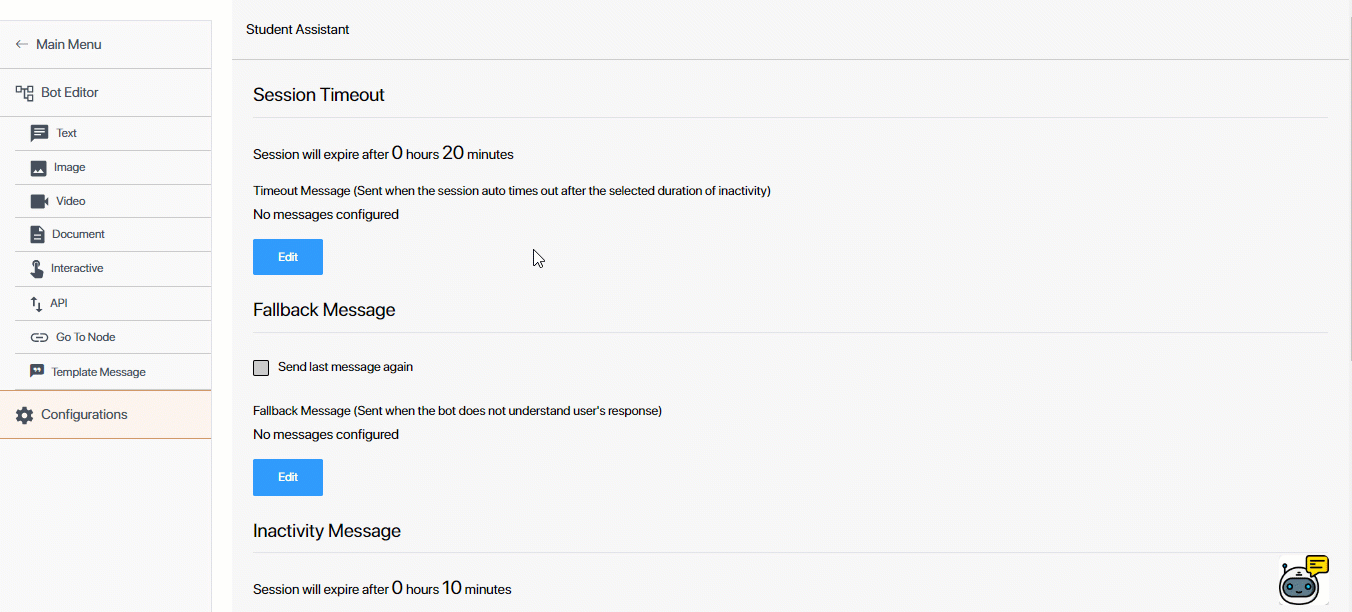
16.2 Fallback Message
Fallback messages are sent when the chatbot doesn’t understand the lead’s message.
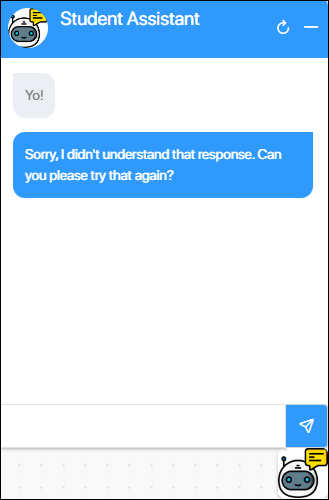
Click Edit to –
- To send the previous chatbot message as the fallback message, enable the
 checkbox.
 - Add the fallback message the lead receives when the bot does not understand the lead’s response.
- To add multiple timeout messages, click .
Once you’re done, click Save.
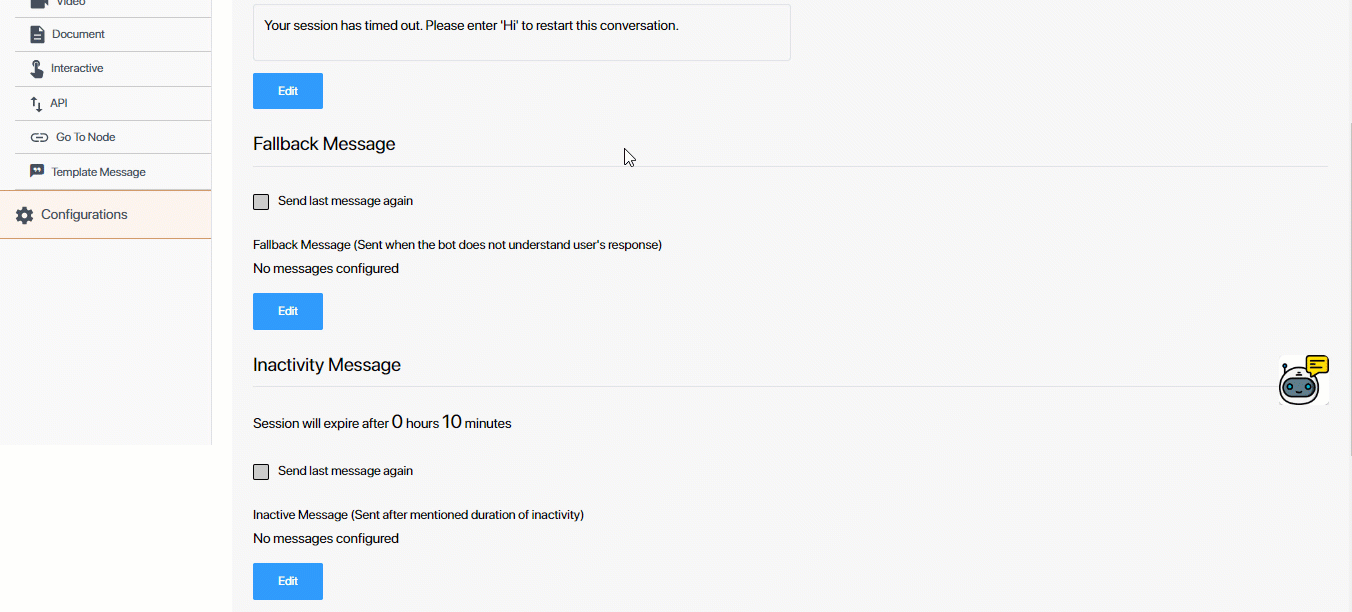
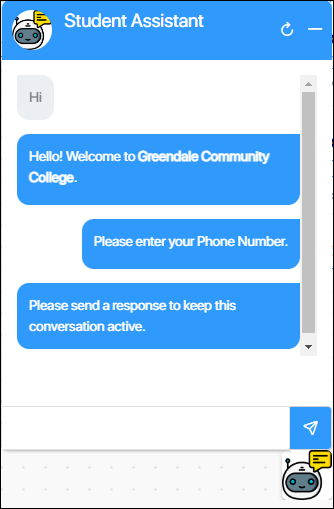
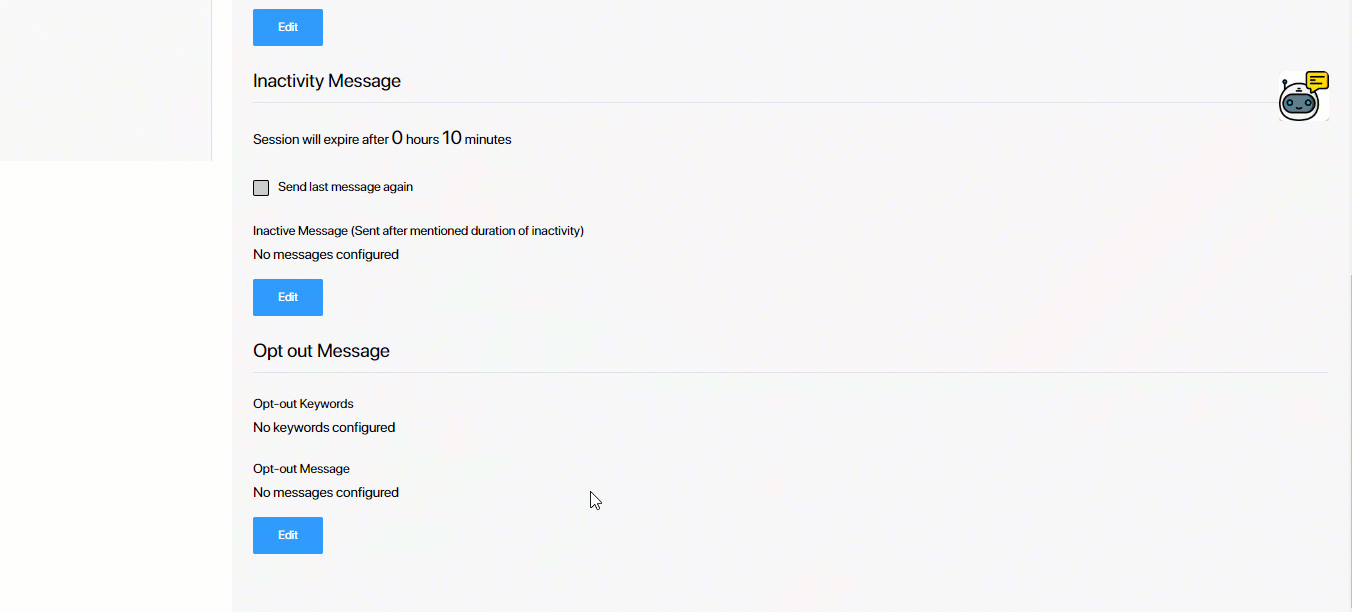
16.3 Inactivity Message
Configure the message the chatbot sends to the lead when the lead is inactive on the chatbot and hasn’t sent any message for a specified time period. This message is a reminder to the lead, to let them know the session is idle.
Click Edit to –
- To send the previous chatbot message as the inactivity message, enable the checkbox.
- Set the hours and minutes of inactivity after which you want to display the message to your lead.
- Add the timeout message the lead receives after the session times out.
- To add multiple timeout messages, click .
Once you’re done, click Save.
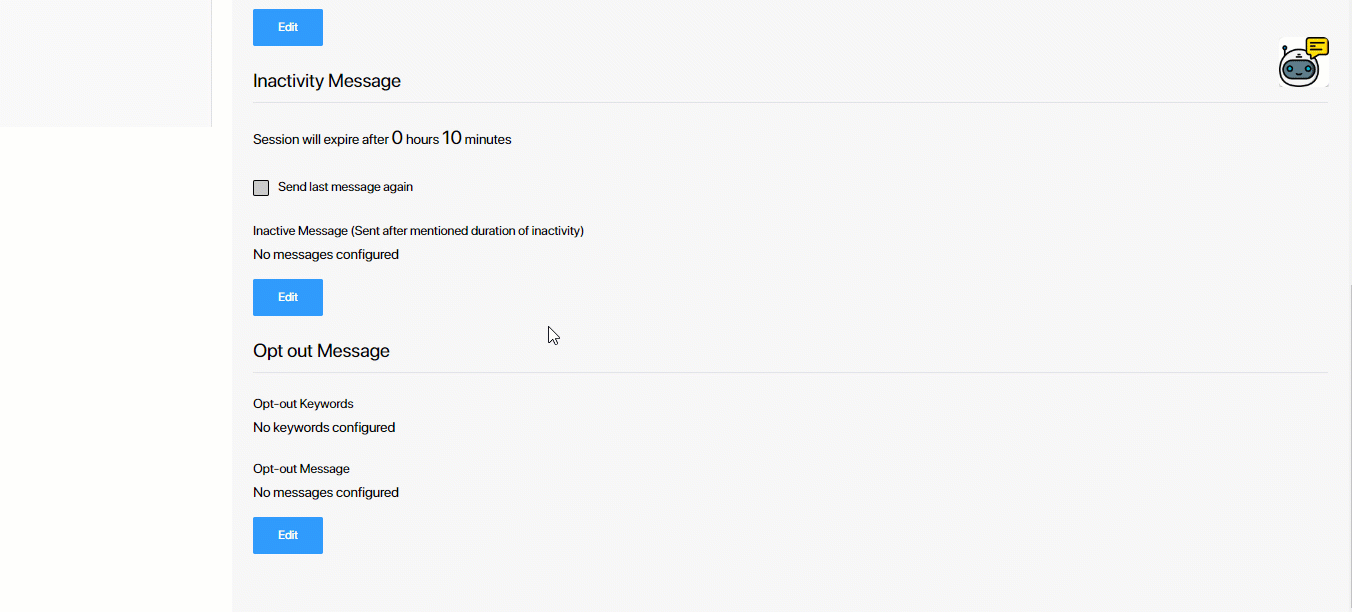
16.4 Opt-out Messages
When a lead sends any of the keywords configured here as an input message, the lead automatically opted out of further interactions with the chatbot. Click Edit to add the list of keywords. In the Opt-out Message box, configure the message you want to send as the chatbot response once the lead has opted out of the conversation.
Once you’re done, click Save.
16.5 Restart Message
When a lead enters a configured keyword, the chatbot restarts the journey from the first message. To set up keywords, click Edit, enter them (e.g., “main menu”, “restart”, “begin again”), press Enter on your keyboard, and click Save.

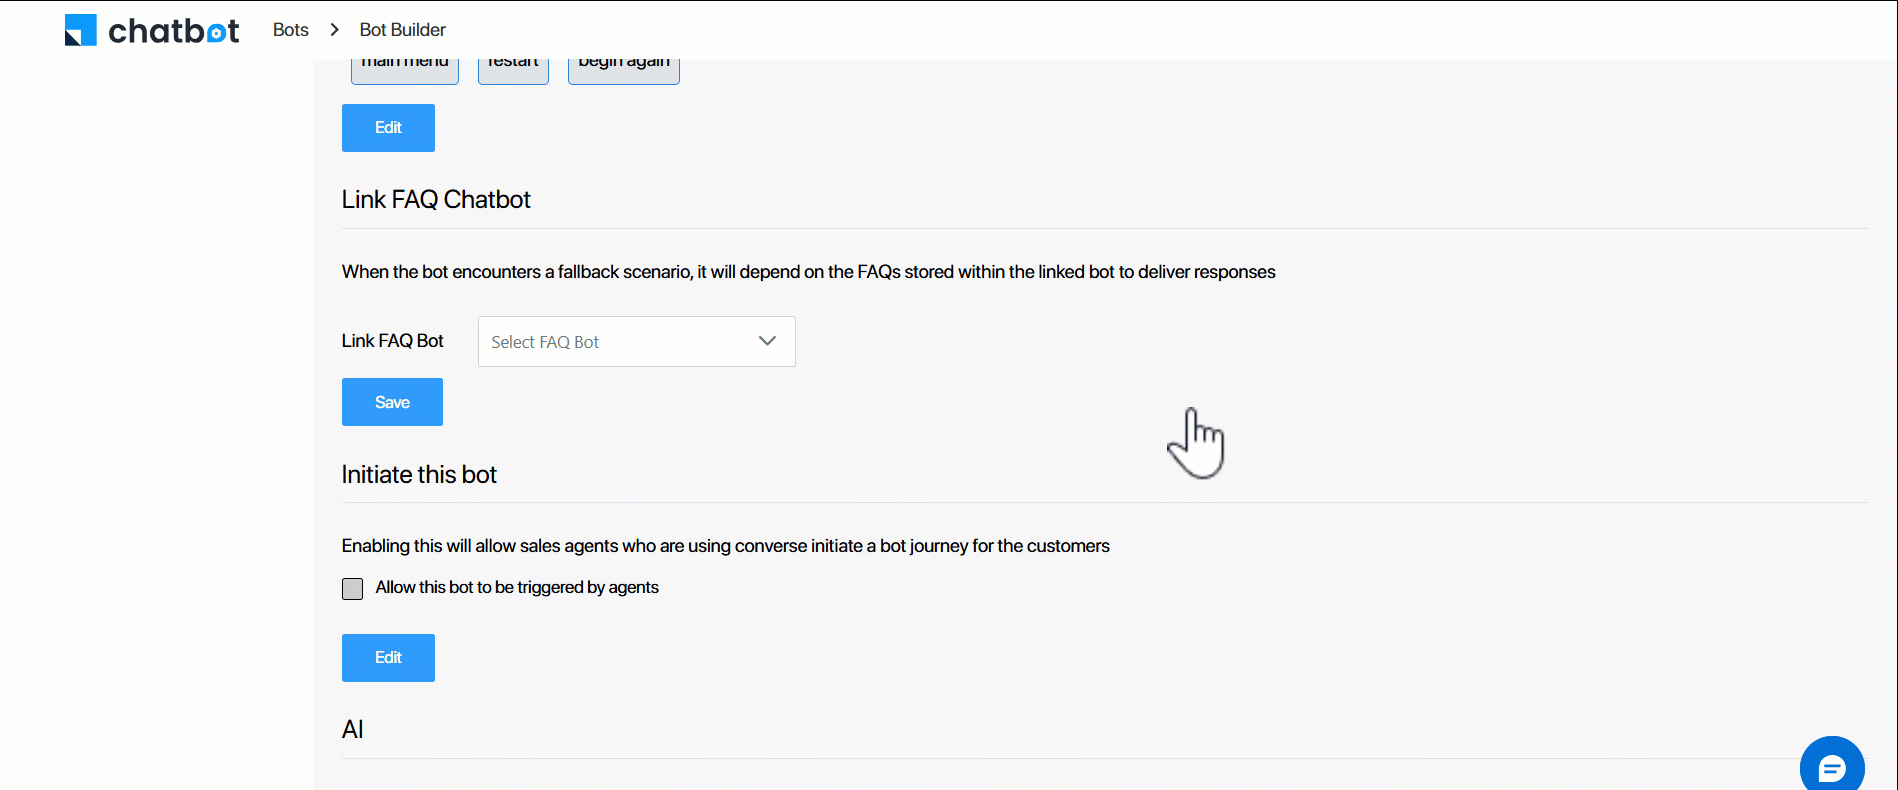
16.6 Link FAQ Chatbot
You can link an FAQ Bot or a AI Knowledge Base Chatbot to the journey-based bot. If a lead asks a question that is not covered or triggers a fallback response, the system checks the linked bot for answers and responds accordingly. Use the Link FAQ Bot dropdown to link the bot, and then click Save.
17. List of Templated Flows
We’ve provided a list of chatbot flows, designed to solve specific use cases, which can be imported into the bot builder. Once you’ve imported a template, you can customize it to reflect your business requirements. Currently, we have the OTP Verification template available, which allows you to create a bot for verifying OTPs entered by leads. To use a Templated Flow –
- Navigate to the Chatbot home page, and from the left-menu, click Templated Flow.
- On the Explore Templated Flows screen, for the template you want to use, click Import Template.
- From the Select a BOT dropdown, you can –
- Import into a New Bot – You can create a bot from scratch, and import this template into the new bot. When you select this, enter a Bot Name (which is mandatory) and Bot Description.
- Import into an Existing Bot – You can select an existing bot to import the template to.
- Once you’re on the bot builder screen, you can modify the template, and the nodes in the template, to meet your requirements. To know how to build a chatbot, refer to Build a Chatbot.
18. Other Actions
On the bot builder screen, you can search for a node using the node name, the user intent, the buttons configured and the Bot Display.
19. Next Steps
After you’ve set up the chat flow, you must configure the chatbot channel. To know how to do this, refer to Configure Chatbot Channel.
Any Questions?
Did you find this article helpful? Please let us know any feedback you may have in the comments section below. We’d love to hear from you and help you out!