1. Feature Overview
LeadSquared offers sign-in integration with Azure Active Directory services, using OpenId Connect. After the integration, you won’t need to manage a separate set of credentials for LeadSquared, and can log in directly with your AD credentials. This integration will also enable you to seamlessly sign in to the LeadSquared mobile app as well. For information on other ADFS integrations, see ADFS Integration for Signing in to LeadSquared.
Note:
- When you enable ADFS integration, it is applied by default to all the users in your account. It CANNOT be disabled for specific users.
- We support Microsoft Azure Integration through the mobile app as well. To enable it, you must be running the following app versions –
- Android v12.6 or higher
- iOS v10.7 or higher
2. Prerequisites
- You must have a Microsoft Azure Active Directory.
- You must be an Administrator of your LeadSquared account.
- You must use the same email Id on Azure and LeadSquared.
- You must have the Azure AD authentication provider enabled on your LeadSquared account. To enable it, please reach out to support@leadsquared.com.
3. How it Works
- Create an application on Azure.
- Grant application access on Azure.
- Set up authentication on LeadSquared
- Test the application on LeadSquared.
4. Create an Application on Azure
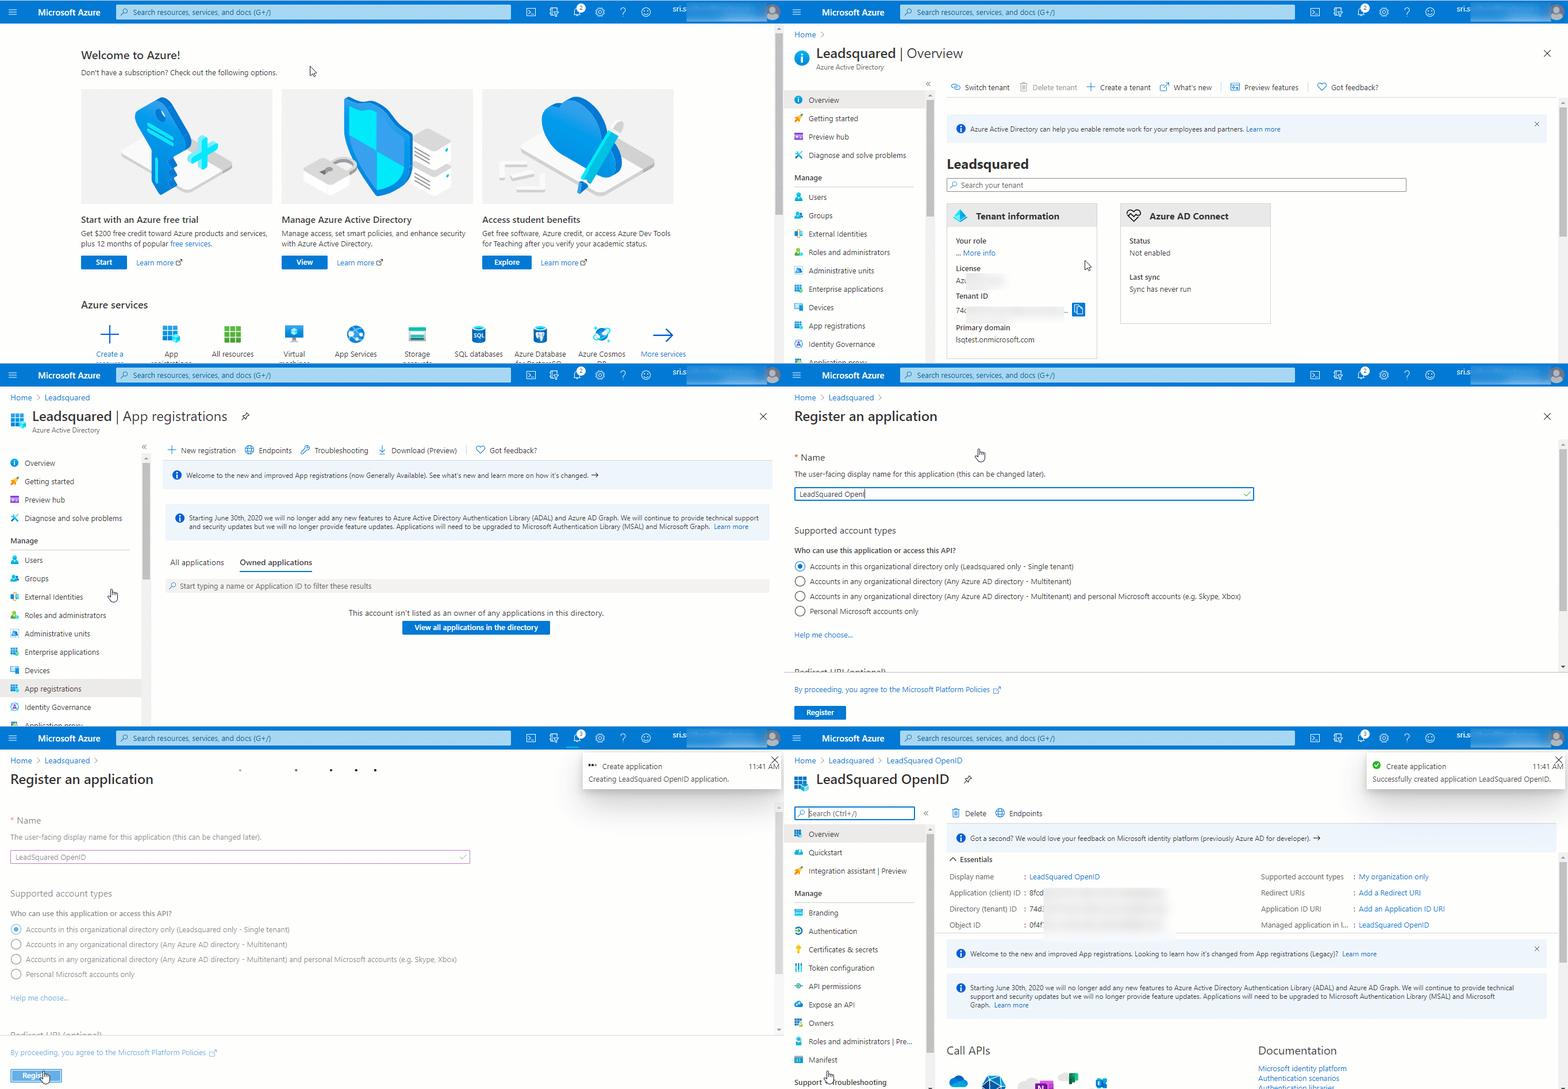
To create a new application on Azure –
- Navigate to the Microsoft Azure portals home page, and under Manage Azure Active Directory, click View.
- On the left panel, click App registrations.
- On the App registrations page, click New registration.
- Enter a relevant name for the app.
- Under Supported account types, select “Accounts in this organizational directory only”
- Once you’re done, click Register.
5. Authenticate Azure Application
5.1 Application Access
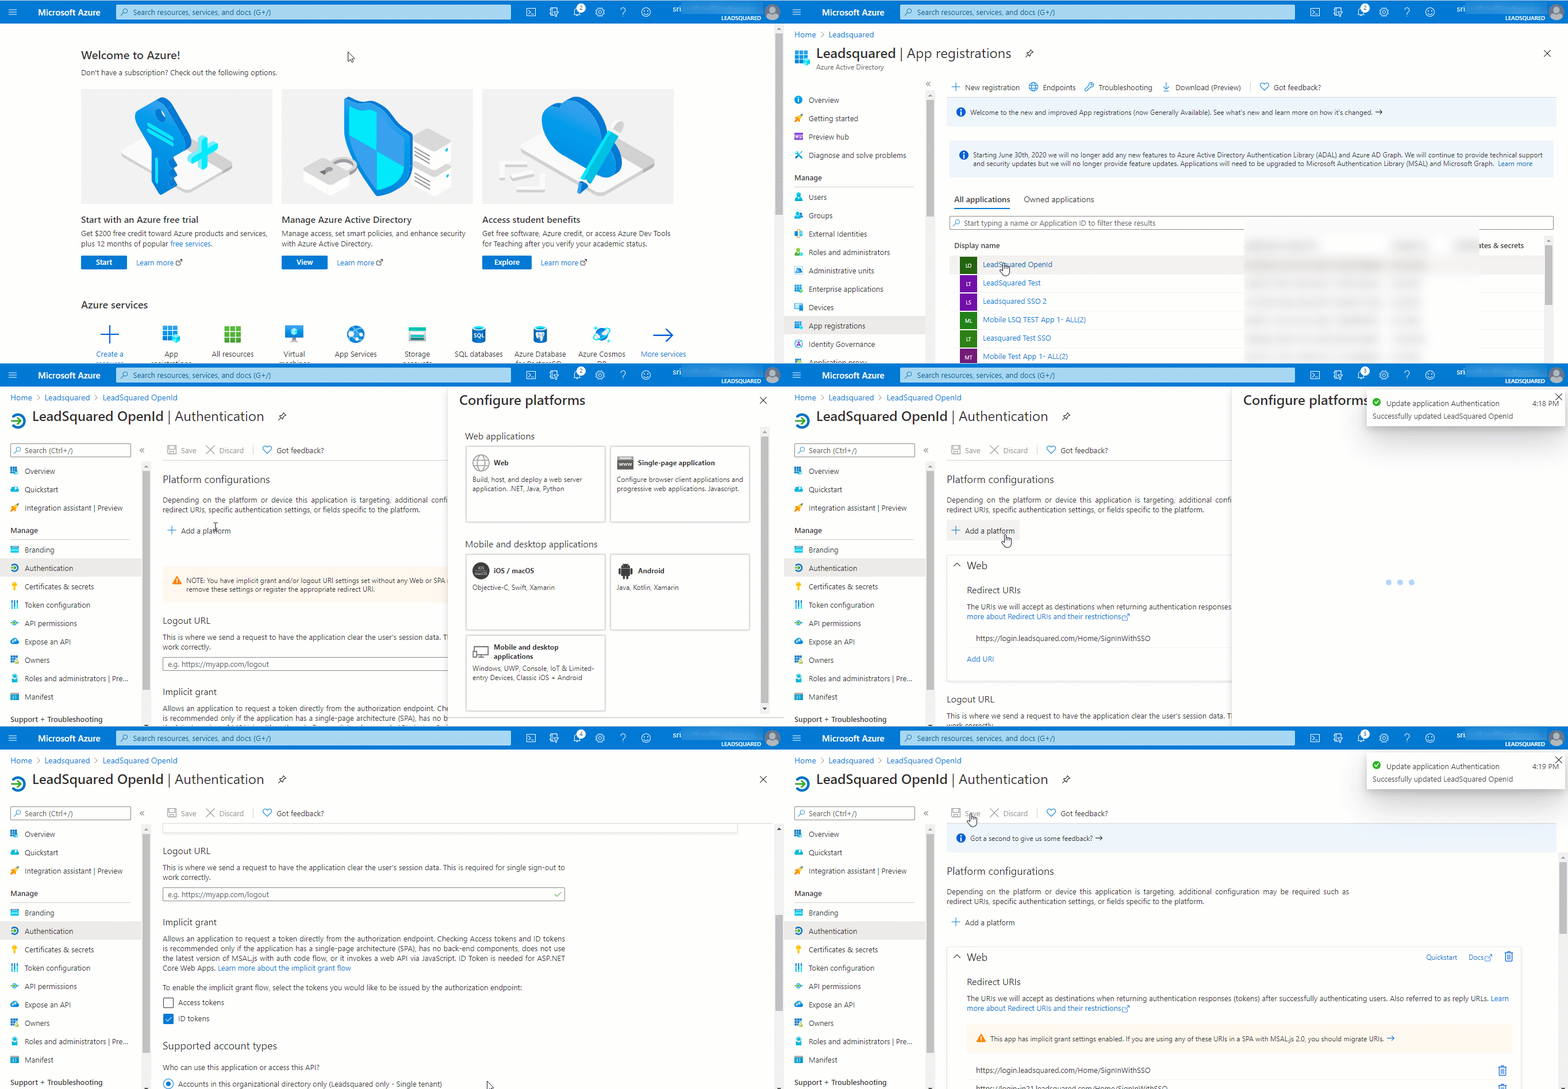
To grant application access to the new application you created –
- On the Microsoft Azure portals home page, under Manage Azure Active Directory, click View.
- On the left panel, click App registrations.
- On the App registrations page, click All applications.
- Under Display Name, click the application you’ve created.
- On the application page, on the left-panel, click Authentication.
- On the Authentication page, click Add a platform, and then click Web.
- Enter this default URL, and click Configure
https://login.leadsquared.com/Home/SignInWithSSO
- Depending on your region, enter the following additional URLs, and click Configure –
- If your LeadSquared account in the Mumbai (India) region –
https://login-in21.leadsquared.com/Home/SignInWithSSO
- If your LeadSquared account is in the Hyderabad (India) region, pas
https://login-in22.leadsquared.com/Home/SignInWithSSO
- If your LeadSquared account is in the USA region –
https://login-us11.leadsquared.com/Home/SignInWithSSO
- If your LeadSquared account is in the Ireland region –
https://login-ir31.leadsquared.com/Home/SignInWithSSO
- If your LeadSquared account is in the Canada region, pass
https://login-ca12.leadsquared.com/Home/SignInWithSSO
- If your LeadSquared account is in the Singapore region, only the default URL is required. No additional URL is required.
- If your LeadSquared account in the Mumbai (India) region –
- Once you’re done adding the platforms, scroll down to “enable implicit grant flow”, and select Access tokens and ID tokens by checking the
 box.
box. - Click Save.
Marvin
If you’re using LeadSquared’s Marvin application, in addition to the steps (until step 5) listed above, the following steps must be completed –
- On the Authentication page, click Add a platform, and then click Single-page Application.
- Enter this default URL, and click Configure
https://marvin.leadsquared.com
- Depending on your region, enter the following additional URLs, and click Configure –
- If your LeadSquared account in the Mumbai (India) region –
https://marvin-in21.leadsquared.com
- If your LeadSquared account is in the Hyderabad (India) region, pas
https://marvin-in22.leadsquared.com
- If your LeadSquared account is in the USA region –
https://marvin-us11.leadsquared.com
- If your LeadSquared account is in the Ireland region –
https://marvin-ir31.leadsquared.com
- If your LeadSquared account is in the Canada region, pass
https://marvin-ca12.leadsquared.com
- If your LeadSquared account is in the Singapore region, only the default URL is required. No additional URL is required.
- If your LeadSquared account in the Mumbai (India) region –
- Once you’re done adding the platforms, scroll down to “enable implicit grant flow”, and select Access tokens and ID tokens by checking the
 box.
box. - Once you’re done, click Save.
Note:
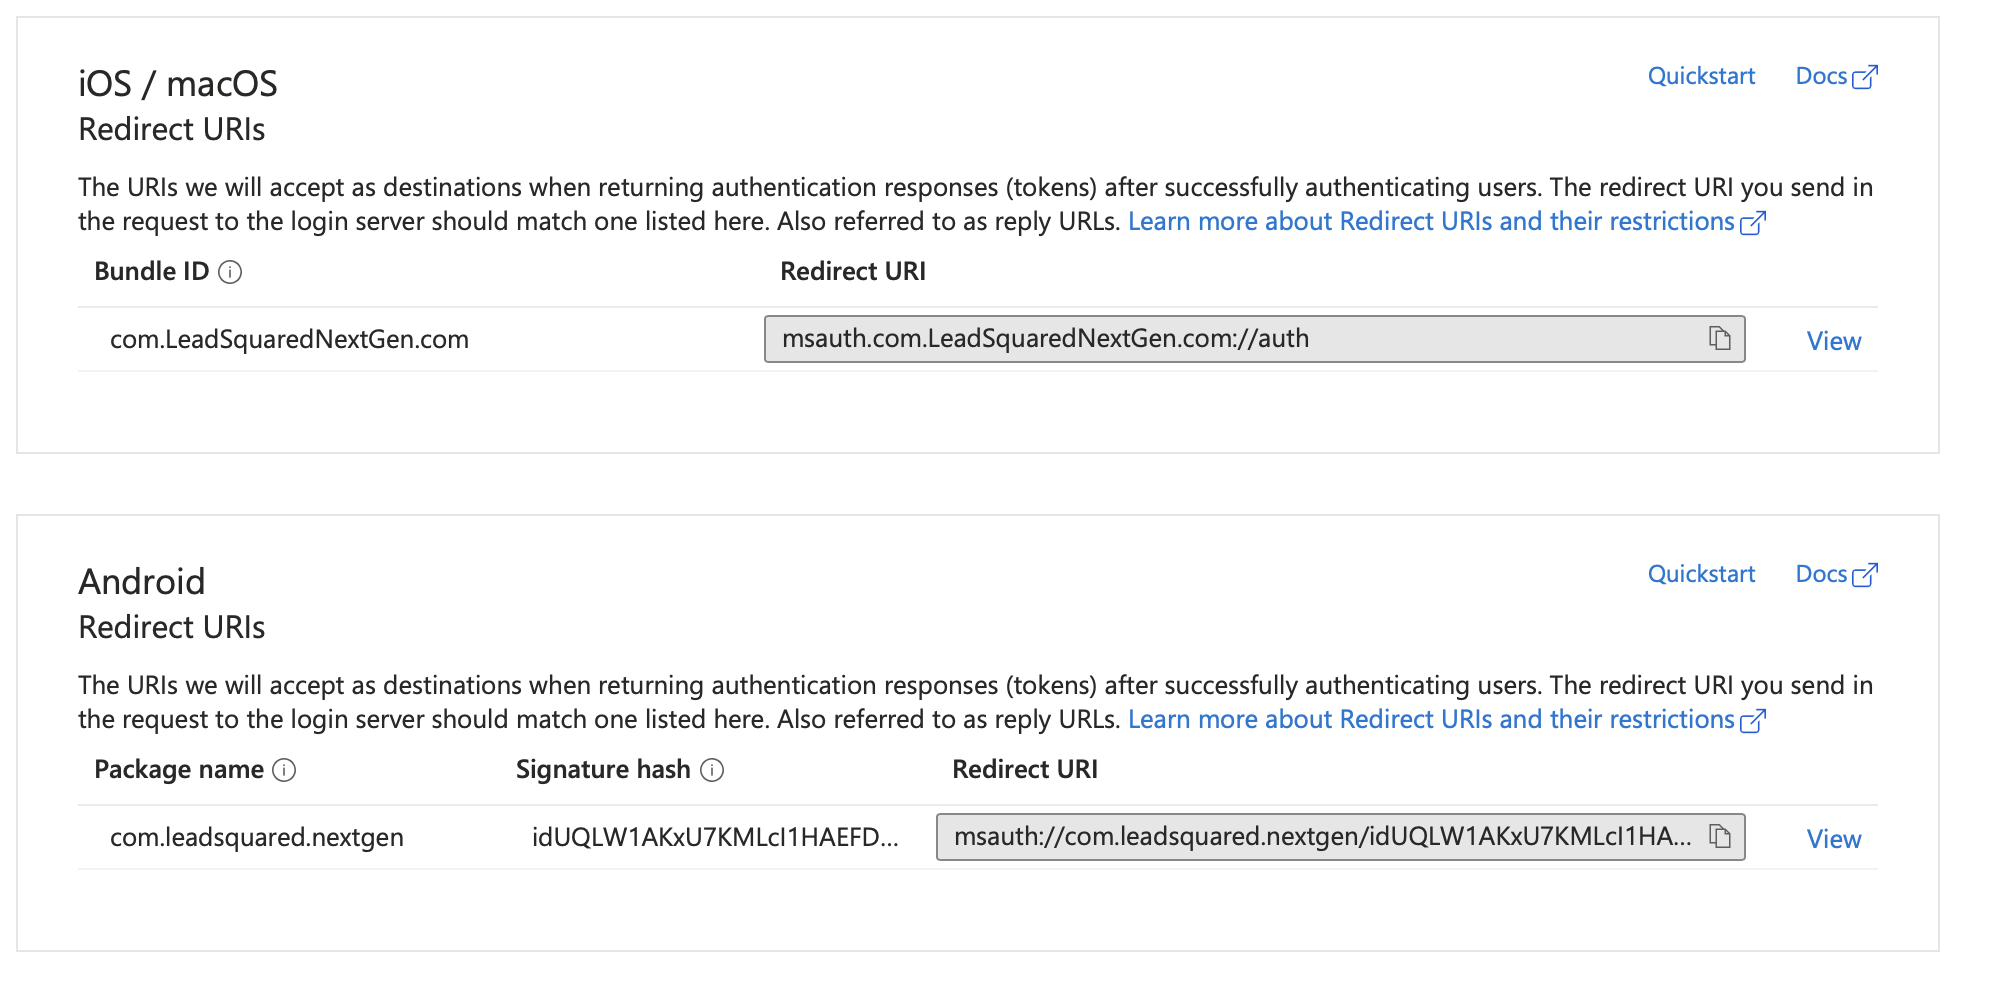
If you’re adding iOS as a platform, configure the following –
- Bundle ID –
com.LeadSquaredNextGen.com - Redirect URI –
msauth.com.LeadSquaredNextGen.com://auth
If you’re adding Android as a platform, configure the following –
- Package Name –
com.leadsquared.nextgen - Signature Hash –
idUQLW1AKxU7KMLcI1HAEFDcZIk= - Redirect URI –
msauth://com.leadsquared.nextgen/idUQLW1AKxU7KMLcI1HAEFDcZIk%3D
5.2 Single Page Application
Then, create a single page application, and configure LeadSquared’s Unified Login feature.
- On the Authentication page, click Add a platform, and then click Single-page Application.
- Enter this default URL, and click Configure
https://identity.leadsquared.com
- Depending on your region, enter the following additional URLs, and click Configure –
- If your LeadSquared account in the Mumbai (India) region –
https://identity-in21.leadsquared.com
- If your LeadSquared account is in the Hyderabad (India) region, pas
https://identity-in22.leadsquared.com
- If your LeadSquared account is in the USA region –
https://identity-us11.leadsquared.com
- If your LeadSquared account is in the Ireland region –
https://identity-ir31.leadsquared.com
- If your LeadSquared account is in the Canada region, pass
https://identity-ca12.leadsquared.com
- If your LeadSquared account is in the Singapore region, only the default URL is required. No additional URL is required.
- If your LeadSquared account in the Mumbai (India) region –
- Once you’re done, click Save.
5.3 Implicit Access
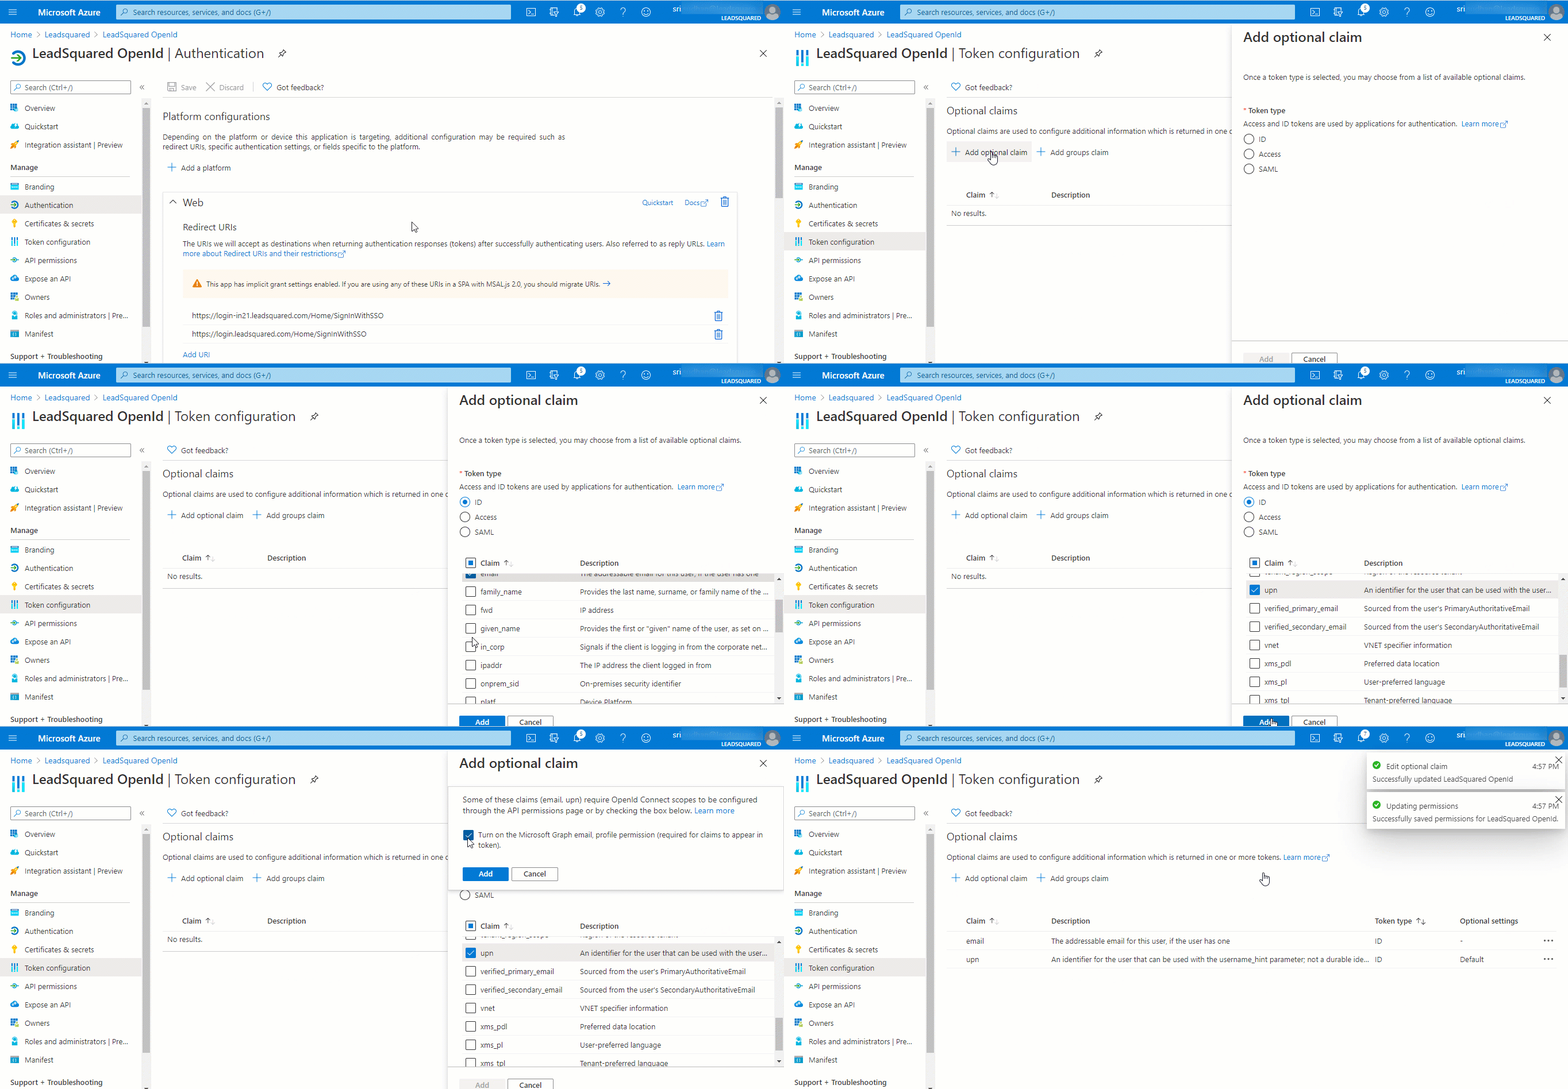
To grant access to your login email ID –
- From the Authentication page, on the left-panel, click Token configuration.
- On the Token Configuration page, click Add optional claim.
- On the right-panel, under Token type, click ID.
- Under Claim, select email and upn by checking the
 box.
box. - Once you’re done, click Add.
- On the Add optional claim confirmation pop-up, confirm by checking the
 box.
box.
6. Application Permissions on Azure
6.1 Grant Permissions
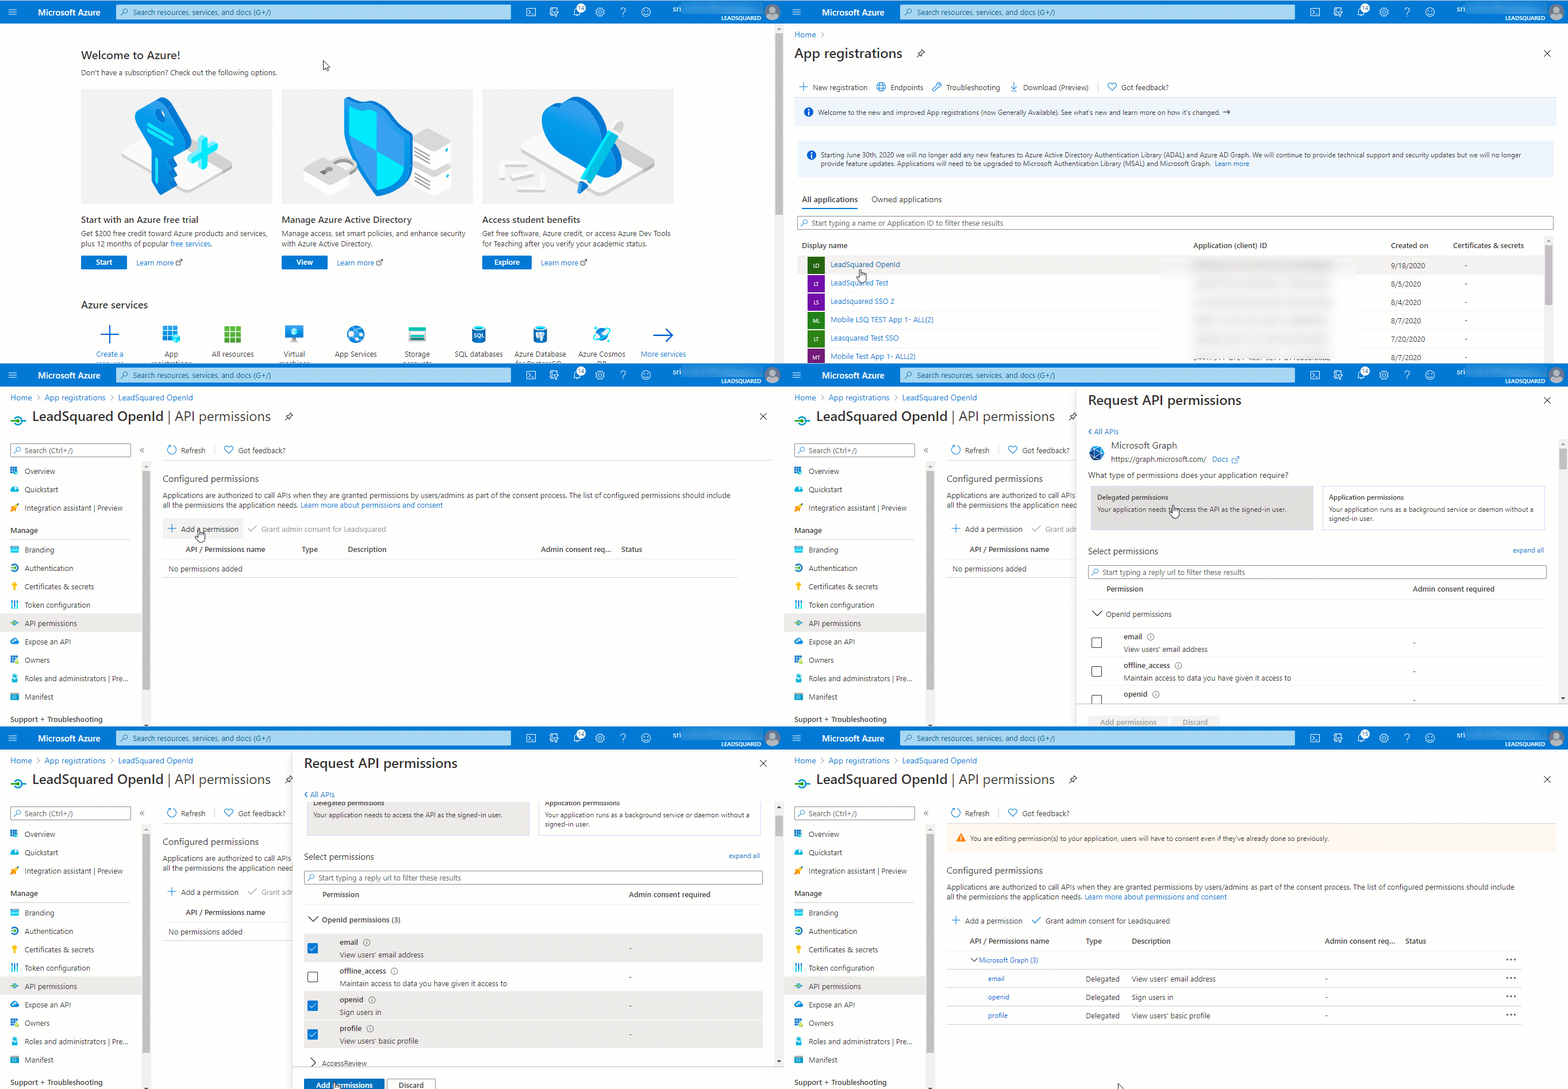
To grant application permissions to the new application you created –
- On the Microsoft Azure portals home page, click App registrations, and then click All applications.
- Under Display Name, click the application you’ve created.
- On the application page, on the left-panel, click API permissions.
- On the API permissions page, click Add a permission.
- On the Request API permissions pop-up, click Microsoft Graph, and then click Delegated permissions.
- Under Permissions, click the
 checkbox against email, profile and openid.
 - Once you’re done, click Add permissions. This will successfully grant permissions.
6.2 Grant Admin Access
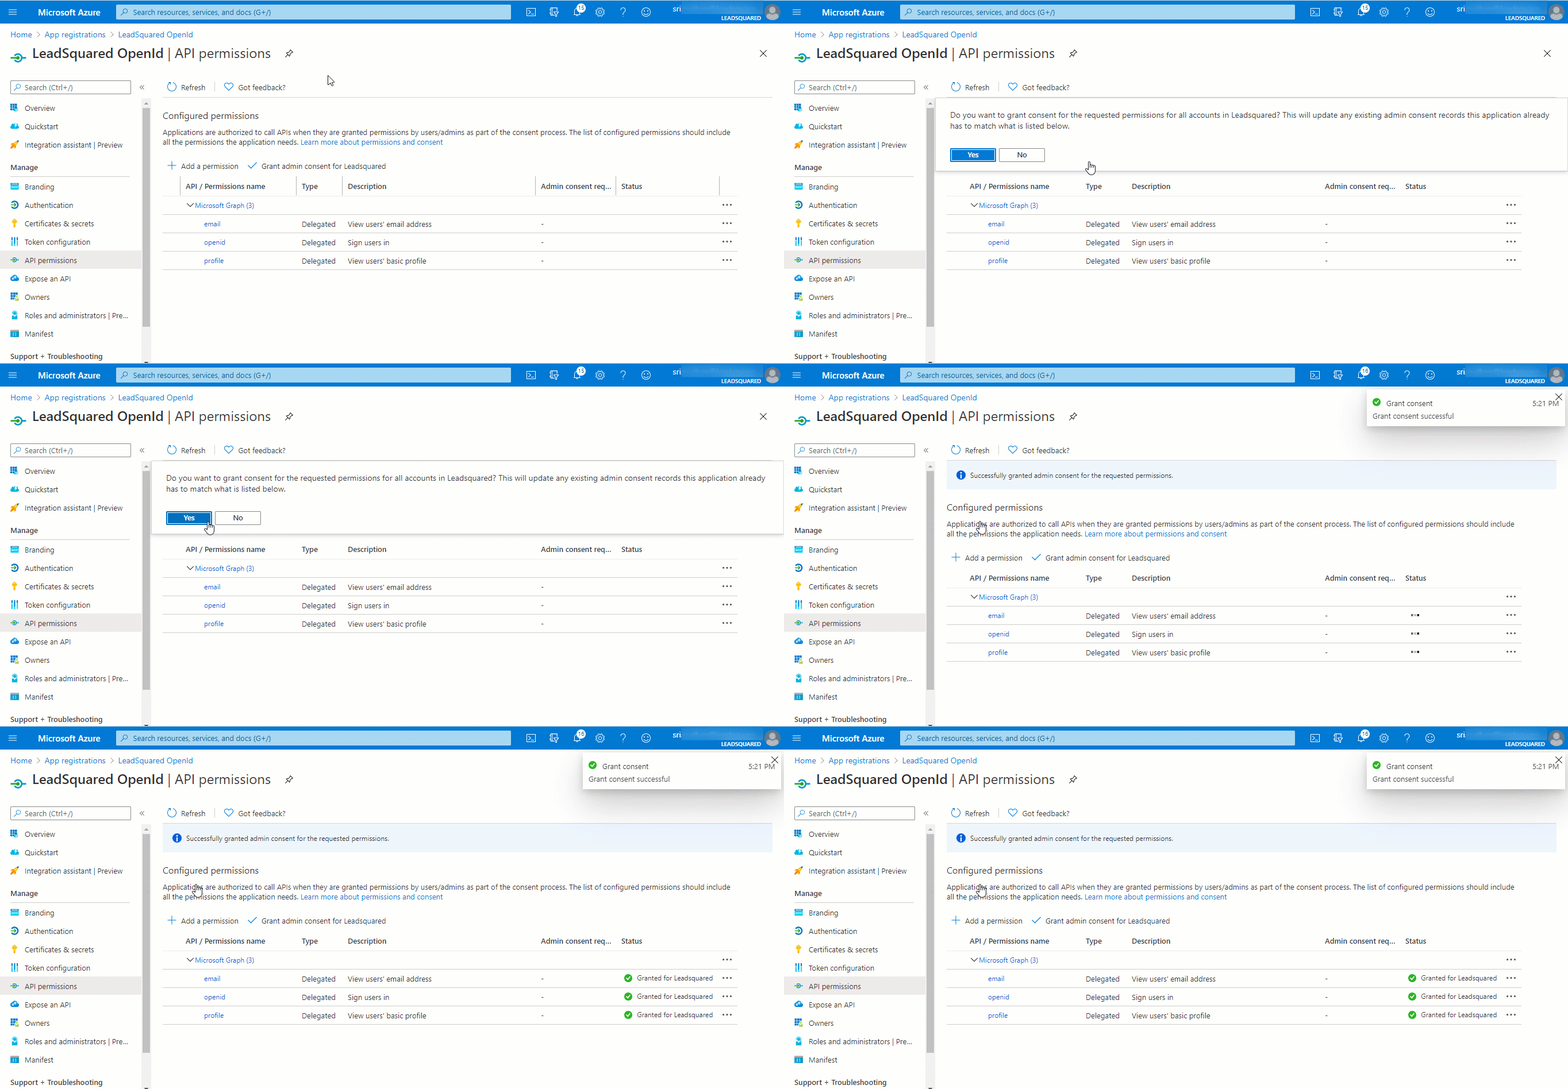
To grant admin access to the new application you created –
- Navigate to the API permissions page, and click Grant admin consent for LeadSquared.
- On the confirmation pop-up, click Yes. This will successfully grant admin access.
7. Authenticate the Azure Application in LeadSquared
To authenticate the application you’ve created on LeadSquared –
7.1 Obtain Client ID and OpenID from Azure
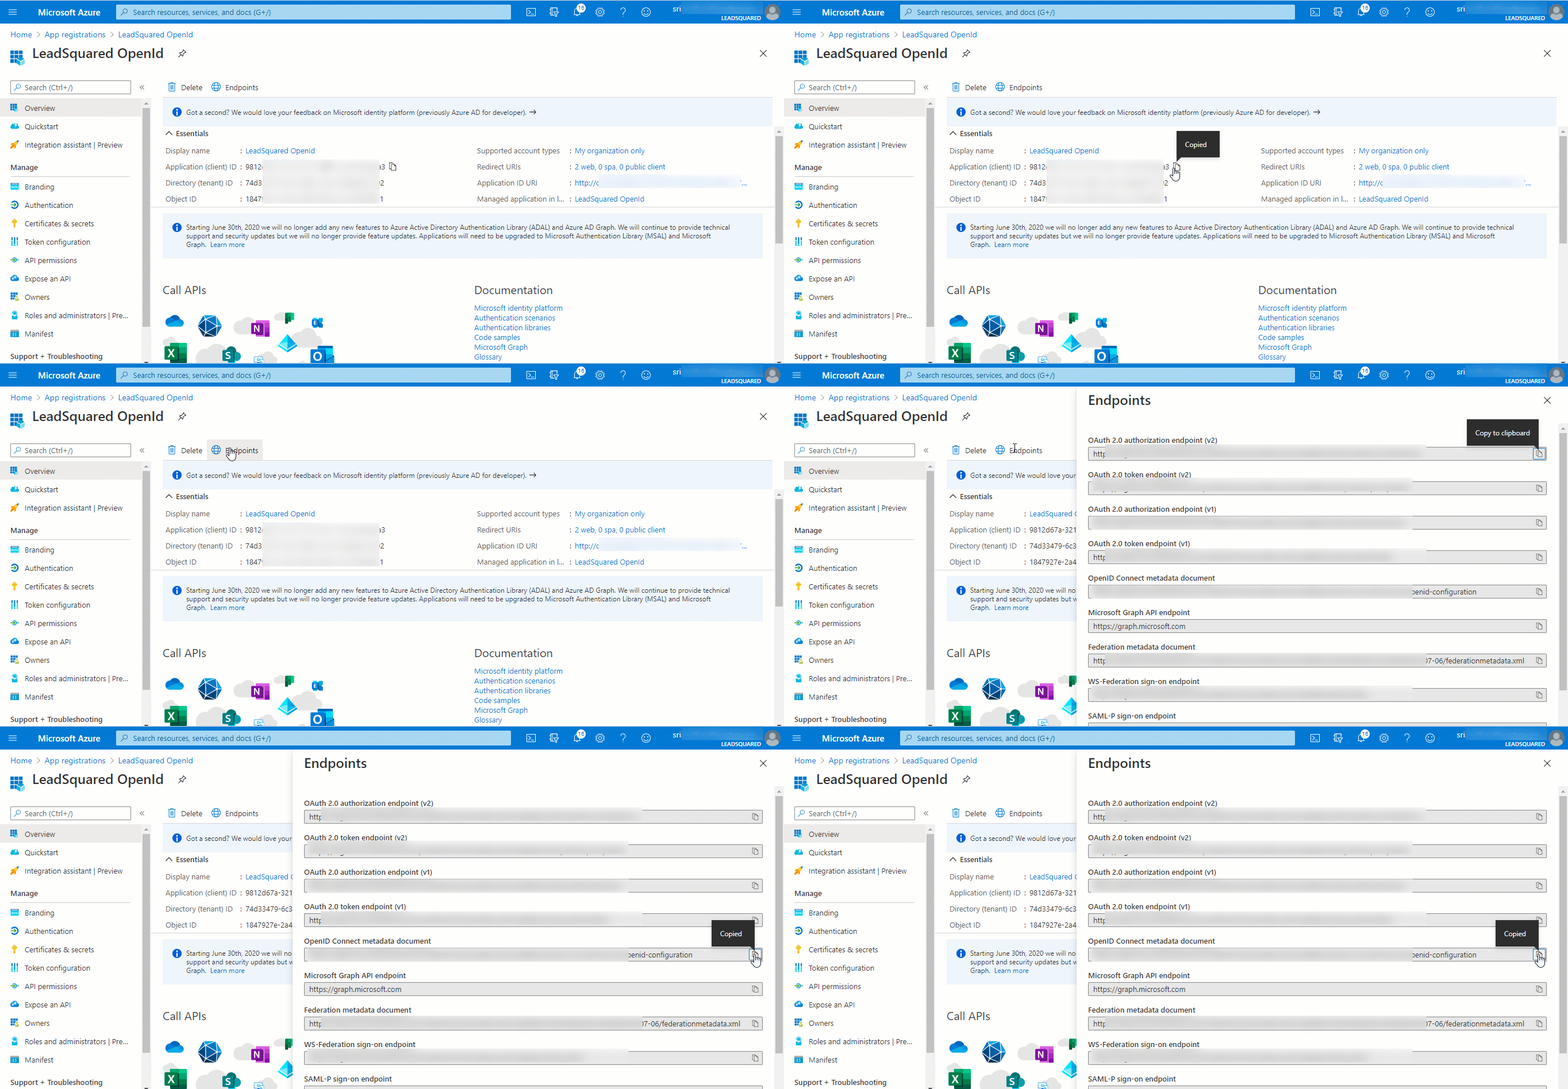
To obtain the client Id for the application you’ve created –
- On the Microsoft Azure portals home page, click App registrations, and then click All applications.
- Under Display Name, click the application you’ve created.
- On the application page, copy the Application (client) ID.
- Then, click Endpoints, and under OpenID Connect metadata, click the
 icon to copy the token.
7.2 Authentication on LeadSquared
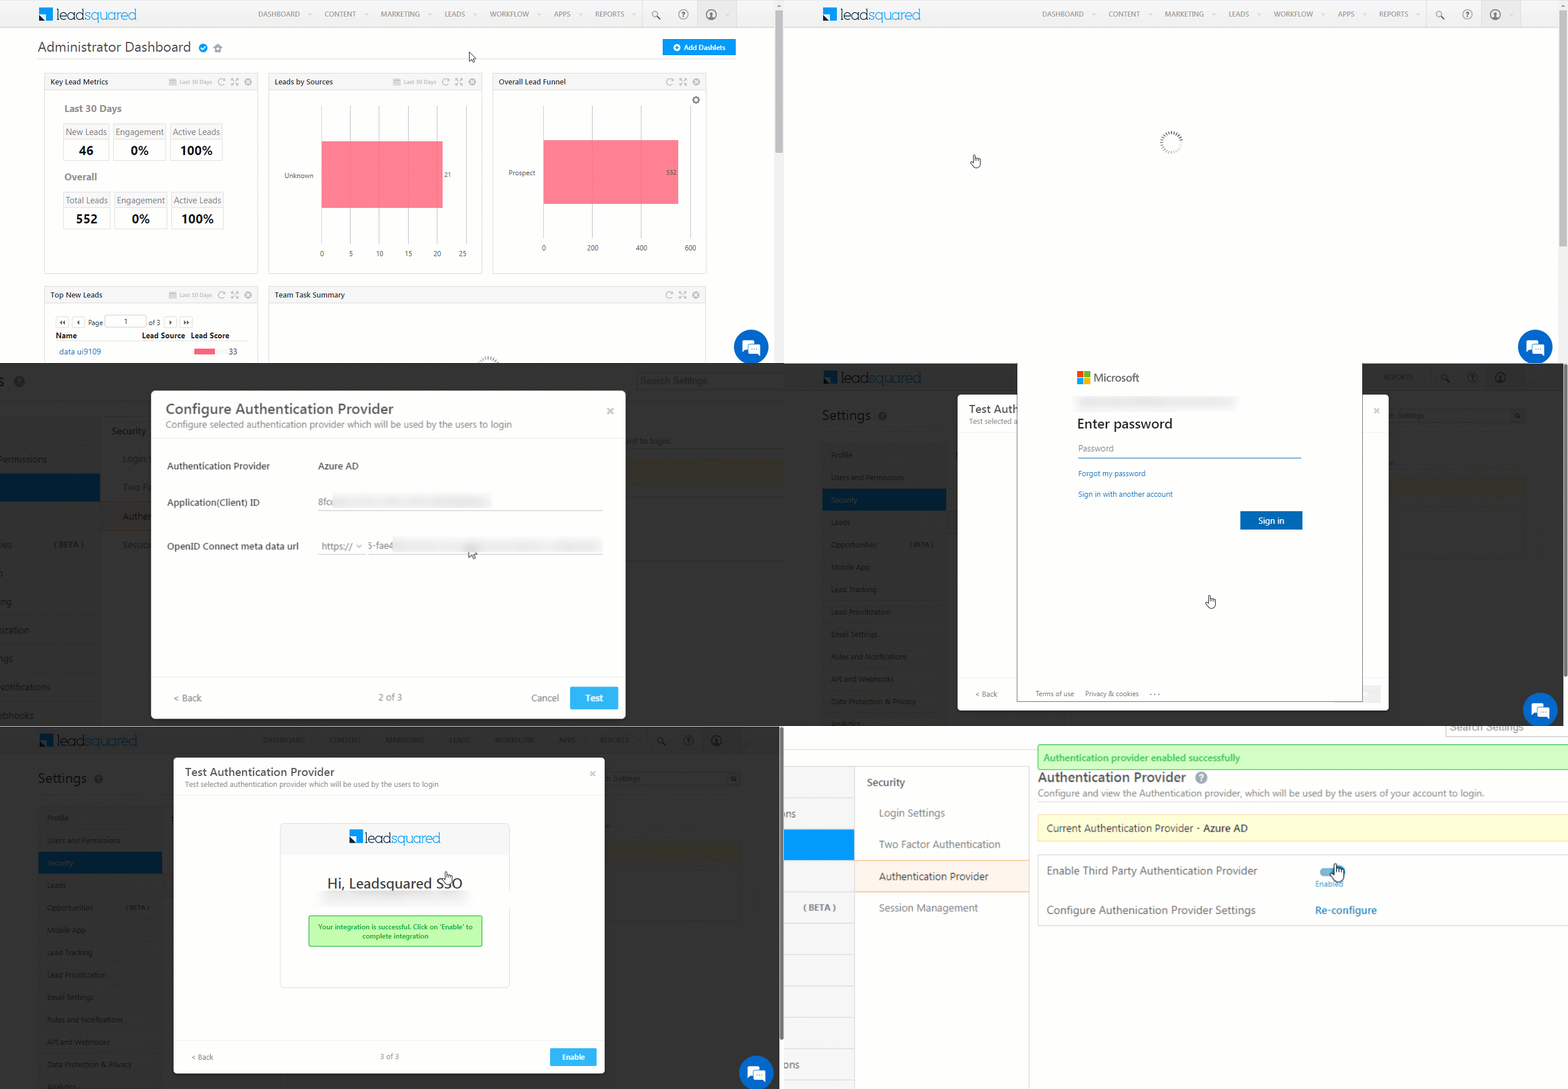
To authenticate and activate your Azure application on LeadSquared –
- From your LeadSquared main menu, navigate to My Profile>Settings>Security>Authentication Provider.
- Against Enable Third Party Authentication Provider, toggle the
 slider.
 - On the Choose Authentication Provider pop-up, select Azure AD.
- On the Configure Authentication Provider pop-up, enter the Application (client) ID and OpenID Connect metadata, and click Test.
- On the Test Authentication Provider window, click Sign in with Azure AD, and on the Microsoft pop-up, enter the password for your Microsoft Azure Id.
- Once you’ve signed in successfully, on the Test Authentication Provider window, click Enable.
- On the Enable Authentication Provider pop-up, click Yes. Your Azure OpenId login will be authenticated successfully.
8. Sign-in with Azure AD Credentials
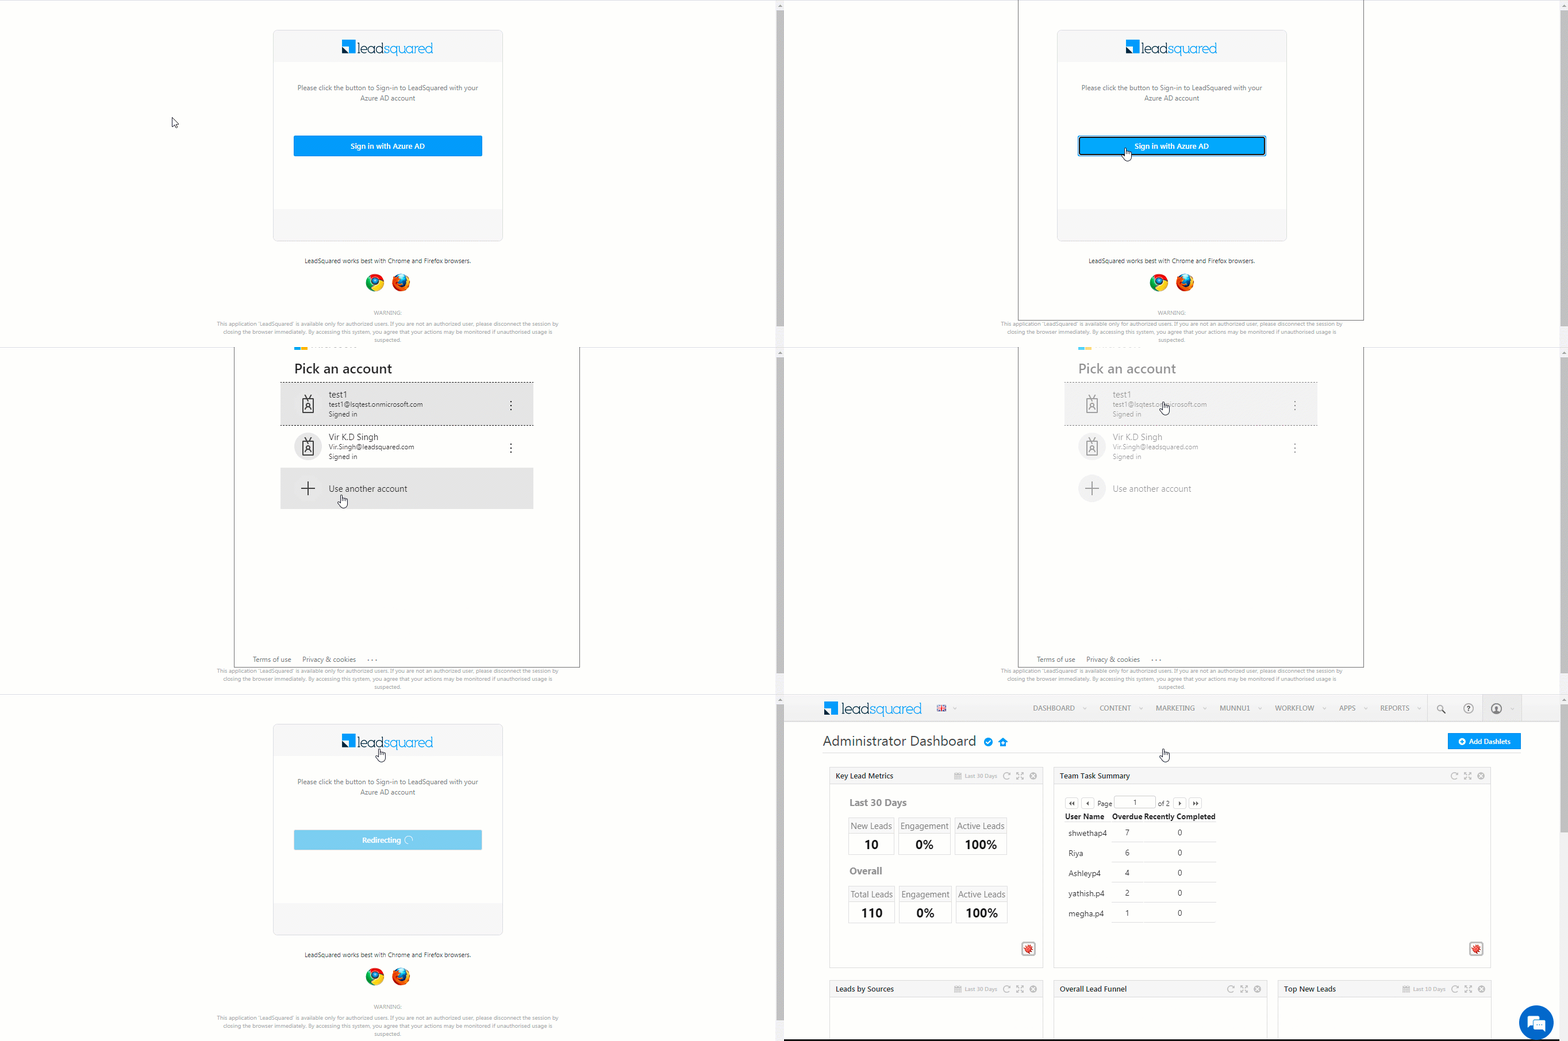
Once the set-up is complete, when you log in to your LeadSquared account (https://login.leadsquared.com/), you’ll be prompted to enter your Azure AD credentials (or choose the Microsoft account if already signed in on the browser).
Any Questions?
Did you find this article helpful? Please let us know any feedback you may have in the comments section below. We’d love to hear from you and help you out!


