1. Feature Overview
Karza Technologies offers Know Your Client (KYC) verification solutions for commercial, retail, financial, and banking services. Integrate LeadSquared with Karza to leverage their KYC verification services directly from your LeadSquared account.
Once integrated, you can use LeadSquared Forms and LeadSquared Portals to seamlessly verify KYC details like PAN, Aadhar, GST, Address, Mobile, Vehicle Registration Certificate, etc.
| Services we currently support | |||
| Category | Service Name | Description | Use Cases |
| Asset & Vehicle Authentication | Vehicle RC Authentication | API to Authenticate Vehicle Registration in India | Vehicle RC authentication & owner check-in used car loan journeys |
| Commercial Verifications | GST Authentication | API to authenticate 15 Digit GSTIN issued by the Goods and Service Tax Network in India. | POI & POA in Commercial KYC verification |
| KYC OCR | PAN OCR | API to extract data from PAN card | Auto-filling of PAN data to reduce manual data entry during onboarding |
| Aadhar OCR | API to extract data from Aadhar card | Auto-filling of Aadhar data to reduce manual data entry during onboarding | |
| OCR Services | Cheque OCR | API to extract data from a cheque leaf | Auto-filling of Bank account data to reduce manual data entry during onboarding |
| Driving License OCR | API to extract data from Driving License | Auto-filling of DL data to reduce manual data entry during onboarding | |
| Retail Verifications | PAN Authentication | API to authenticate Permanent Account Number (PAN) issued by the Income Tax Department of India. | PAN Authentication as Proof of Identity (POI) in Digital KYC |
| PAN Status Check | API to authenticate the status and details of a given PAN. | PAN status check in customer-facing journeys | |
| PAN Profile (Detailed) | API to share the demographic/profile details of an Individual/Entity using a PAN | Auto-filling of verified PAN data to reduce manual data entry during onboarding | |
| Aadhaar Number Verification | API to authenticate the 12-digit Aadhaar Number of a user. | Basic Aadhar Number verification in customer-facing journeys | |
| Aadhaar Offline KYC (XML Verification) | API to validate the XML file of an Aadhaar card | Offline KYC during Full KYC | |
| Utility Bills Authentication | Mobile Authentication | API to authenticate current status of a Mobile Number and the connection type [Prepaid / Postpaid] | Non-OTP-based mobile authentication in customer-facing journeys |
| Electricity Bill Authentication | API to authenticate Electricity Bills / Customer ID issued by various Electricity Distribution Companies across India. | Proof of Address in Retail KYC (where Aadhar is not available) and commercial KYC | |
| Services we plan to support in the near future | |||
| Category | Service Name | Description | |
| Banking Authentication | Bank AC Verification | API to verify bank account holder name basis IFSC and account number | |
| Commercial Verifications | GSP GST Return Filing | The API provides the filing history of the particular GSTIN with the GST Network. Delay and Default fields in the API response are calculated for the following – GSTR 1, GSTR 3B, and CMP 08. The due date and number of days of delay for filing returns can also be fetched using an optional request parameter | |
| MCA Signatories | API to authenticate directors/partners of company/LLP | ||
| Company and LLP Master Data | API to authenticate Company, LLP, FCRN and Foreign LLP Identification Numbers issued by the Ministry of Corporate Affairs (MCA) | ||
| Shop & Establishment | API to authenticate Shop & Establishment Certificates issued by Municipal Authorities in selective parts of India (list of supported areas attached below in notes) | ||
| Digital Essentials – Contactability | Email Authentication | API to authenticate email ID provided by the customers as part of the registration process | |
| Employment & Income Authentication | EPF Authentication | API to authenticate Universal Account Number (UAN) issued by Employees Provident Fund Office (EPFO) in India, via OTP based Consent of the Account Holder | |
| Miscellaneous | CKYC Search | API to search basic details of individual from CERSAI portal | |
| CKYC Download | API to download individual details that are uploaded at CERSAI portal | ||
| OCR Services | ITR-V OCR | API to extract data from Income Tax Return Acknowledgement Form (ITR-V) issued by the Income Tax Department of India | |
| Retail Verifications | Aadhaar XML Download (Aadhar eKYC) | API to download the XML file on successful OTP validation (parsed XML O/P is shared in response) | |
| Driver’s License Authentication | API to authenticate Driver’s License issued by the Road Transport Offices of the States of India. | ||
| Voter ID (EPIC) Authentication | API to authenticate Voters’ ID issued by the Election Commission of India. | ||
| Passport Verification | API to verify passports issued by Passport Seva Kendra basis File Number and Date of Birth | ||
| DigiLocker Account Status | API to check if the DigiLocker account exists for the given mobile number | ||
| DigiLocker Document List | API to get the list of all documents from the user’s DigiLocker Account | ||
| DigiLocker Document Download | API to download the documents linked with user’s DigiLocker account | ||
2. Prerequisites
- You must be the Administrator of your LeadSquared account to install and configure this connector.
- You must have a Karza Account with access to their API collection for the required services.
- This is a paid feature. To enable it, reach out to your account manager, or write to support@leadsquared.com.
3. How it Works
First, install, configure and test the Karza connector. Next, create a dynamic form to facilitate the actual KYC verification for the end user. Using form rules, call the relevant connector service, and map the response from Karza to display the KYC verification results and data to the end user. You can map the response to an additional field in the form such as ‘Is PAN Verified’, ‘Verification Status’, etc.
The Karza integration requires the following steps –
- Install and configure the Karza connector.
- Choose the required services (Retail Verification, Commercial Verification, Asset and Vehicle Verification, etc.).
- Map system/custom fields in LeadSquared (e.g., lead/opportunity/activity fields) to the attributes required by Karza for the chosen services.
- Use the Karza dashboard to test the connection for each service.
The Karza dashboard provides a convenient tool to test the connection between LeadSquared and Karza, and access success/failure responses for each service.
- An API URL is generated for each service.
- Choose a lead to test the API and obtain a response.
- Note the attributes in the response payload.
- Create a dynamic form to facilitate the KYC process for the end user.
- Add the lead/opportunity details to the form (PAN number, Aadhaar number, GSTIN, etc.).
- Add an additional field to show the result of the KYC verification to the end-user.
- For example, you can use fields like ‘Is PAN Verified’, ‘Is Aadhaar Verified’, etc.
- Use additional fields to capture other data points returned by Karza.
- Use form rules to call the relevant API (available in the Karza dashboard for each service) and populate the additional field (that’s shown to the end-user, e.g., the ‘Is PAN Verfied’ field) with the verification response from Karza.*
- Publish the form
- Embed the form in a work area within the LeadSquared application using the Process Designer.
- Embed the form in a self-serve portal using the Portals Designer.
* Each service returns a user-friendly success (e.g., “Authentication Successful”) or error message (e.g., “Number to be authenticated seems invalid”) in the status.message response parameter.
4. Install and Configure the Connector
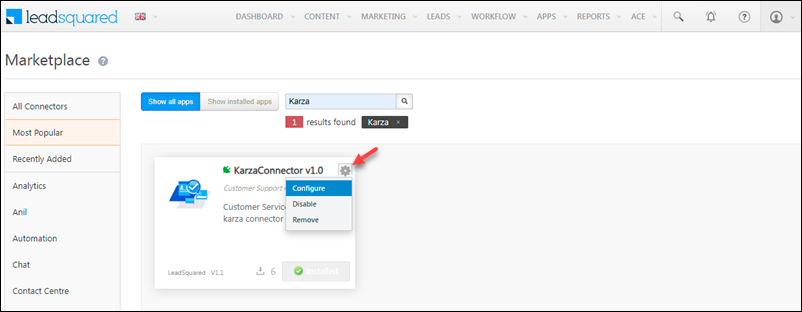
- From your LeadSquared account, navigate to Apps>Apps Marketplace.
- Search for Karza, and click Install.
- Alternatively, you can find the connector on the left panel, under Verifications.
- Once installed, hover your cursor over
 , and click Configure.
4.1 API Authentication
| Category | Environment | Base URL |
| All Authentication APIs (excluding GST) | User Acceptance Testing (UAT) | https://testapi.karza.in |
| Production (Live) | https://api.karza.in | |
| GST Authentication APIs | User Acceptance Testing (UAT) | https://gst.karza.in/uat |
| Production (Live) | https://gst.karza.in/prod |
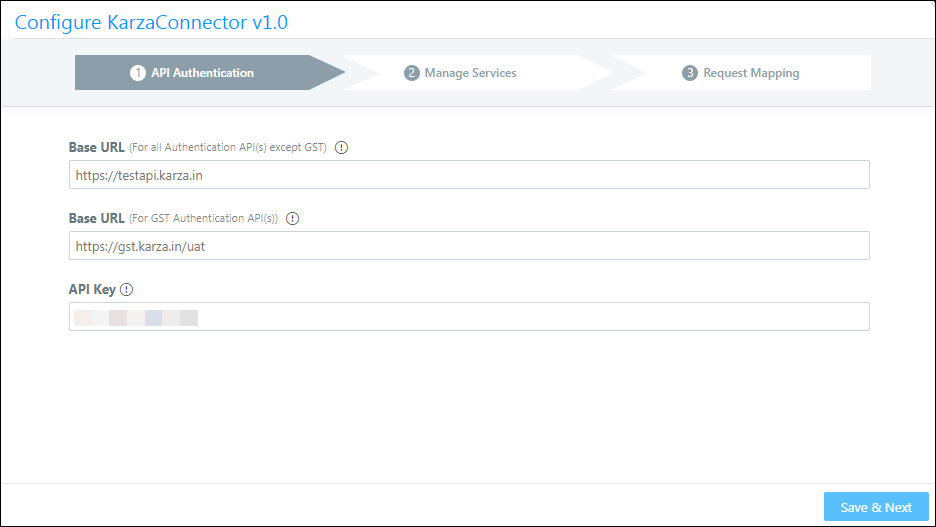
Enter the following –
- Base URL (For all Authentication API(s) except GST).
The base URL provided by Karza for KYC, Utility Bill, Asset and Vehicle, Employment and Income, Bank and Payments Authentication APIs. - Base URL (For GST Authentication API(s)).
The base URL provided by Karza for GST Authentication APIs. - API Key
The API provided by Karza for the Authentication APIs.
Click Save & Next when you’re done.
4.2 Manage Services
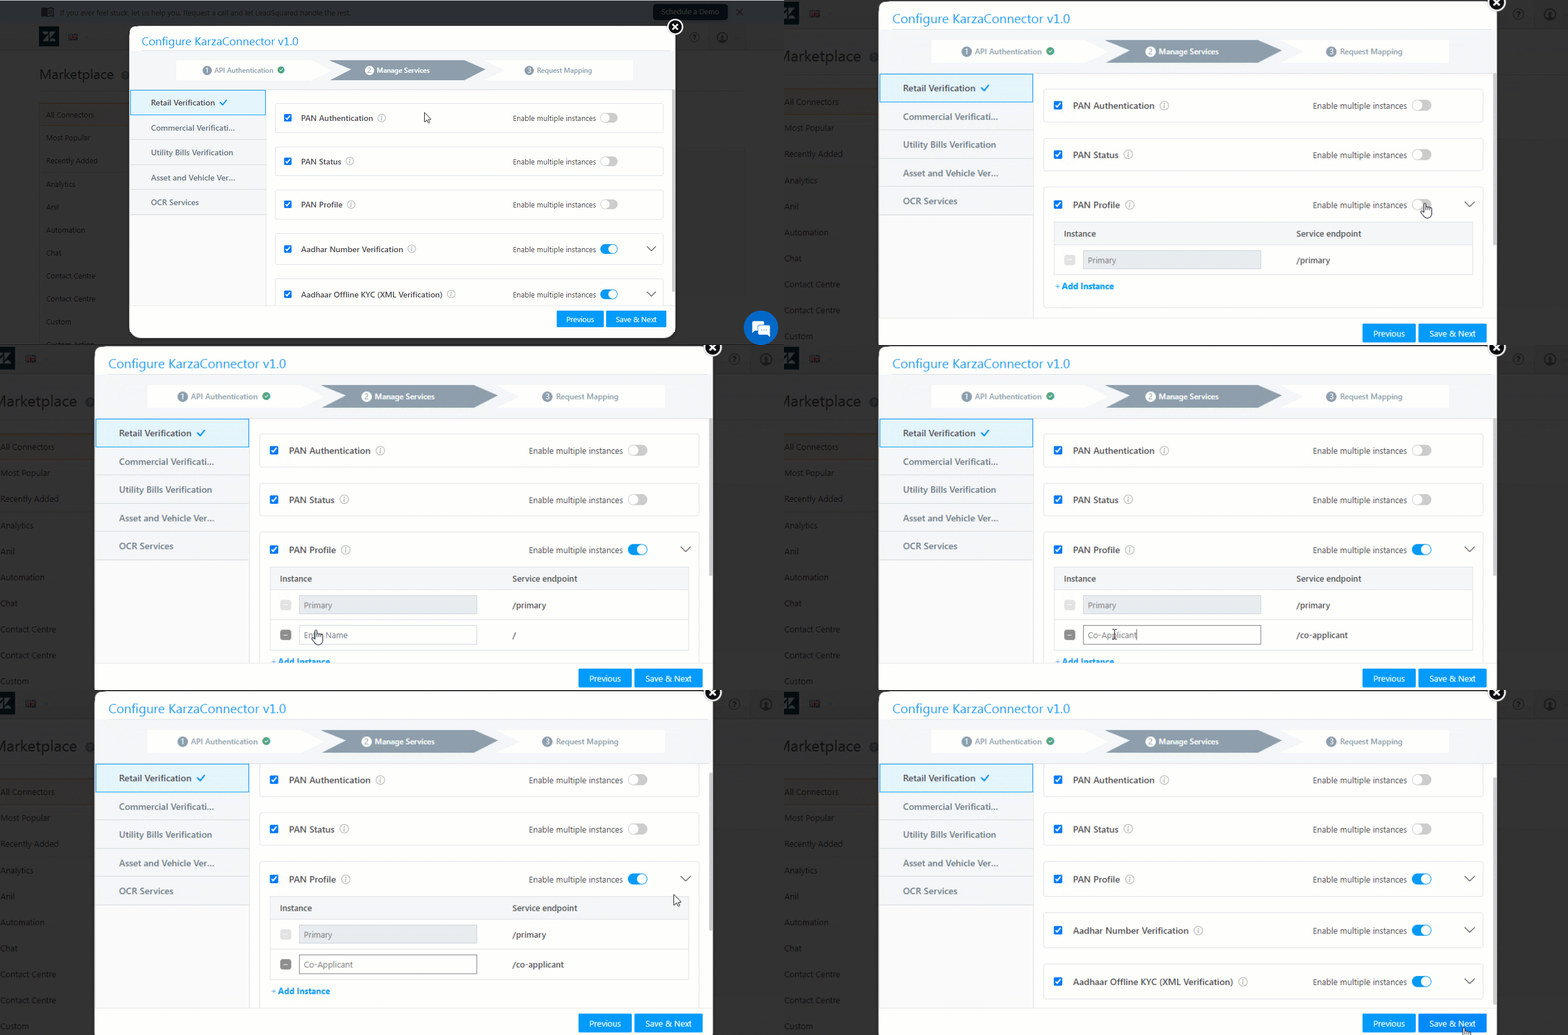
Available services are listed under each category. Select a category (Retails Verification, Commercial Verification, etc.), then select the services you want to enable (PAN Authentication, Aadhar Number Verification, etc.).
- Click
 to Enable multiple instances.
 - The primary instance is created by default. Click Add Instance.
- Enter a name for the new instance – e.g., ‘Co-Applicant’.
- To remove an instance, alongside the instance name, click
 .
.
- To remove an instance, alongside the instance name, click
4.3 Request Mapping
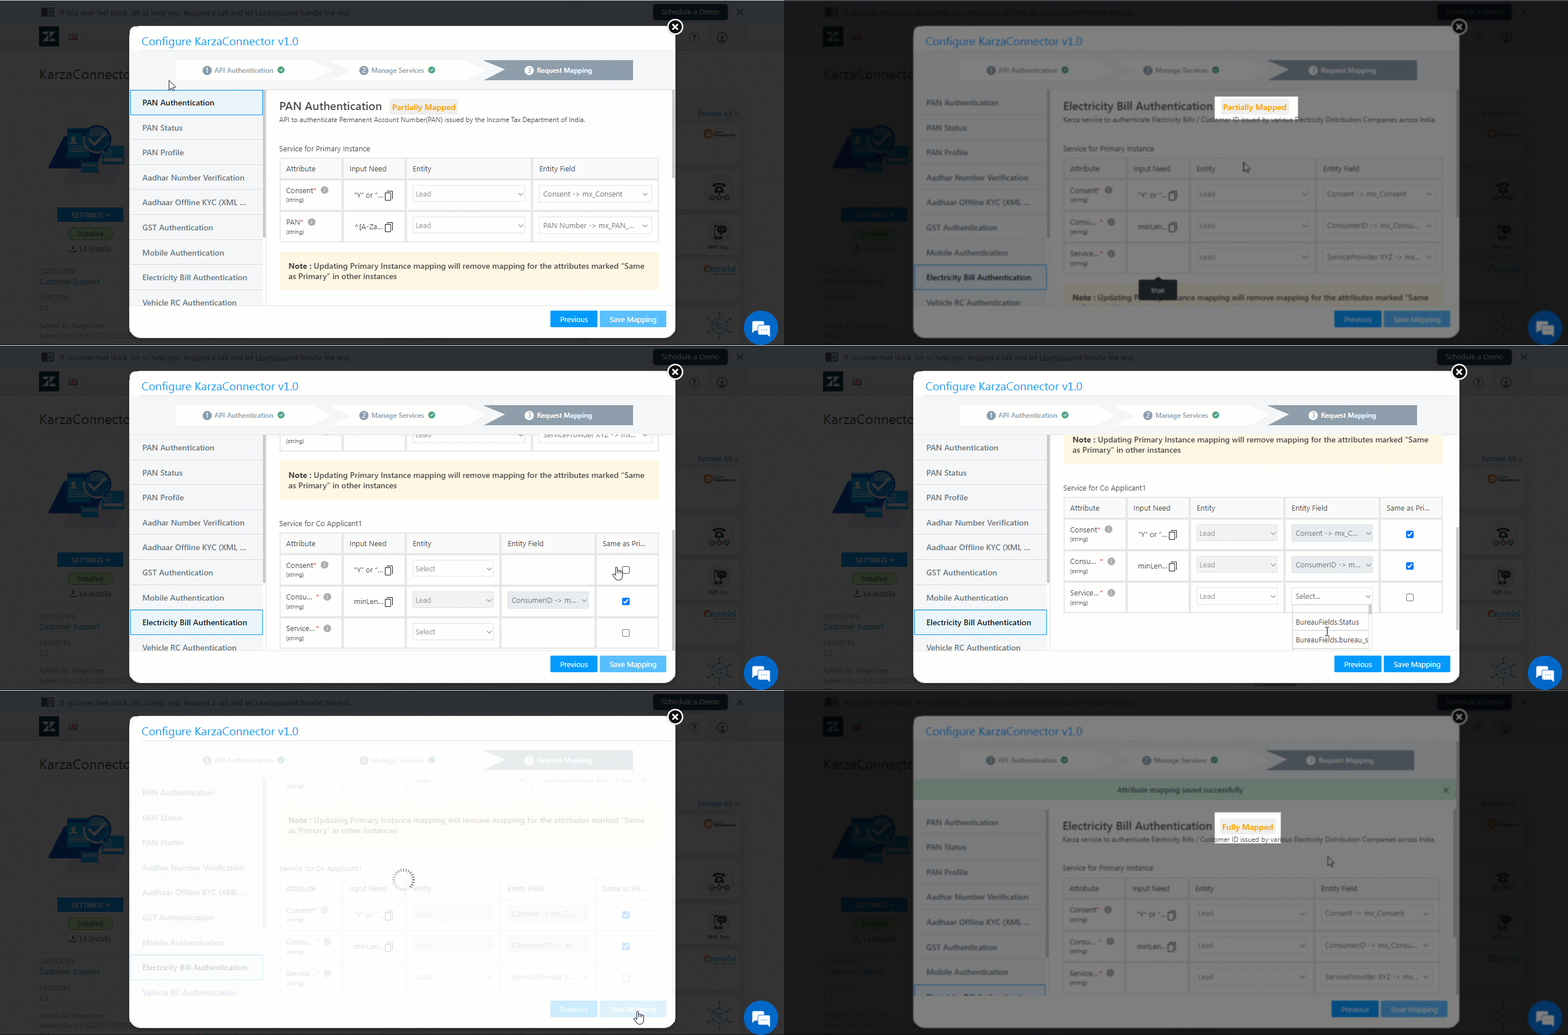
For each service, map the attributes required by Karza with the corresponding LeadSquared fields. If you’ve enabled multiple instances of a service, be sure to map the required fields for each instance. For each service the following statuses are displayed – Not Mapped, Partially Mapped, Fully Mapped.
- Alongside each attribute, click
 to view the attribute name.
 - The input requirements for each field are specified.*
- Select the LeadSquared entity (lead/activity/opportunity) and the entity field (e.g., PAN Number) to map to the attribute.
- For services with multiple instances, you can use the Same as Primary
 to inherit the mapping configured in the primary instance.
 - Your mapping configurations are not autosaved. Click Save Mapping to save your configurations at each step, or after mapping all attributes. Close the configuration pop-up when you’re done.
5. Test the Services
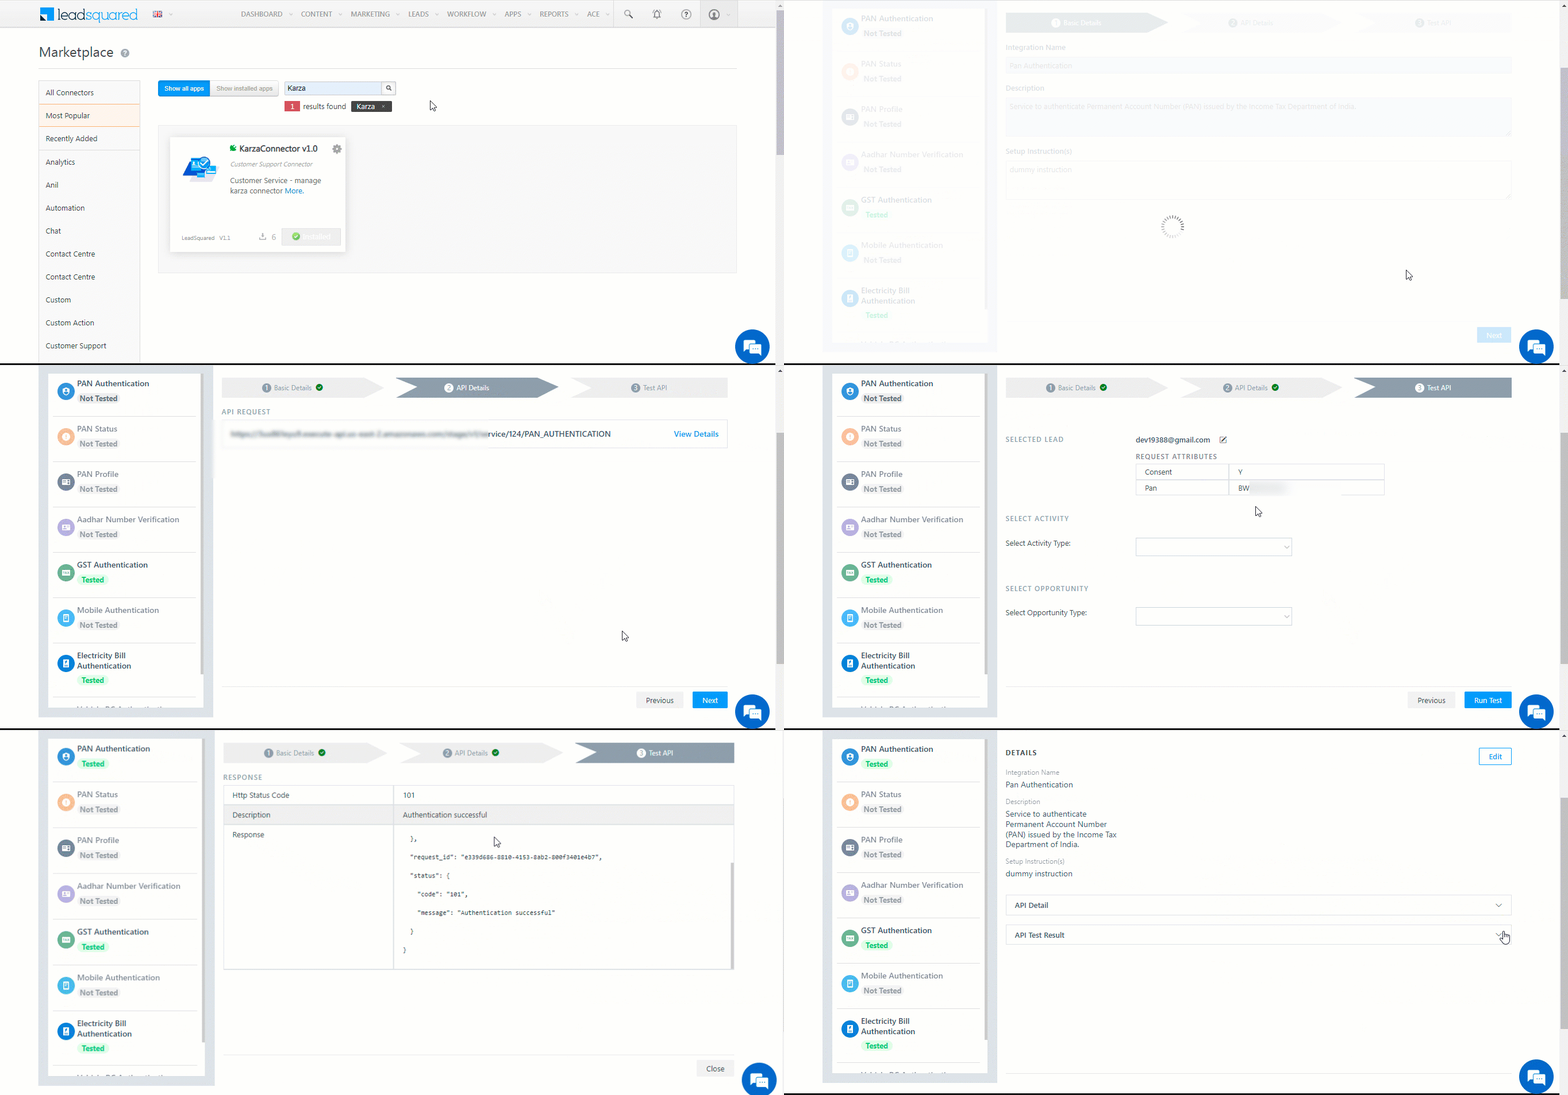
After installation and configuration, navigate to the Karza Verification Dashboard and test each service to ensure the connection is established and working as expected. After you test each service, the ![]() tag will change to
tag will change to ![]() .
.
- On the main menu, navigate to Apps>Karza Verification.
- Alongside the service you want to test, click
 .
. - The basic details are pre-populated. Enter setup instructions, and then click Next.
- Alongside the API Request URL, click View Details.
- This is the API URL you’ll call to test the service. It’s also the URL you’ll use to call service from your dynamic form.
- Here, you can change the attribute-field mapping pre-configured at the connector level. Note that any changes made here will update the mapping of that attribute across all services where it’s used. If you made any changes, click Save and close the pop-up.
- Click Next to proceed to the Test API step.
- Search for a lead using the lead’s complete email address. Click Search, then select the lead from the search results.
The request attributes being passed in the request to Karza will be displayed (this is helpful for testing in UAT accounts, to ensure the data being passed in the request is valid).
Also, you can select an activity type/opportunity type and the activity/opportunity instance to test the service.
6. Create a Dynamic Form for the KYC Process
After testing the enabled Karza services, set up a seamless KYC process for the end-user using dynamic forms –
- Create a new form or edit an existing one. For more details, see How to Create a Form.
- Add the lead/activity/opportunity fields required for KYC to the form.
- Ensure these fields were mapped correctly during the connector configuration and testing.
- Add the Regex to the field-level validation properties.
- Add the relevant rules.
Example – PAN OCR and PAN Verification Services
In this example, we set up a dynamic form where –
- We use Karza’s PAN OCR service to extract information from an uploaded PAN card document
- We use Karza’s PAN Authentication service to verify the PAN card details
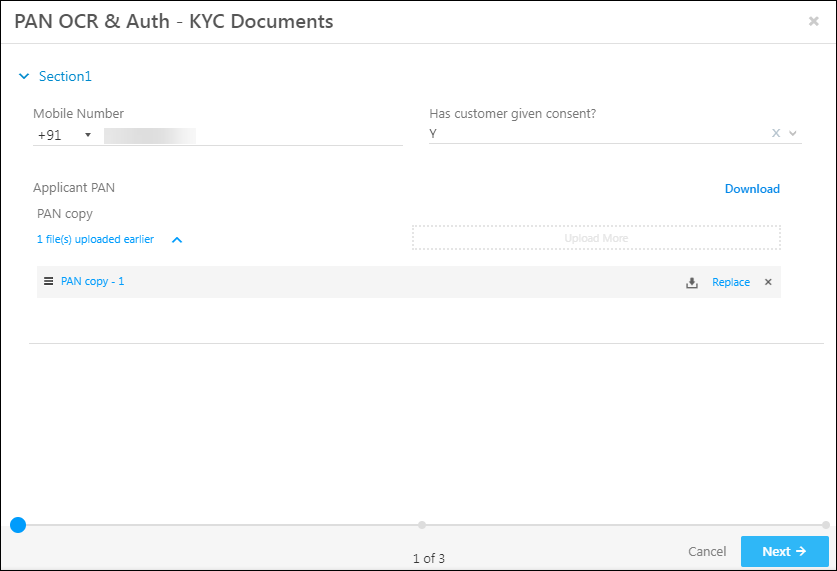
We’re using a multi-step form for this example. In the first step, we capture the customer’s mobile number, consent, and PAN document (using a custom field set).
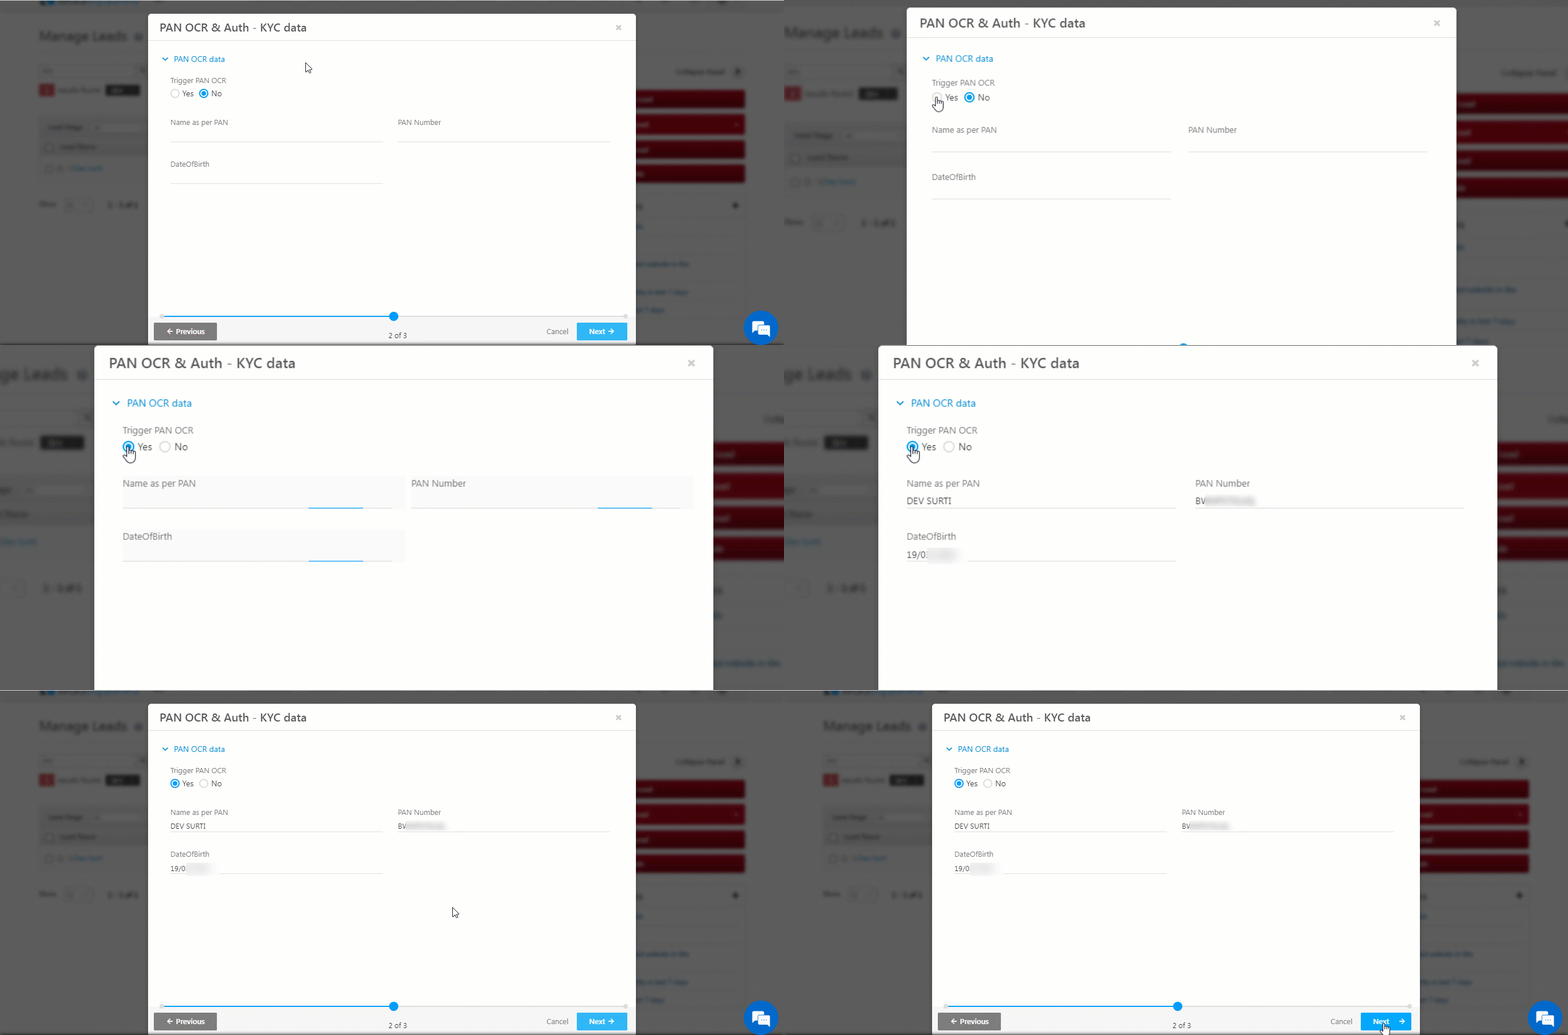
In the second step of the form, we use a boolean field, ‘Trigger PAN OCR’, to trigger the call to Karza’s OCR service, and populate the Name, PAN Number, and Date of Birth fields with the response.
This is set up using the following example rule –
If ‘Trigger PAN OCR’ is true,
Then Set Value of Field ‘Name as per PAN’, ‘PAN Number’, and ‘Date of Birth’ using Data From API – POST <API URL, post data obtained from Karza verification dashboard> and map the specific response parameters to set the field values.
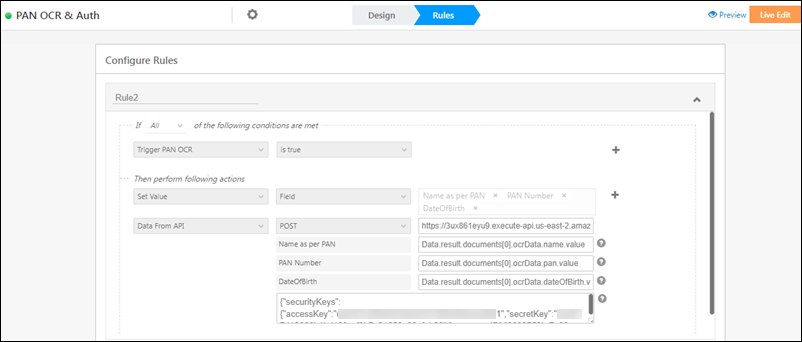
All the details of the service (API URLs, Post Data, Mappings, Responses, etc) to enter in the form rule are available on the Karza Verification Dashboard.
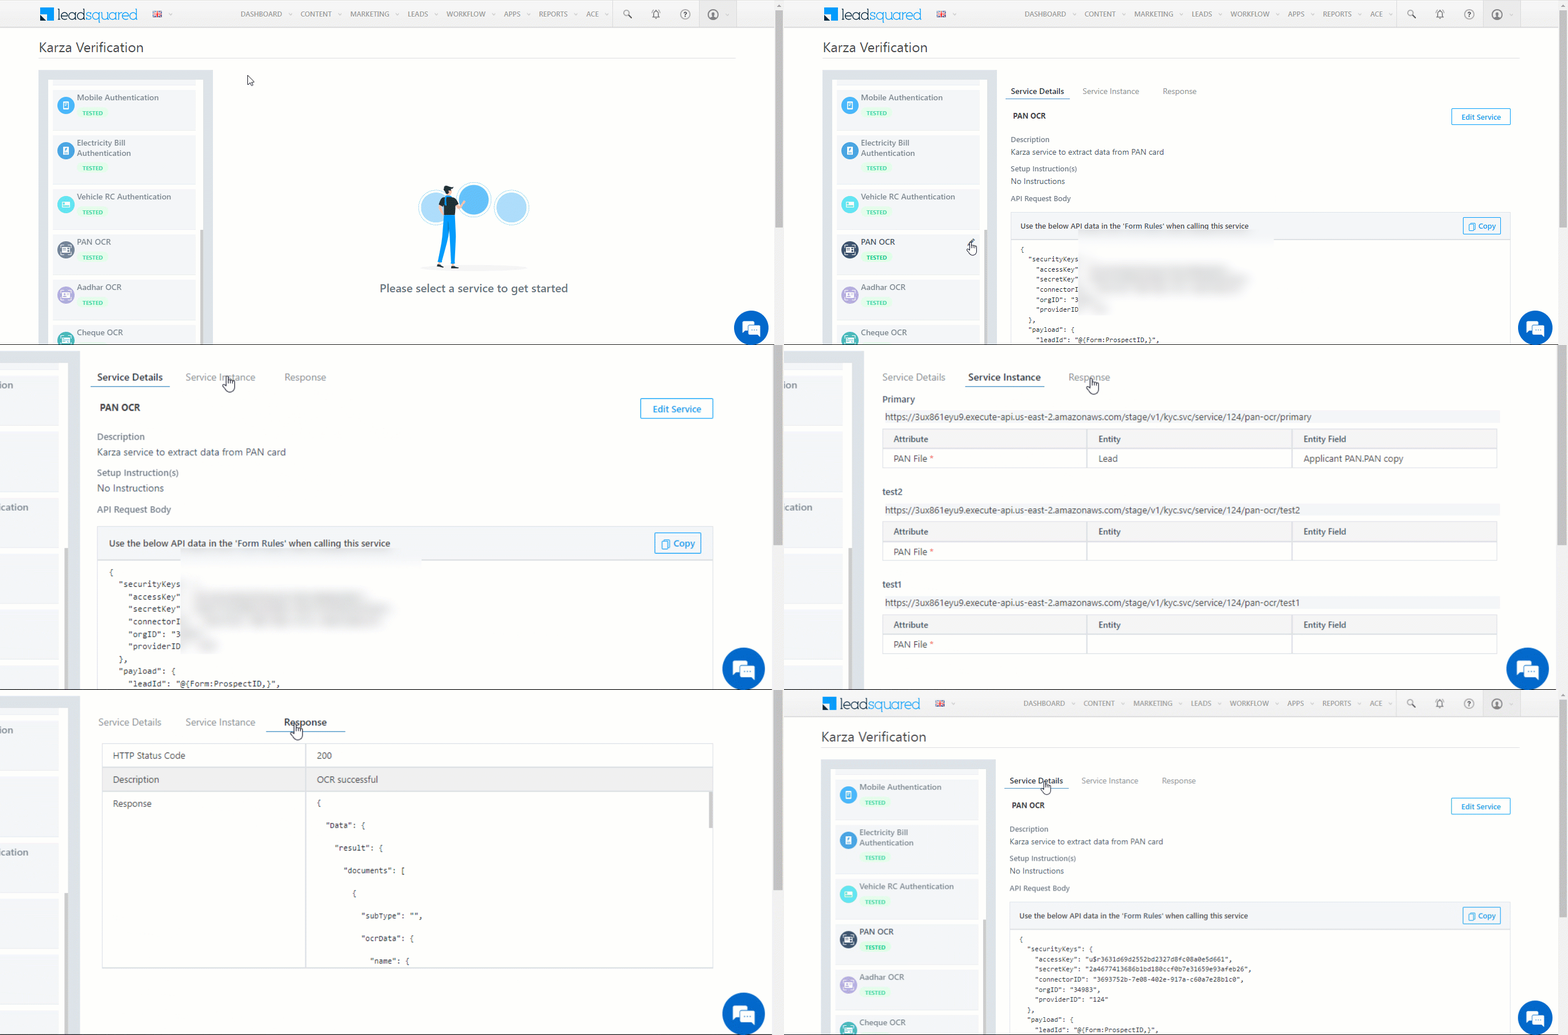
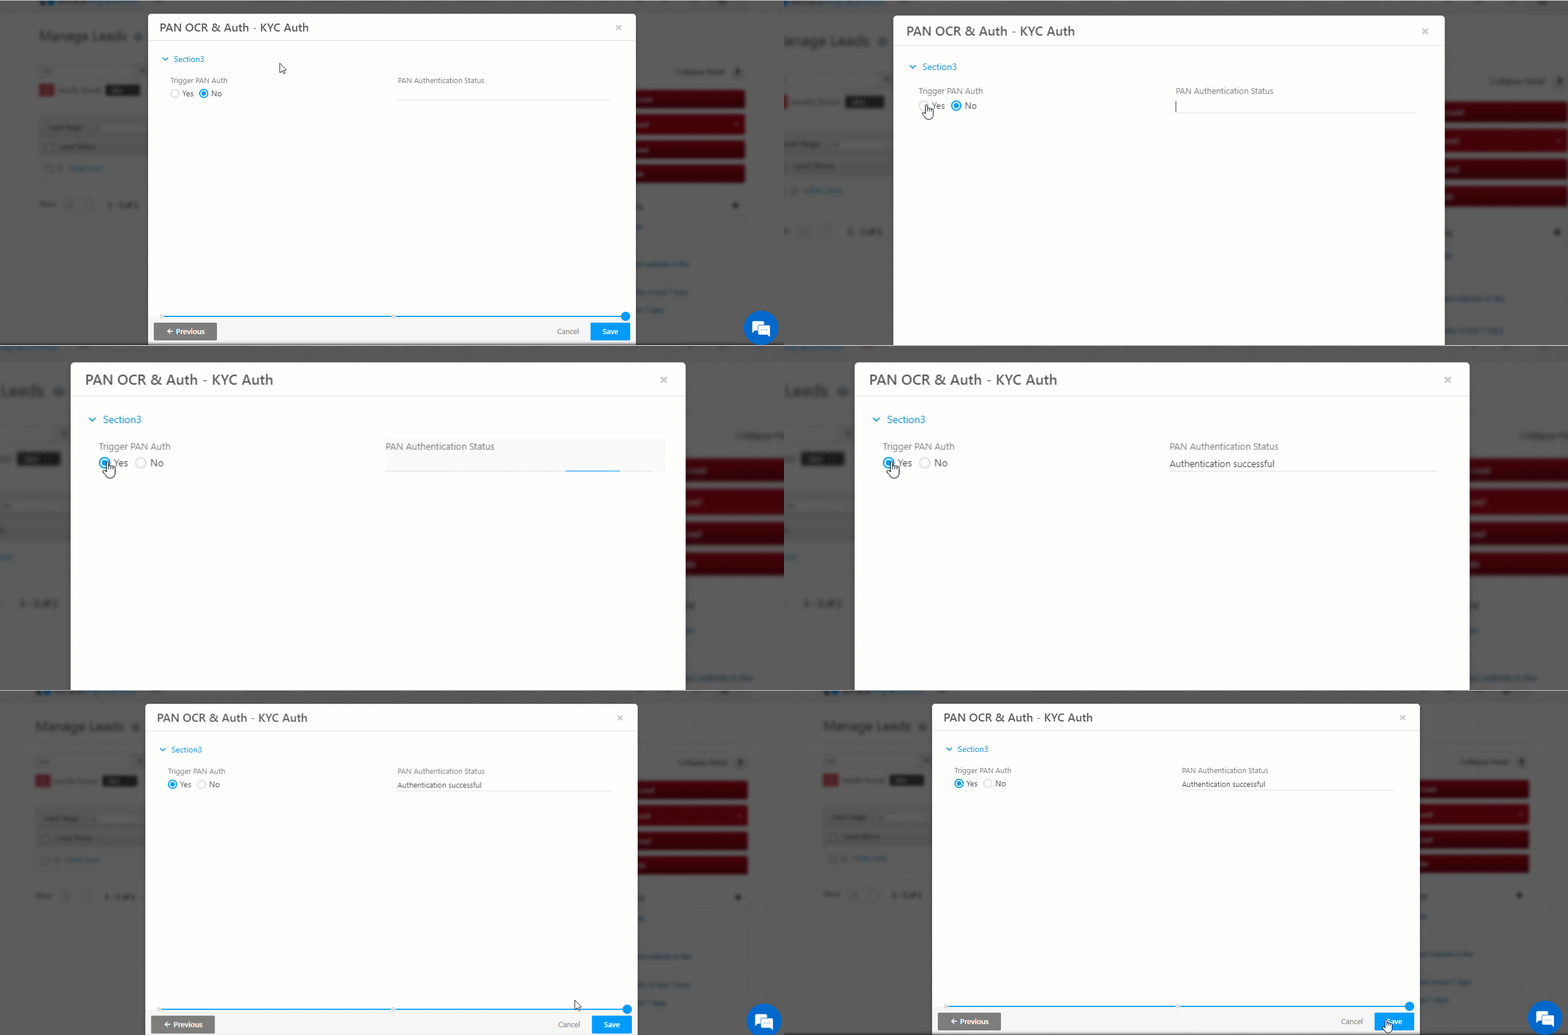
In the third step of the form, we call Karza’s PAN Authentication service to verify the PAN card details. We use a boolean field, ‘Trigger PAN Auth’, to trigger the call to Karza’s service, and populate the response in the ‘PAN Authentication Status’ field.
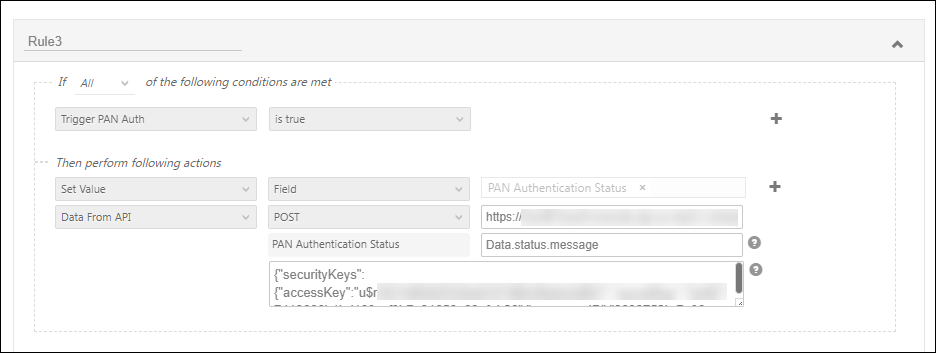
Here’s the sample form rule used to set this up –
If ‘Trigger PAN Auth’ is true,
Then Set Value of Field ‘PAN Authentication Status’ using Data From API – POST <API URL, post data obtained from Karza verification dashboard> and map the specific response parameters to set the ‘PAN Authentication Status’ field values.
Next Steps
When you’re done, Publish the form. Next –
- Use the process designer to embed it in a work area on LeadSquared.
- Use the portal designer to embed the form in a self-serve application portal.
Any Questions?
Did you find this article helpful? Please let us know any feedback you may have in the comments section below. We’d love to hear from you and help you out!


