


Get Started
Sales Suite
Field Ops
Marketing
Service CRM
Integrations & Apps
FloStack
How to Create a Process
1. Feature Overview
The process designer lets you organize your forms into workflows. You can create workflows for any business process such as loan/insurance application, KYC collection, education applications, medical applications, etc.
After you’ve created one or more forms, use the process designer to –
- Choose the work area (Manage Forms page, Manage Activities page, Smart Views, etc.) where you want to display your forms.
- Set conditions on users (show forms to particular teams, roles, sales groups, etc.) and form field values.
- Chain together multiple forms to create processes.
If you haven’t created any forms yet, see How to Create a Form.
2. Prerequisites
- You must be an administrator user to use the process designer.
- You must create and publish forms to use in the process designer.
3. Example Use Case
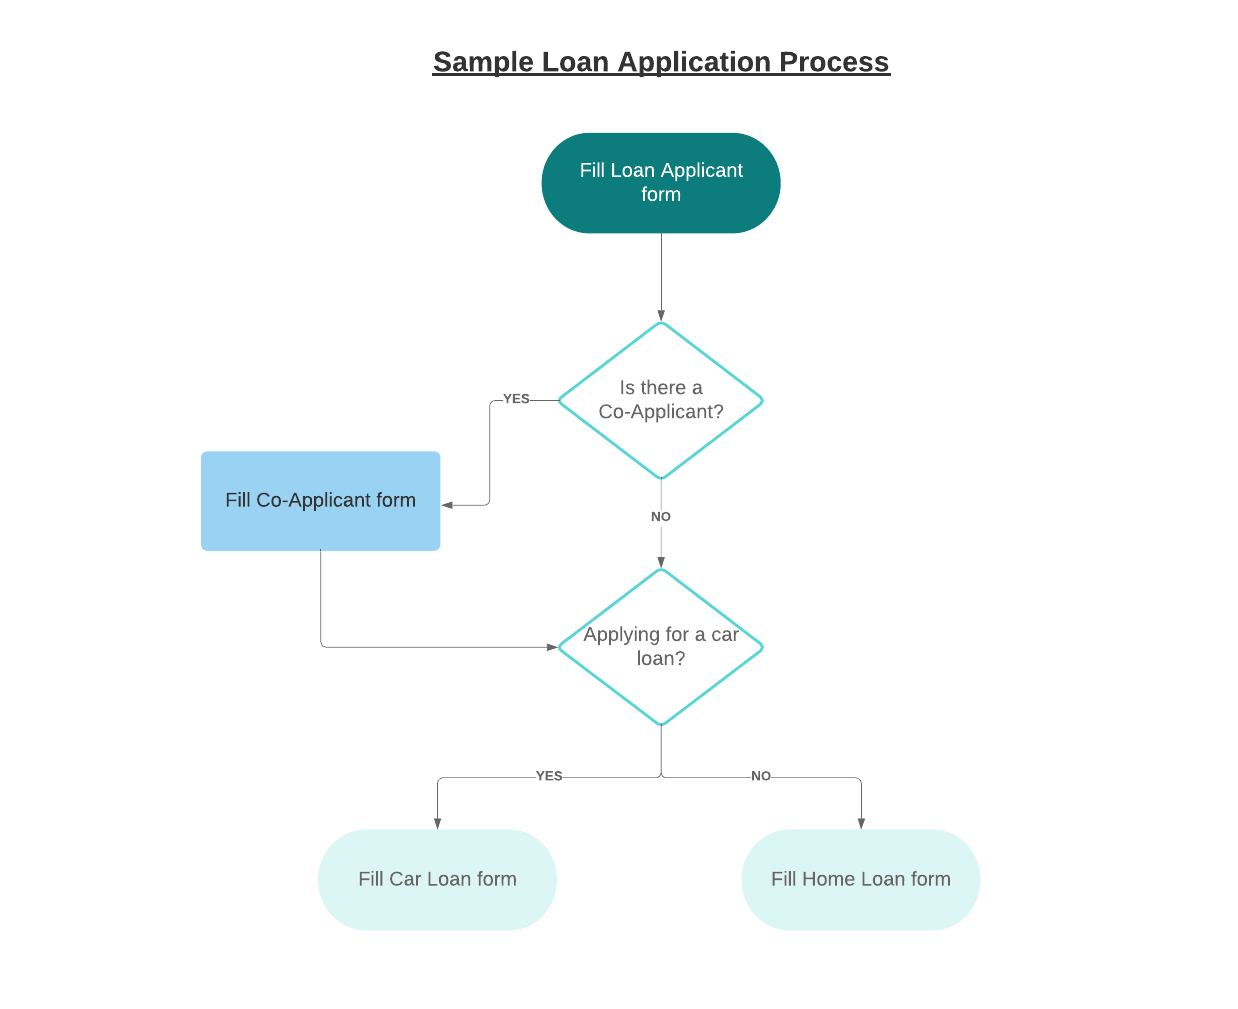
This example takes the use case of a simplified loan application process.
Let’s assume we’ve created the following forms –
- Loan Applicant form
- Co-Applicant form
- Car Loan form
- Home Loan form
Using the process designer, we can chain these forms together to create the following process –
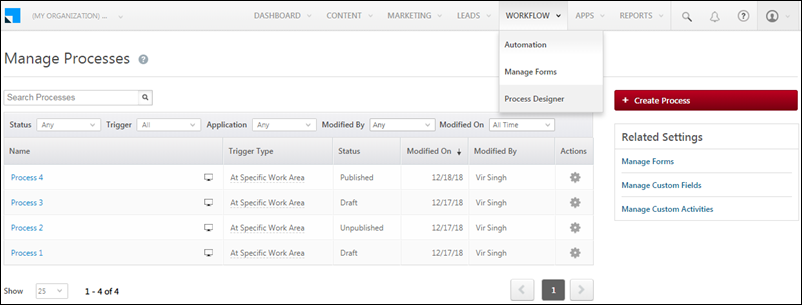
4. Manage Processes
To access the Manage Processes page, navigate to Workflow>Process Designer.
All the processes you create will appear here. You can search for a process or filter by status, trigger, application, modified by and modified on dates. The settings![]() icon under the Actions column allows you to edit, delete, clone, rename or publish a process.
icon under the Actions column allows you to edit, delete, clone, rename or publish a process.
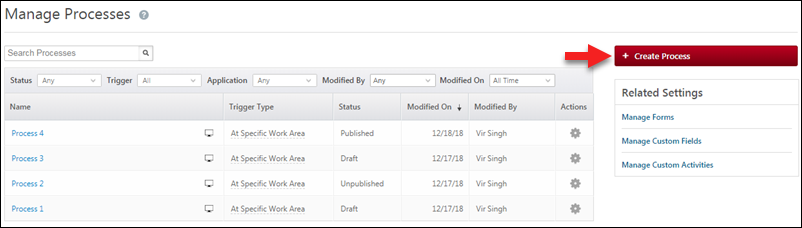
5. Create a Process
Click the Create Process button to create a new process.
Now choose a trigger –
- At Specific Work Area
This option lets you create a button on a specific page (Manage Leads, Lead Details, etc.) to trigger the process. - On Task Complete
The process will be triggered before a user marks a task complete.

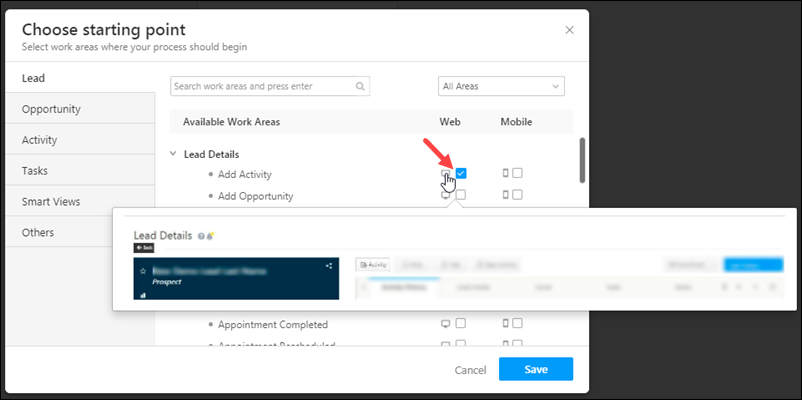
5.1 At Specific Work Area
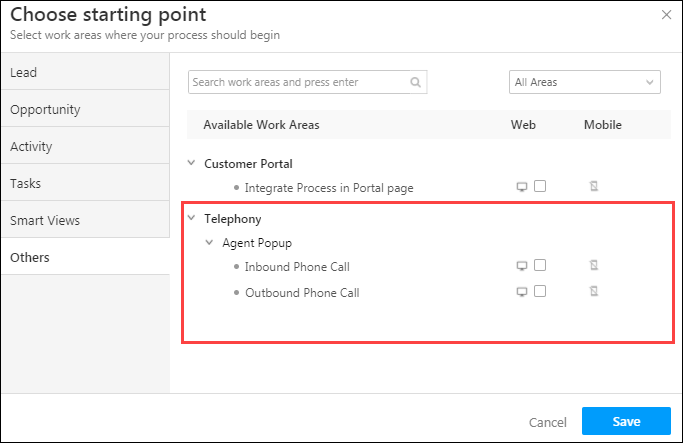
If you select the At Specific Work Area trigger you can choose the page or area you want the process to be initiated from. You can choose multiple work areas to begin a process from.
- Under the Available Work Areas section, click on a work area, then click the checkboxes alongside Web or Mobile.
Be sure to hover your cursor over the desktop and mobile
  icons to view a screenshot of the work area where you’re placing the starting point of the process.
 - Select all the work areas you want, then click Save.
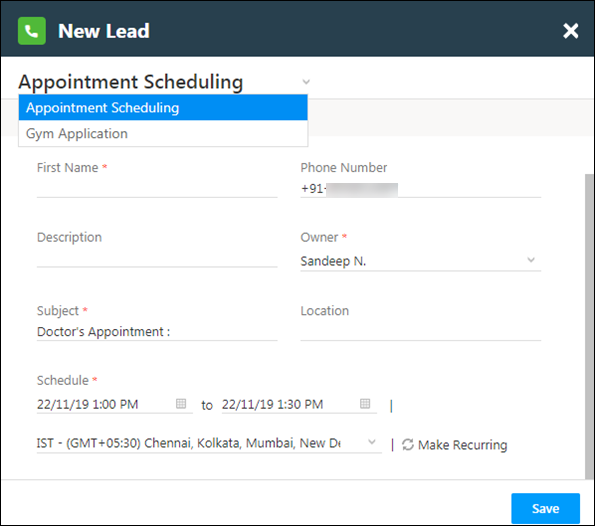
Agent Pop-up
You can trigger a process from the Agent pop-up for inbound and outbound phone calls. Just select the appropriate option under Others>Telephony>Agent pop-up work area>Inbound Phone Call/Outbound Phone Call.
Note: Forms linked to the Telephony work area must have Phone Number or Mobile Number fields in the first tab.
You can display multiple forms on the agent pop-up to help users switch between applications (car loan, home loan, personal loan forms, etc.). This requires you to setup multiple processes.
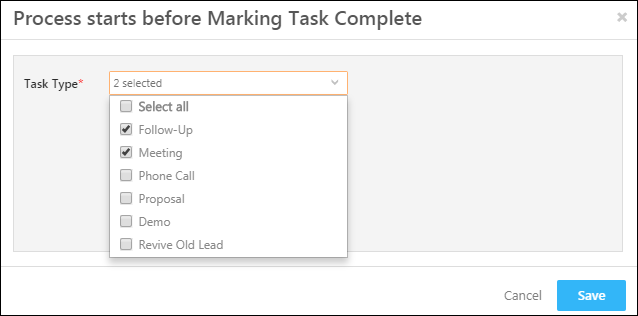
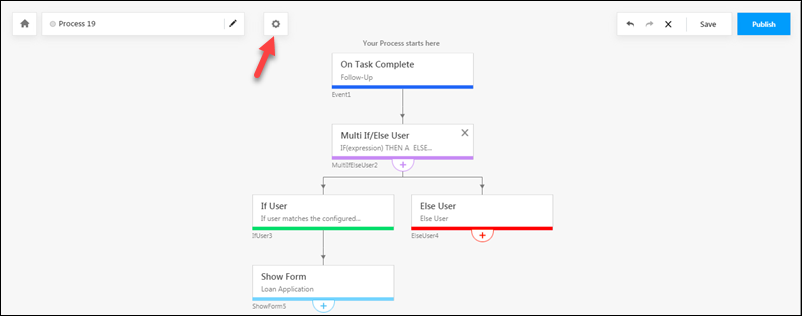
5.2 On Task Complete
The On Task Complete trigger allows you to start the process when a user attempts to mark a task type complete. You must select the task types you want to initiate the process on by clicking the corresponding check-boxes. Click Save when you’re done.
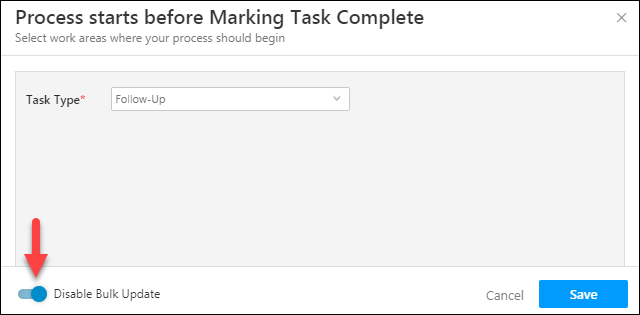
Note: When tasks are updated (completed) in bulk from the Manage Leads or Smart Views page, the process configured on a certain task type may not trigger. To ensure that users can’t bulk update and complete a task type you’ve used as a trigger for a process, click the Disable Bulk Update option –
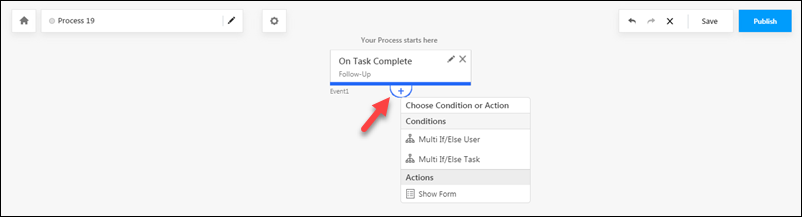
After setting a trigger, click the add ![]() icon to view the subsequent conditions and actions.
icon to view the subsequent conditions and actions.
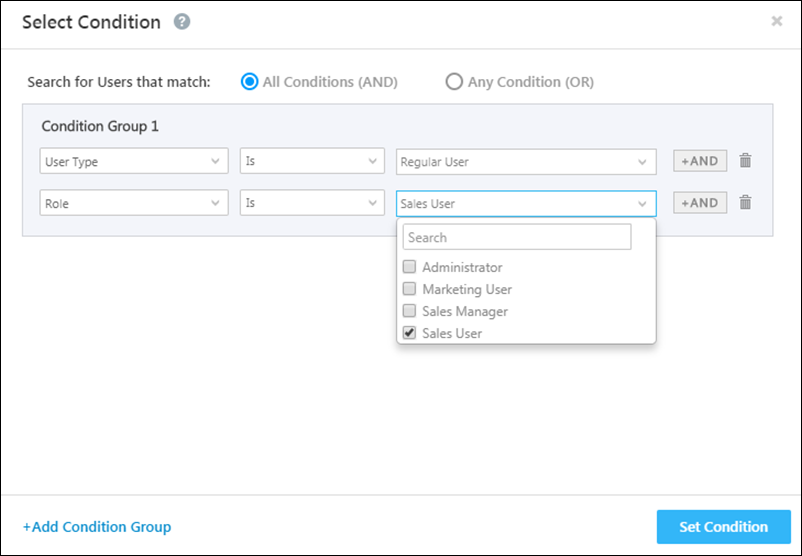
5.3 User Conditions
You can set up multiple conditions to choose which users can see your forms and processes. You can set up these conditions on any user attribute including role, team, sales group, etc.
- Under Conditions, click the Multi If/Else User option.
- You can create condition groups and set up multiple conditions. For more information, see User Advanced Search.
- Click Set Condition when you’re done.
The process will branch out into a Yes path and a No path.
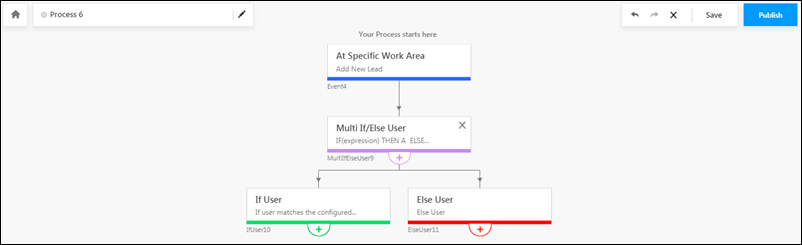
Click the add icon under each path to continue the process.
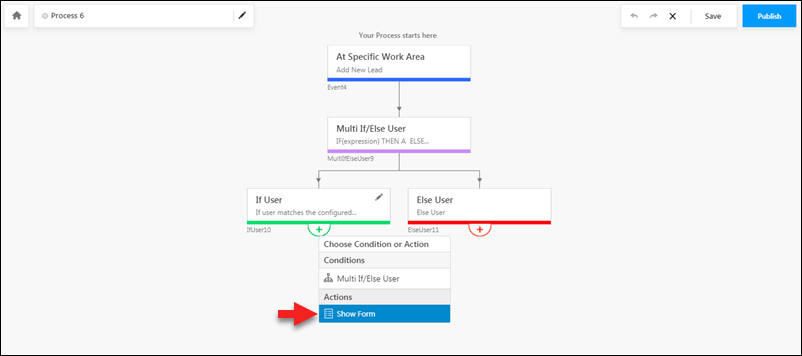
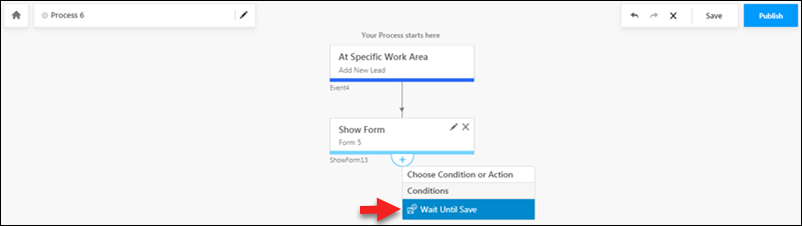
5.4 Show Form Action
Click the Show Form action to display a published form at any point in your process.
The Show Form pop-up has 2 tabs.
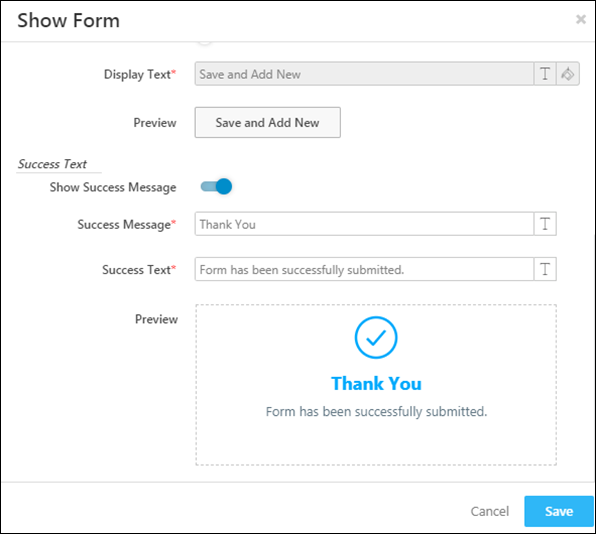
The Form Details tab lets you choose the form you want to display, how you want the initiate process button to look in the work areas you selected and also how you want the action buttons within the form to appear.
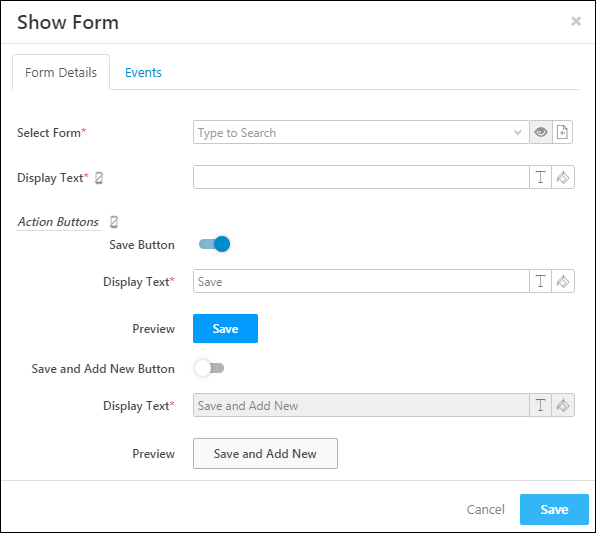
You can also display a success message when the form is successfully submitted. Scroll down to the Success Text section, and enter the success message and text.
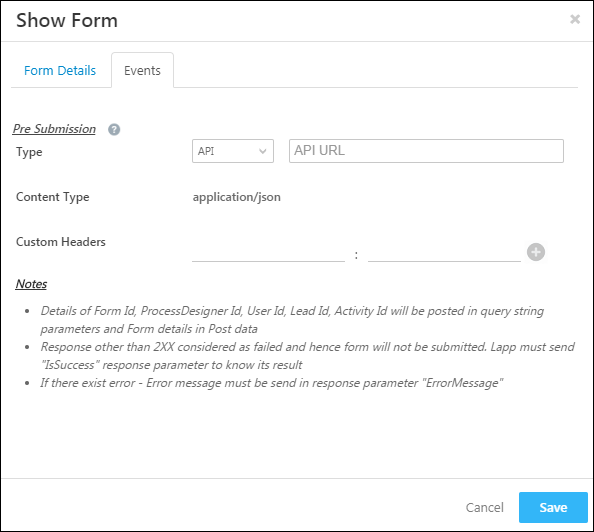
The Events tab lets you call Lapps or an external API before a form is submitted. You can use this as a final validation for a form submission. Read the notes carefully.
The API or Lapp should return 200 OK as the response code and content like {“IsSuccess”:true} or {“IsSuccess”:false,”ErrorMessage”:”Your personal details and passport details do not match. Please check”}
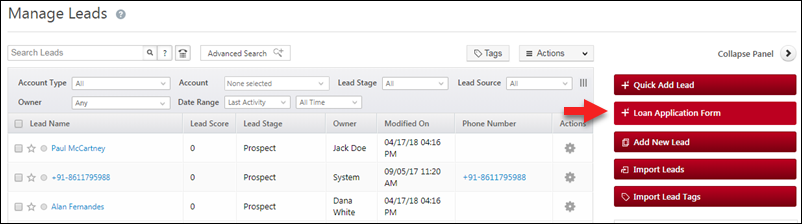
After selecting a form and setting all the configurations, click Save. Here’s an example of how the initiate process or open form button will appear –
5.5 Adding More Forms to the Process
After you’ve added a Show Form action, you must select the Wait Until Save option before you can add more conditions or actions to the process.
Following the Wait Until Save condition, you can choose conditions based on the form fields of the previous form you’ve selected.
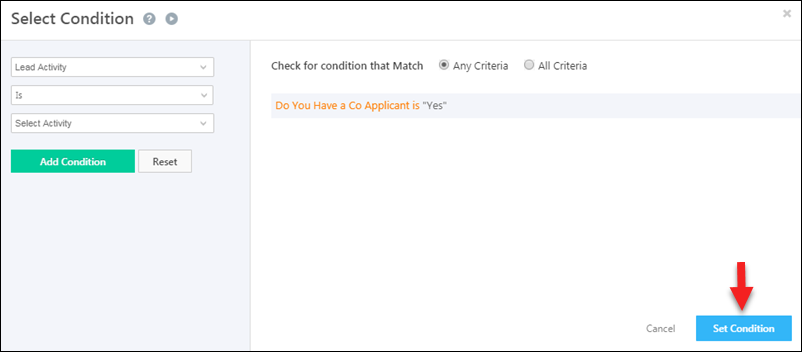
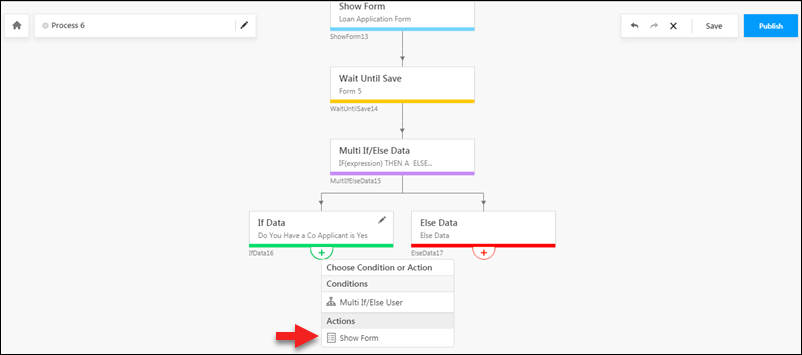
For example, if you’ve included a field in your previously chosen form called ‘Do you have a co-applicant’. You can now use the Multi If/Else Data condition to check if the field value is ‘Yes’, If the value is ‘Yes’ you can show the ‘Co-Applicant’ form.

Use the advanced search feature to set conditions on the fields of the form you selected in your previous Show Form action. For more details, see How to Use Advanced Search.
When you’re done, click Set Condition.
You can now show another form when these conditions are matched.
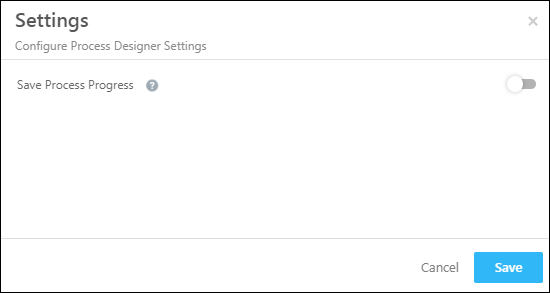
5.6 Process Settings
Click the settings![]() icon to access the process settings.
icon to access the process settings.
The Save Process Progress setting allows you to save the progress of all the forms in your process. It allows users to pick up where they left off, whether that’s in a particular section of the first form, or in some form further down the process.
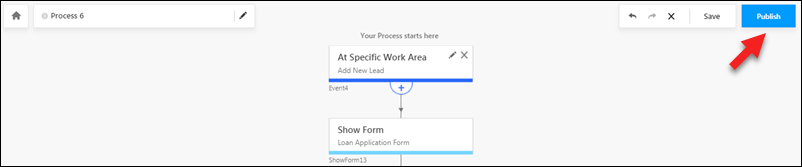
5.7 Save & Publish
Although your process gets auto-saved, it’s good practice to click the Save button to ensure you don’t lose your work. Click Publish when you’re done creating the process.
6. Demo
The following process follows a simple two-form flow. The first form is a simple loan application form. If the user marks the ‘Do You Have a Co-Applicant’ field as ‘Yes’ in this form, the process we created will trigger the second ‘Co-applicant’ form to appear.

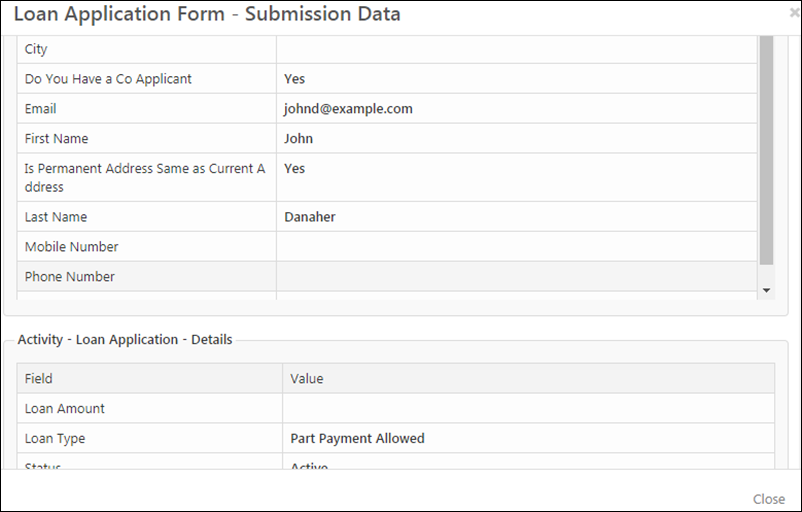
6.1 Form Submission Activity
An activity is posted against every form submission, to help you maintain an audit trail for each important change. You can view these activities on the Lead Details page –
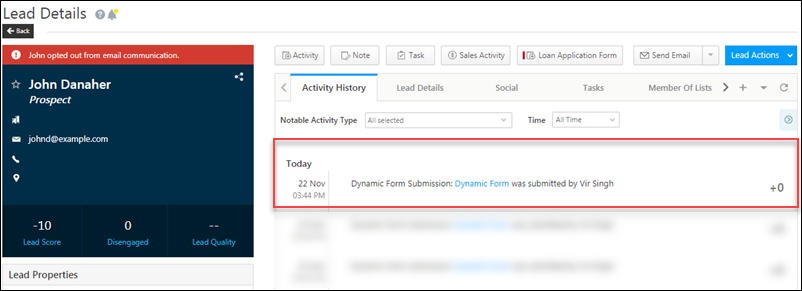
Click the activity to view details –
Any Questions?
If you have a question that this article did not answer, please let us know in the comments section below. We’ll be happy to improve the content and help you with any doubts you have.
These steps were followed completely, but no button or activity appears at the specified locations on the Lead Details/Manage Leads page. Is there a troubleshooting page to discuss these issues?
Hi, Zach. Could you send an email to support@leadsquared.com with a brief on the use case you’re trying to achieve? We’ll get back to you ASAP with a resolution.
how can i setup an automation if task is updated then action, else nothing.
it on specific task upd.ation
Hi. I’m sorry, I’m not sure I understand this query. Could you please elaborate?
Why is there a limit on the number of processes that we can create? How can we manage if we have more processes? What can be the solution? Please help.
Hi, Ritik. Thank you for your question. There is a limit on the number of processes you can create, based on your LeadSquared plan. You can either optimize your processes, or you can increase the limit on the number of processes. Please reach out to your account manager, or write to support@leadsquared.com.