1. Welcome to Your New LeadSquared Experience!
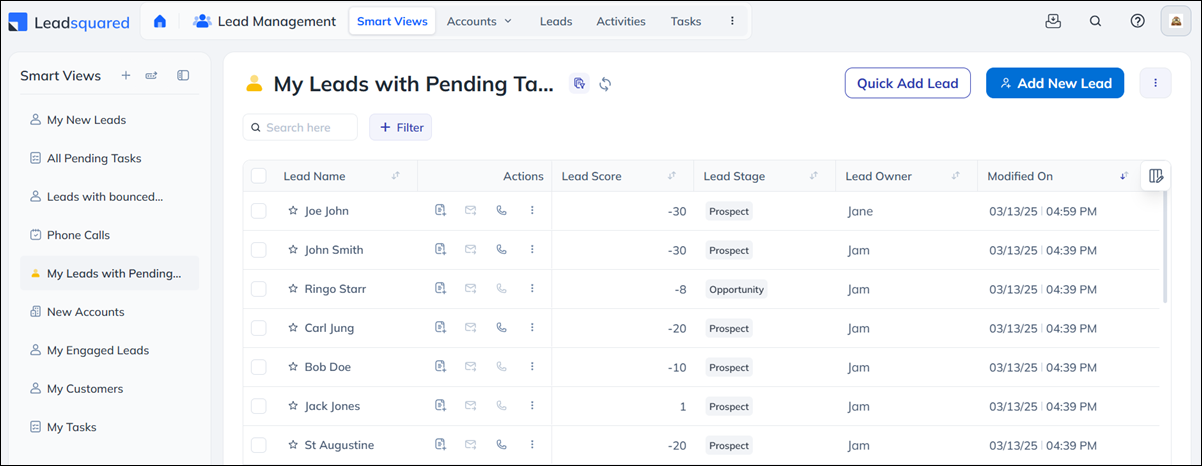
LeadSquared NextGen is a complete UI/UX transformation designed to enhance productivity, simplify navigation, and streamline workflows. Built with data-driven insights, it eliminates friction points in daily operations, introduces a modern, intuitive interface, and delivers faster performance for a seamless user experience.
Key Enhancements
- New Navigation: Faster access to essential features with streamlined menus.
- Global Search: Instantly find leads, tickets, and key details from anywhere.
- Quick View: Access leads, tasks and ticket details and actions in one click without opening full pages.
- LSQ1 Design System: A fresh, modern UI with customizable grids, filters, and layouts.
- Smarter Workspaces: Powerful enhancements on every page.
- App Tabs: Open multiple records in tabs, reducing back-and-forth navigation.
Our Fastest Version Yet: NextGen delivers a 35%+ performance boost, making it the fastest LeadSquared experience ever.
2. Accessing NextGen
Get started with LeadSquared NextGen by logging in through https://app.leadsquared.com/
Once enabled, all users are redirected to NextGen. They don’t need to remember specific URLs, and their existing bookmarks will continue to work.
3. New UI to NextGen Transition
If you’re currently using LeadSquared’s New UI (enabled via the “Try Now” option from the classic interface), you’re already experiencing parts of the NextGen platform. Several enhancements from the LSQ1 Design System—such as customizable filters, smarter columns, and seamless pagination—have been introduced across key pages to provide a more streamlined experience.
This ensures that your transition to the full NextGen platform will be smooth and intuitive. With the complete upgrade, you’ll gain access to the entire suite of features, including:
- A comprehensive navigation
- Global search across modules
- Enhanced pages including Manage Opportunities, Manage Lists, and Manage Activities
This is part of a scheduled platform enhancement and will be applied automatically. Simply log in and enjoy a faster, smarter platform designed to keep your workflow smooth. To learn more about the LSQ1 Design System and its capabilities, visit the LSQ1 Design System section.
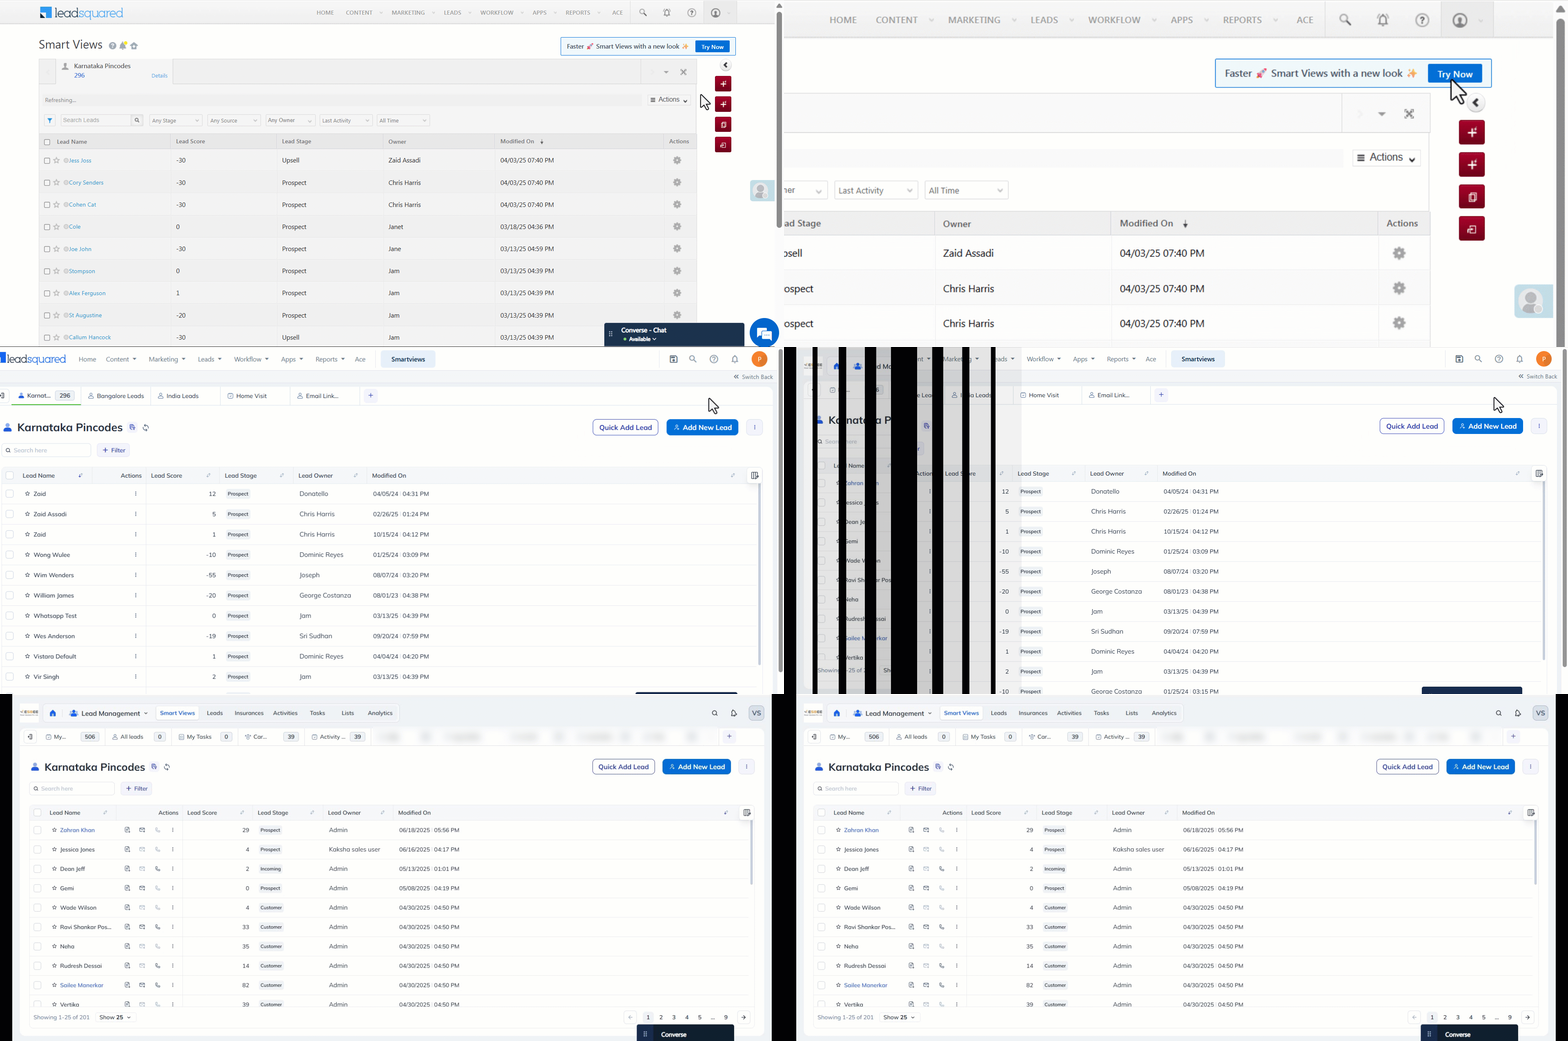
4. New Navigation – Faster, Smarter Access
What’s Changed?
- One-click navigation for lead management, sales, and customer support workflows.
- Primary menus are now more accessible, reducing search time.
- Sub-menus are grouped logically under each module for quick access.
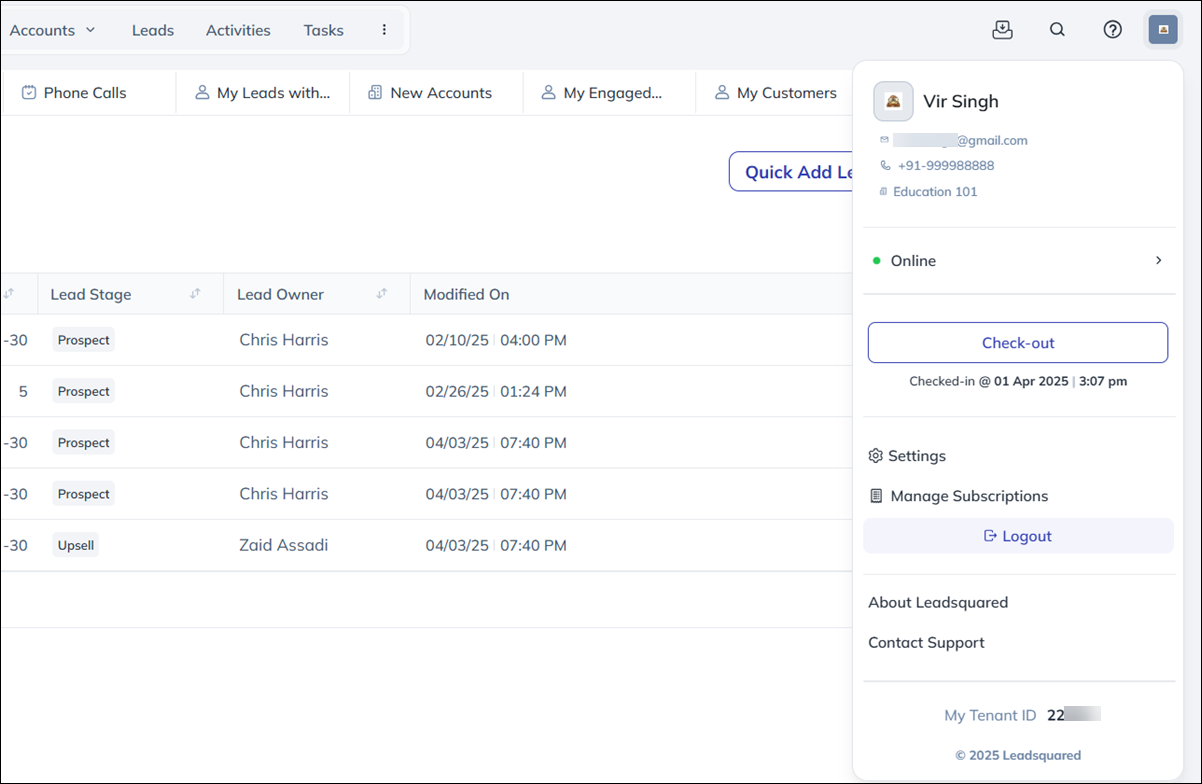
- Enhanced User Profile with key details (Email, Team, Tenant Id) upfront.
How to Use the Main Menu:
- Click the Main Menu to access all modules.
- Hover over each option to view and open the corresponding sub-menus.
- Click to access a page from any sub-menu.

Upgraded User Profile
The revamped User Profile offers better visibility and quick access to key details. You can view your email address, team, Tenant ID, and check-in date and time at a glance. The Tenant ID can be copied for any communication with our support team.
From here, you can navigate to Settings, Manage Users, and Manage Subscription (based on your permissions). You can also Check-in/Check-out, update your online status (Online, Away, etc.), and log out—all in one place.
5. Global Search – Find Everything Instantly
What’s new?
- Search for leads, tickets, and more without navigating away.
- View key details in search results without opening full records (a.k.a Quick View).
- Take quick actions (assign leads, update statuses, add notes).
- Save recent searches for faster access.
| Available For | Leads, Tickets and Opportunities |
| Coming Soon | Search for Tasks, Accounts, Lists and Reports. |
How to Use:
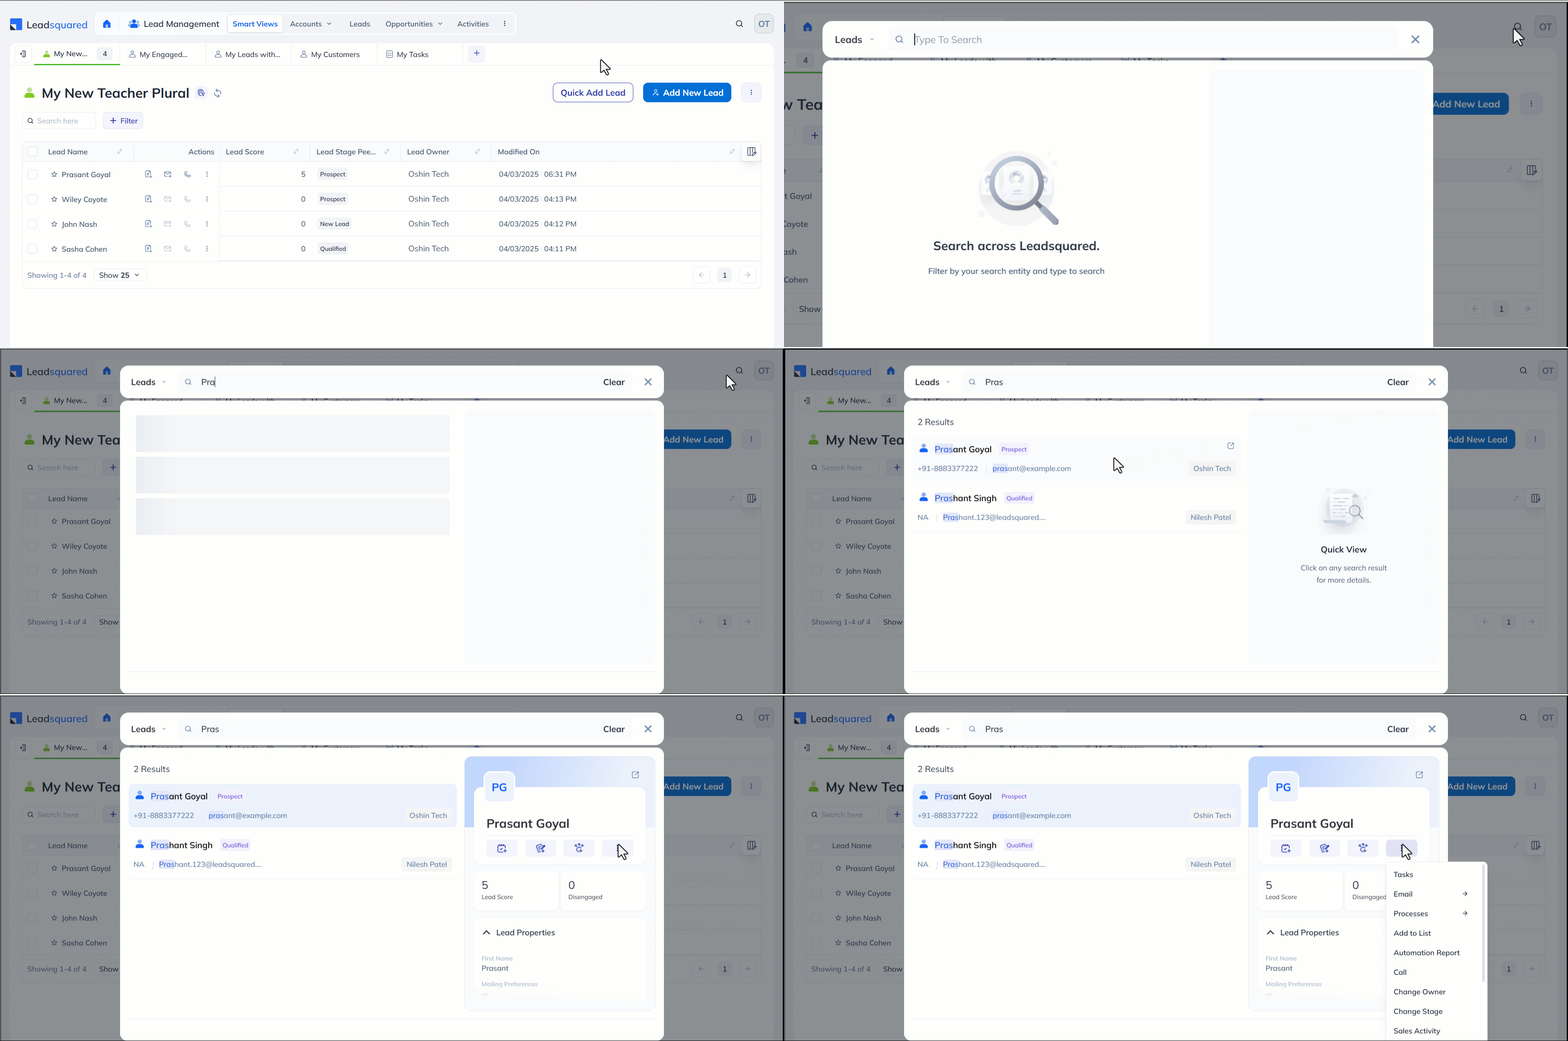
- Click the Search Bar on the top navigation (on the right side, alongside your user profile).
- Click the drop-down on the top-left corner to select the entity (lead, ticket, etc.)
- Enter a keyword (lead name, ticket ID, etc.).*
- Click a result to preview details or take quick actions.
Note:
- *For Leads, you can only search lead fields that are enabled for quick search. To learn more, see how to include fields in Quick Search.
- Results only appear after typing three characters.
- Up to five Recent Search Keywords and Recent Search Results are saved. Clear these by clicking Clear All.
- Results are ranked based on relevance, giving priority to key fields like First Name, Last Name, Email, and Phone Number.
6. Quick View – More Details, Fewer Clicks
Why It’s Useful?
- Saves time and reduces unnecessary clicks.
- View lead/task details instantly by clicking on the row.
- Take key actions—update status, assign tasks, add notes—without leaving the page.
| Currently Available On | Leads, Opportunities, Tickets and Tasks (Manage Tasks and Smart Views). |
| Coming Soon | Support for Activities and Accounts. |
Where You Can Access Quick View
Quick View is seamlessly integrated into several key areas of the platform, making it readily accessible:
- Global Search – Click on any search result to launch the Quick View panel.
- Smart Views – Instantly access task details and take actions directly from your Smart Views dashboard.
- Manage Pages – Available on the Manage pages for Leads, Tasks, Tickets, and Opportunities (via Global Search).
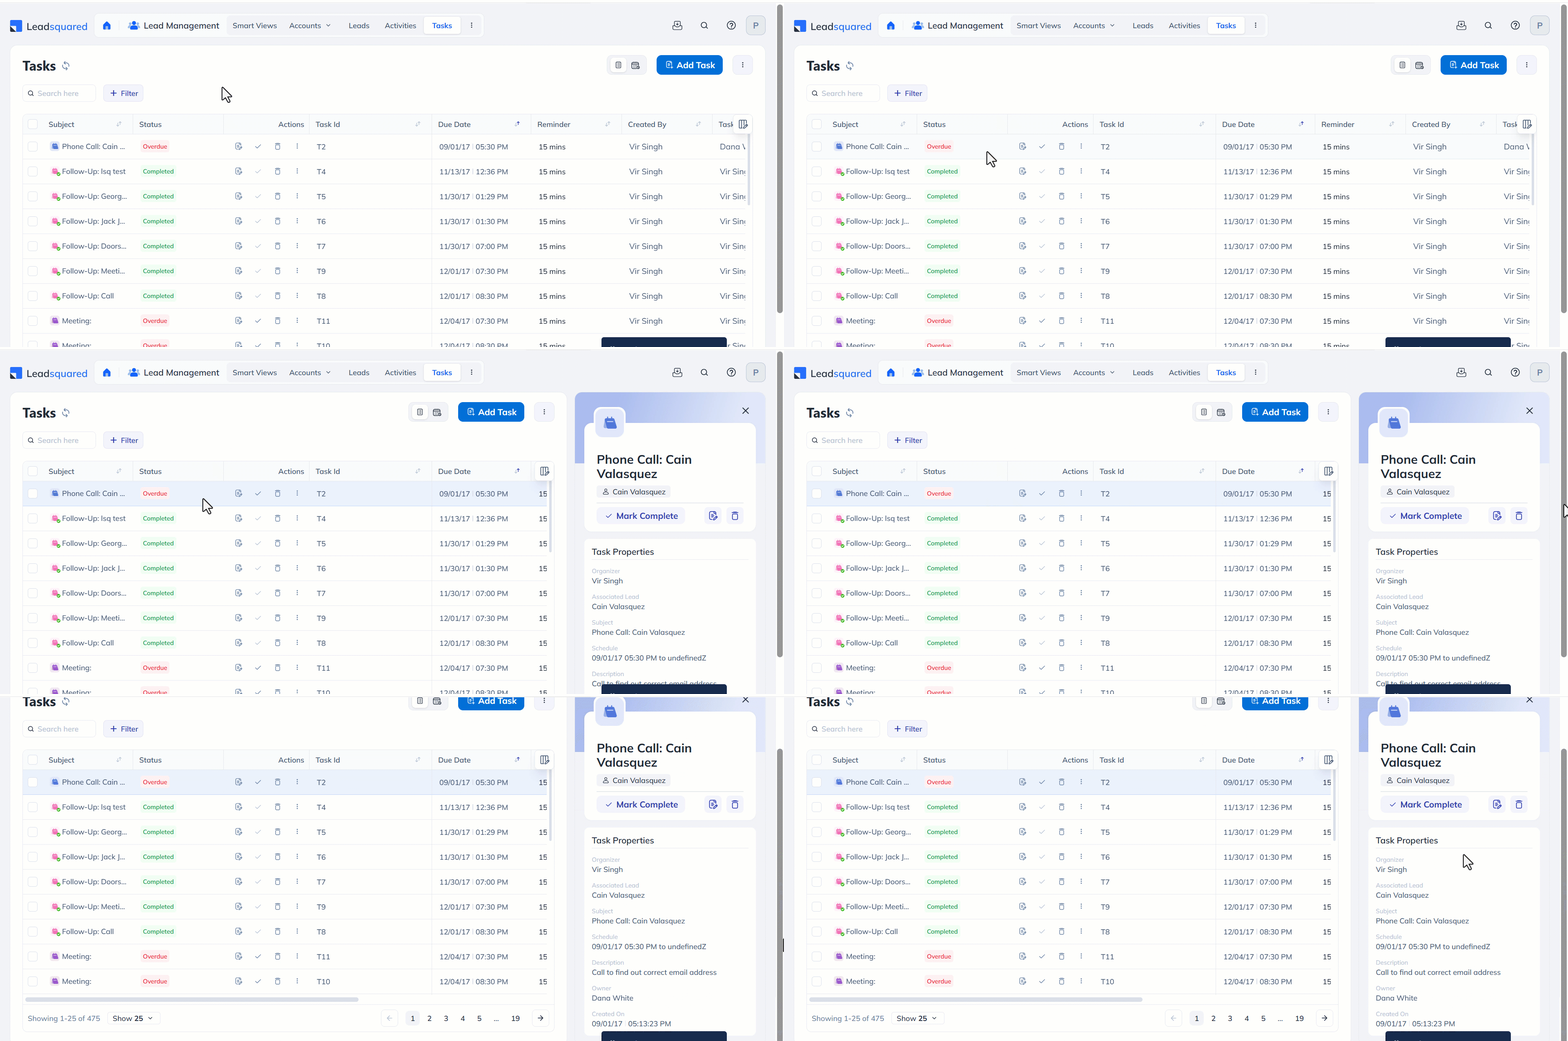
How to Use Quick View for Tasks
- Go to the Manage Tasks and Smart Views page.
- Click anywhere on a row to open the Quick View Panel.
- Perform quick actions without navigating away.
- If you’ve completed the task, click Mark Complete.
- Click the
 edit icon to make changes to the task and once done, click Save & Close.
 - Click the
 delete icon to delete the task. On the Delete Task popup, click Yes, Delete
How to Use Quick View on Global Search
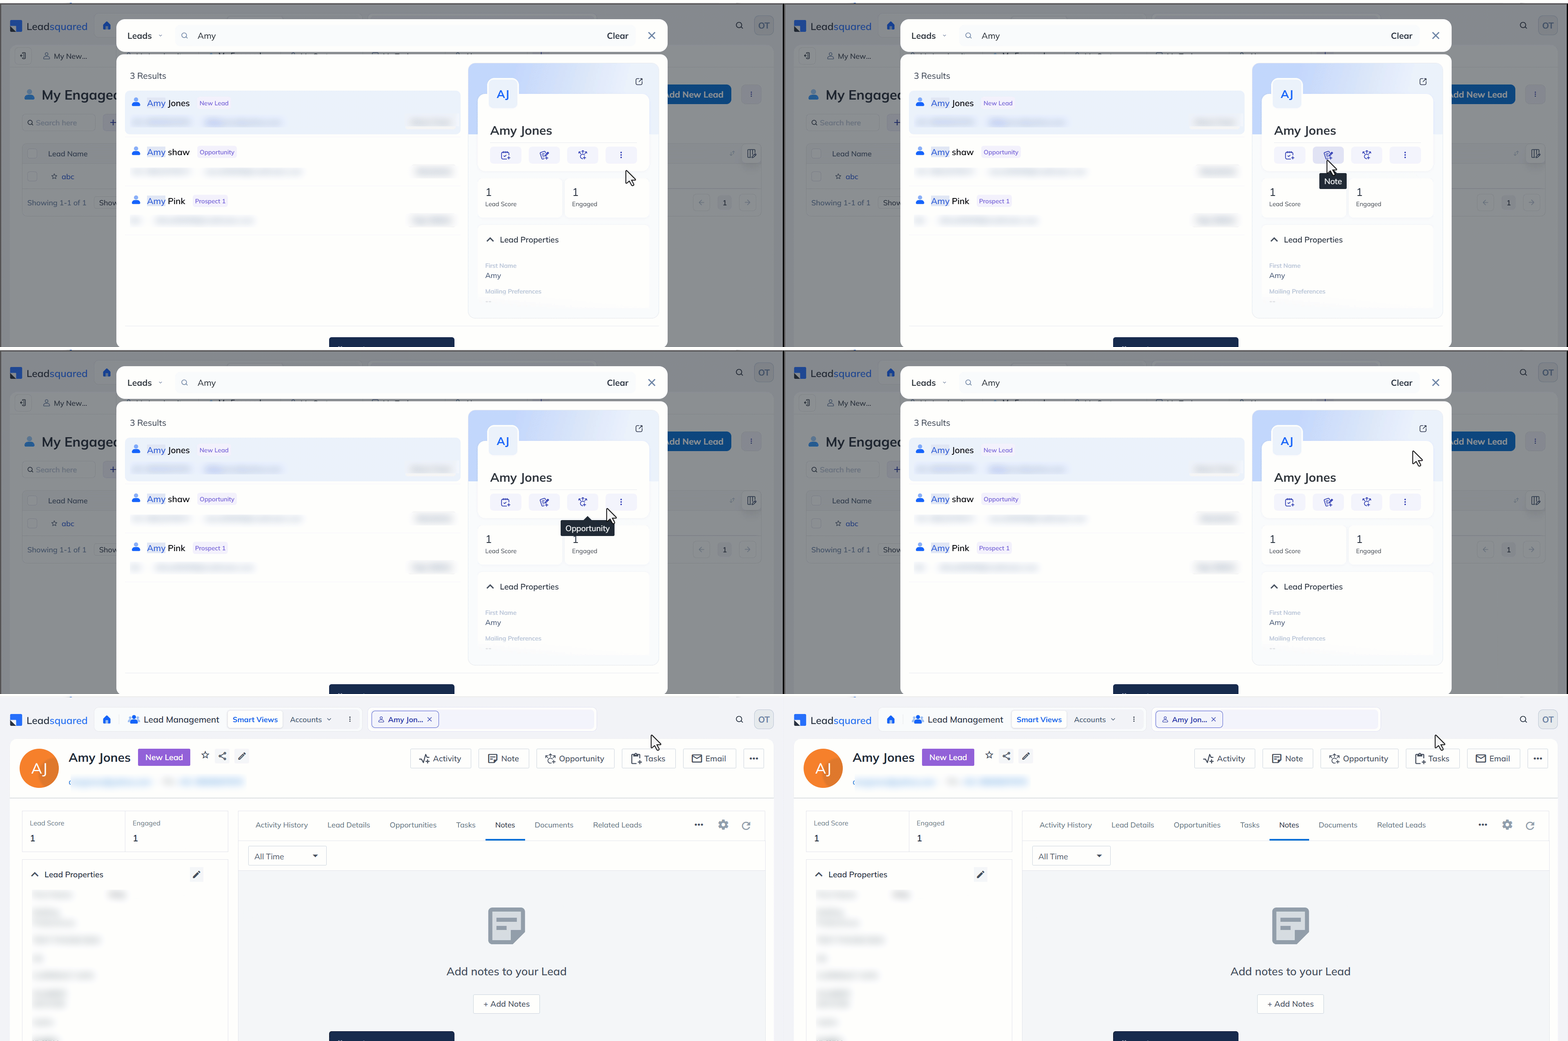
- Search for a lead using Global Search, then click a result to open the Quick View Panel.
- Perform quick actions.
- Click the
 actions icon to perform other actions like calling, emailing, changing stage etc,.
 - Click
 icon to view the complete lead details page.
- Click the
7. LSQ1 Design System – A Cleaner, More Efficient UI
Key Upgrades:
- Customizable Filters: Instantly create and pin filters for quick, effortless access.
- Smarter Columns: Drag, reorder, and resize columns for efficiency.
- Seamless Pagination: Smooth scrolling between pages.
| Currently Available On | Smart Views, Manage Leads, Manage Opportunities, Manage Activities, Manage Tasks and Manage Lists pages |
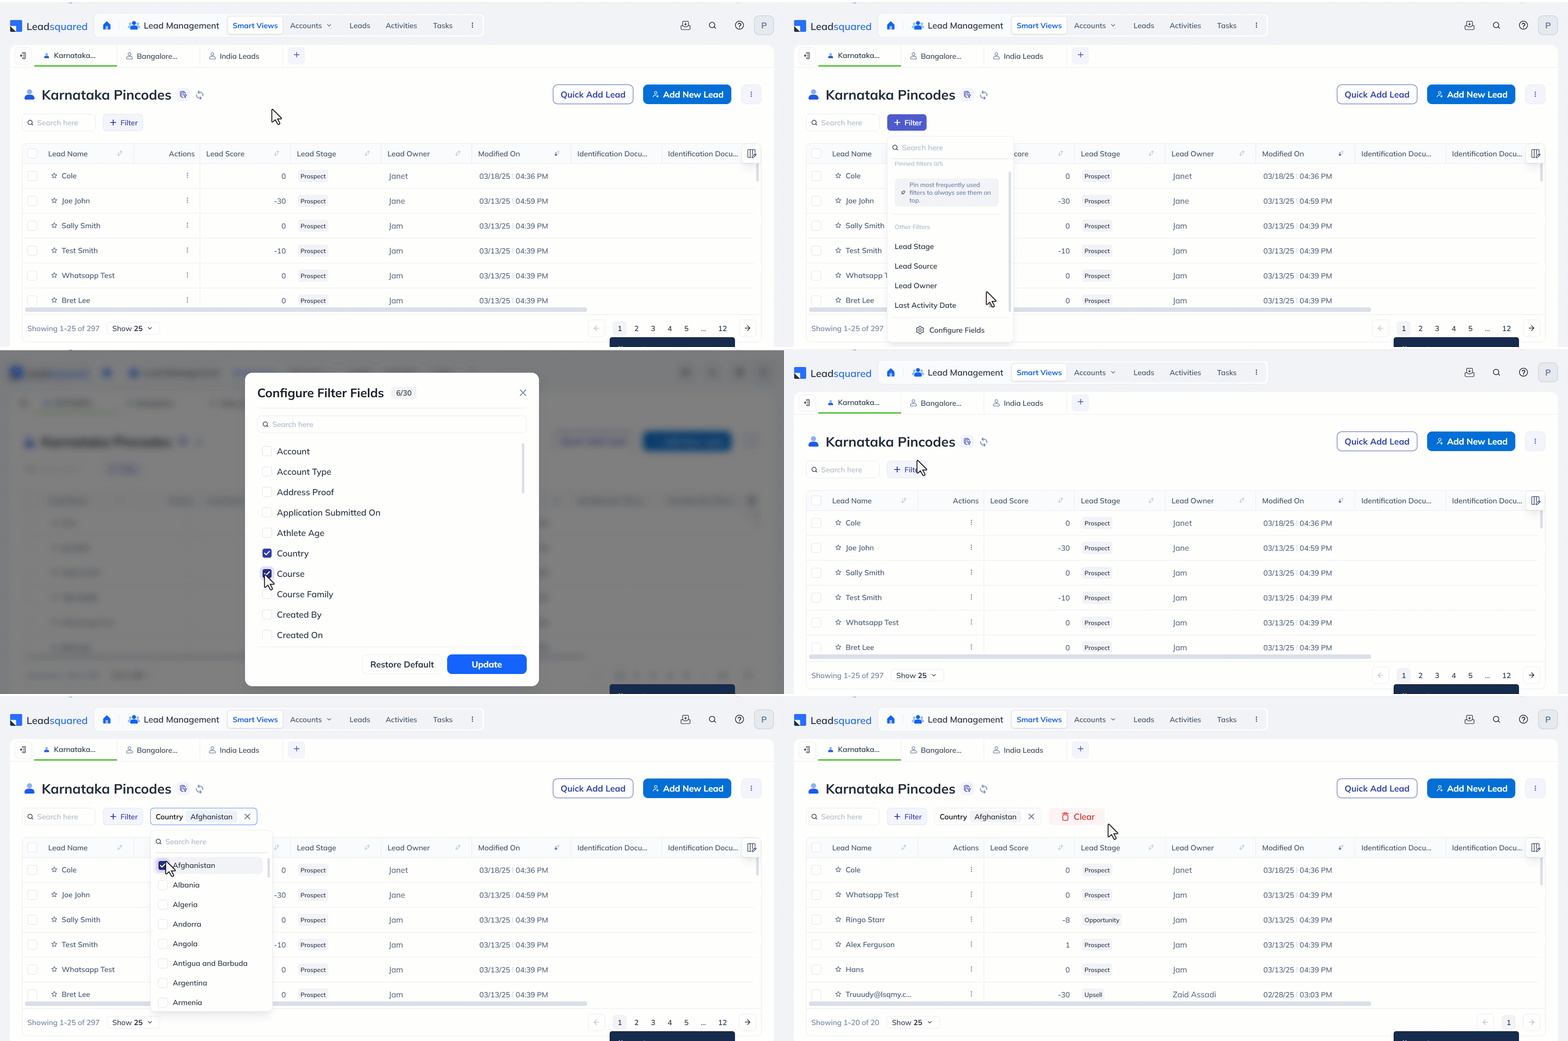
How to Use Customizable Filters
- Go to any data grid (Smart Views. Leads, Activities, Tasks).
- Click the Add Filter icon.
- Select the relevant default filter or click Configure Fields to add more filters to the list. Click Update to add the fields as filters.
- To search for entities based on the filter, click the Add Filter icon and select the relevant filter.
- Then select the value from the drop-down. Once the value is selected, click anywhere outside the drop-down to retrieve the results.
How to Pin Filters
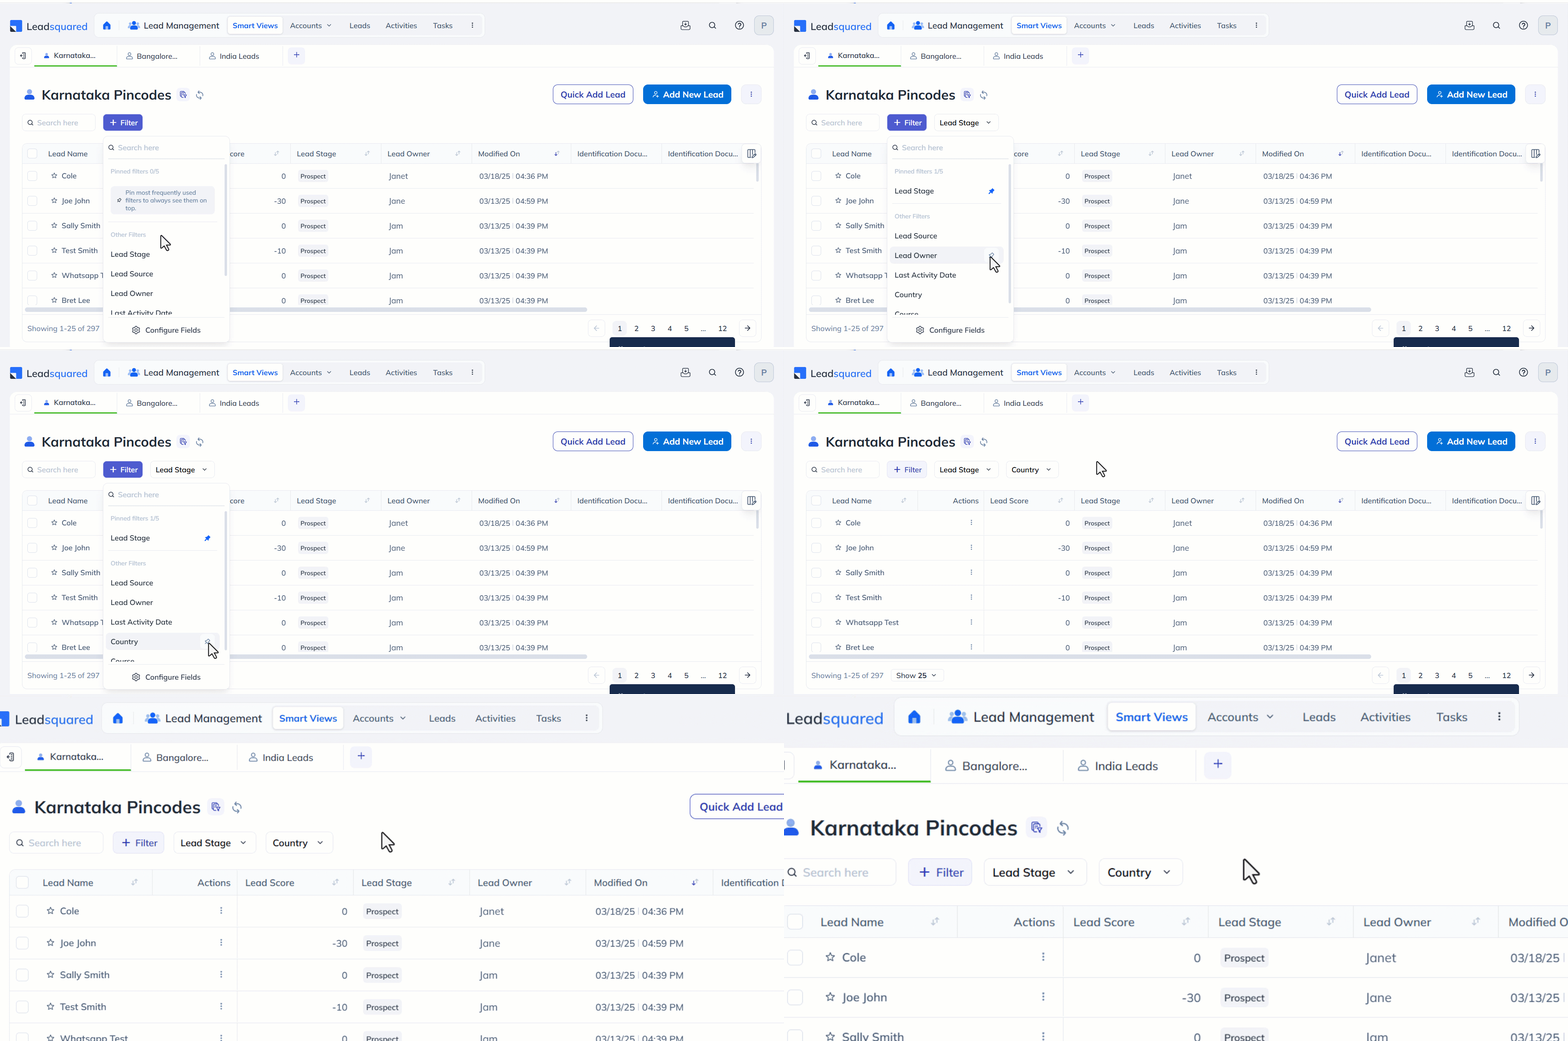
Pinned filters appear next to the Add Filter icon. You can pin upto five of your frequently used filters by clicking the ![]() pin icon alongside the relevant filter. Search for entities with this filter any time.
pin icon alongside the relevant filter. Search for entities with this filter any time.
How to Use Advanced Filters
Use Advanced Filters (formerly Advanced Search) to find leads that match multiple conditions (e.g., Country = India, Stage = ‘Prospect’, Last Activity = engaged with email campaign).
| Available on: | Manage Leads, Manage Opportunities and Manage Activities |
- Click Filter>Advanced Filters.
- Click Add Condition, enter criteria, and click Add.
- Click Show Results to view matching leads
How to Use My Filters to Save Frequently Used Advanced Filters
My Filters (previously Quick Filters) allow you to save your frequently used filters, making it simple for you to find leads faster. Once you’ve created an Advanced Filter, save it as a quick filter for easy access.
- Navigate to Filters>Advanced Filter.
- An Advanced Filter pop-up will appear. Select Search Criteria and click Add.
- The selected criteria will appear. Now click Save as a Quick Filter.
- Assign a name to the filter and click Create. The added Quick Filter will be added to the My Filters dropdown.

How to Customize Columns
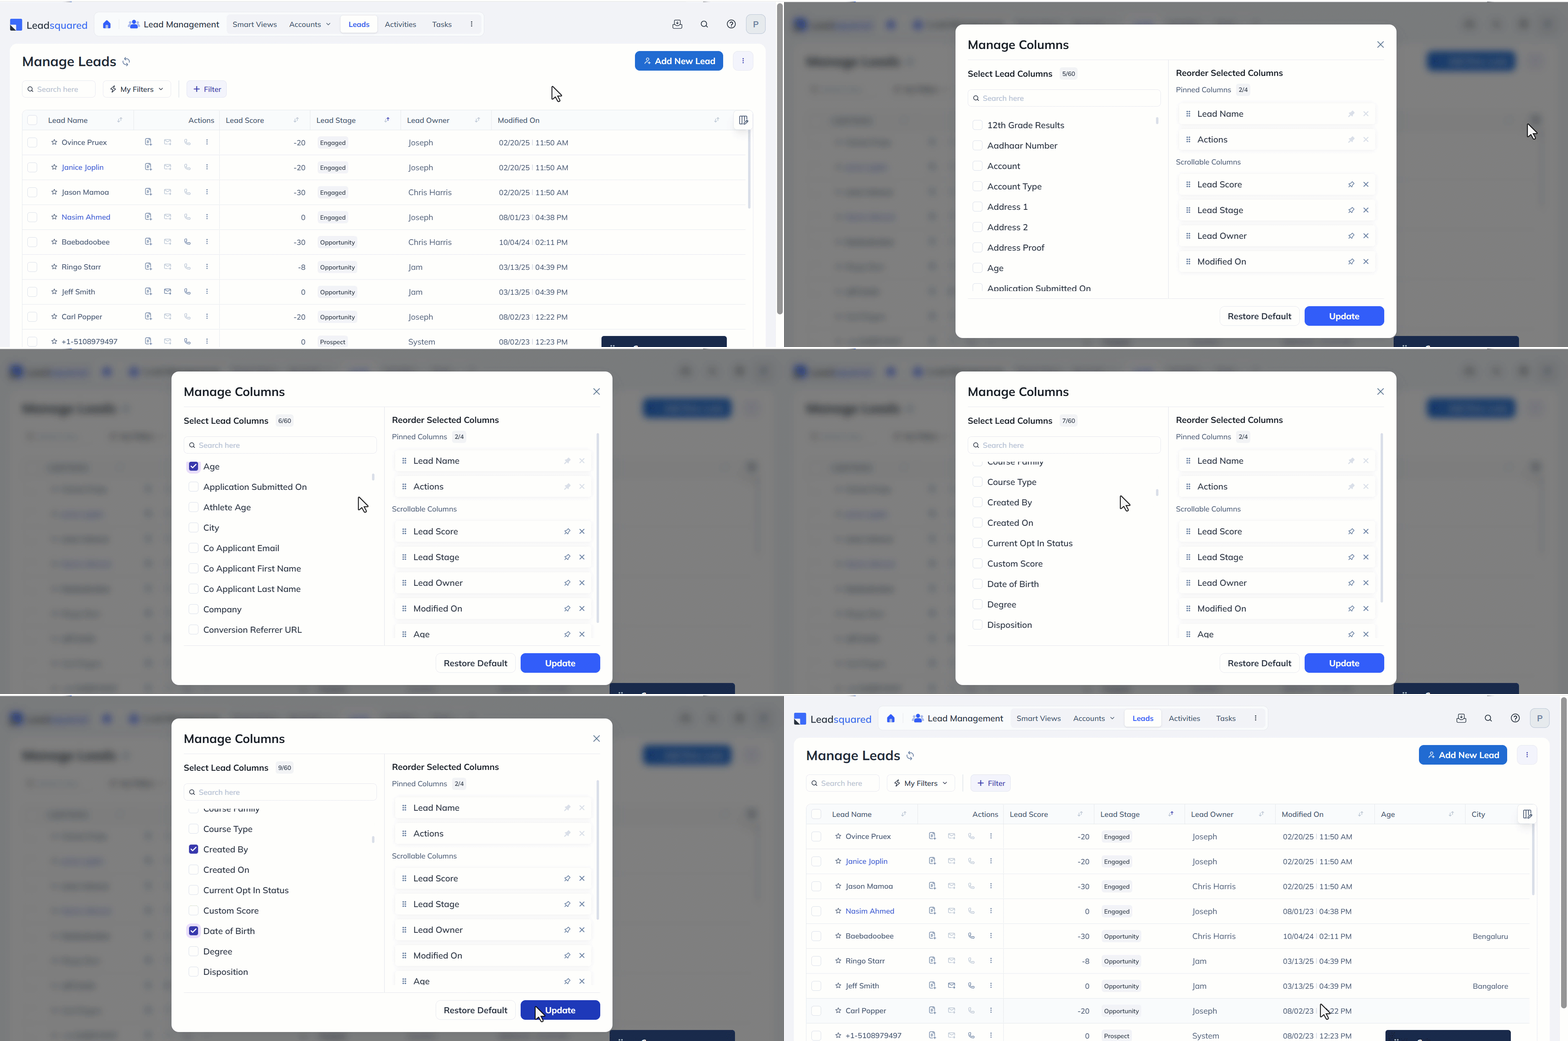
Use Manage Columns to add, pin, and rearrange up to 60 columns in your grid. Extra columns become horizontally scrollable for easy access.
| Available on: | Smart Views, Manage Leads, Manage Opportunities, Manage Tasks, Manage Activities, and List Details pages. |
- Click
 in the top-right corner of the grid.
 - Select the checkboxes for the fields you want to display.
- Selected fields move to Scrollable Columns and appear in the grid.
How to Pin and Rearrange Columns
Pinning a column moves it to the front of the grid and freezes it in place. Pinned columns remain visible and do not move or get hidden when scrolling through the grid. You can pin up to four columns, with two primary columns pinned by default.
- Click the
 icon alongside the relevant selected column to pin it. The field will move under the Pinned Columns section.
 - Click and hold the
 move icon to reposition the field within the column as per your preference. This can also be done in the Scrollable Columns section to rearrange the fields in the grid.
 - Once you’ve selected and pinned the columns, click Update.
Click Restore Default if you want to bring back the default view.

How to Use Pagination
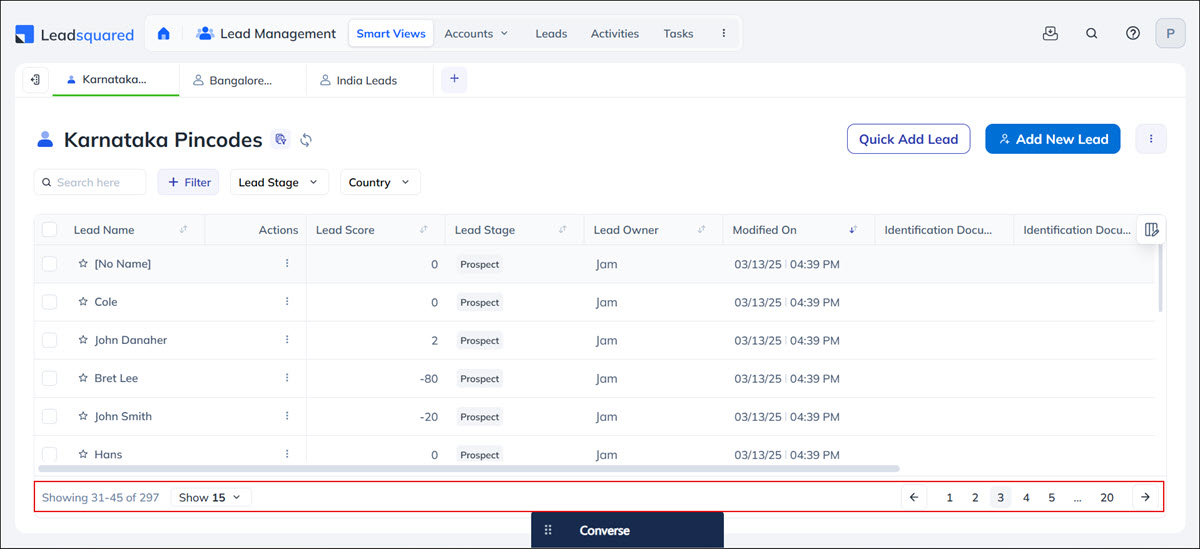
Seamlessly navigate between multiple grid pages using user-friendly pagination. The page navigation bar, fixed at the bottom, lets you switch pages and view the visible and total row count across all pages. You can choose the number of rows to display per page.
| Available On: | Smart Views, Manage Leads, Manage Opportunities, Manage Tasks, Manage Activities, Manage Lists and List Details pages. |
8. Smarter Workspaces: Powerful Enhancements on Every Page
Here’s whats new –
- Smart Views – Switch between top and side panel layouts for a more flexible workspace.
- Manage Opportunities – Get a better view of all your opportunities across different opportunity types
- Manage Activities – View all activity types upfront in a dedicated panel for faster access.
- Manage Lists – A cleaner layout with quick access to essential actions.
Upgraded Smart Views – Flexible Panels & Quick Edits
How to Switch Panel Views
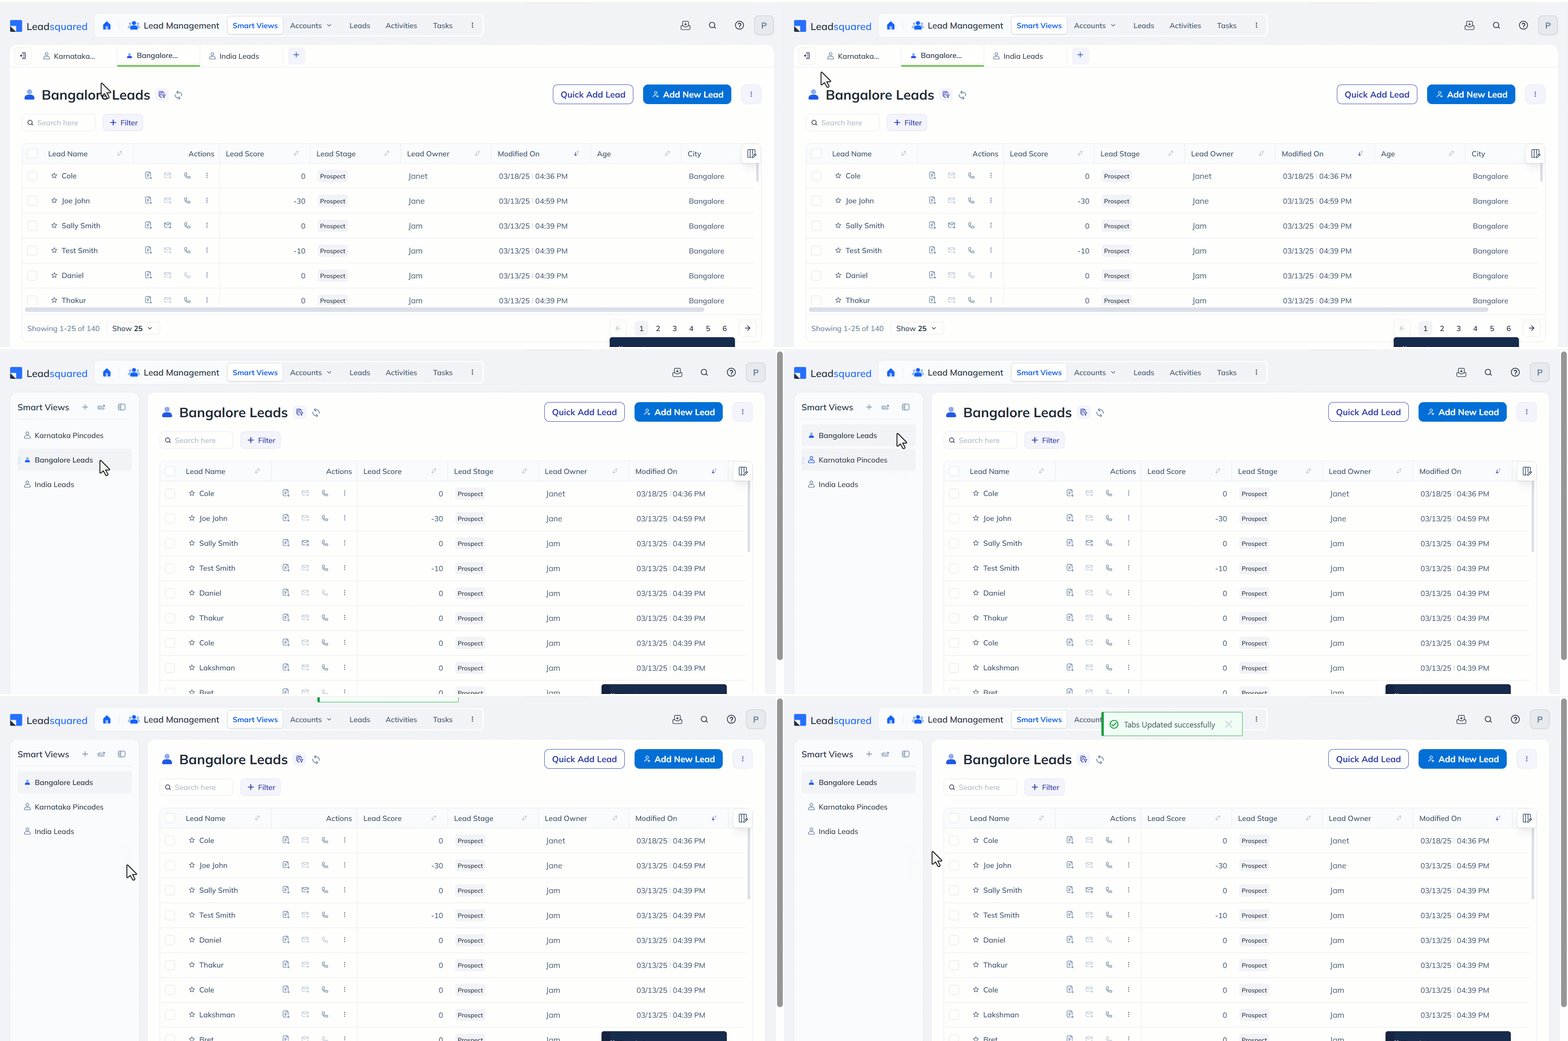
On the Smart Views page, you can switch between Top and Side views of tabs. The tabs are in top view by default.
- Click the
 side view icon alongside the leftmost tab to view all the Smart Views tabs in a list form.
 - Click and hold the relevant tab to reposition it within the list.
Alongside the Smart Views heading –
- Click the
 plus icon to add a new Smart Views Tab.
 - Click the
 Collapse/Expand Menu icon to toggle the visibility of the Smart Views tabs list.
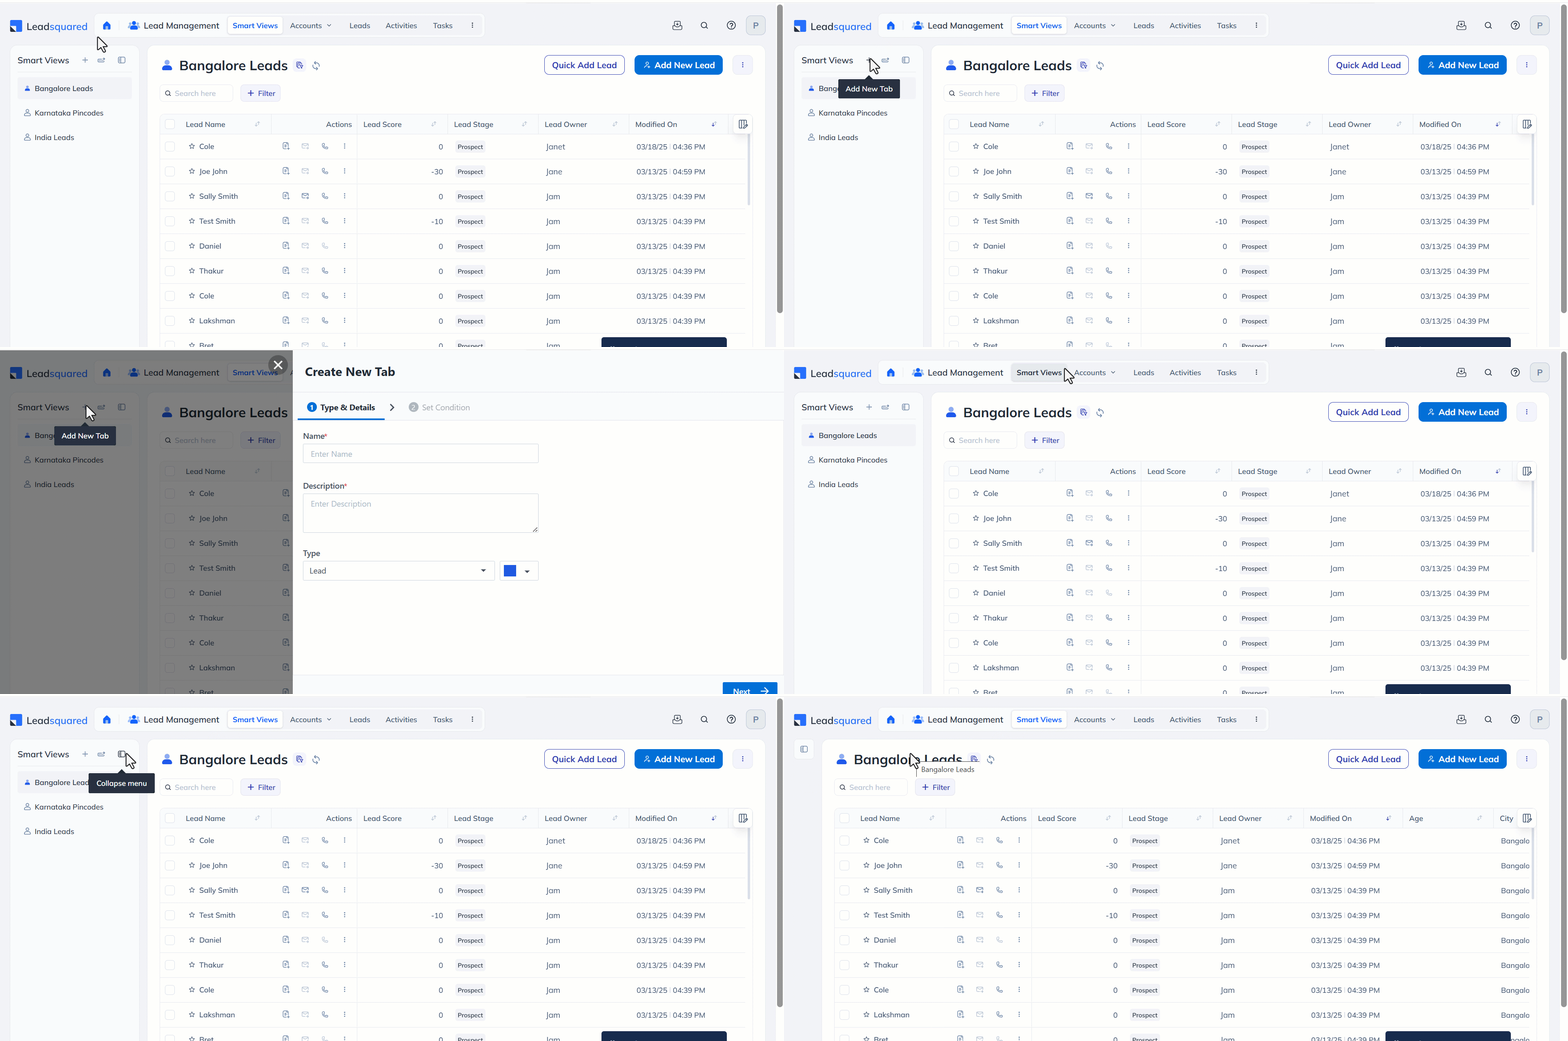
To switch back to the top view –
- Click the
 top view icon on top of the Smart Views heading.
 - Click and hold the relevant tab to reposition it.
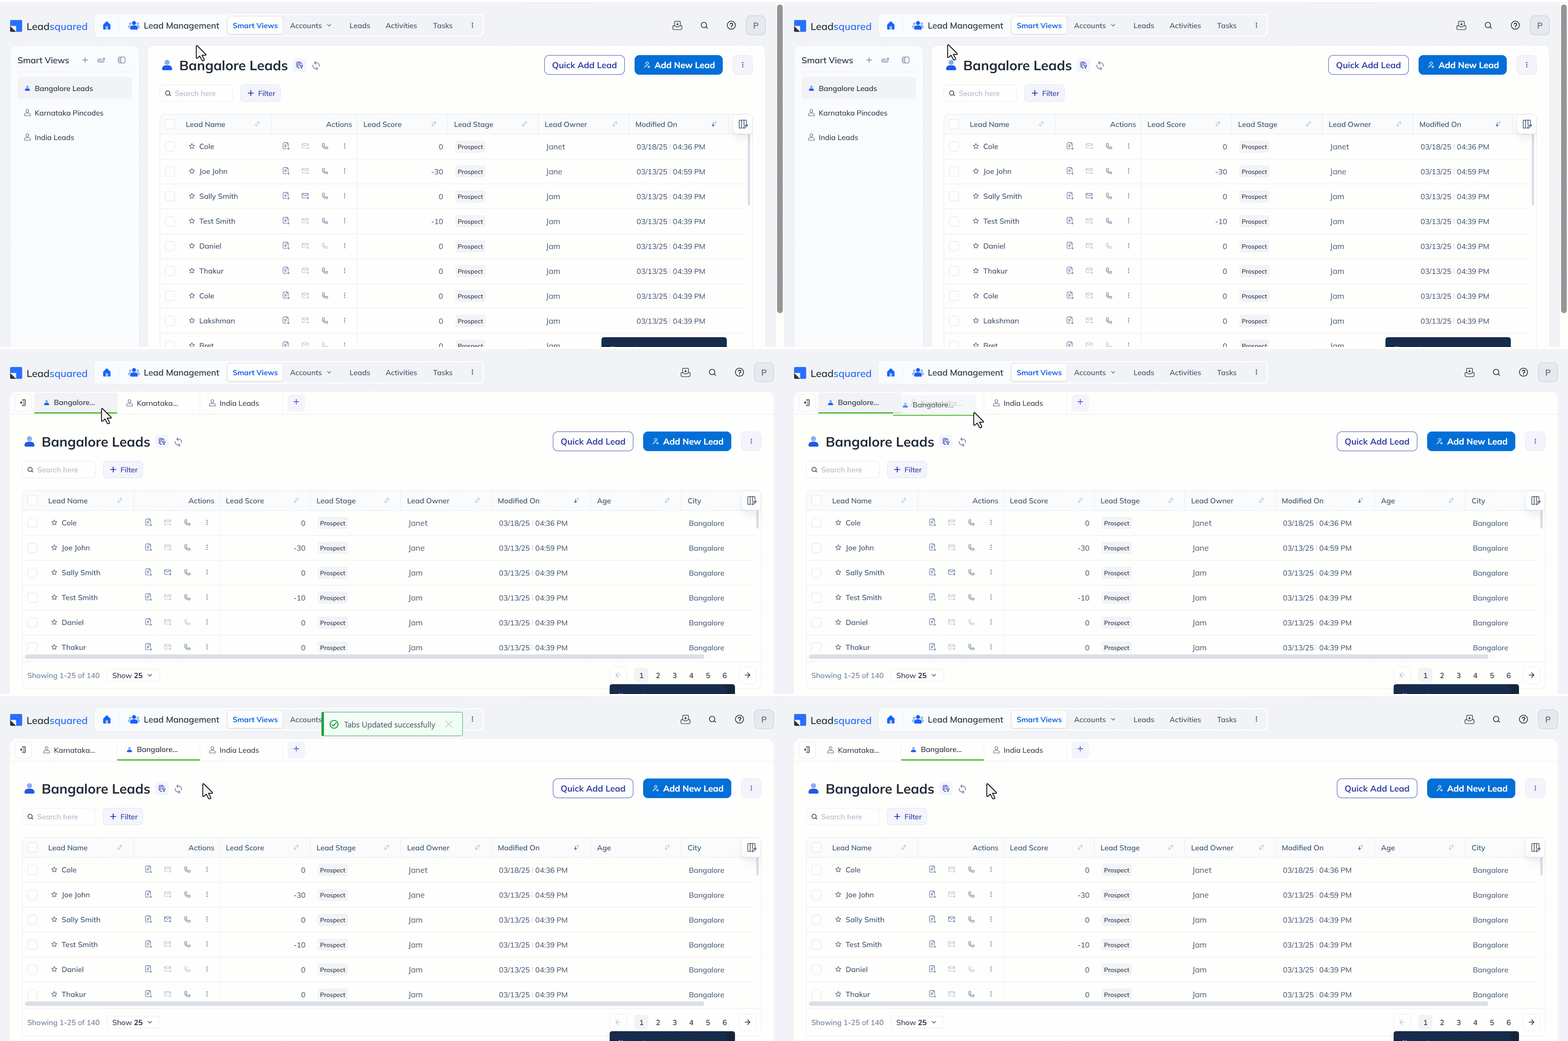
To add a new Smart Views Tab when in top view, click the ![]() plus icon next to the rightmost tab.
plus icon next to the rightmost tab.

How to Quick Edit Tab Info
Click the ![]() Tab Info icon to key info like the tab description, conditions, creation and modification dates, and owner.
Tab Info icon to key info like the tab description, conditions, creation and modification dates, and owner.
- To delete a particular Smart Views Tab, click Delete View.
- If the tab was created by you, you can make changes to it by clicking Edit View.
Manage Opportunities
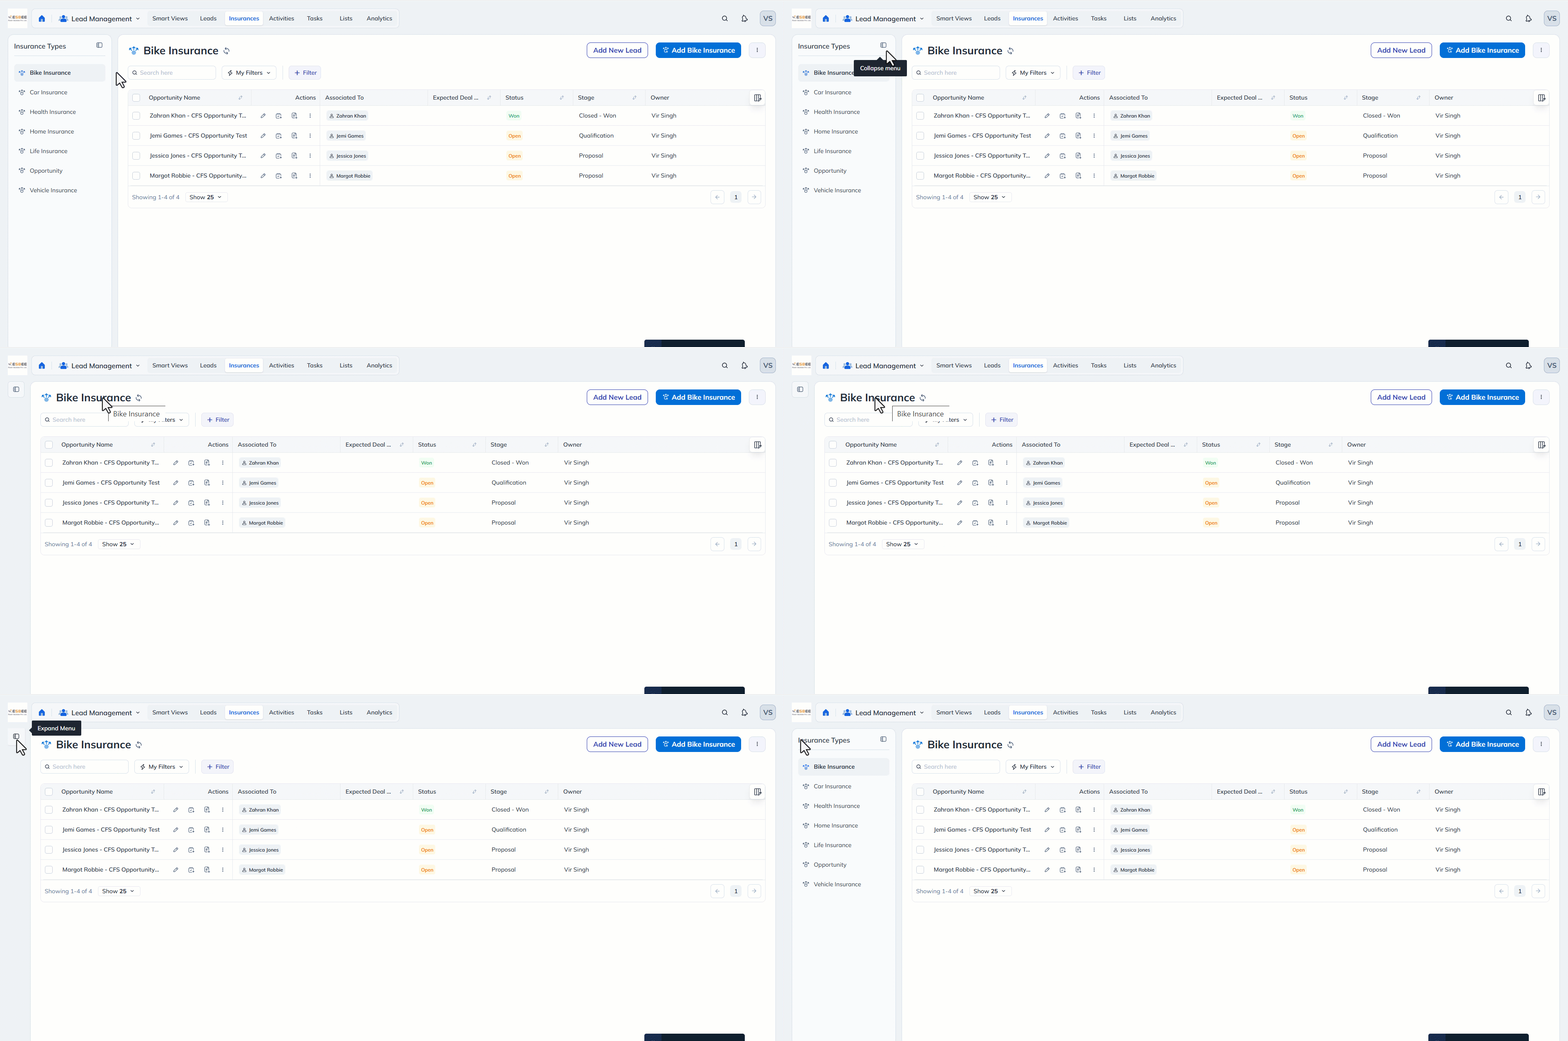
The Manage Opportunities page is more efficient, allowing you to access all your Opportunity Types with fewer clicks. The opportunity types are listed in a collapsible panel on the left side of the screen. You can expand or collapse this panel to easily switch between types or get a full view of your opportunity grid.
How To Expand and Collapse the Opportunity Type List
To get a better view of the opportunity grid, click the ![]() Collapse/Expand Menu icon. This will toggle the visibility of the Opportunity Types column as needed.
Collapse/Expand Menu icon. This will toggle the visibility of the Opportunity Types column as needed.
Manage Activities – Instant Access to All Activity Types
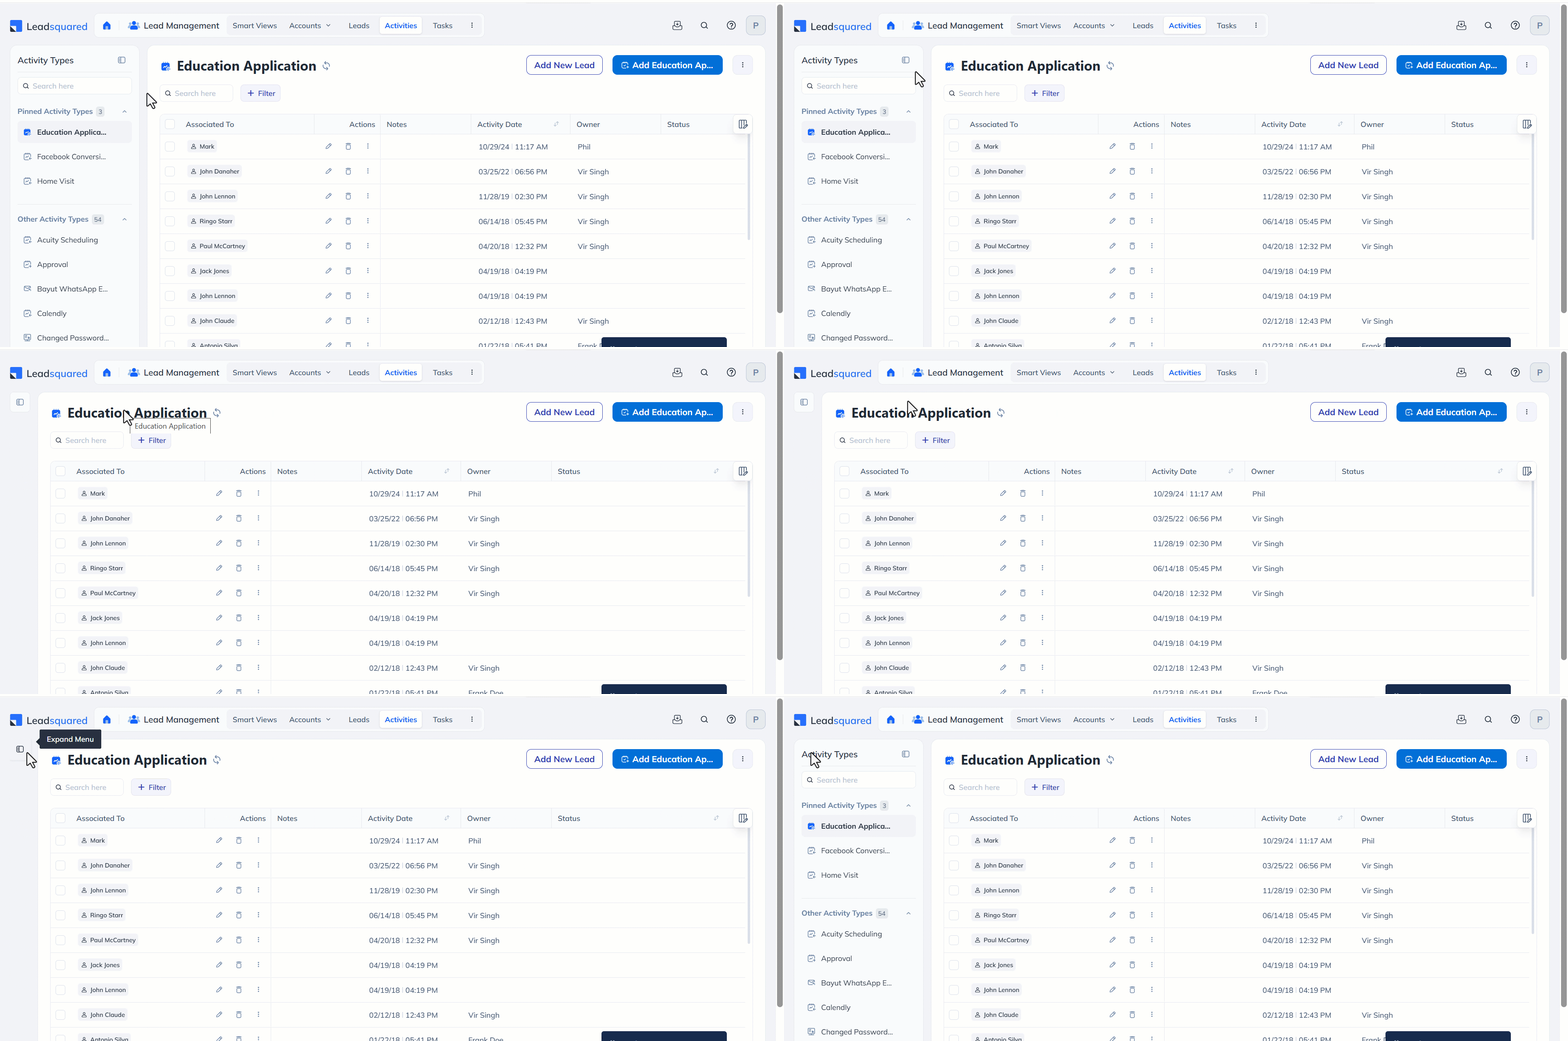
No more drop-downs, now instantly see all activity types at a glance—listed in a left-side panel for easy access. Pin your frequently accessed activity types to the top for easy access.
How to Pin Activity Types
- Scroll through the list of Other Activity Types or search for it using the search bar on top of the Activity Types column.
- Hover over the relevant activity and click the
 pin icon alongside it.

Click to view the activities related to a particular activity type. Key actions are available upfront and the same LSQ1 filtering, column customisation and pagination improvements are available.

How to Collapse and Expand the Activity Type List
To get a better view of the activity grid, click the ![]() Collapse/Expand Menu icon. This will toggle the visibility of the Activity Types column as needed.
Collapse/Expand Menu icon. This will toggle the visibility of the Activity Types column as needed.
List Management – Cleaner Layout and Quicker Actions
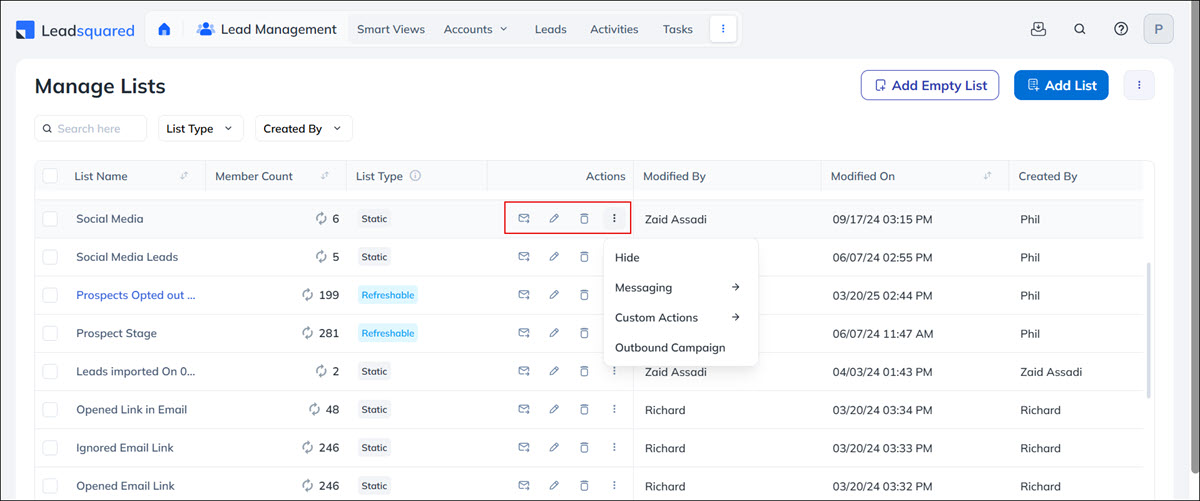
How to Use the New Manage Lists Page
- You can send emails to lists directly from here. Click
 to open the Send Email popup.
 - Click the
 edit icon to edit the list. Click the
  delete icon alongside the relevant list to delete it.
 - Click the
 actions icon alongside the relevant list to perform any action including messaging, making a call etc.
How to Use the New List Details Page
The List Details page now lets you perform quick actions like making calls and sending emails. For more actions, hover over the ![]() actions icon.
actions icon.
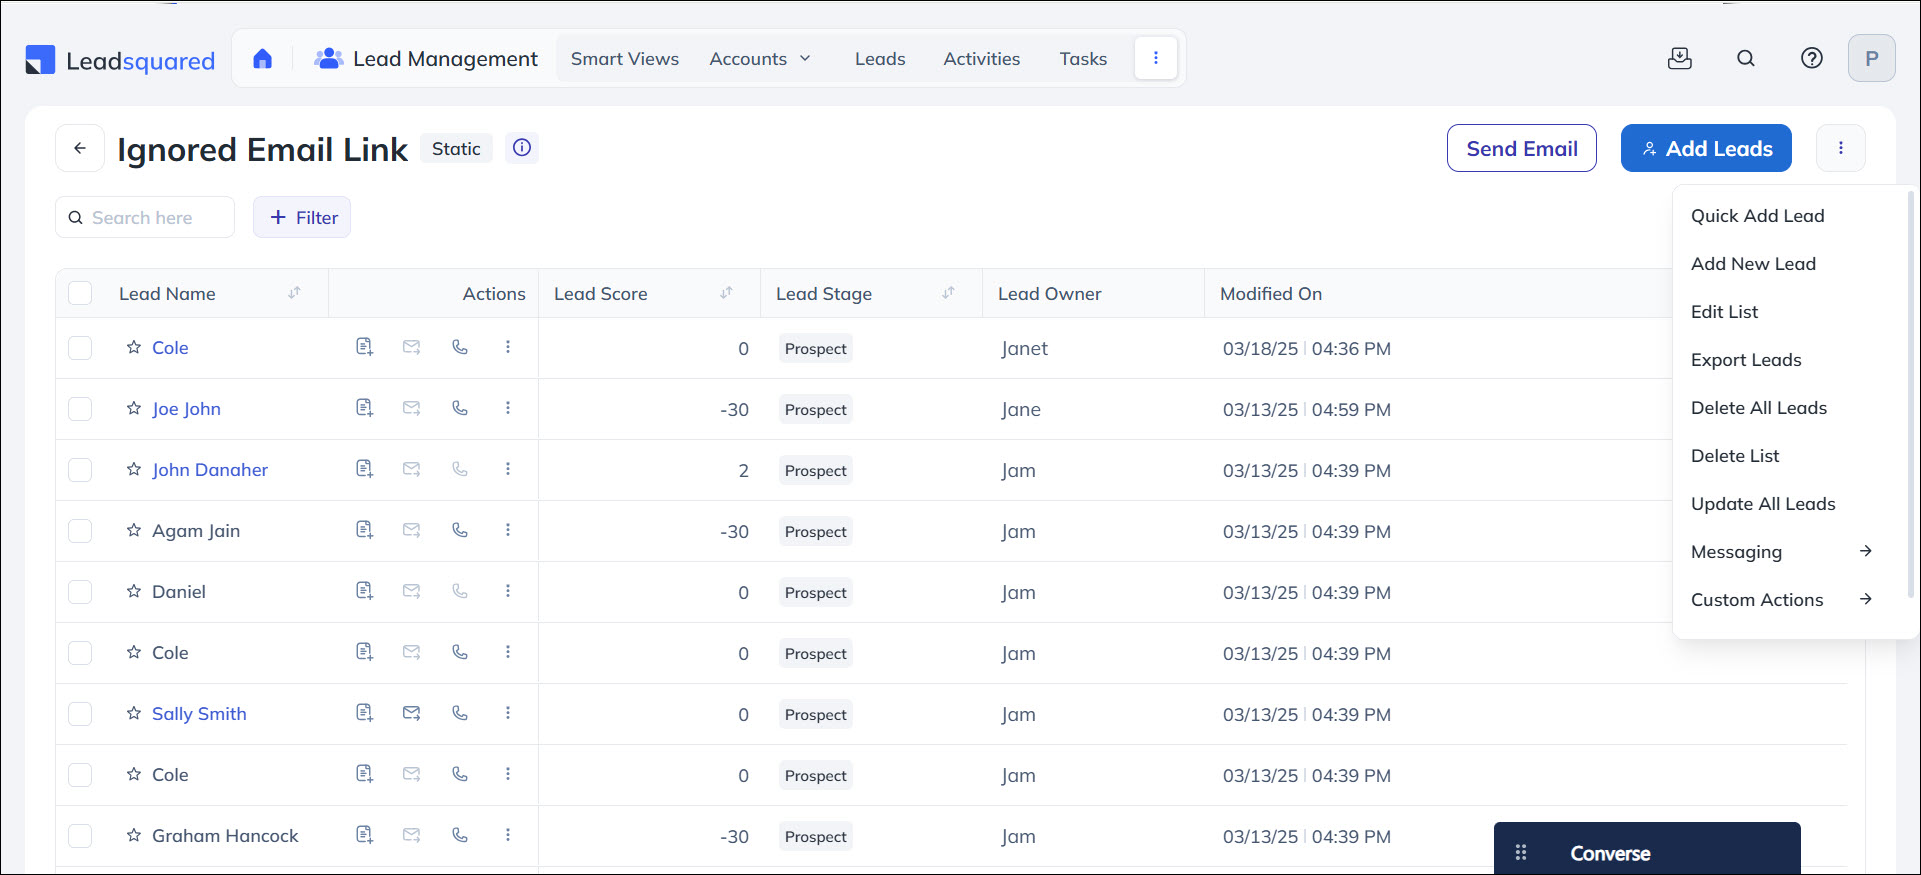
By clicking ![]() the info icon, you can get details about the list including the description, type, creator, modifier, creation and modification dates and time.
the info icon, you can get details about the list including the description, type, creator, modifier, creation and modification dates and time.

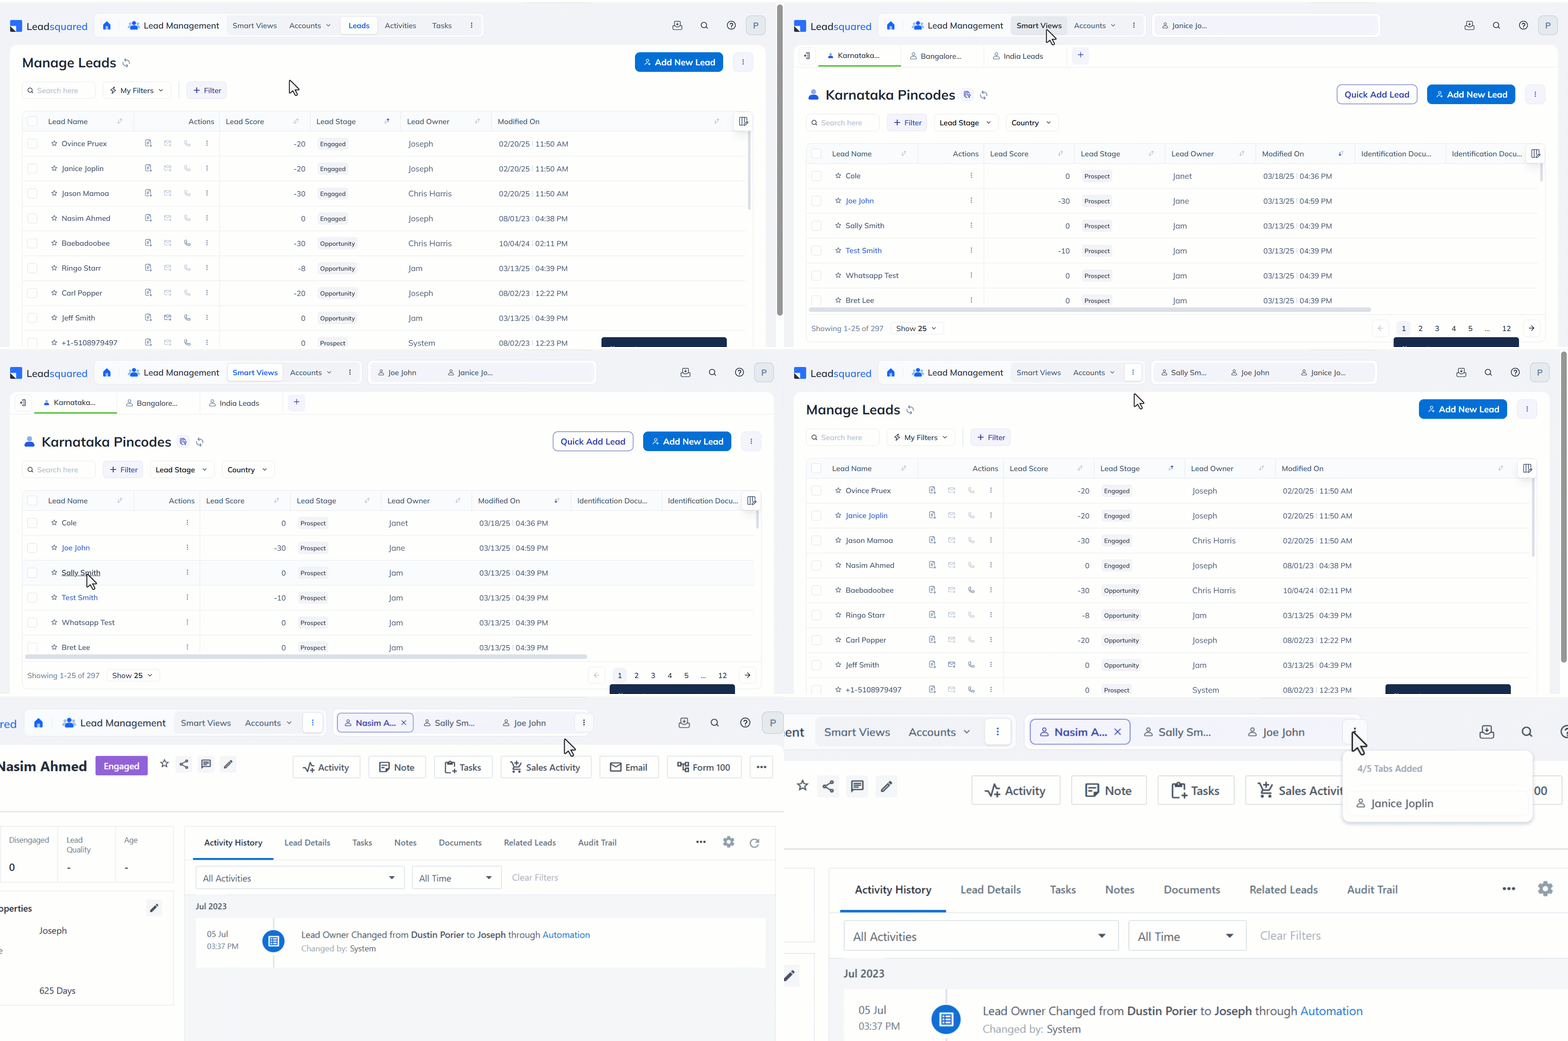
9. App Tabs: Seamlessly Manage Multiple Leads & Opportunities
With App Tabs, you can open multiple entity detail pages (leads, opportunities, etc.) within the application, eliminating the need to juggle multiple browser windows. Switch between tabs seamlessly and return to grid pages anytime using the top navigation. You can open up to five App Tabs at a time. To learn more, see App Tabs – Feature Guide.
Any Questions?
Did you find the content in this article helpful? Feel free to leave doubts/questions in the comment section below. We’ll get back to you as soon as possible.


