


Get Started
Sales Suite
Field Ops
Marketing
Service CRM
Integrations & Apps
FloStack
Email Settings – Manage Email Subscription Preferences (Email Categories)
1. Feature Overview
You can manage subscription preferences of leads using LeadSquared’s Email Categories feature by –
- Creating new Email Categories.
- Assigning Email Categories to every new email sent.
- Allowing your leads to selectively subscribe or unsubscribe to specific email categories.
- Allowing your leads to completely unsubscribe from all emails.
Note:
- If you already have the mailing preferences/Email Subscription choices of your leads you can also directly import them via CSV (see Section 4 – Import Mailing Preferences).
- For more details on Email Settings, see Email Settings – Feature Guide.
2. Prerequisite
You must be the Administrator of your LeadSquared account.
3. Setting up Email Categories
- Navigate to My Profile>Settings>Email Settings>Email Categories.
- Next to Mandate category in emails*, click Yes.
- Click Create.
- Once you can view the Add Email Category pop-up window, enter the relevant details.
- Click Save.
Note:
- *Enabling Mandate category in emails will force the user to specify a category while creating email campaigns, Autoresponders, one to one emails or sending emails to list.
- You can add up to 10 email categories.
- To see how the form will render, click Preview Mailing Preference Form.

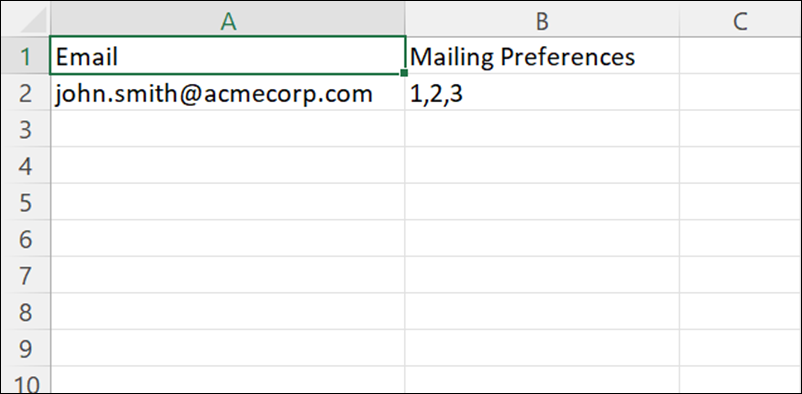
4. Import Mailing Preferences
You can update Mailing Preferences of existing leads by uploading a CSV file. The file must contain the lead’s email address in the first column and mailing preference code in the next column. You can find the code in the Email Categories settings under Code.
Note: You can download a sample CSV file in the Select a CSV to Upload pop-up window to understand the required format.
To import your mailing preference by uploading a CSV file –
- Navigate to My Profile>Settings>Email Settings>Email Categories.
- Under Import Mailing Preferences, click Import.
- Click Upload CSV and then click Continue.
- Click Close.
5. Using Email Categories
Once you set up your mailing preferences, you will see a drop-down to select an Email category whenever you send a new email. Recipients can unsubscribe or manage their mailing preferences by navigating to the footer of the email.
The Unsubscribe option will remove the recipient from the specific Email Category. For example, if the Email was sent under Product Update category, clicking Unsubscribe will ensure that the recipient does not receive emails of this category in the future.
The Mailing Preferences option will give the recipient options to subscribe or unsubscribe to other email categories or even completely unsubscribe from all emails.

Any Questions?
Did you find this article helpful? Please let us know any feedback you may have in the comments section below. We’d love to hear from you and help you out!
Why does the Campaign module require the use of Mailing Preferences, I cannot just use Unsubscribe, I have to add Mailing Preferences when sending out email campaigns – we only use one category type when emailing our clientelle.
Hi, we need more context on this. Can you give us a detailed description of the issue you’re facing?
Thanks for sharing. But how do you remove the default unsubscribe link?
Hi Tara.
To remove the Unsubscribe link –
1. Scroll to the bottom of the email editor.
2. Click the bottommost text section of the email that says “If you wish to opt out of all type of emails, click Unsubscribe”.
3. Once the section is selected, click the delete icon below it.
I hope this answers your question.
Do we have an option to NOT TO HAVE MAILING Preferences for Transactional type Emails.
Hi, Sreesai. We include the unsubscribe and mailing preference links for bulk emails, to comply with CANSPAM rules and to ensure your emails don’t end up in spam. You will not be able to remove these links on bulk emails. But if you’re sending 1-on-1 emails, you can exclude these links.