


Get Started
Sales Suite
Field Ops
Marketing
Service CRM
Integrations & Apps
FloStack
RingCentral Telephony Connector
1. Feature Overview
The RingCentral Telephony Connector lets you integrate your RingCentral account with LeadSquared. Once integrated, you’ll be able to –
- Make calls directly from your LeadSquared account.
- Automatically create new leads through incoming phone calls from unknown numbers.
- Utilize the agent pop-up to store or view lead information during phone calls.
- View your call logs as LeadSquared activities together with downloadable recordings.
For RingCentral SMS integrations, see RingCentral Texting Connector.
2. Prerequisites
- You must be an administrator user of your Leadsquared account.
- Your account plan must support telephony integration.
- You must have an active account with RingCentral.
3. Installation
- On the main menu, navigate to Apps>Apps Marketplace and search for “RingCentral Telephony”.*
- Click Install.
- Once installed, hover your cursor over the settings
 wheel, then click Configure.
* You can also find it under the category Telephony – United States on the left pane.
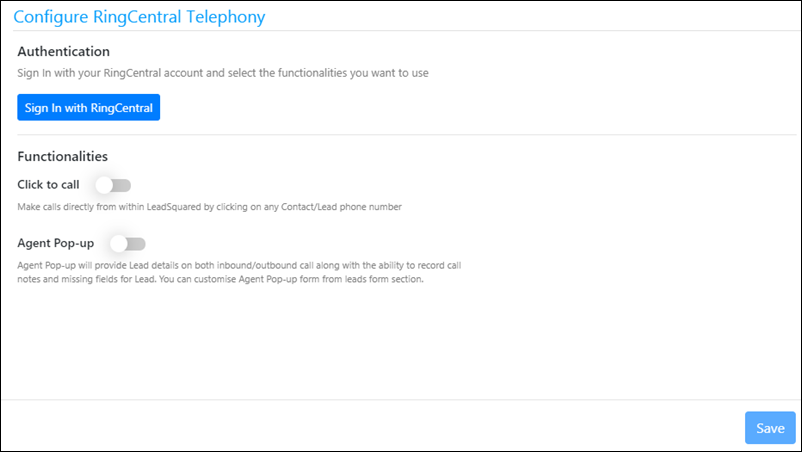
4. Configuration
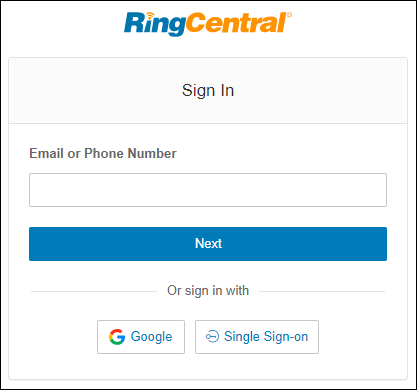
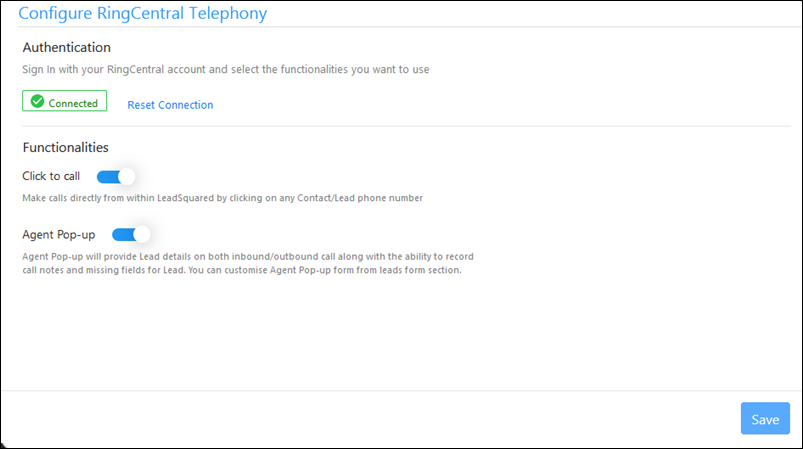
First, complete the Authentication step by clicking Sign In with RingCentral.
Enter your RingCentral account credentials
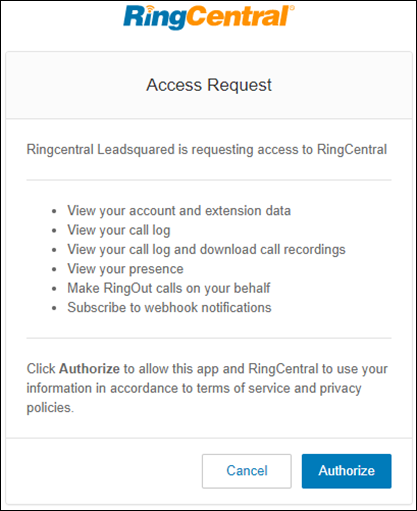
Click Authorize to give LeadSquared access to the necessary permissions.
After connecting to your RingCentral account, enable the Click to call and Agent Pop-up features, then click Save.
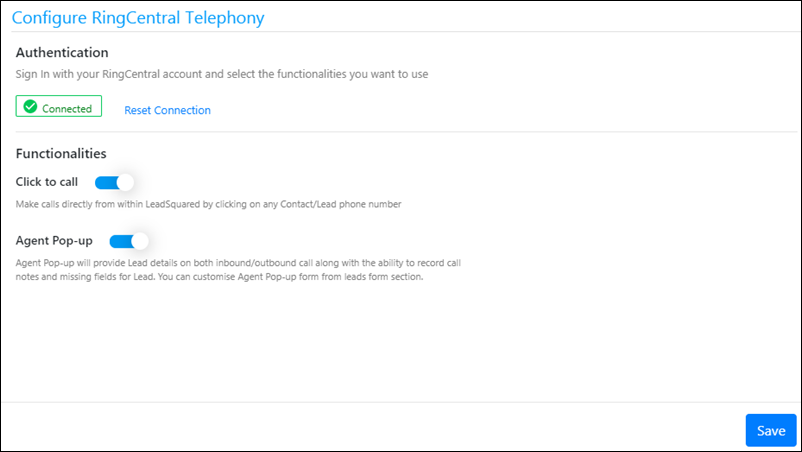
Note: The administrator user of your RingCentral account can create roles and assign the set of permissions required for calling (from the users page in your RingCentral account, https://service.ringcentral.com).
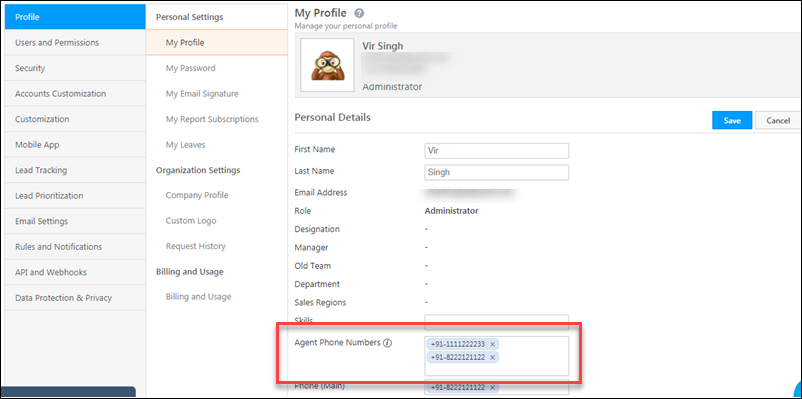
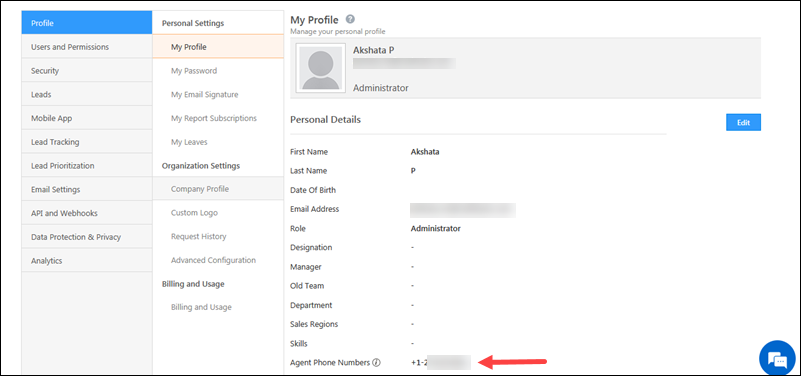
4.1 Adding Agent Phone Numbers
Now add the agent’s direct phone number to the corresponding user in your LeadSquared account.
- Navigate to My Profile>Settings.
- Alongside the personal details section, click Edit.
- Add the agent’s direct phone number in the Agent Phone Numbers field.
Note: You can add multiple agent phone numbers. While placing a call, you’ll be able to choose a number from the list you enter here.
5. Click to Call
If you enabled click to call during configuration, you’ll now be able to call leads directly from your LeadSquared account. Note that when you place a call to a lead, first the agent receives a call and only once that call is answered does it connect to the lead.
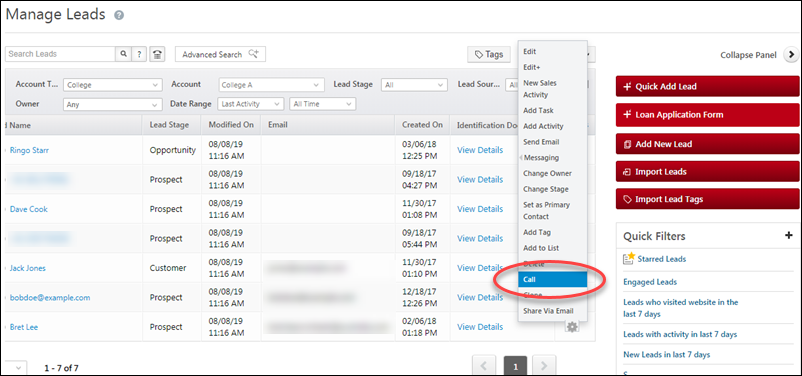
5.1 Manage Leads Page
On the Manage Leads page, alongside the lead you want to call, hover your cursor over the settings![]() wheel, then click Call.
wheel, then click Call.
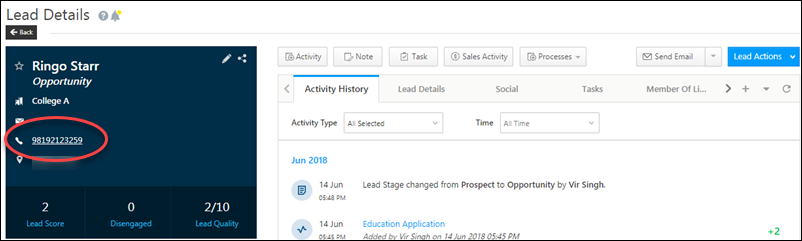
5.2 Lead Details – vCard
You can also make calls from the lead details page. Click the lead’s phone number in the vCard to initiate the call.
6. Phone Call Activities
Outbound and Inbound phone call activities will be automatically posted and you can view them on the following pages –
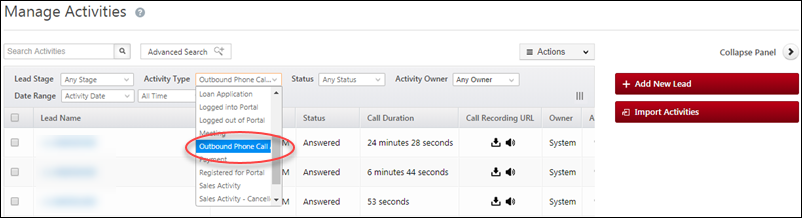
6.1 Manage Activities
Be sure to set the filter to ‘Outbound Phone Call’ or ‘Inbound Phone Call’ on the Manage Activities page. You can also use advanced search to set multiple search criteria.
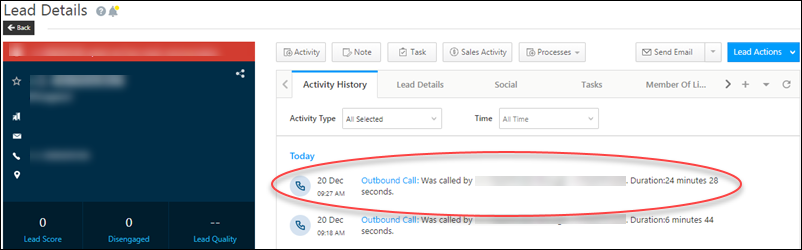
6.2 Lead Details – Activity History
Phone call activities will also be visible in the Activity History tab on the Lead Details page.
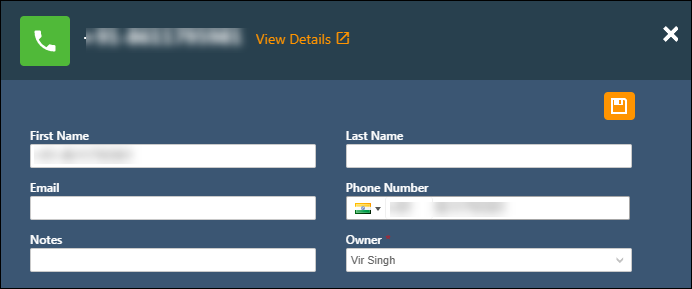
7. Agent Pop-up
If you enable the Agent Pop-up during configuration, when you’re making inbound and outbound phone calls, you’ll see a pop-up like this –
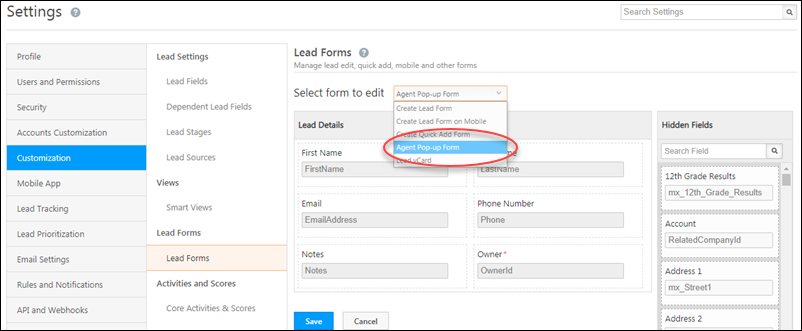
To configure the fields in the agent popup –
- Navigate to My Profile>Settings>Customization>Lead Forms.
- Select the Agent Pop-up form from the dropdown.
- Drag and drop the fields you want displayed in the form, then click Save.
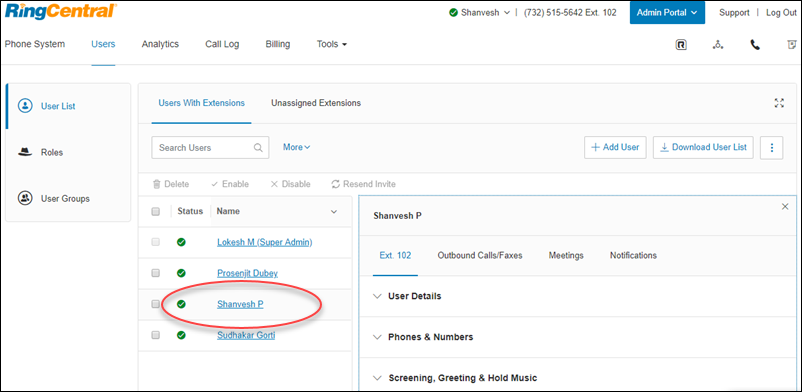
8. RingCentral Account Settings
This section explains some of the settings needed in your RingCentral account for seamless integration. The following settings are accessible to the RingCentral Administrator user at https://service.ringcentral.com.
On the Users page, click on a particular user to configure the devices, phone numbers and other functionality –
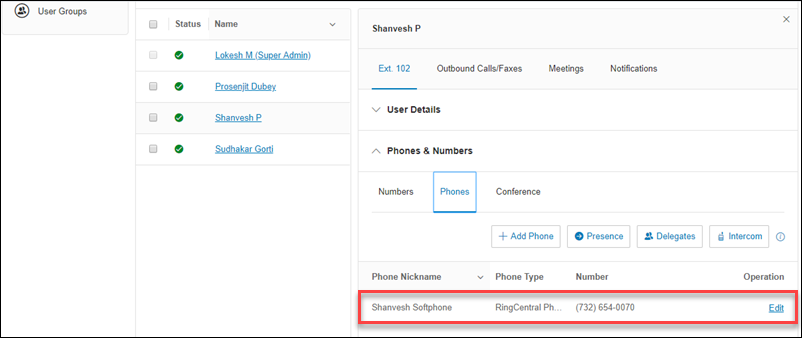
Click Phones & Numbers>Phones and enter the agent’s direct number –
Next, navigate to Outbound Calls/Faxes>Caller ID, and configure the caller Id or display number –
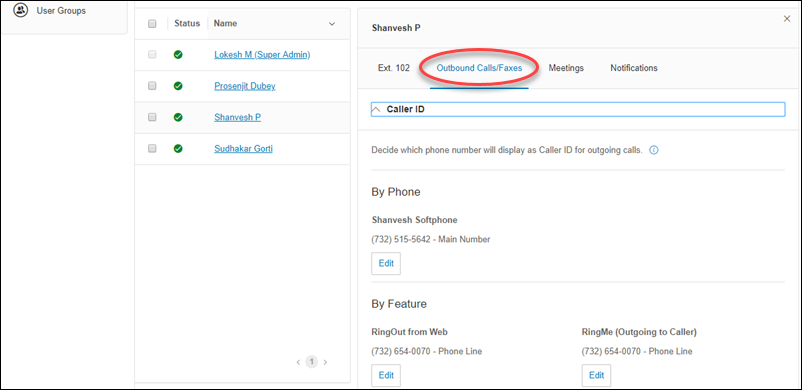
To avail the Soft Phone feature, download and install the RingCentral app. Remember to select the direct agent number while placing a RingOut call to get accurate call log details.
Finally, to ensure accurate call logs, add the agent direct number to the RingOut from Web feature –

9. Troubleshooting
We’ve listed down a few errors you might come across when using this connector.
1. Unable to Complete Authentication
- Ensure your RingCentral subscription plan is Premium or Ultimate. To know more, refer to RingCentral Plans.
- In your RingCentral account, ensure the user performing the authentication has the following permissions –
- Read Company CallLog
- Read Extensions
- Read Company Info
- Call Recording
- Company Call Log
- Read Call Log
- Read Call Recordings
- Read Company Call Recordings
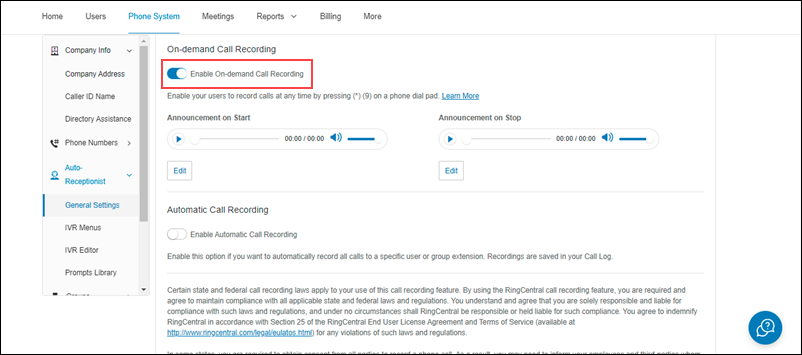
- If the CallRecording permission is missing, then in your RingCentral account, navigate to Phone Systems>Auto-Receptionist>General Settings, and enable On Demand Call Recording.
2. Error in Click2Call
If you’re facing a Click2Call error in your LeadSquared account, then –
- Ensure the Click2Call option is enabled for the RingCentral Telephony Connector (and not any other connector) in your account.
- On the Connector Configuration pop-up, the connection status should be “Connected”. If the status is “Not Connected”, please reauthenticate the connector by entering valid RingCentral credentials.
- Ensure your agent/user’s phone number is added on Settings>Profile>My Profile, against Agent Phone Numbers.
3. Call Logs are not Created
If call logs are not getting created in your LeadSquared account, then –
- Ensure the RingCentral Telephony connector is configured with valid account credentials, and the “Connected” status is displayed after authentication.
- Configure the connector with your RingCentral account credentials only in a single LeadSquared account, as call logs will get captured only in a single account (tenant).
4. Call Recordings are Not Available
If the call recordings are not available in your LeadSquared account, then –
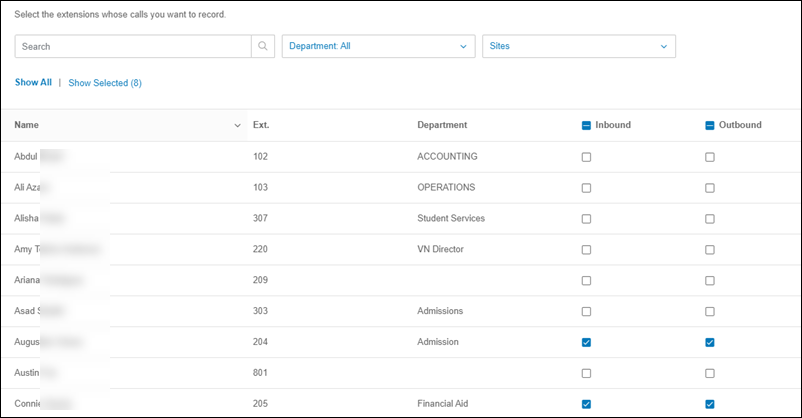
- In your RingCentral account, ensure the Call Recording permission is enabled. To do this, navigate to Phone Systems>Auto-Receptionist>General Settings, and enable On Demand Call Recording.
- On the General Settings screen, under Automatic Call Recording>Extension’s Recording, click the Edit button.
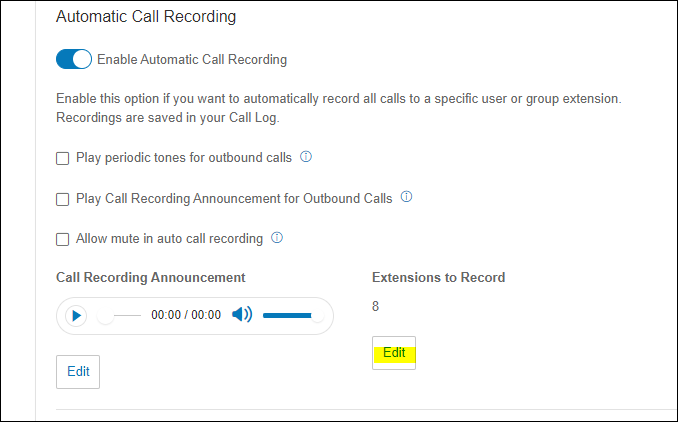
Then, select the users for whom inbound and outbound calls will be recorded.
Any Questions?
Was this article helpful? Leave us a comment below!
Where can I lookup my Account ID and extension ID
Hi Jatinder,
You can obtain your Account ID and Extension ID from your RingCentral account. You can view this post on the RingCentral community for assistance or contact their support team. Hope this helps!