1. Feature Overview
Once Admins set up Service CRM on the LeadSquared mobile app, Agents can perform actions on tickets and resolve them. This article helps agents work on these tickets through the mobile app.
2. Prerequisites
- Click here to download the LeadSquared mobile app –
- Service CRM is a paid feature. To enable it on your account, contact your account manager, or write to scsupport@leadsquared.com.
- Only Sales + Service type Agents can use the mobile app.
3. How it Works
From the LeadSquared mobile app, you can view, update, add, close, and delete tickets. This article shows how to perform these actions.
4. View Tickets
- After you install the LeadSquared app, log in and tap Tickets to view the tickets on your account.
- You can filter tickets by All Tickets, My Tickets, My Group Tickets, Custom Views, and Shared Views.
- Under each of these views, you can further filter the ticket by Unresolved, Mentioning Me, Customer Responded, Unassigned, etc.
5. Create Tickets
To create a new ticket from the mobile app,
- Navigate to the Tickets screen and tap the tickets icon.
- On the Add Ticket form, add the relevant ticket details.
- To know more, refer to Create Tickets.
- Once you’re done, tap Submit. A new ticket is created in your account.
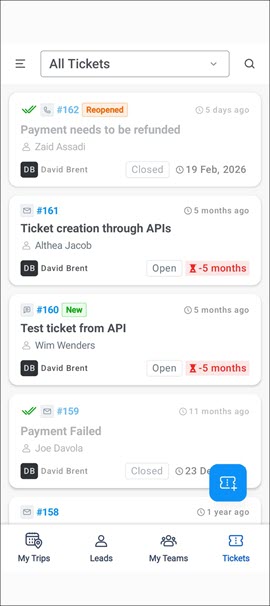
6. Manage Tickets Screen
6.1 Views
From the Manage Tickets screen, view the following ticket details –
- Ticket Creation Channel – The channel icon, such as email, call, SMS, etc., through which the ticket is created appears here.
- Ticket Number – The ticket number is displayed.
- Ticket Tags – Various tags that the system or agents added to the ticket appear here.
- Ticket Created Time – The time displayed in the top-right corner shows how much time has passed since the ticket was created.
- Ticket Subject – The ticket subject is visible.
- Customer Name – The customer (lead) linked to the ticket appears here.
- Ticket Owner – The ticket owner’s name is visible here.
- Status – The current ticket status is visible here.
- Closed tickets are highlighted with a double tick icon, and the entire ticket is greyed out.
- SLA Date – For open tickets, the bottom-right date shows the days or months past the SLA. For closed tickets, it shows the date on which the ticket was closed.
6.2 Actions
Perform the following actions on the Manage Tickets screen –
- Assign – Assign the ticket to a different user in your account.
- Change Status – Update the ticket status.
- Close – After you resolve the ticket, fill the ticket disposition form to close it from this screen.
- Delete – Deletes the ticket.
7. Ticket Details Screen
7.1 Views
On the Ticket Details screen, view the following details –
- Customer Interactions – View emails the customer sends related to the ticket, the replies agents send to the customer, and the attachments in these interactions. Also view the internal notes posted by other Service CRM agents on these tickets.
- Ticket Properties – View ticket details like priority, status, ticket owner, etc.
- Customer Information – View the customer (lead) details like name, email, phone, etc.
7.2 Actions
Perform the following actions on the Ticket Details screen –
- Update Ticket Status – When working on a ticket, update its status to reflect the progress made.
- Update Ticket Owner – If required, update the ticket and tag it to a different agent.
- Update Ticket Properties – Update other ticket fields, such as stage, channel, etc., from here to reflect the progress.
- Update Customer Properties – Update customer (lead fields) as well from this page.
- Add Notes – Add internal notes to share additional ticket details with colleagues. You can also attach files to these notes.
- Copy Text from Images – Use the eye icon to copy text from images and paste it into ticket fields.
- Close a Ticket – After you resolve the ticket, fill the ticket disposition form to close it from this screen.
- Delete – Deletes the ticket.
Any Questions?
Did you find this article helpful? Please let us know any feedback you may have in the comments section below. We’d love to hear from you and help you out!


