Tag Archive for: alternate mobile number

Manage User Custom Fields

1. Feature Overview

When you create users, there are a number of system fields available (such as first name, last name, etc.) to store their information. You can also create custom user fields (like their work anniversaries, gender, marital status, etc.). You can choose the data types you want the fields to accept and customize them according to your preferences.
You can also setup automations on the basis of some of these fields. To know more, see How to Create a User Automation.


2. Prerequisites

You must be an Admin user to create and edit user fields. If you require more than the available number of custom fields, please write to support@leadsquared.com.


3. Create Custom Fields

To create a custom user field –

  1. Navigate to Settings>Users and Permissions>User Fields.
  2. Click Create.
  3. On the Create User Field (Custom) form, enter relevant details in the following properties –
Property Description
Enter the display name (eg, “Birthday”, “Work Anniversary”, etc.) of the field that’s being created.
Enter the schema name of the field. Only alphanumeric characters and underscores are allowed.
DataType The data type of the field. The following are the data types available, along with their limits –

  • Text – You can add up to 20 fields, with a limit of 250 characters per field.
  • Number – You can add up to 40 number fields.
  • DateTime – You can add up to 10 DateTime fields.
  • Dropdown – You can add up to 20 dropdown fields.
  • Long Text – You can add up to 10 long text fields, with a limit of 1024 characters per field.
Is Mandatory To make this field mandatory for your users to fill in, enable the checkbox.
Is Editable To allow your users to edit this field on the My Profile page, after they’ve submitted the details, enable the checkbox.
Is Hidden for the User To hide this field for the user on the My Profile page, enable this checkbox.

Once you’re done, click Save. You can now enter the details of each custom field while creating or editing a user from the Manage Users page. For more information, see Manage Users.

LeadSquared Custom User Fields

Note: Once published, you cannot change the DataType of a custom user field.


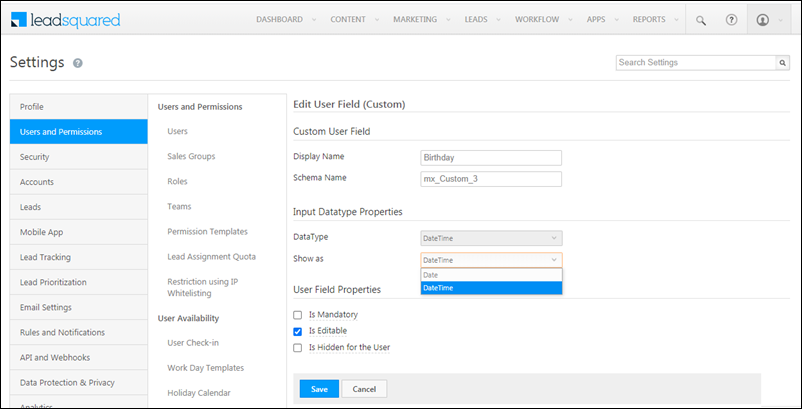
3. Edit Custom User Fields

To edit a custom user field –

  1. Navigate to Settings>Users and Permissions>User Fields.
  2. Against the field you want to edit, hover your cursor over the icon, and click Edit.
  3. On the Edit User Field (Custom) form, you can edit the following fields –
Property Description
Edit the display name (eg, “Birthday”, “Work Anniversary”, etc.) of the field that’s being created.
Edit the schema name of the field. Only alphanumeric characters and underscores are allowed.
Show As This option will show up only for a DateType field. You can choose how the field is displayed, either as a ‘Date’ field or a ‘DateType’ field.
Is Mandatory To make this field mandatory for your users to fill in, enable the checkbox.
Is Editable To allow your users to edit this field on the My Profile page, after they’ve submitted the details, enable the checkbox.
Is Hidden for the User To hide this field for the user on the My Profile page, enable this checkbox.

Once you’re done, click Save.

LeadSquared Custom User Fields


4. Populate Custom Fields for Users

Once you’ve created and configured custom user fields in your account, you can populate them with data for each user.

  1. Navigate to the Manage Users page.
  2. When creating or editing a user, click the Other Details tab.
  3. All the custom fields are available here. Click Edit to populate them with values.

LeadSquared User Management


5. FAQs

What is the maximum number of custom lead fields I can create?
You can create up to 260 custom lead fields in your LeadSquared account.


Any Questions?

Have any questions you’d like to voice? Or any experiences with this feature you’d like to share? Please feel free to start a discussion in the comments section.

Create Custom Lead Fields

1. Feature Overview

LeadSquared provides a set of default lead fields out of the box, but every business captures unique information about its leads. Custom lead fields let you extend the standard lead profile with fields specific to your industry or workflow — such as a credit score for financial services, a property budget for real estate, or a patient ID for healthcare.

Note: If an existing unused lead field already has the data input type you need, consider renaming its Display Name instead of creating a new field.

Examples by industry:

Industry Example Custom Fields
Banking & Financial Services Aadhaar Number, Social Security Number, Credit Score
Education & Ed-Tech 12th Grade Results, Course Interest
Real Estate Location Interest, Budget, Property Type
Healthcare Patient ID, Age, Previous Diagnosis
General Spouse’s Name, Permanent Address, Marital Status, Gender


2. Prerequisites

You must have Administrator access to create or modify custom lead fields.


3. How It Works

When you create a custom lead field, you define its properties and the section it belongs to. The section determines where the field appears when adding or viewing a lead record. Properties control the field’s data type — such as text, number, or date — and its behavior, such as whether it is mandatory, searchable, or included in mail merge.

Note: Review the data input type carefully before saving — most field properties cannot be changed after creation.


4. Creating a Custom Lead Field

  1. Go to My Profile>Settings>Leads>Lead Fields.
  2. Click the Create icon.
  3. Fill in the field properties (see reference below).
  4. Click Save.

navigate to create custom lead fields


5. Field Properties Reference

5.1 Basic Properties

Property Description
Display Name The label shown to users on the lead form (e.g., Alternate Mobile Number).
Include Field in Section The section of the lead profile where the field appears: Lead Details, Additional Details, or Hidden Fields.
Mail Merge Default Value A fallback value used in mail merge when a lead has no data in this field.
Data Input Type The field’s data type. Determines how the field is rendered and what values are accepted (see table below).

5.2 Data Input Types

Data Type Rendered As Example
Text (String) Text box Designation
Number Text box (select Decimal or Integer) Fax Number
Email Email input Alternate Email Address
Phone Text box or Phone Controller Secondary Phone Number
Website URL input Company Blog
Date Date picker Follow-up Date
Time Time picker Follow-up Time
Boolean Radio button or checkbox Valid Passport
Dropdown Single-select dropdown Country
Multi-Select Dropdown Multi-select dropdown Courses Opted For
Custom Field Set (CFS) Configurable — supports file/image uploads PAN Card
Note: If you need a large number of dropdown options, see Large Options Set for Lead Fields.

5.3 Behavioral Settings

Setting Description
Include in Mail Merge Allows this field’s value to be dynamically merged into email campaigns, automations, and integrations.

Note: File-type CFS fields cannot be included in mail merge.
Is Mandatory Prevents users from saving a lead record without filling in this field.
Include in Quick Search Makes this field searchable from the Quick Search bar on the Manage Leads page.
Show in Quick Add Displays this field when creating a lead through the Quick Add option.
Lock After Create Prevents non-admin users from editing the field value after the lead is created. Does not restrict API-level updates.
Use in Lead Clone Auto-populates this field when cloning an existing lead.
Show in Import Makes this field available for column mapping when importing leads.


6. Editing a Custom Lead Field

Once a field is created, only the following properties can be modified:

  • Mail Merge Default Value
  • Maximum Length
  • Is Mandatory

All other properties, including the data input type, are locked after creation.


7. How to Create a Currency Field

LeadSquared does not have a dedicated currency data type, but you can display a Number field in currency format using Custom Field Sets (CFS). Follow these steps:

Step 1: Set your account’s default currency format.

  1. Go to Settings>Profile>Company Profile.
  2. Click Edit.
  3. Next to Default Currency, click Format, select your preferred comma-separated currency format, and click Save.

Step 2: Create a currency-formatted number field.

  1. Go to Settings>Leads>Manage Custom Field Sets.
  2. Click Create.
  3. Enter a Name and Description, then click Next.
  4. Click Add Field, enter a Display Name, and select Number from the Type dropdown.
  5. Click the actions menu (seria sales user dashboard actions) and select Currency from the Show As dropdown.
Note: Currency formatting is also available for Opportunity, Task, and Activity number fields.

How to Create a Currency Field


Any Questions?

Did you find this article helpful? Please let us know any feedback you may have in the comments section below. We’d love to hear from you and help you out!