


Get Started
Sales Suite
Field Ops
Marketing
Service CRM
Integrations & Apps
FloStack
Zendesk Connector
1. Feature Overview
The Zendesk Connector syncs tickets between your Zendesk and LeadSquared accounts. It lets you manage your tickets and interactions with the leads (End Users) directly from LeadSquared, and also allows you to create tickets in Zendesk from your LeadSquared account.
Additionally, if a ticket is added to a Zendesk End User that does not exist as a lead in LeadSquared, a new lead gets created in your account. To know more, refer to Zendesk Connector.
2. Prerequisites
- You must be the Administrator of your LeadSquared account.
- This is a paid feature. To enable it on your account, please reach out to your account manager, or write to support@leadsquared.com.
- Unique fields in your LeadSquared account must include Email Id, Phone Number, and Mobile Number.
- Lead share via API must be enabled on your LeadSquared account. To enable it, please reach out to your account manager, or write to support@leadsquared.com.
- This connector is only supported on LeadSquared accounts that have more than 30 custom Activity fields.
- For any Zendesk custom ticket field, we only sync up to 200 characters in LeadSquared.
3. How it Works
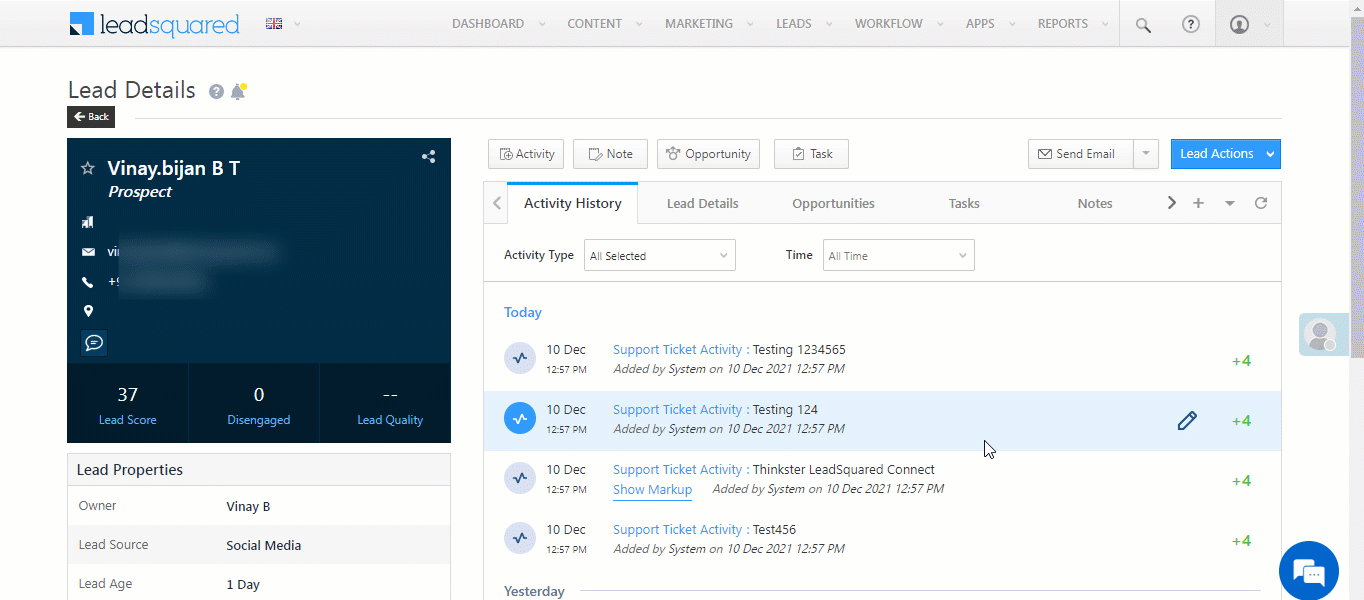
Once the connector is installed and configured, tickets from your Zendesk account are automatically mapped as activities against leads in LeadSquared. A new activity type, along with a new tab on the Lead Details page, called “Support Tickets”, is created by default. From this tab, you can perform various actions on your tickets like updating them, replying to your leads, and notifying your users.
When you create new tickets from LeadSquared (from the Smart Views, Manage Leads, and Lead Details pages) they are automatically mapped to existing End Users in your Zendesk account.
4. Install the Connector
- From the main menu, navigate to Apps>Apps Marketplace.
- Search for Zendesk Connector, and click Install.
- Alternatively, you can find the connector on the left panel, under Customer Support.
- Once the connector is installed, hover your cursor over
 , and click Configure.
5. Configure the Connector
Once the connector is installed, on the Configure Zendesk Connector pop-up, provide the following details –
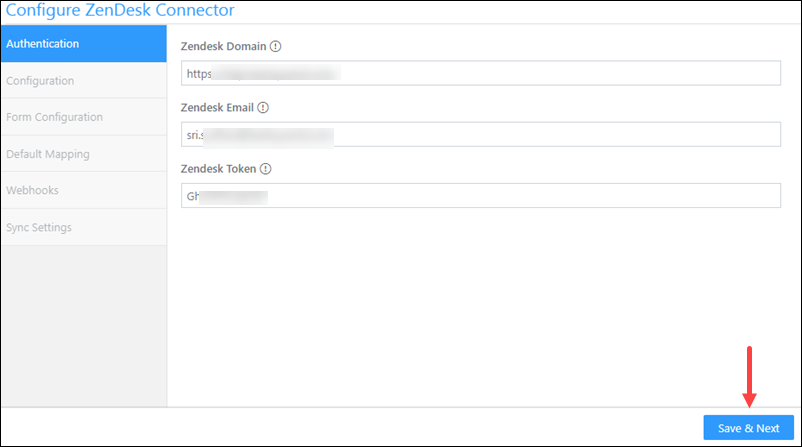
5.1 Authentication
Enter the following details to authenticate your Zendesk account –
- Zendesk Domain – Enter your Zendesk domain name here.
- Zendesk Email – Enter your Zendesk email Id here.
- Zendesk API Key – Enter your Zendesk API key here. To know more, refer to Generating a New API token in Zendesk.
- Once you’re done, click Save & Next.
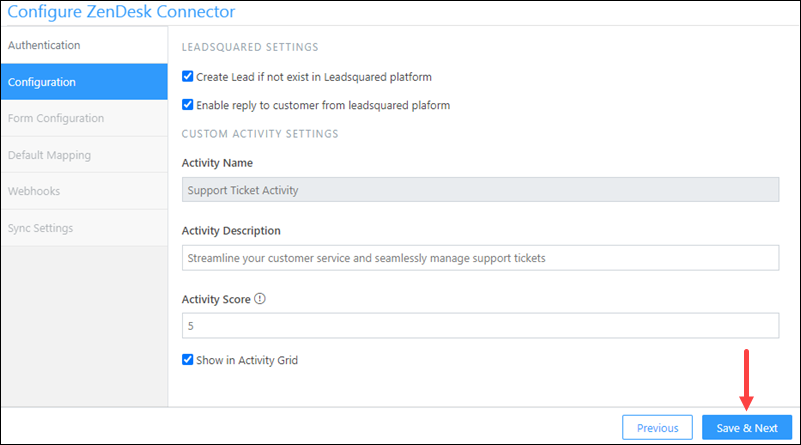
5.2 Configuration
- Create Lead if not exist – When enabled, if a ticket is added to a lead that does not exist in your LeadSquared account, a new lead is automatically created.
- Enable reply to customer – When enabled, you’ll be able to chat and reply to your customers (leads) in real-time, from LeadSquared.
- Activity Name – The name of the activity. This field is not editable.
- Activity Description – The activity description, which will help your users understand what the activity does.
- Activity Score – The default score for the activity. Every time this activity is posted, this score will get added to the overall lead score.
- Show in Activity Grid – To make this activity visible on the Activity Grid on the Manage Activities and Smart Views page, enable the checkbox.
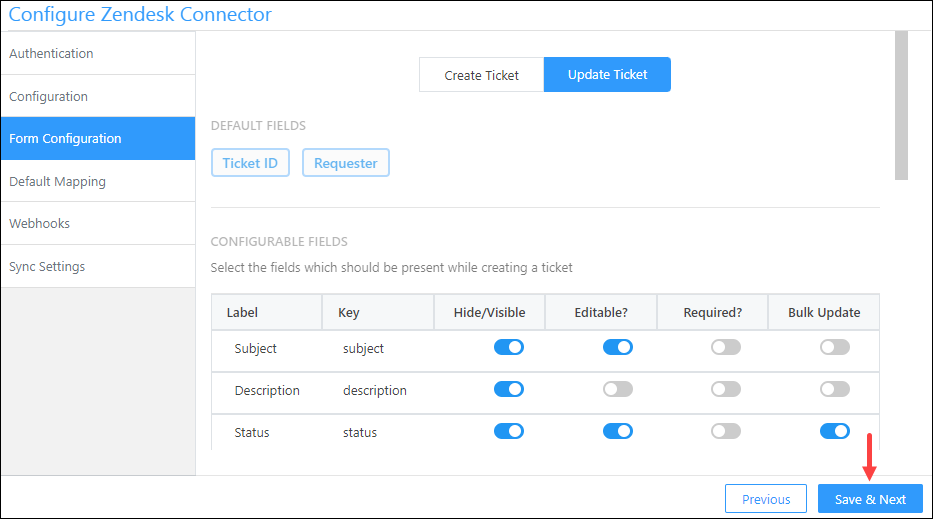
5.3 Form Configuration
Select the ticket fields you want to display to your LeadSquared users when they Create and Update Tickets. The data in these fields will automatically get mapped to the corresponding fields in Zendesk. Additionally, configure the actions your users can perform when they work on a ticket (form) –
- Hide/Visible – To display the field to your users, enable the
 slider.
 - Editable – To allow your users to edit this field, enable the slider. This will only show up when a user updates an existing ticket.
- Required – To make a field mandatory for your users, enable the slider.
- Bulk Update – To allow bulk update for this field, enable the slider. This will only show up when a user updates an existing ticket.
5.4 Default Mapping
By default, the Zendesk Ticket and Contact system fields are mapped to the corresponding LeadSquared Activity and Lead fields. If required, you can also add custom activity and lead fields.
To add a custom field –
- Click Add Custom.
- Under Zendesk Ticket/Contact Fields, from the dropdown, select the custom Zendesk field.
- Under Map to Leadsquared Field, select the corresponding LeadSquared field.
- Under Enable/Disable, click to enable data capture to the selected field.
- Once you’re done, click
 .
. - After adding all the custom fields, click Save & Next.
Note:
- To edit a custom field, click
 .
. - To delete a custom field, click
 .
.

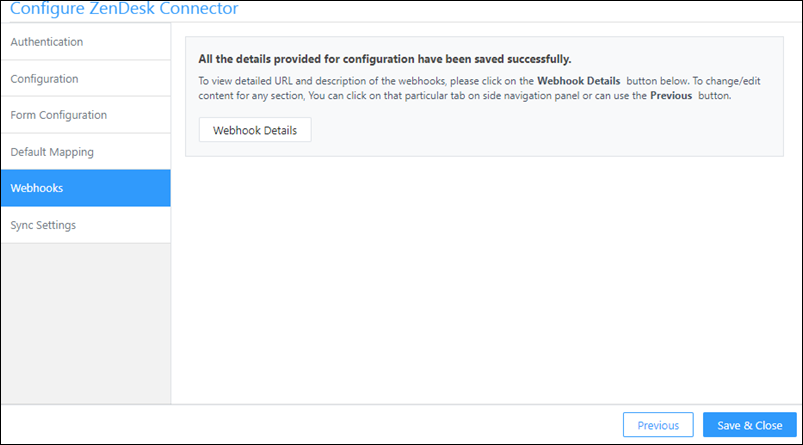
5.4 Webhooks
The webhooks are automatically created and configured in your Zendesk and LeadSquared accounts. No further action is required from your end. To view the webhook, click Webhook Details.
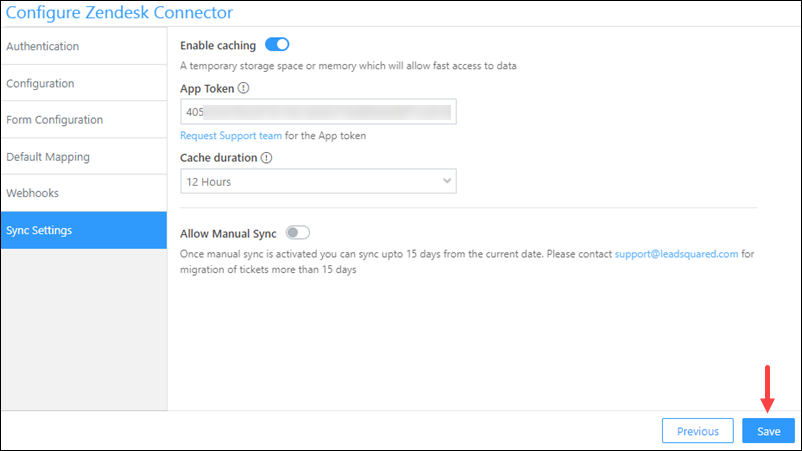
5.5 Sync Settings
To improve the overall performance of the connector, we recommend you Enable caching.
- Alongside Enable caching, enable the slider.
- Under App Token, enter your LeadSquared account’s Cache Service App Token.
- From the Cache duration dropdown, select the maximum duration for which you want to store cache data.
- Once you’re done, click Save. The connector is successfully installed and configured in your account.
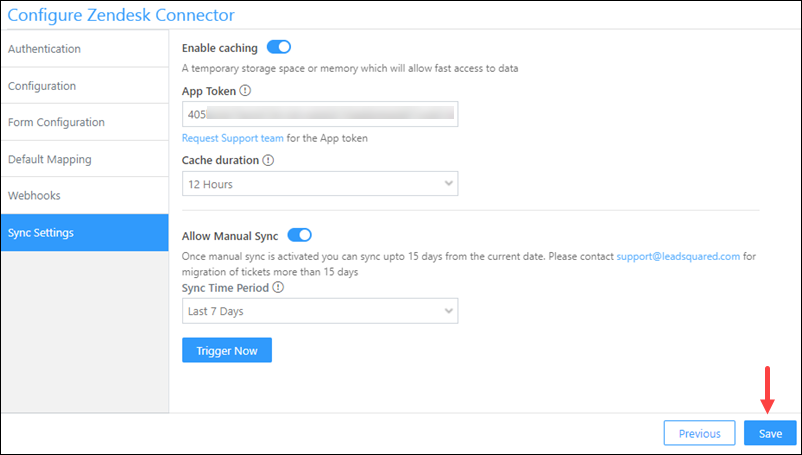
Additionally, you can manually sync existing Zendesk tickets with LeadSquared. Tickets that were created in the past 15 days (from the date of the manual sync) can be synced.
- Alongside Allow Manual Sync, enable the slider.
- From the Sync Time Period dropdown, select the date range within which you want to carry out the sync. You can select Last 7 Days or Custom Date Range.
- If you’ve selected Custom Date Range, enter the Start Date and End Date.
- Once you’re done, click Trigger Now. The tickets in the selected date range will get synced with LeadSquared.
- Lastly, click Save & Next. The connector is successfully installed and configured in your account.
6. Individual Ticket Actions
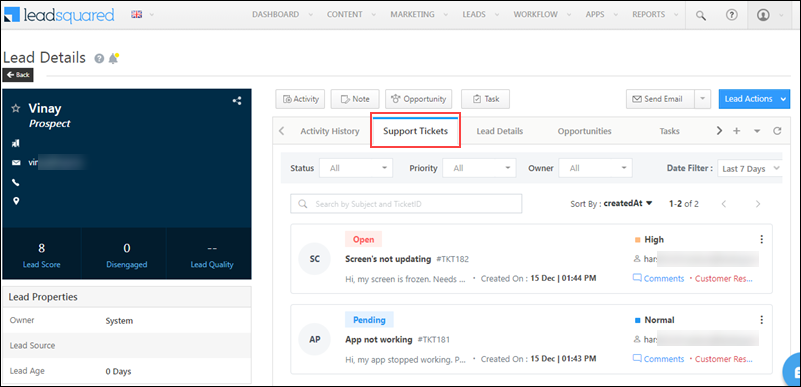
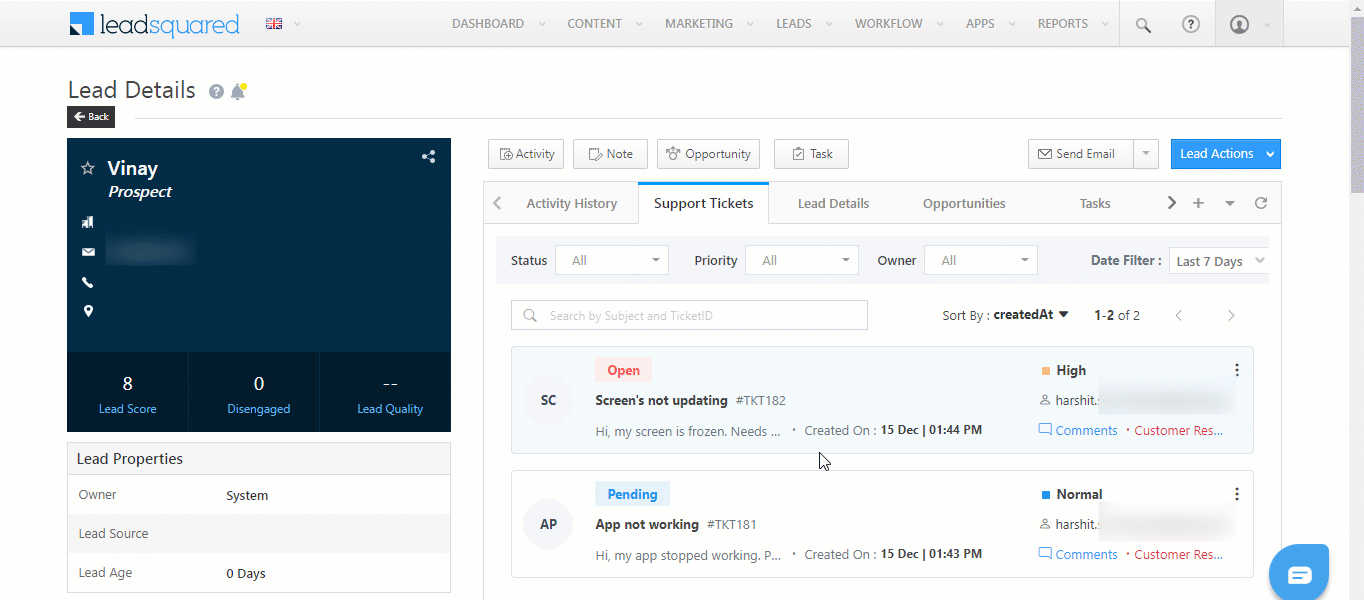
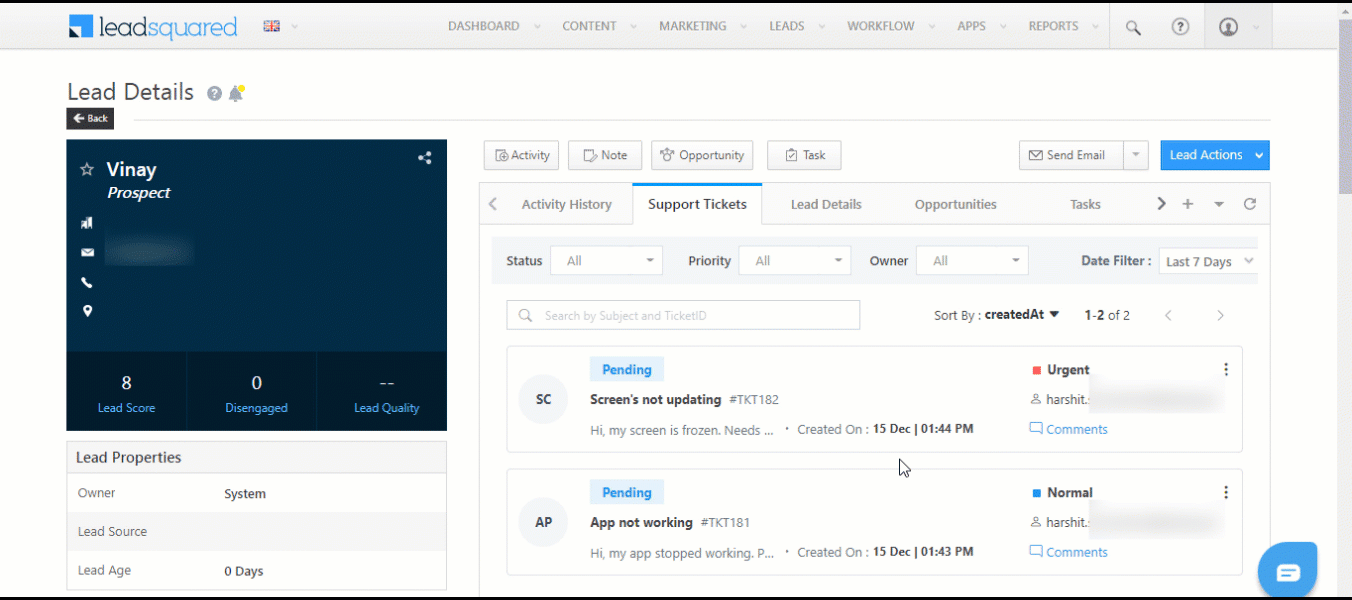
Once your accounts are synced, support tickets from Zendesk become visible under the Activity History tab on the Lead Details page. Additionally, a separate tab called Support Tickets is created on the Lead Details page, where these tickets are mapped as activities to your leads. You can filter these tickets by –
- Status – Open, Pending, Resolved, and Closed.
- Priority – Low, Medium, High, and Urgent.
- Owner – The ticket owner in LeadSquared.
- Date – Today, Last 7 Days, Last 15 Days, or Last 30 Days.
Note:
- You can send and receive attachments (images, documents, PDFs, videos, etc.) from your lead when replying to a ticket. You can also add attachments when creating and updating a note.
- You can search for a ticket using the Ticket ID or the ticket’s subject line.
On the Support Tickets tab, you can perform the following actions –
6.1 Reply to a Ticket
- Alongside the ticket you want to reply to, click Comments, and then click the Reply button.
- You can choose the sender email Id from which your leads will receive the reply, through the From dropdown.
- In the text box, type your reply.
- To add an attachment to your reply, click
 , and then drag and drop the file you want to send to your lead.
 - If required, you can add other LeadSquared users to the mail thread, by adding them to the CC or BCC tab.
- Once you’re done, click Send Reply. The lead will receive your reply.
Note:
- You can add multiple attachments to the reply, but the combined file size of all the attachments must be less than 6MB.
- After typing out a reply, if you want to save it as a draft, click Save Changes.

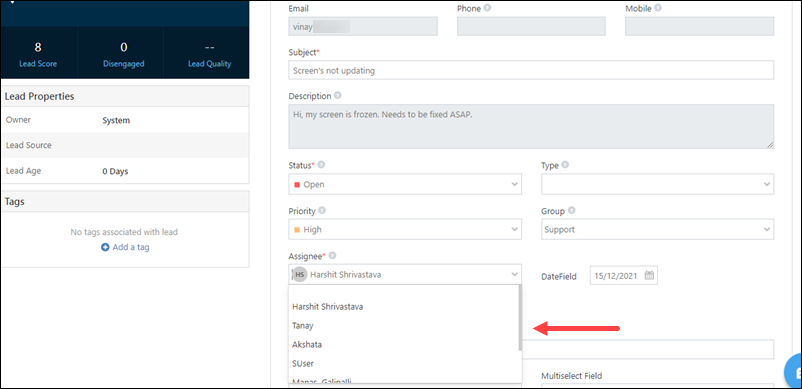
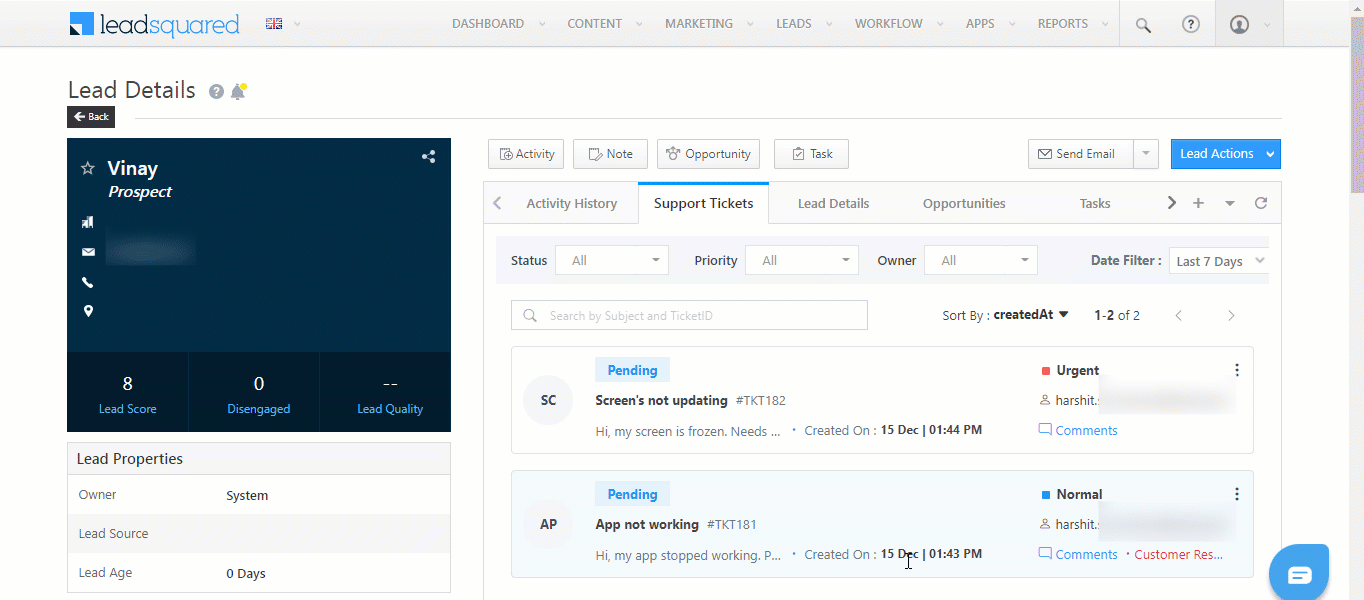
6.2 Update a Ticket
To edit and update the details of a ticket (such as the Subject, Status, Description, Priority, etc.) –
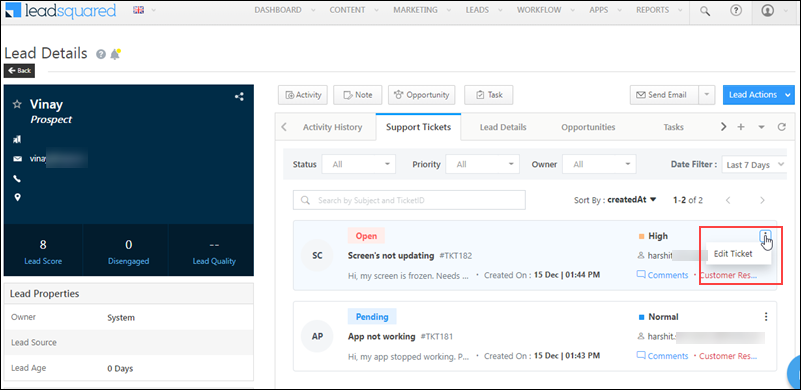
- Alongside the ticket you want to update, click Comments.
- Then, click the Edit Ticket button.
- On the Edit Ticket screen, enter the new values for the fields you want to update.
- Once you’re done, click Save Changes. The ticket will get updated in your LeadSquared and Zendesk accounts.
To assign the ticket to a different user, from the Agent dropdown, select the user you want to reassign the ticket to.
You can also update the ticket by hovering your cursor over ![]() , and clicking Edit Ticket.
, and clicking Edit Ticket.
6.3 Add a Note
- Alongside the ticket you want to add a note to, click Comments, and then click the Add a Note button.
- From the Notify To dropdown, select the LeadSquared user you want to notify with the note.
- In the text box, type the contents of your note.
- To add an attachment to your note, click , and then drag and drop the file you want to add to the note.
- Once you’re done, click Add Note.
6.4 View Conversations
You can view ticket-related conversations with your leads from the following screens –
Lead Details Screen
On the Lead Details screen, from the Support Ticket tab, click Comments to view the conversations with your lead.
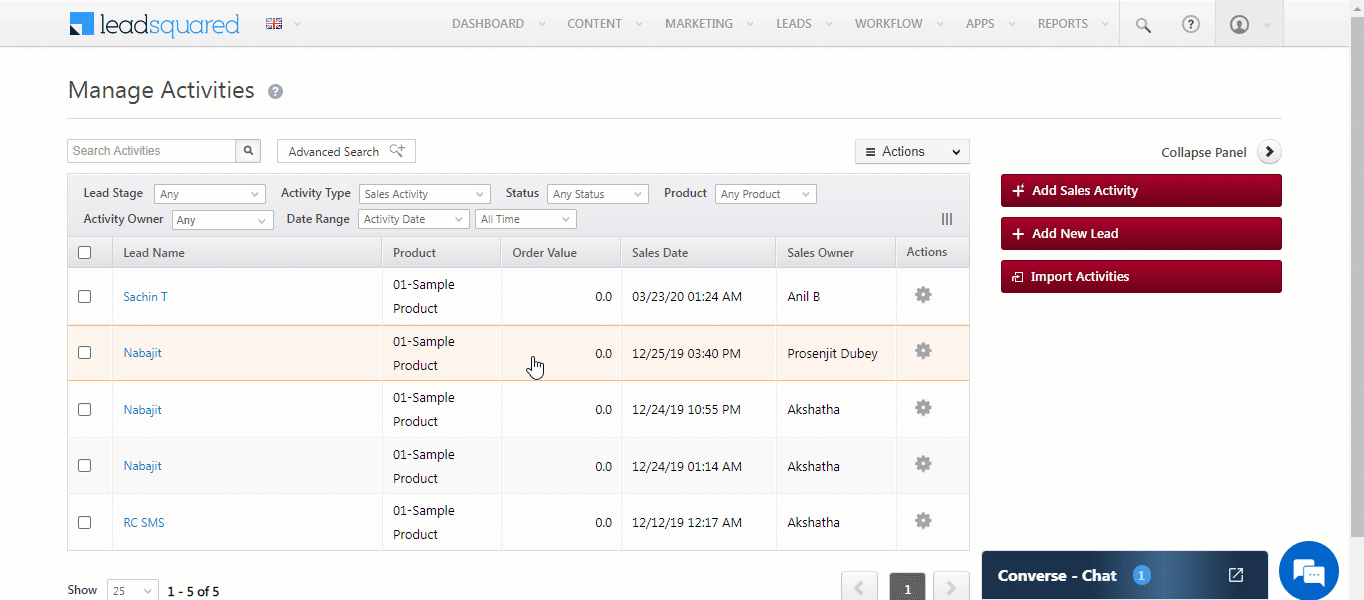
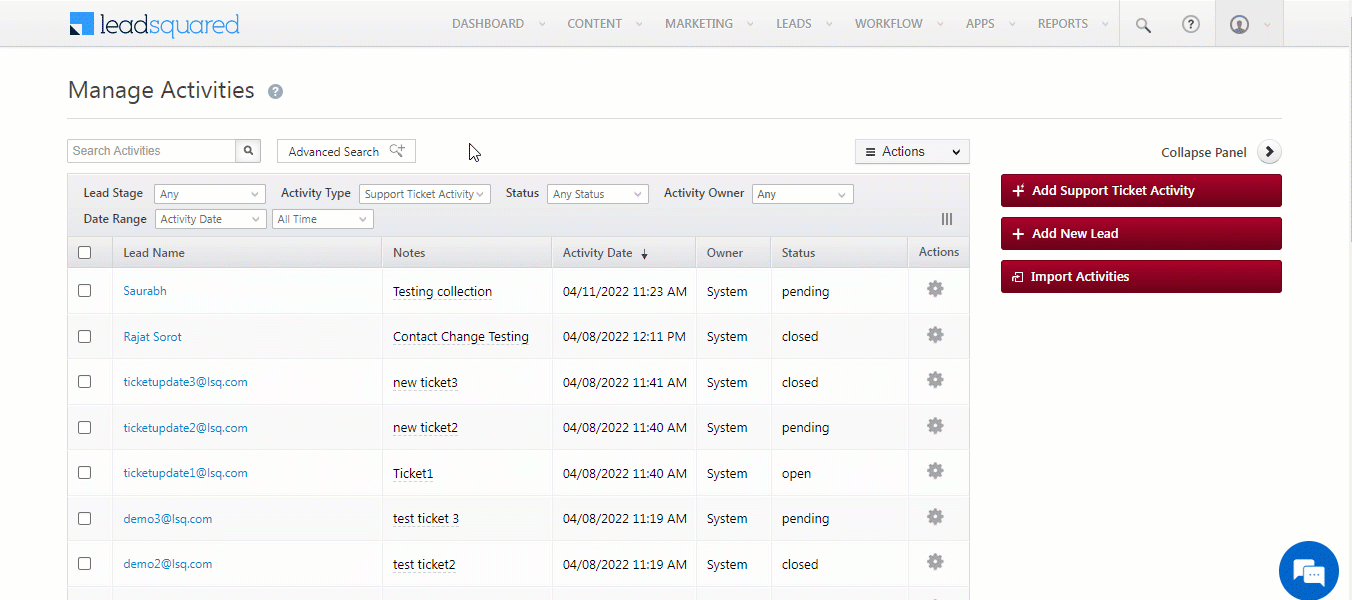
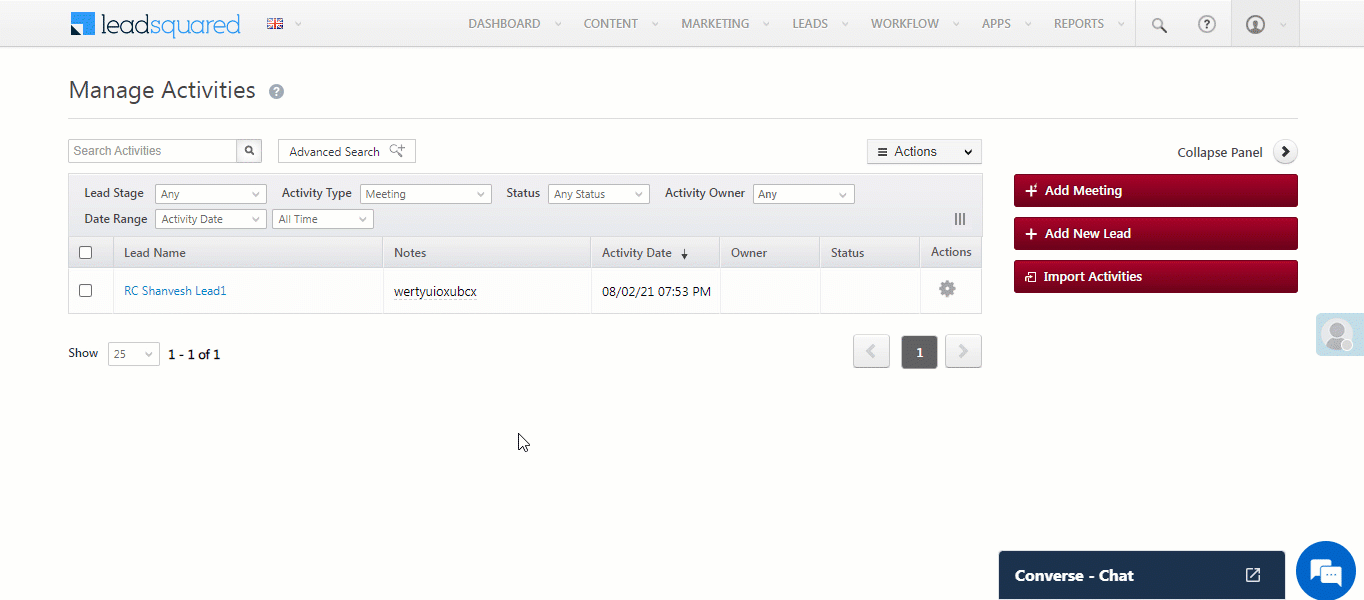
Manage Activites Screen
To view the conversation from the Manage Activities screen –
- Navigate to Leads>Manage Activities.
- From the Activity Type dropdown, select Support Ticket Activity.
- Alongside the lead you want to view the conversations for, hover your cursor over .
- From the options, hover your cursor over Custom Actions, and click View Details.
- You can view the conversation on the View Details pop-up.
Note: You can also perform the following actions on the Manage Activities page, from the View Details pop-up –
- Reply to your Lead
- Add a Note
- Assign the ticket to a different user
- Update Status and Priority of the ticket
7. Bulk Ticket Actions
In addition to the actions listed above, you can perform the following actions from the Manage Activities and Smart Views pages –
7.1 Update Multiple Tickets
To update multiple tickets in bulk –
- Navigate to any one of the pages listed above, and alongside the leads for whom you want to update tickets, click
 .
. - Hover your cursor over the
 menu, then hover your cursor over Custom Actions, and click Bulk Ticket Update.
 - On the Bulk Ticket Update pop-up, for the desired fields, enter the new values.
- Once you’re done, click Save Changes. The selected tickets are updated. To view the ticket update status, see Ticket Logs.
7.2 Merge Tickets
If you’ve created multiple tickets on the same lead, or if you have multiple tickets created for the same issue, you can merge all these tickets into a single ticket. This will help your users focus on a single ticket, and take the issue to resolution.
Note: When you merge tickets –
- Only conversations with your leads present in the selected secondary tickets are merged with the primary ticket. All the other ticket details (such as Ticket Status, lead details, etc.) remain unchanged in the primary ticket.
- Once merged, the status of the secondary tickets is changed to Closed.
- Navigate to any one of the pages listed above, and alongside the leads for whom you want to merge tickets, click .
- Hover your cursor over the menu, then hover your cursor over Custom Actions, and click Merge Ticket.
- On the Merge Ticket pop-up –
- By default, the first ticket you’ve selected is marked as Primary. To mark a different ticket as Primary, alongside the ticket, click
 .
. - To find a specific ticket among the list of selected tickets, use the Search By field. You can Search By Email or Ticket ID.
- To remove a ticket you no longer want to merge, alongside the ticket, click
 .
.
- By default, the first ticket you’ve selected is marked as Primary. To mark a different ticket as Primary, alongside the ticket, click
- Once you’ve selected the Primary ticket, click Continue.
- On this screen, a default note is added to the Primary as well as Secondary tickets, to help your users keep track of the tickets that have been merged.
- If required, you can edit this default note on any of the tickets. To do so, alongside the note you want to edit, click
 .
. - If you want to send this note via email to the Secondary ticket owners, enable Add secondary recipients to CC.
- To make this note visible to your lead (contact), click on Private, and from the dropdown, select Public.
- If required, you can edit this default note on any of the tickets. To do so, alongside the note you want to edit, click
- Once you’re done, click Merge. The selected tickets are now merged, and you can find all the conversation details under the Primary ticket.

8. Create Tickets in LeadSquared
When you add tickets to leads in LeadSquared, they are automatically added to existing End Users in Zendesk. If a ticket is added to a lead that does not exist in your Zendesk account, then a new End Users is created. You can add and update tickets to your leads from the following screens –
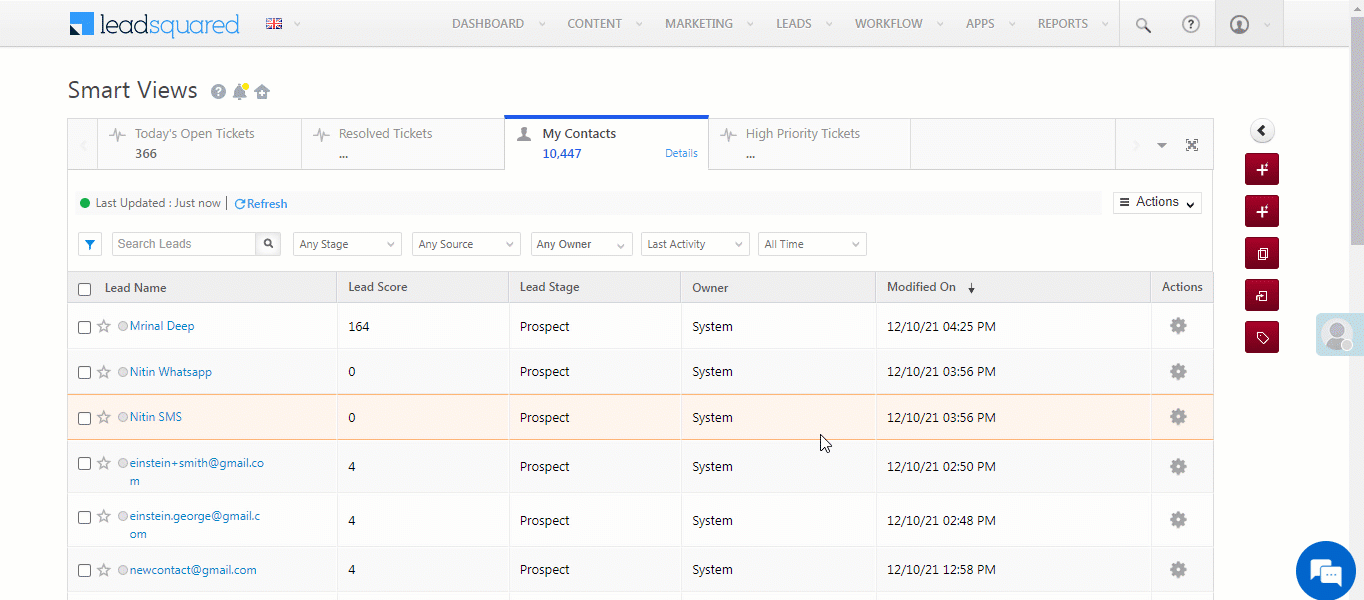
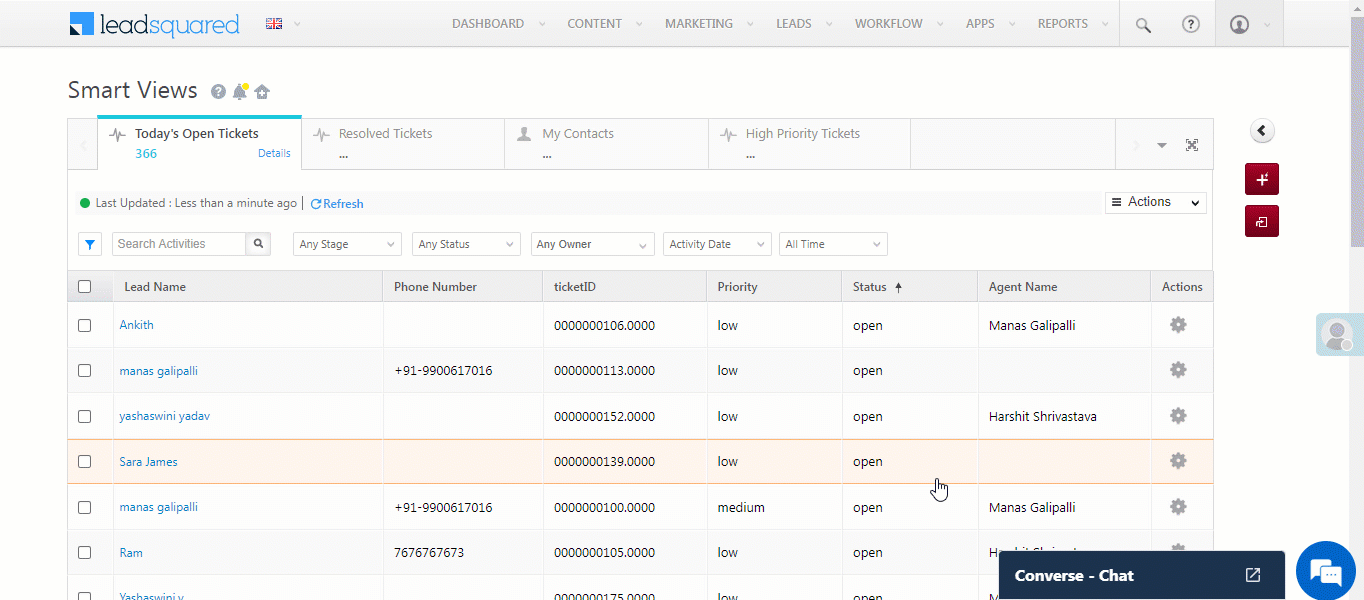
8.1 Smart Views
Here, you can create tickets on leads, and update existing tickets. To create a ticket –
- From the main menu, navigate to Leads>Smart Views.
- On the Leads Smart Views tab, alongside the lead you want to add a ticket to, hover your cursor over .
- Under Custom Actions, click Create Ticket.
- On the Create Ticket pop-up, enter all the necessary details.
- Once you’re done, click Create Ticket.
To update an existing ticket –
- From the main menu, navigate to Leads>Smart Views.
- On the Tickets Smart Views tab, alongside the ticket you want to update, hover your cursor over .
- Under Custom Actions, click Update Ticket.
- On the Update Ticket pop-up, enter all the necessary details.
- Once you’re done, click Save Changes.
8.2 Manage Leads
To create a ticket from the Manage Leads screen –
- From the main menu, navigate to Leads>Manage Leads.
- Alongside the lead you want to add the ticket to, hover your cursor over .
- Under Custom Actions, click Create Ticket.
- On the Create Ticket pop-up, enter all the necessary details.
- Once you’re done, click Create Ticket. The ticket is automatically mapped to the corresponding lead in your Zendesk account.

8.3 Lead Details
To create a ticket from the Lead Details page –
- Hover your cursor over the Lead Actions menu.
- Under Custom Actions, click Create Ticket.
- On the Create Ticket pop-up, enter all the necessary details.
- Once you’re done, click Create Ticket.
8.4 Manage Activities
From the Manage Activities screen, you can update existing tickets.
- From the main menu, navigate to Leads>Manage Activities.
- From the Activity Type dropdown, select Support Ticket Activity.
- Alongside the ticket you want to update, hover your cursor over .
- Under Custom Actions, click Update Ticket.
- On the Update Ticket pop-up, enter all the necessary details.
- Once you’re done, click Save Changes.
9. View New Lead
In Zendesk, if you add a ticket to an End User that does not exist in LeadSquared, a new lead is automatically created, with the lead’s Name, Email Id, and Phone Number. The Create Lead if not exist setting must be enabled for this feature to work.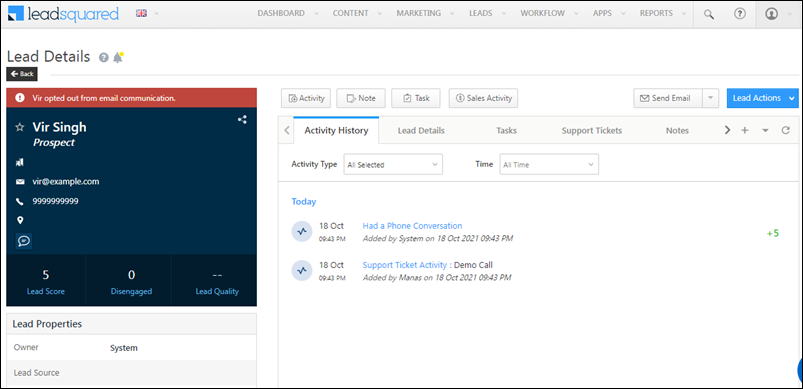
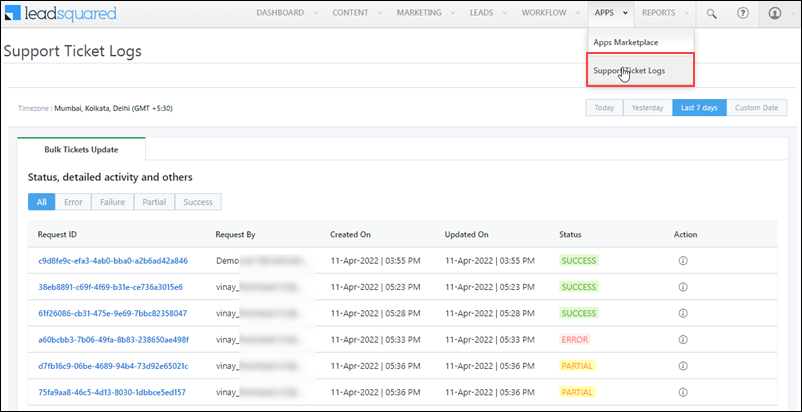
10. View Logs
A detailed log of all the Bulk Update requests made is maintained in your account. To view this log, navigate to Apps>Support Ticket Logs.
- You can filter logs by the following statuses –
- Error
- Failure
- Partial
- Success
- All
- To view the API details of a Request, under Actions, click
 .
. - You can filter the logs by –
- Today
- Yesterday
- Last 7 days
- Custom Date
Any Questions?
Did you find this article helpful? Please let us know any feedback you may have in the comments section below. We’d love to hear from you and help you out!