1. Feature Overview
The Email Parser connector extracts personally identifiable information (PII) of potential leads from inbound emails, and creates them as leads in your LeadSquared account. You can capture emails from Gmail, Outlook and other email providers. This connector streamlines processes, reduces manual data entry, prevents errors in lead creation, and improves efficiency.
- AI-Powered Content Parser – Leverages advanced artificial intelligence (AI) algorithms to capture lead data, ensuring precise parsing of PII information.
- Capture Leads in Real-Time – Capture information from emails as leads in LeadSquared using AI.
- Capture Attachments – Capture and store email attachments in the Lead/Activity CFS field.
2. Prerequisites
- You must be the Administrator of your LeadSquared account.
- This is a paid connector. To enable it, reach out to your account manager, or write to support@leadsquared.com.
3. How it Works
This connector parses information from inbound emails and uses this to create new leads in your LeadSquared account.
- Install and configure the Email Parser (AI Powered) connector
Install the connector on your account, and add relevant details to configure it. - Enter the Prompt
When configuring the connector, provide a prompt to identify and parse lead data from your inbound emails. LeadSquared runs this text prompt and uses advanced AI capabilities to capture data from these emails. Some example prompts are listed below. - Share webhook
Once you’ve entered the prompt and approved the lead mapping, a webhook URL is generated. Share this URL with your account manager, or send it to us at support@leadsquared.com. - Set up auto-forwarding in your email client
Once we receive the webhook URL, we’ll share an email ID with you. Set up an auto-forwarding rule on your email client to forward inbound emails to this email ID. We will then parse details from these emails to create new leads in your LeadSquared account.
4. Install the Connector
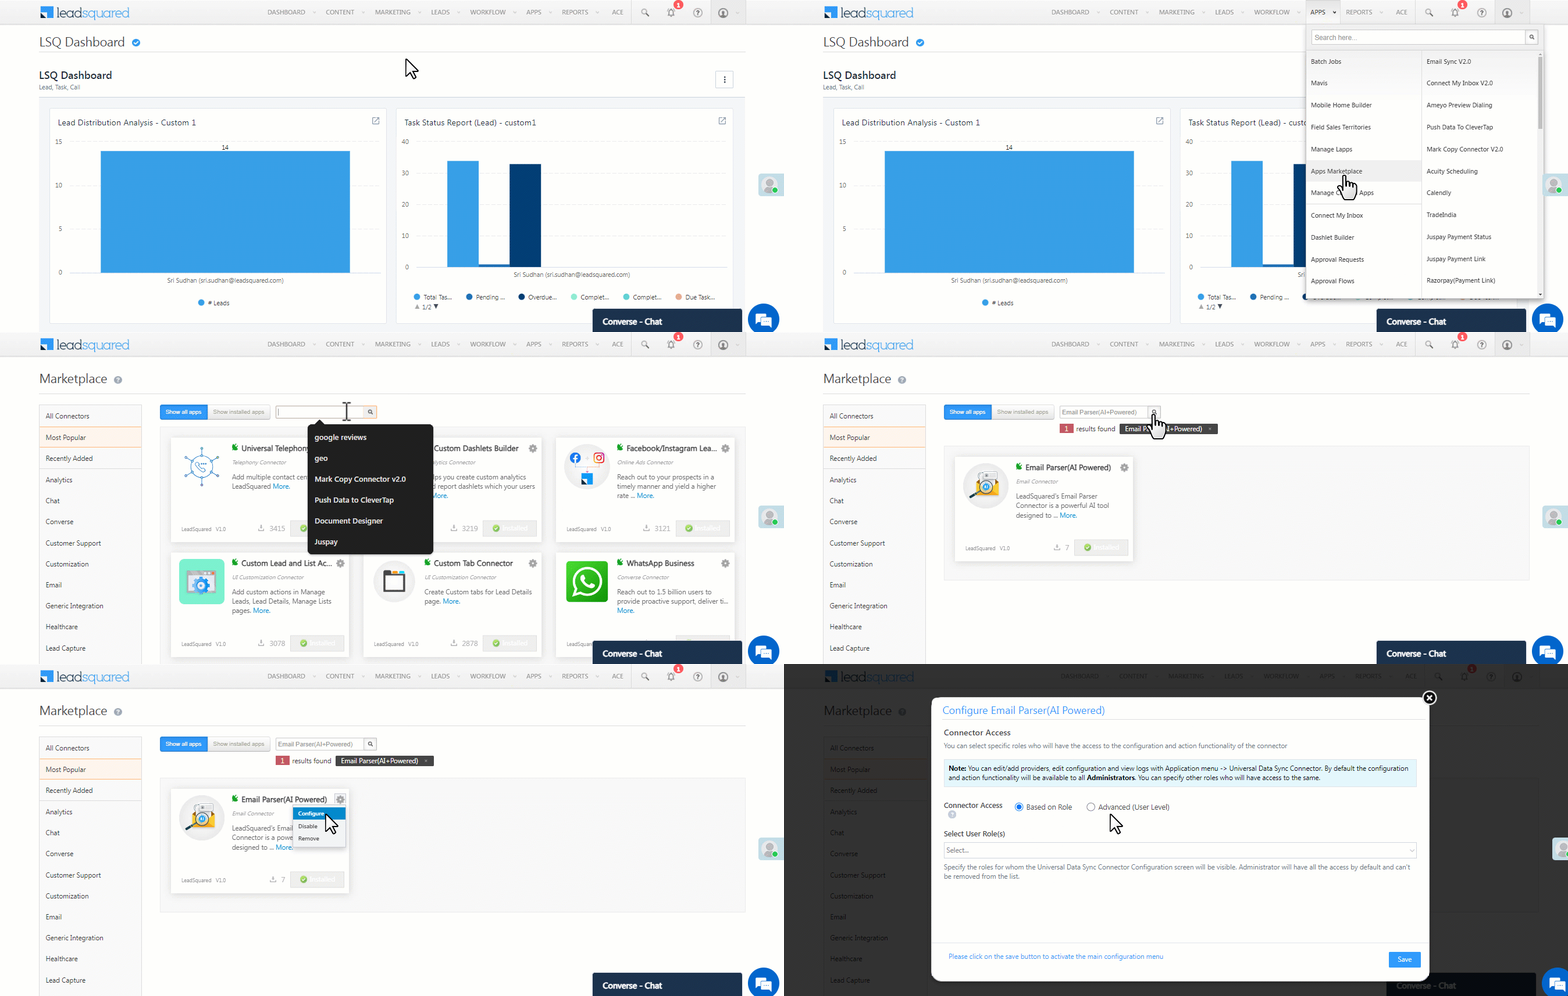
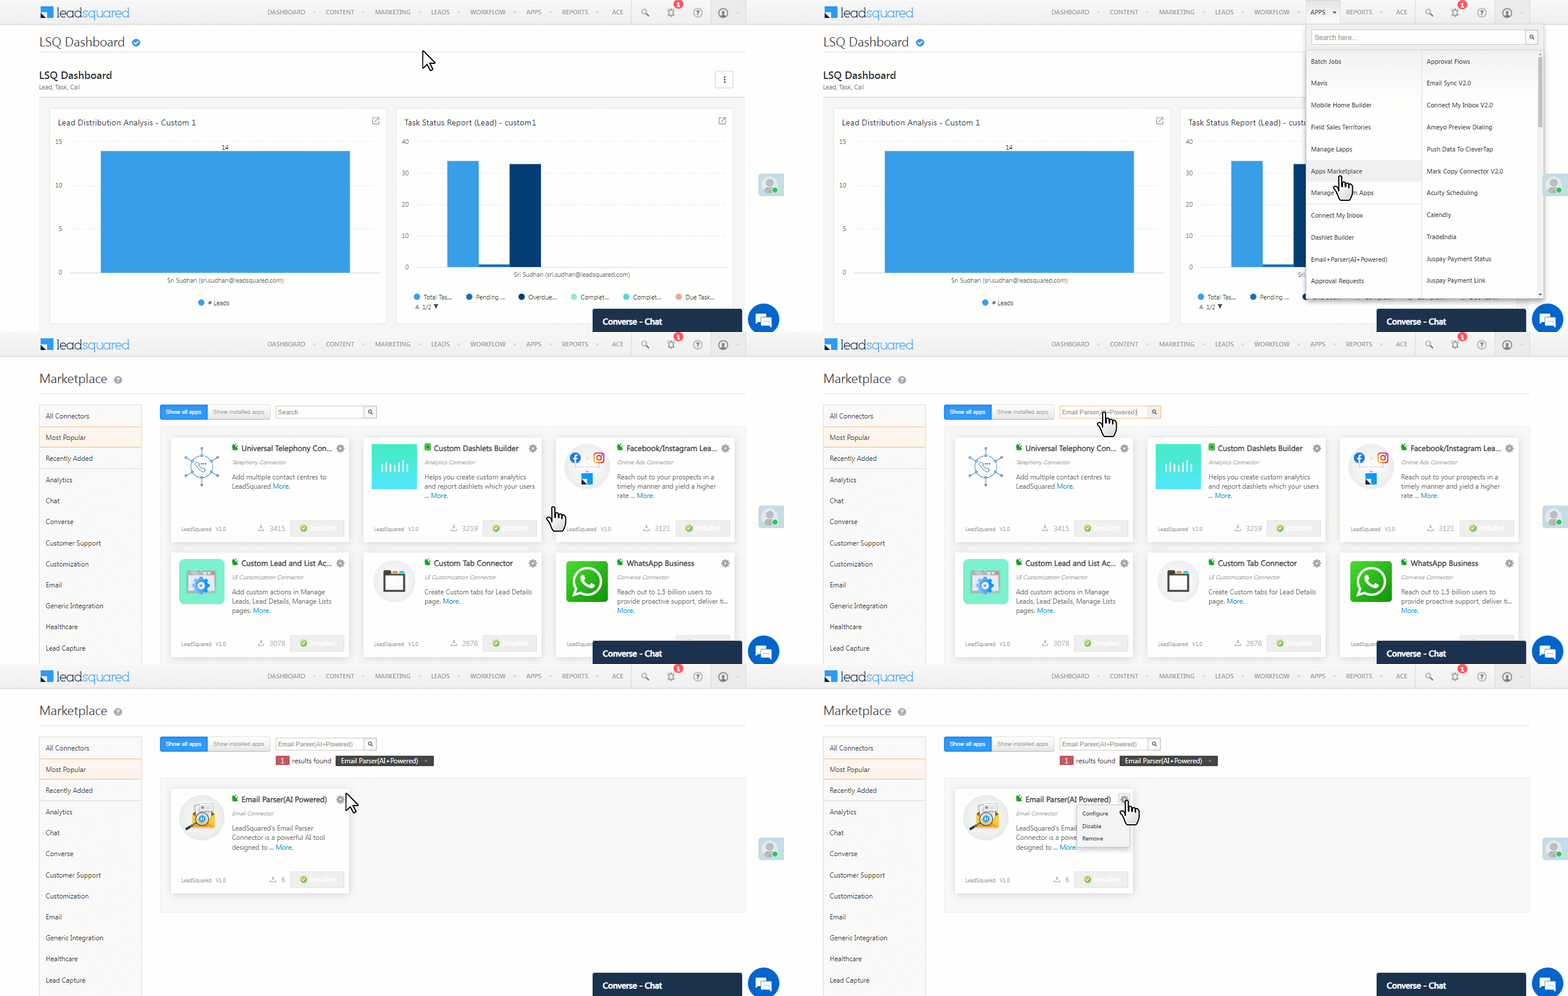
- Navigate to Apps>Apps Marketplace.
- Search for Email Parser(AI Powered), and click Install.
- Alternatively, you can find the connector on the left panel, under Email.
- Once installed, hover your cursor over
 , and click Configure.
5. Configure the Connector
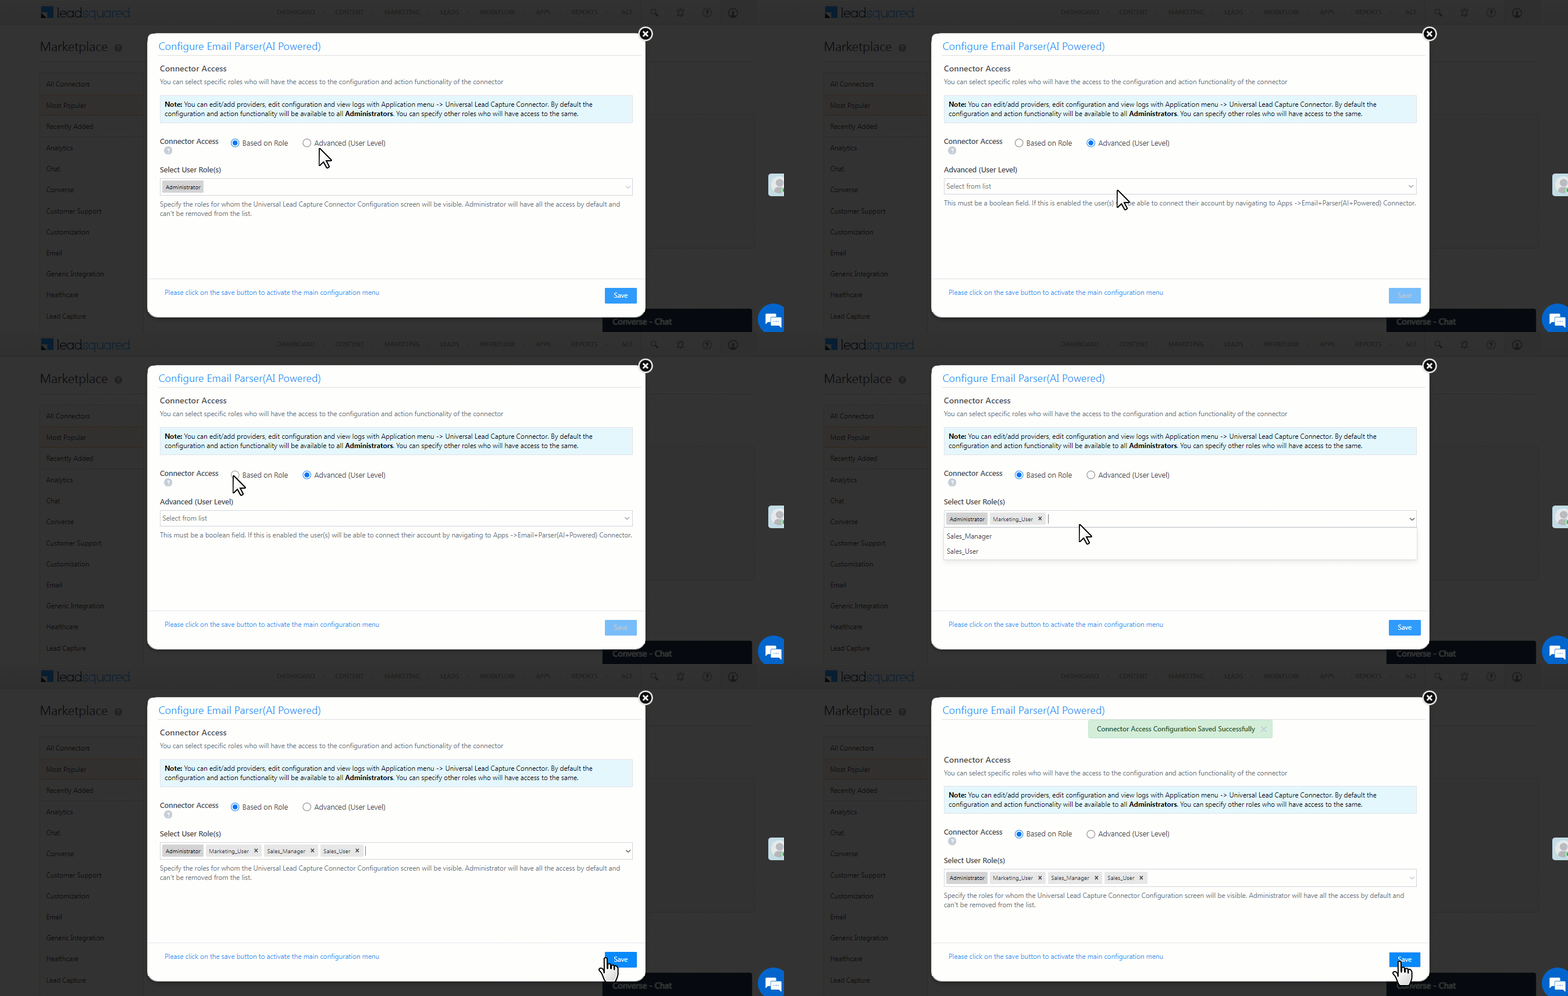
After installing the connector, configure access for non-Admin users in your account through the Configure Email Parser (AI Powered) pop-up. Only users with granted access can view and access the connector under the Apps menu.
- Select if you want to grant Connector Access that’s Based on Role or Advanced (User Level).
- Based on Role – From the Specify Roles dropdown, select the LeadSquared user roles that can access the connector.
- Advanced (User Level) – From the Advanced (User Level) dropdown, select a user boolean field. Based on the value in the selected boolean field, the user can access the connector. For example, for the user Sam, if the “Is Employee” boolean user field contains the value “Yes”, then this user can access the connector.
- Once you’re done, click Save Details. To continue the configuration, refer to the below sections.
6. Create the Prompt
To capture lead details from inbound emails, create a prompt, and pass it in LeadSquared. We pass this prompt and use AI to parse information from the email. This information is sent back to LeadSquared and is used to create a new lead.
Below are sample inbound emails, the details we want to capture from these emails, and the corresponding prompts. Use these examples as a guide to create your own prompts, which you’ll add to LeadSquared (as shown in the next section).
| Email Sample | What We Want to Capture | Prompt |
| “Hello, Ali,
A customer just tried to reach you through the LeadSquared number, but you missed their call. Here are their details for you to follow up: Date: April 13, 2024 Remember, good follow-up makes for a memorable customer experience and will likely help you close better. Good luck, -The LeadSquared Team” |
Here, this email is sent to the lead owner, Ali. Ali is listed in the ‘To’ section, and the company’s support email ID is in the ‘CC’ section. The lead’s phone number is mentioned in the email body. We want to parse the –
|
extract valid NAME in JSON from text, don’t create your own data. Give data in Lead key only, if available.: |
| “Hello, Matthew
Shyam is interested in speaking to you about your property listed on your platform. Ref No: S-PA01–DIP-VD2-5BR1 |
Here, this email is sent to the lead owner, Matthew. The lead’s name, email, phone number and property reference are mentioned in the email body. We want to parse the –
|
extract valid NAME, EMAIL, PHONE and REFERENCE ID in JSON from text, don’t create your own data. Give data in Lead key only, if available.: |
| “Dear Team,
Greetings. Please find the attached RX DETAILS of the below-mentioned patient: Kindly suggest the cost estimation and the Ophthalmologist’s opinion. URGENT! Best Wishes, |
Here, this email is sent to the support team by the insurer. We want to parse the –
We DON’T WANT to parse –
|
extract valid details like NAME, AADHAAR, AGE, DOB, EMAIL, multiple PHONE and ADDRESS without STATE and COUNTRY in JSON from text for patient and attendant, don’t create your own data.: |
7. Admin Configurations
After creating the email prompt, to continue the connector configuration, navigate to Apps>Email Parser(AI Powered).
7.1 Basic Details
Enter the following details –

| Property | Description |
|
Prompt
|
Pass the prompt you’ve created. |
| Lead Source | Enter the lead source through which the leads were captured (e.g., email parser, email campaign, etc.). This detail will be displayed on the Lead Details page, under Lead Source. |
| Default Country Code | If the lead’s mobile number is captured without a country code, the default country code selected from the dropdown will be automatically added to the lead’s mobile number. |
| Select Time Zone | The time zone followed in your account. |
| Lead Capture Search By Criteria | To avoid creating duplicate leads, select one unique lead field (e.g., email ID, mobile number, PAN number) as the search key.
To know how to mark a LeadSquared lead field as unique, please refer to How to Make a Custom Field Unique. |
| Lead Capture Secondary Search By Criteria | If lead identification and capture through the primary Search By Criteria fail, it will be re-attempted using the secondary Search By Criteria. |
| Select User to Notify on Failure | Choose a user from the list of all users available in your LeadSquared account. If there’s an error in fetching leads, the user selected here will receive a failure message via email.
To know more about the type of errors, please refer to Error Notifications. |
| Enable Notification | To ensure notification emails are sent to the selected user when there’s a failed query, enable the |
Once you’re done entering all the details, click Save & Next.
7.2 Entity Options
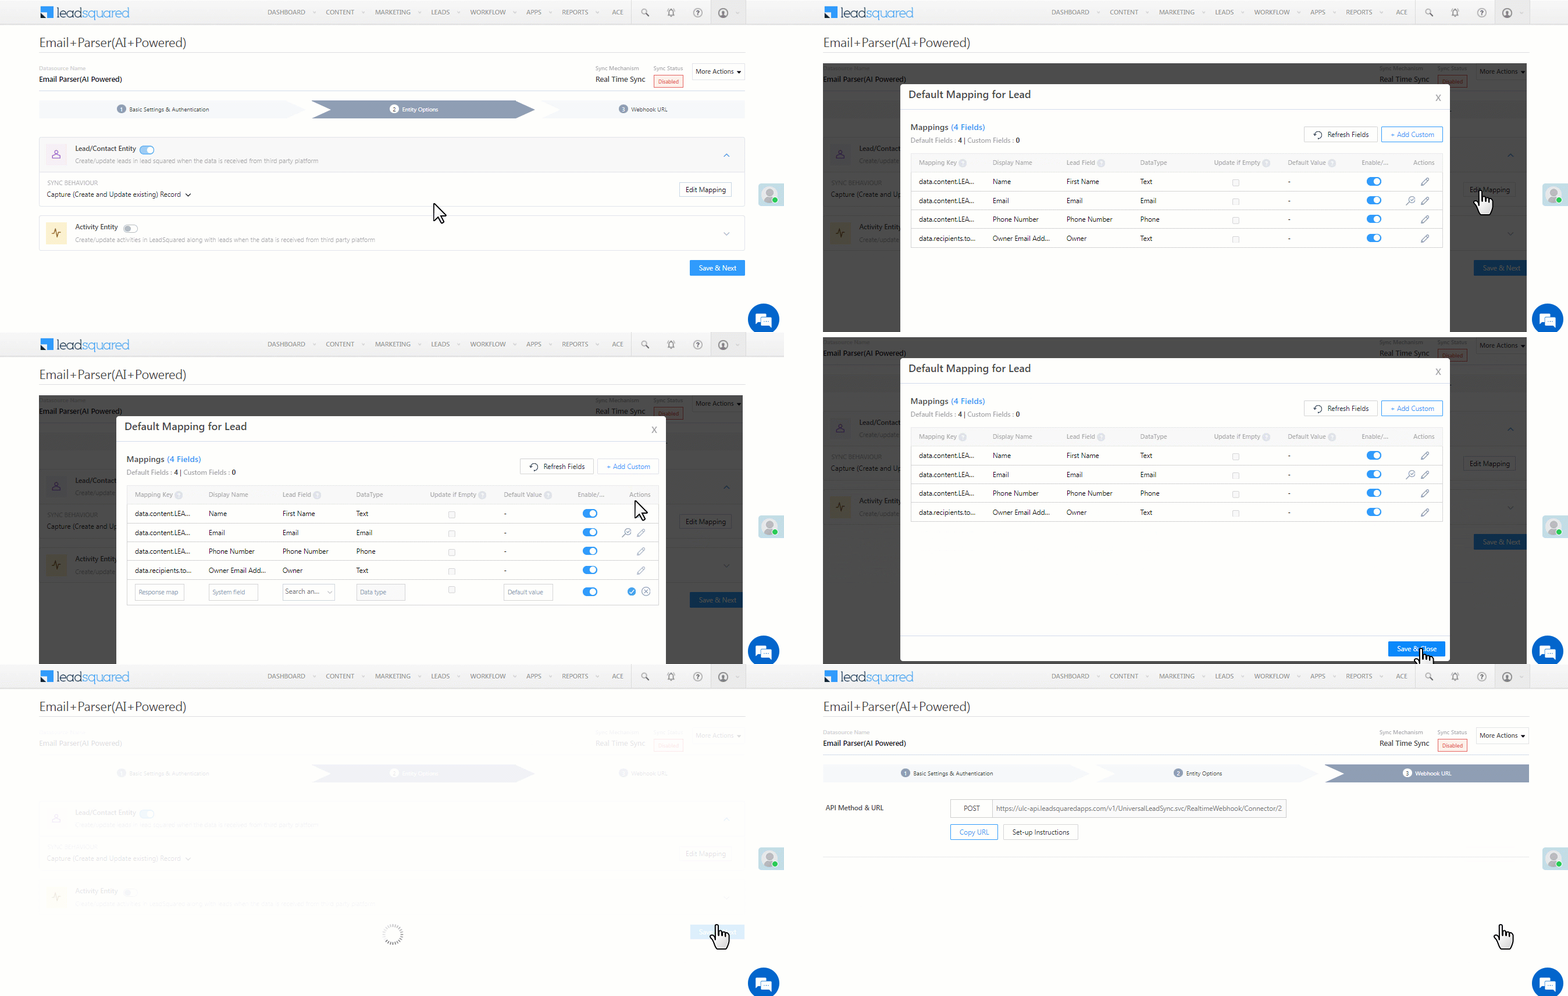
Once you’re adding the basic details and email prompt, click Entity Options. By default, the following email fields are mapped to the corresponding LeadSquared lead fields –
- Lead Name
- Phone Number
- Lead Owner Email Address
The Lead Sync Behaviour is set to Capture (Create and Update existing) Record by default. It is recommended you DO NOT change this.
It is mandatory to click Edit Mapping under Lead entities, and on the Default Mapping pop-up, click Save & Close. This step must be completed even if you don’t update any of the lead mappings.
However, if you choose to capture more lead details from the email, or if you want to create a new activity using the content from the email, under Lead/Contact Entity or Activity Entity, click Edit Mapping. On the Default Mapping pop-up, you can edit the existing mapping or add custom lead/activity mapping. To know how to do this, refer to How to Map Entity Options for Lead Capture.
Once you’re done, click Save & Next.
7.3 Webhook URL
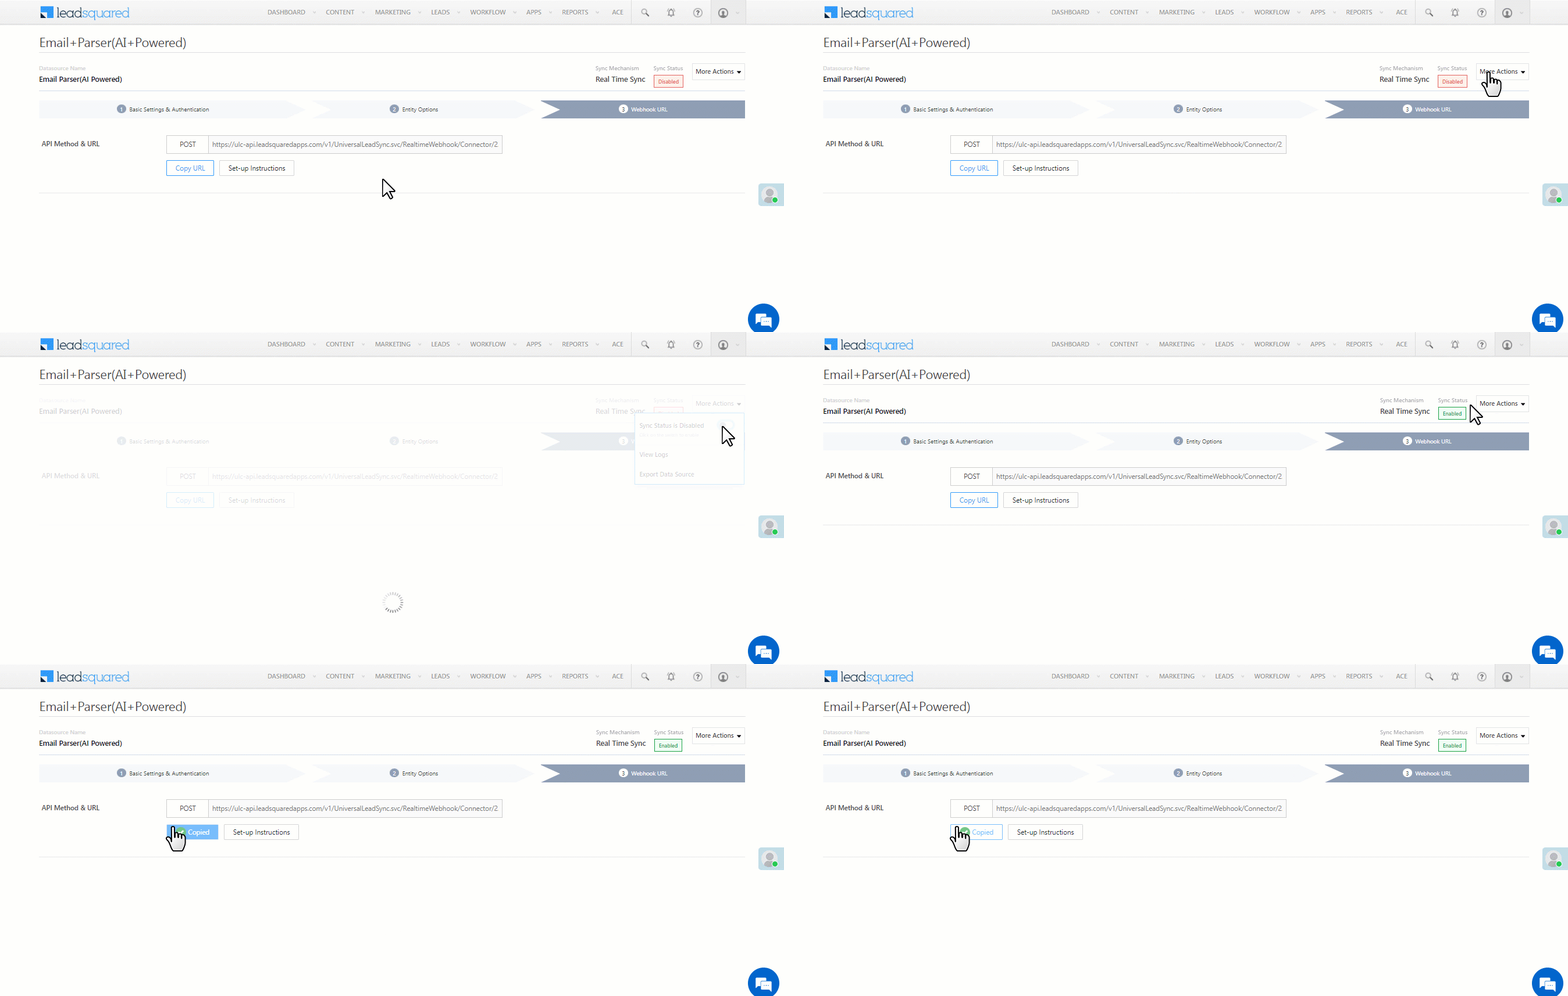
After you provide basic details and finish field mapping, click More Actions, and enable the sync job. A custom webhook URL is generated. Share this webhook with your LeadSquared account manager, or mail us at support@leadsquared.com. Once we receive it, we’ll share an email ID with you. Use that to set up the auto-forwarding rule in the next section.
8. Set up Auto-forwarding
Your LeadSquared account manager will share an email ID with you. In your email client (Gmail, Outlook, etc.), set up an auto-forwarding rule that sends all inbound emails to this ID. Based on the prompt you provided, we’ll use AI to parse details from these emails and create new leads in your LeadSquared account.
- To set up an auto-forwarding rule in your Outlook account, refer to Turn on automatic forwarding in Outlook.
- To set up an auto-forwarding rule in your Gmail account, refer to Automatically forward Gmail messages to another account.
9. View Logs
Here, you can view logs of all the sync jobs that have taken place. View New Events (New Leads), Updated Events (Updated Leads), and Errors (when capturing leads).
- Navigate to Apps>Email Parser(AI+Powered).
- From the More Actions dropdown, click View Logs.
- You can filter the logs by selecting a date range (Today, Last 7 Days, This Month, and Last Month), by selecting the Job Status (“All”, “Success” and “Failure”), and by selecting the Sync Status (All, Error, and Success).
- You can view the sync status of the following events –
- New Events – List of all the new leads that have been created in LeadSquared during the selected date range.
- Updated Events – A list of all the –
- Duplicate leads that were created with the same Search by Criteria value (e.g., with the same Email Id, Mobile Number, etc.).
- Leads that previously contained errors, which were fixed and synced successfully.
- Failed – The list of leads that have not been captured due to mapping errors (e.g., when a boolean field is mapped to an integer field, etc.).
- To view the Sync Response details, under Request ID/Sync Job ID, click the Id.
- Under the right panel, you can view the response status, the API URL, the request, and the response.
- The responses that are successful will contain the details of the leads that have been pushed from your email client.
- To view the lead capture response under Sync API Response, Leads Updated and Errors in Leads, click
 .
.
Note:
- For a response that contains an error, the reason for the error is listed in the response. Once you fix it, you can click the Retry button to perform the sync again.
- The current Lead Sync Behaviour will reflect in the Logs screen. This will help identify the sync that’s used (Capture or Update) for the selected Request/Sync Job Id.

10. Other Actions
You can edit or delete the Email Parser connector instance that you created. To do this –
- Navigate to Apps>App Marketplace.
- Search for Email Parser(AI+Powered).
- Alongside the connector, hover your cursor over
 .
. - From the list of options, you can perform the following actions –
- Edit Configuration
- Disable Configuration
- Remove Configuration
Any Questions?
Did you find this article helpful? Please let us know any feedback you may have in the comments section below. We’d love to hear from you and help you out!


