1. Feature Overview
The Sales Activity feature lets you capture important information related to each sale (e.g., product sold, sales owner, date, order value, etc.). Depending on the nature of the business the Sales Activities are also known as Customer Sign-up, Order Capture, Purchase Order, Paid Subscription, New Registration, Enrollment, New Deal, etc.
These activities sum up to give you the total Revenue generated which can be tracked and analysed using the Sales and Revenue Reports and the LeadSquared Goals feature.
2. Prerequisites
- Only Admins and Marketing Users can configure sales activities.
- Once configured, all users can post sales activities on leads.
3. How it Works
- Navigate to the Manage Leads or Lead Details page on LeadSquared.
- Select the option to add a new sales activity against a lead.
- Enter the appropriate details and save the activity.
4. Add Sales Activity for a Lead
Sales Activities can be added by Administrators, Sales Users, and Sales Managers.
4.1 Add an Activity From Manage Leads Page
1. Navigate to Leads>Manage Leads.
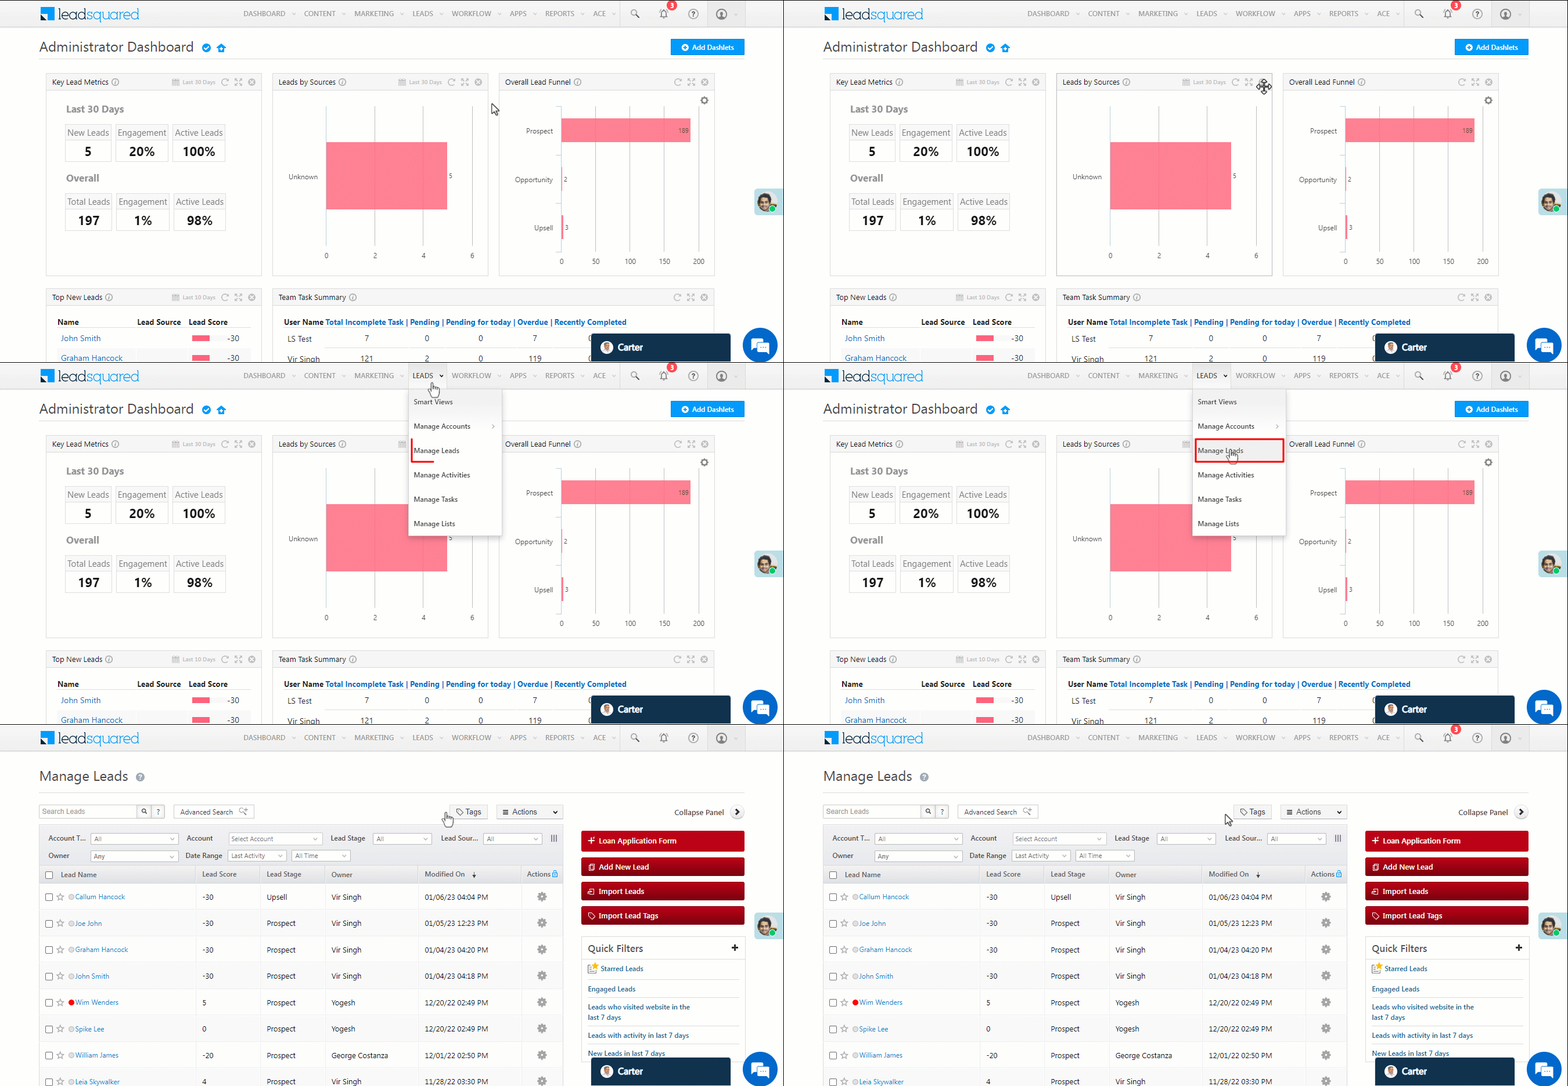
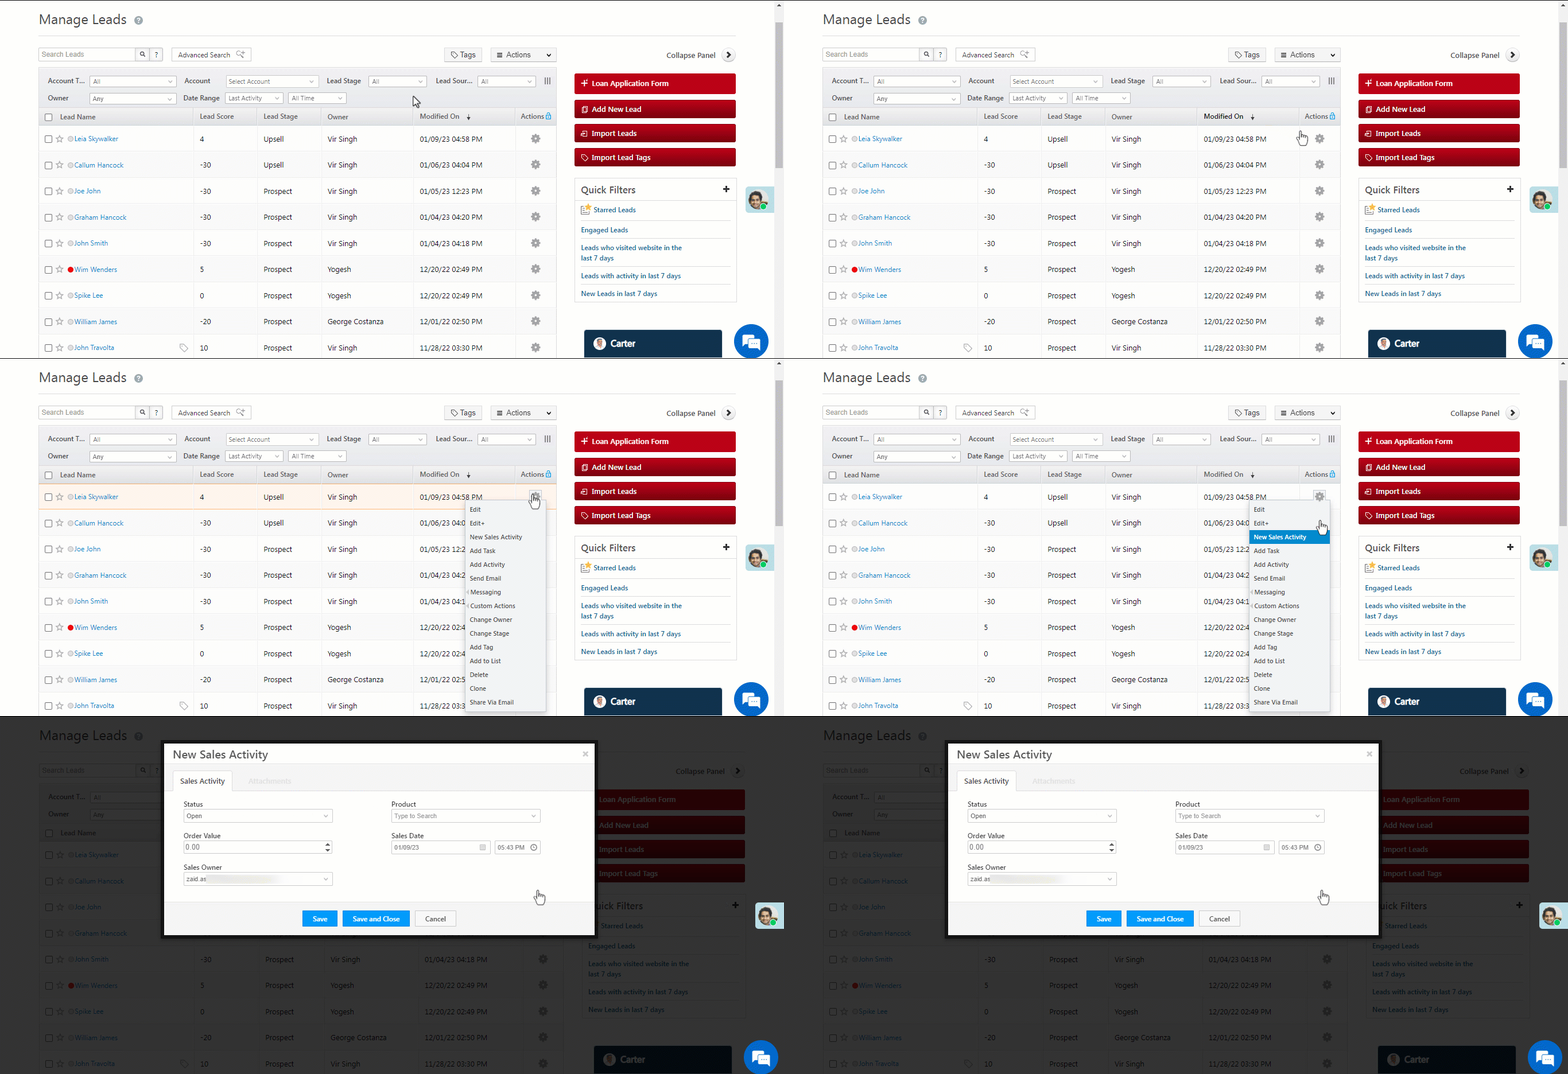
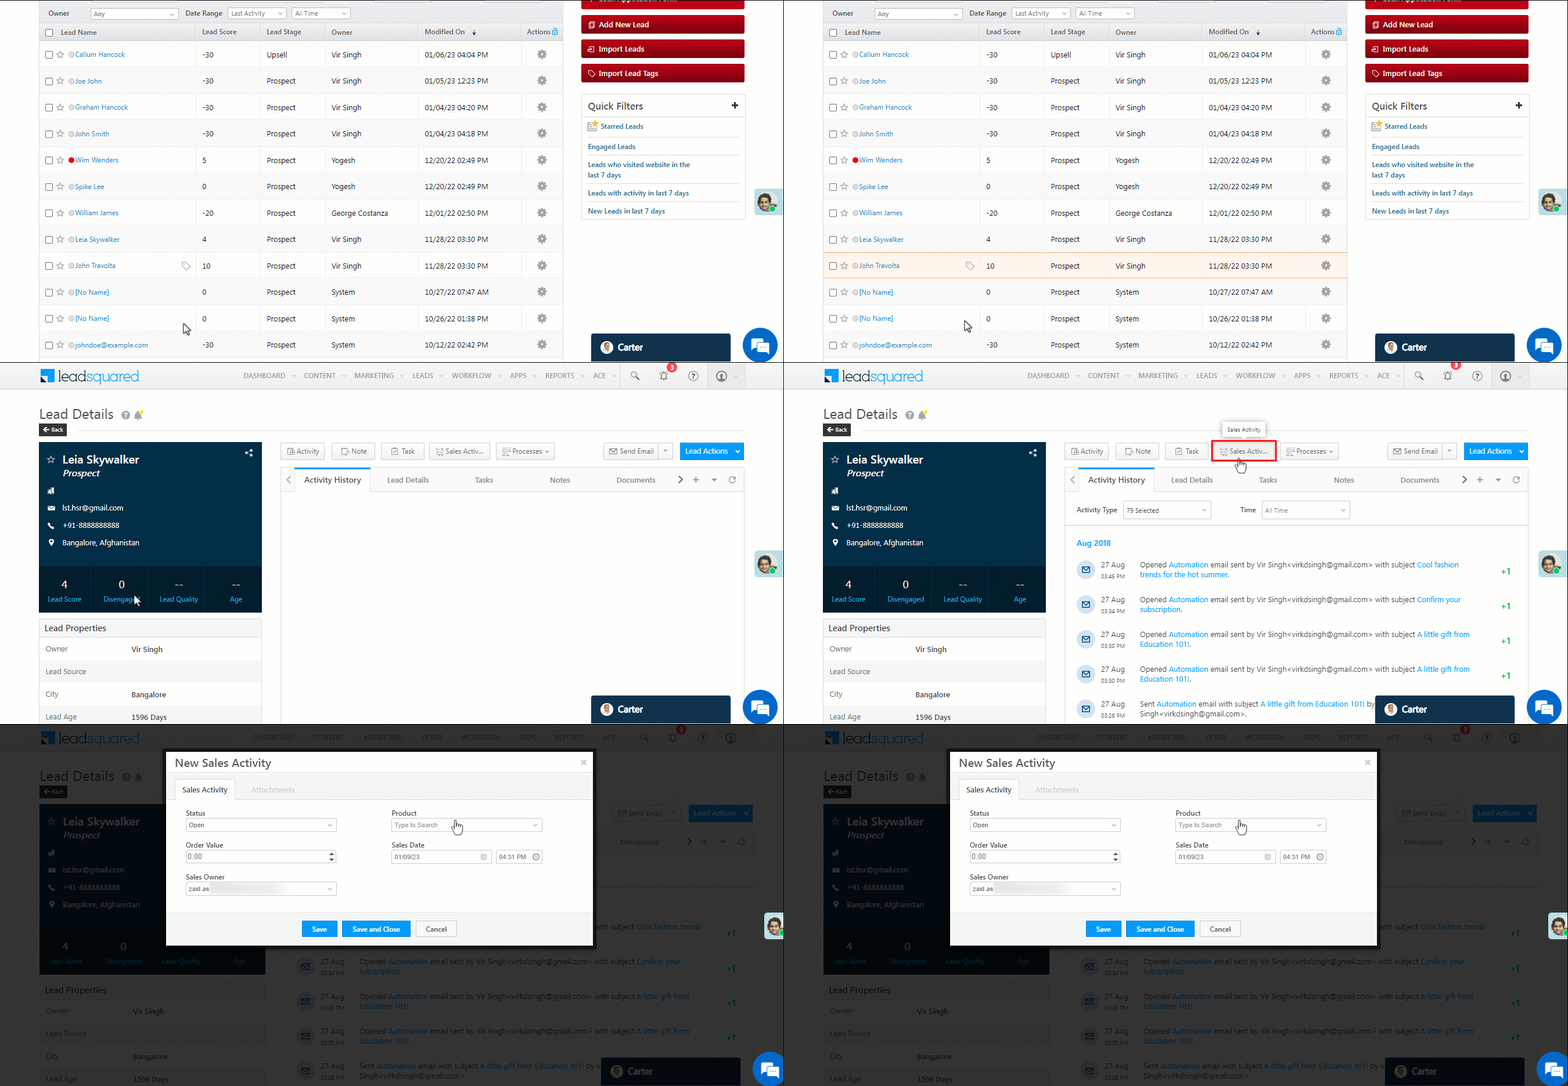
2. Alongside the relevant lead, hover your cursor over the ![]() icon and select New Sales Activity.
icon and select New Sales Activity.
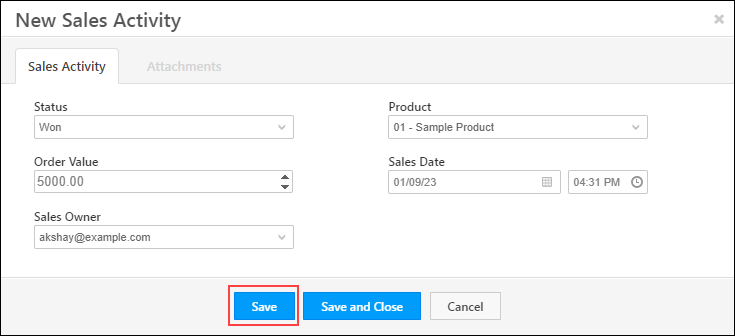
3. Enter the relevant details in the New Sales Activity box –
| Sales Activity Field | Description |
| Status | Select the status of the lead for the new sales activity. |
| Product | Select the product being sold. |
| Order Value | Enter the order value or deal size for the sales activity. |
| Sales Date | Select the date and time of the sale. |
| Sales Owner | Select the owner for the lead. |
Once you’re done, click Save.
Note:
- You can edit the Sales Activity Fields on the Settings page.
- You can create multiple products that your users can choose from while creating a sales activity.
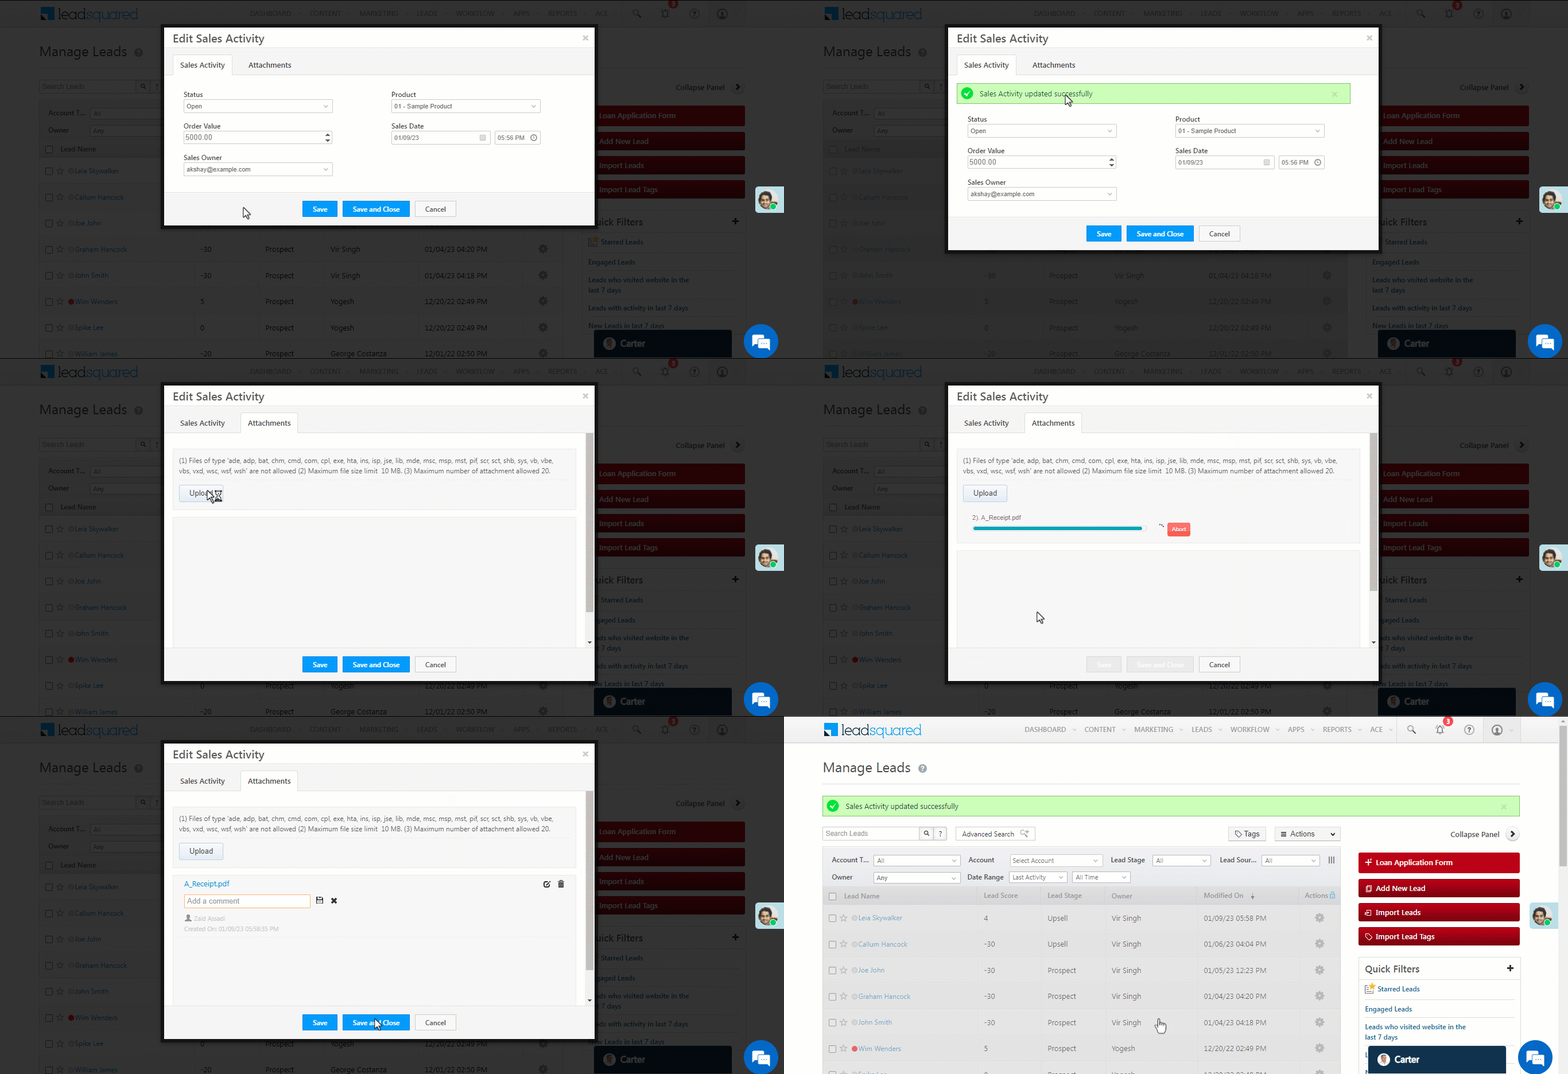
4. If you would like to add an attachment (for example, an invoice) to the sales activity, click on the Attachments tab. Click Upload and select the required attachment. Once the attachment is uploaded, click Save and Close. Once the activity is saved, it is captured in the Activity History panel.
4.2 Add an Activity From Lead Details Page
1. Navigate to Leads>Manage Leads.

2. To view the Lead Details page, click the name of the relevant lead. Next, click on Sales Activity.
5. Edit or Delete Sales Activity
5.1 Edit a Sales Activity
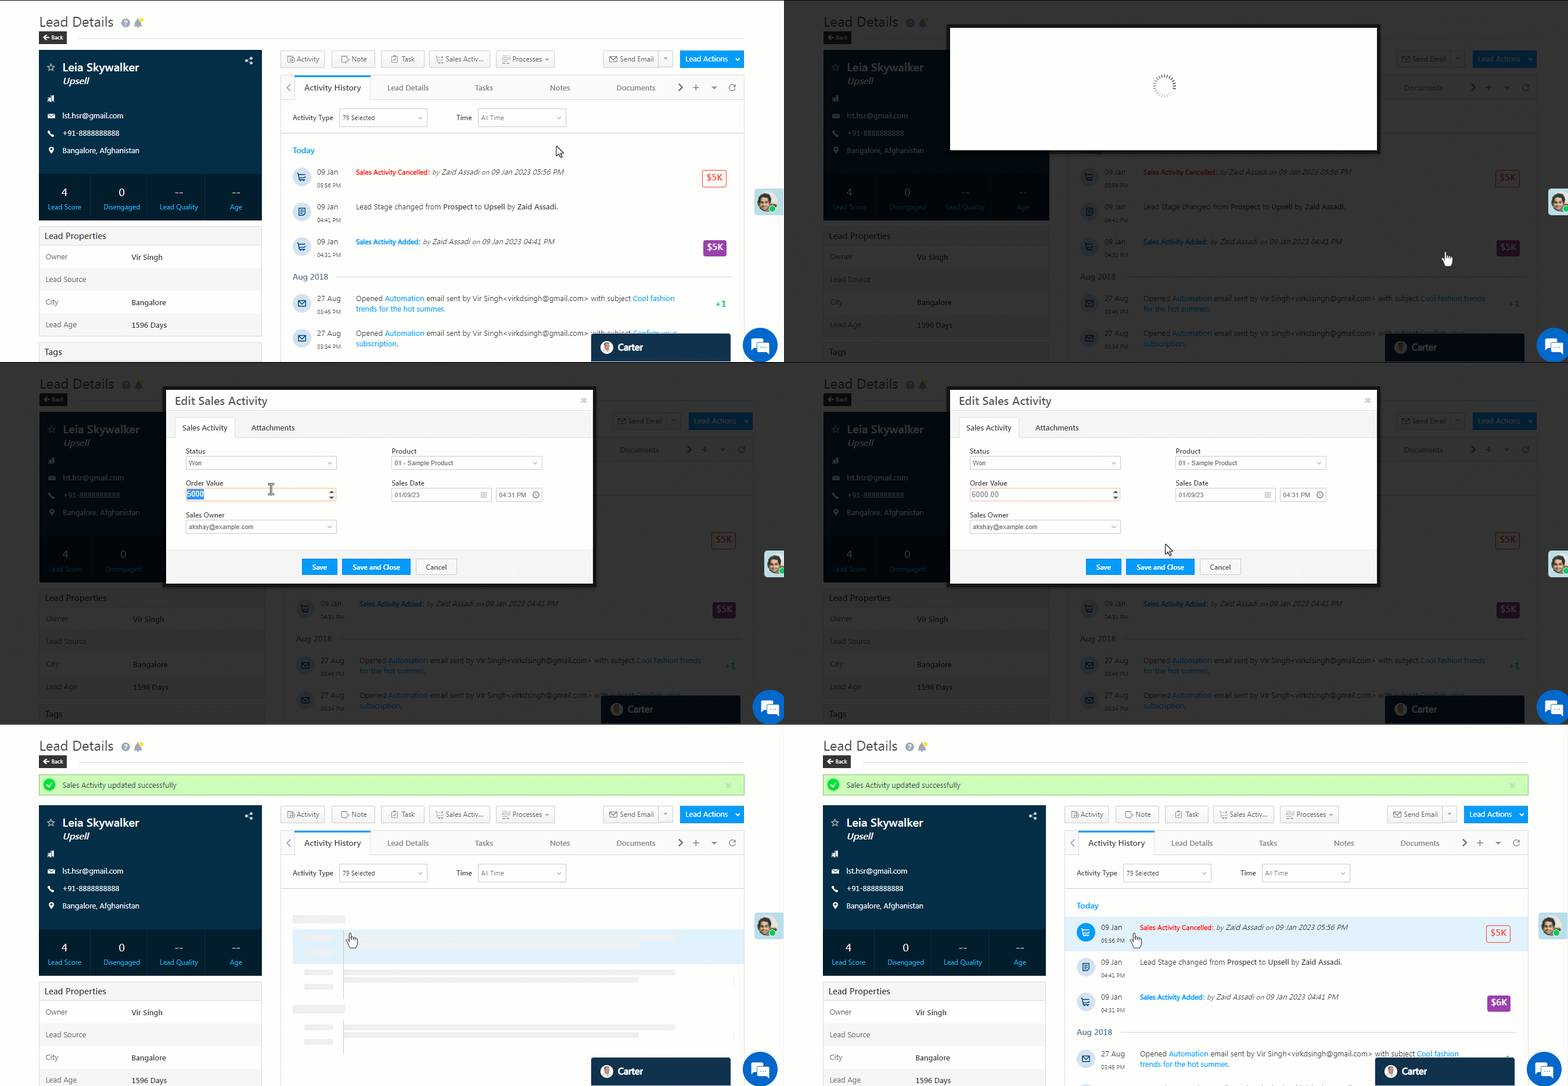
- On the Lead Details page, Under the Activity History tab, click on the
 icon against the lead activity.
 - Make the required changes and click Save and Close.
5.2 Delete a Sales Activity
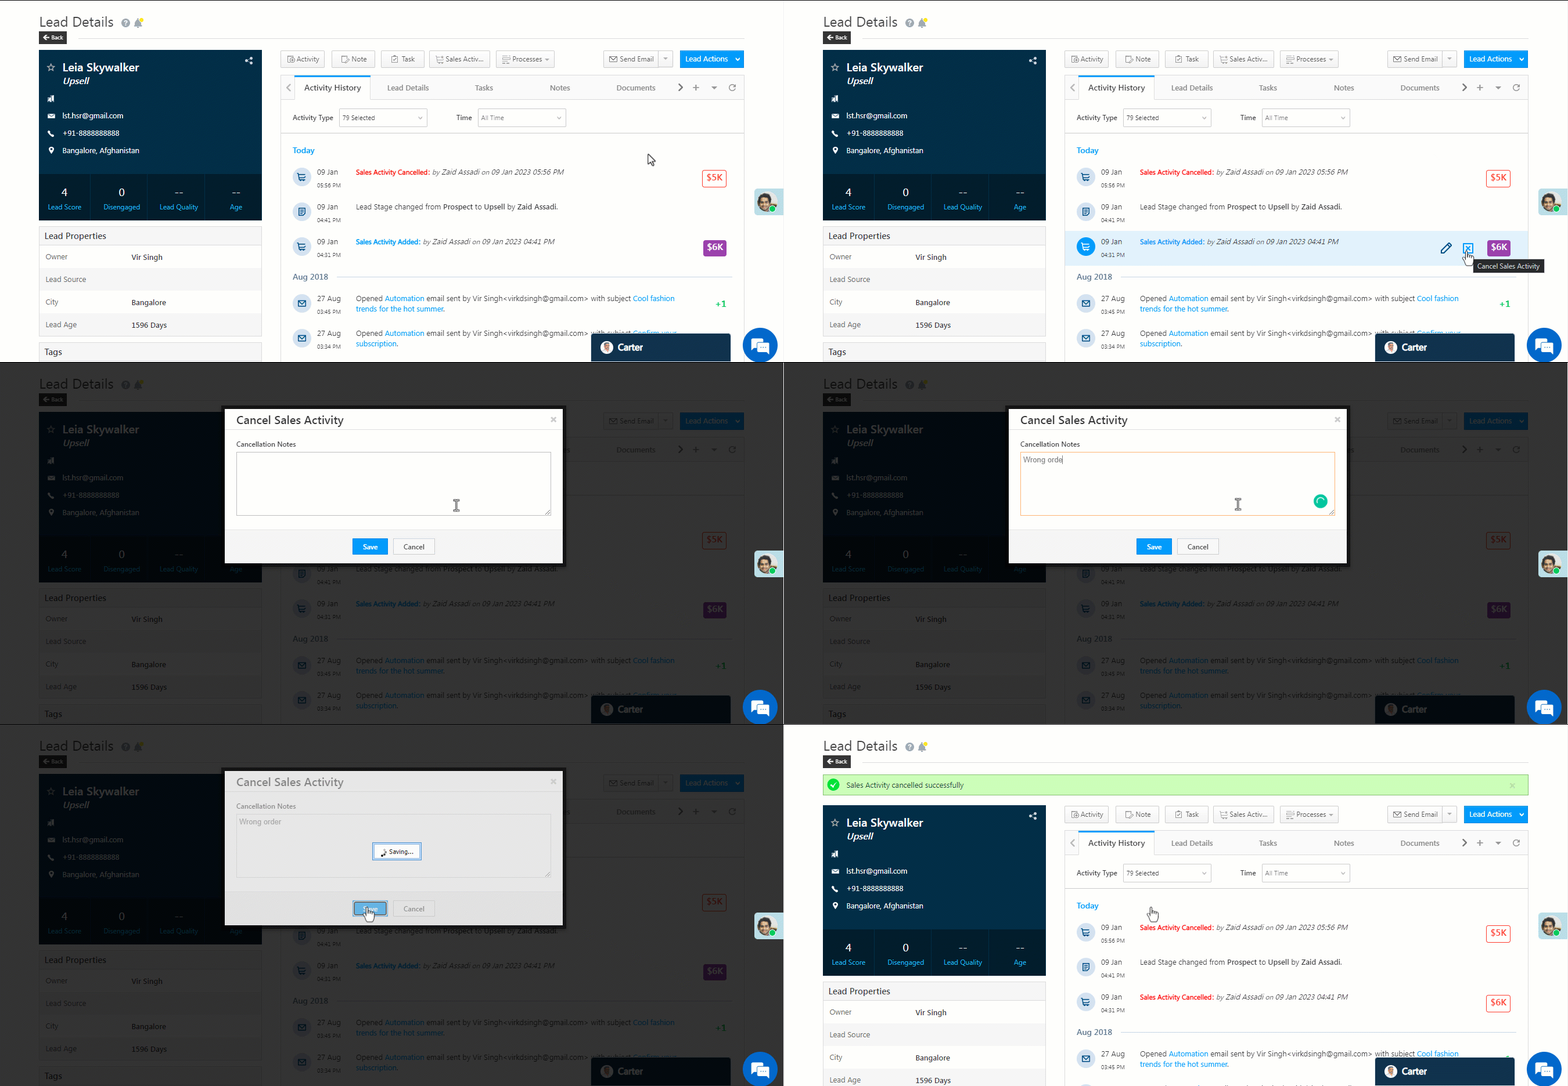
- On the Lead Details page, under the Activity History tab, click on the
 icon against the lead activity.
 - Enter a cancellation note and click Save.
5.3 Advanced Search
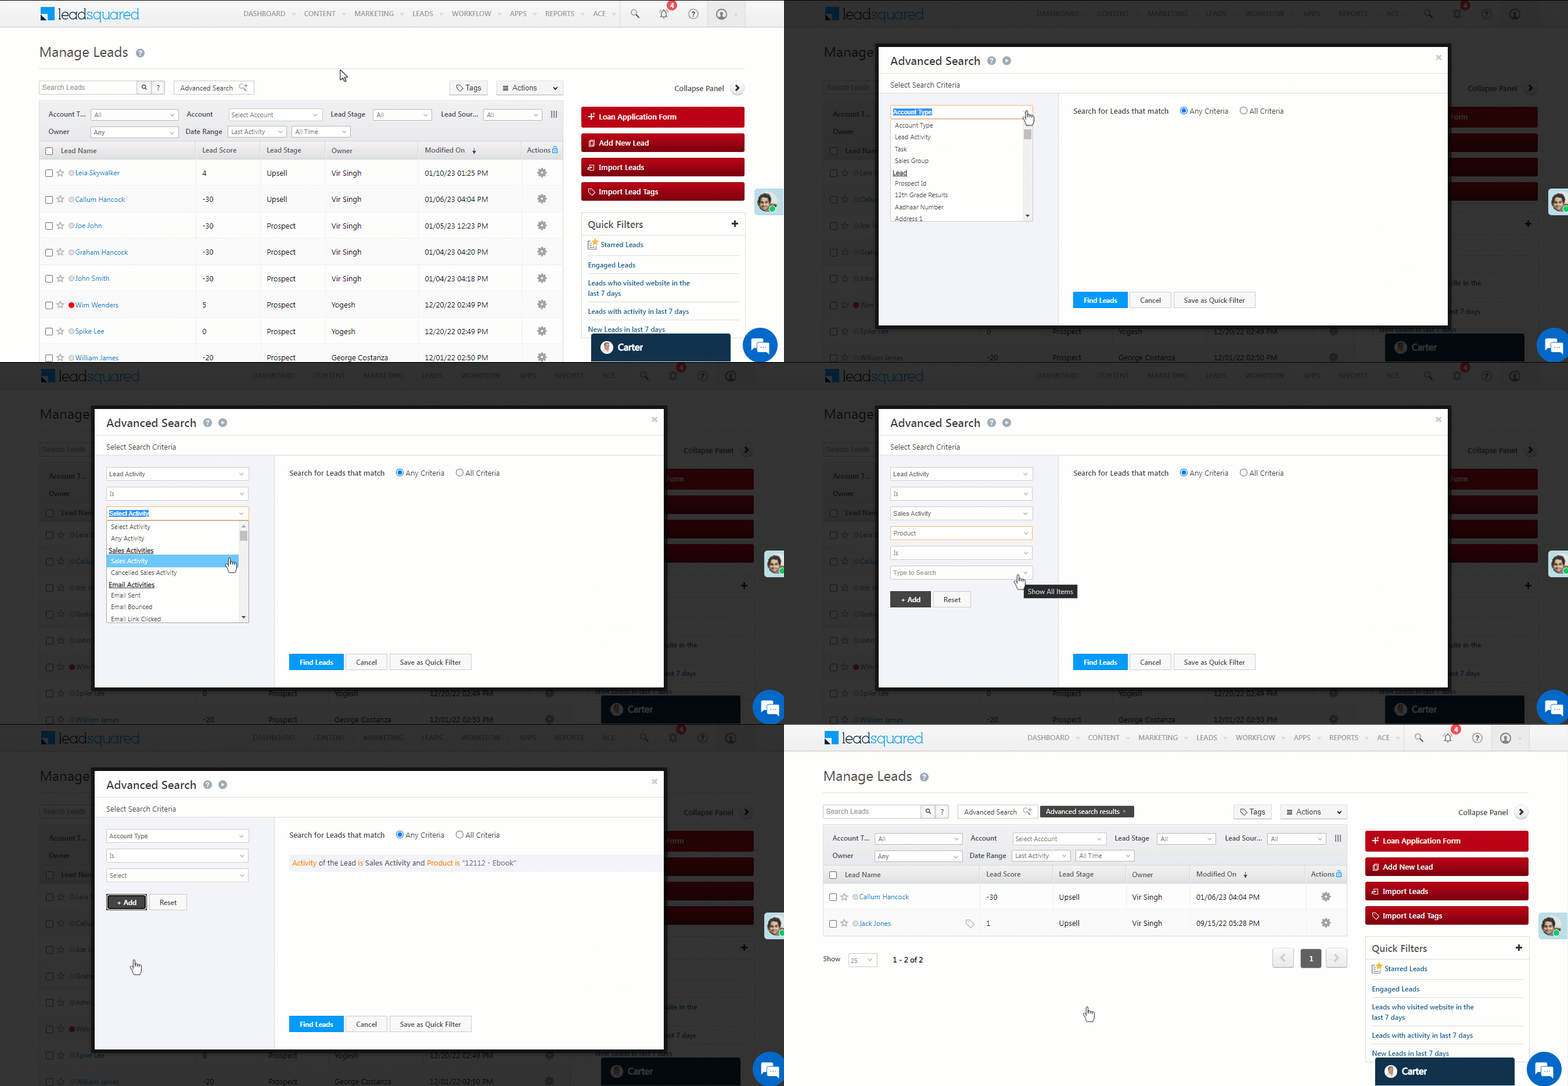
You can use advanced search to find leads where custom fields of activities contain or don’t contain data.
- Navigate to Leads>Manage Leads.
- Click on Advanced Search.
- Enter the search criteria for the activity and sales field you are searching for.
- Click on + Add to add the search criteria.
- Click Find Leads.
Note:
- The default currency can be specified in the Sales Activity Settings by an Administrator.
- Sales Activity can be renamed in the Sales Activity Settings by an Administrator to match your requirement.
- Example: An education business may call it Admission or Enrollment.
- Sales Activities can also be added through Smart Views, Manage Lists, and List Details page.
Any Questions?
Did you find this article helpful? Please let us know any feedback you may have in the comments section below. We’d love to hear from you and help you out!


do we have sales activity at opportunity level
Hi, Rakesh. No, opportunities currently do not support sales activities. If this changes in the future, we’ll let you know.
how to add multiple products
Hi, Rakesh, hope this helps – Add Multiple Products.