1. Feature Overview
As a Sales User, you can view and work within the territories assigned to you (by your manager/administrator) using the LeadSquared mobile application. Leads are automatically assigned based on proximity to your location. This helps in reducing time spent on traveling and improves your efficiency.
- Find leads near you and within your assigned territories.
- Add new leads on the go within/outside your territory.
- Track your lead’s location.
- View directions to your leads along with the traffic conditions.
Note:
- This article is to help sales users navigate the Field Sales Territories feature. For more information on how Administrators and sales managers can use this feature, see Field Sales Territories for Admins and Sales Managers.
- If you’ve enabled both Near Me and Territories in your account, you can access both. A boundary will be displayed around the territories in Near Me.
2. Prerequisites
- You must be an Administrator, Sales Manager, or a Sales User.
- You must have territories created by the Administrator.
- You must run the following versions, or later –
3. How it Works
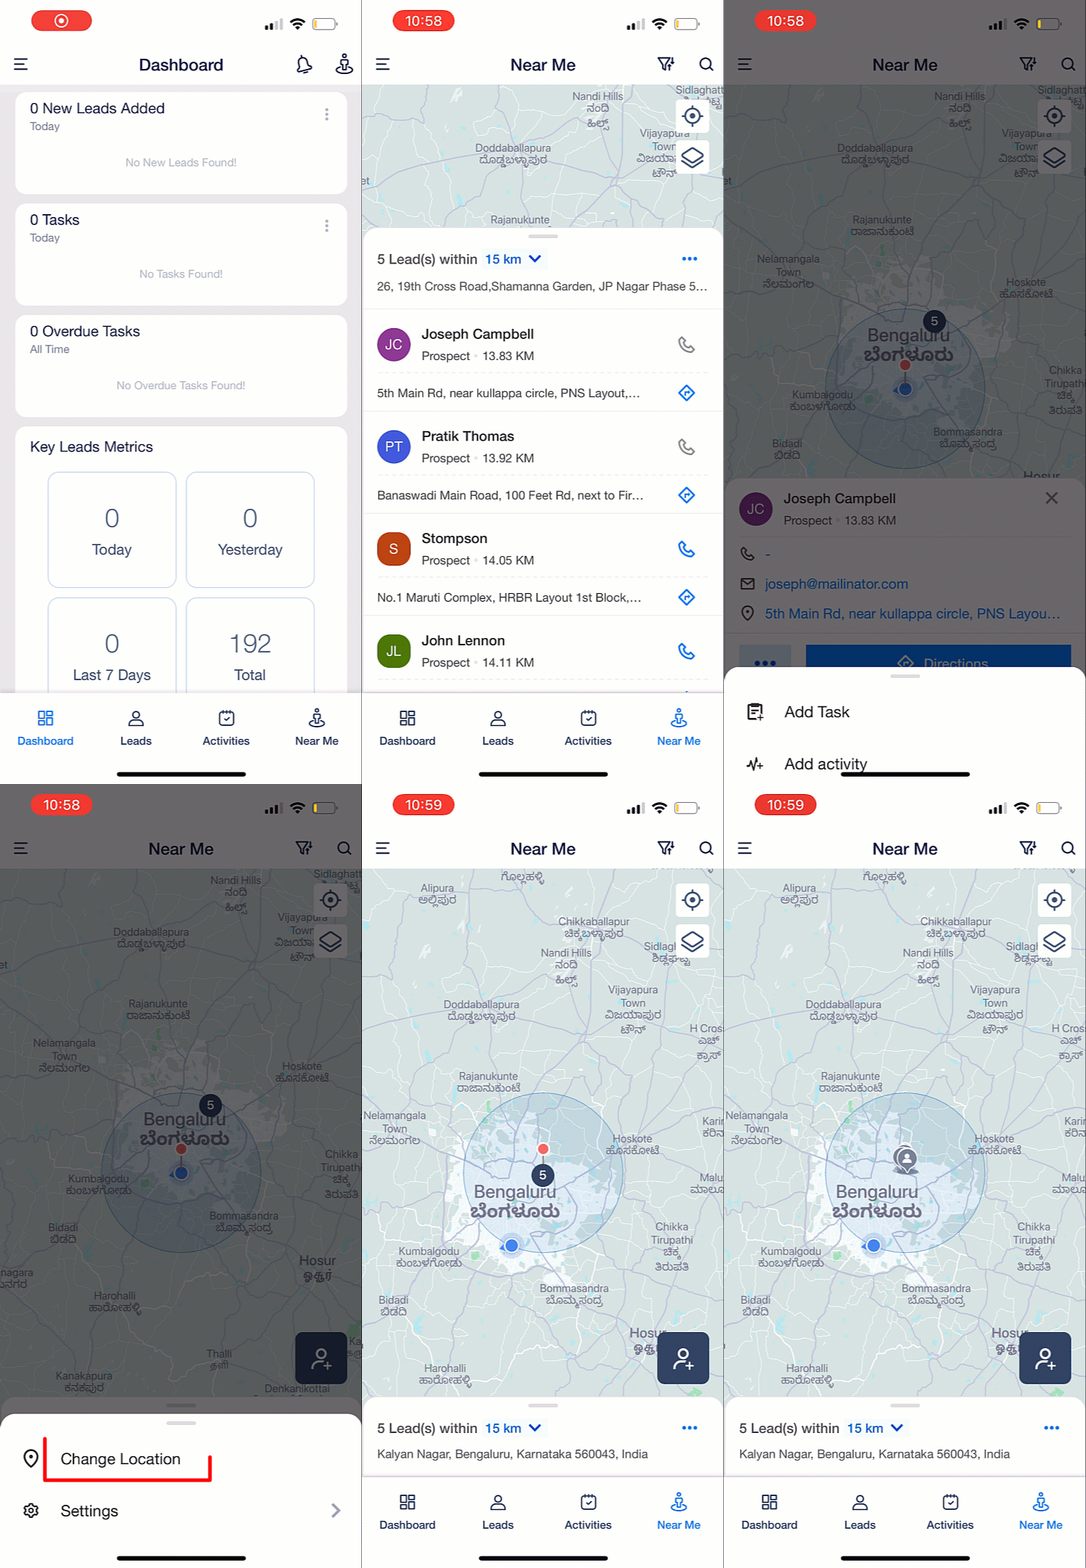
Open the LeadSquared mobile app and tap Near Me. You will be able to view your location, your assigned territories and all leads around you at a particular radius. Adjust the search radius to filter the leads displayed. You can call or view directions to your leads on this page. You can also view the traffic condition along the route suggested to you.
4. Find Leads in Your Territory
Open the latest version of the LeadSquared mobile app. On the Dashboard, tap Near Me. A red pin marks your location and all the leads present within a particular radius around you are displayed. Even if your location is outside the territories assigned to you, the leads assigned will still be displayed. You can also view the territories assigned to you and the leads within these territories on this screen.
- To increase the radius of your search, tap the dropdown on the bottom of the screen, next to Leads within. Select the required radius. You can also pinch to zoom in and increase your radius. While doing so, you can find leads around you within any radius.
- To view all the leads present in a particular radius around you, tap the bar on the bottom of the screen that displays your location. Tap on any one of the leads to view the lead details. You can also call or find the directions to the lead here.
- To filter your leads, tap
 .
.- Once you apply filters, you can reset/change them by tapping on Change Filter Field.
- To search for a particular lead, tap

- To find leads in other locations, move the map to the desired location and tap
 .
. - Once you can view the lead’s details, to add a task or activity, tap
 . Select Add Task or Add Activity.
 - To add new leads directly from this page, tap
 .
. - To change your location, on the bottom of the screen, tap
 . Tap Change Location.
 - To enable/disable the cluster view of leads –
- Tap
 .
. - Tap Settings.
- Slide the Cluster View switch.
- Tap
- To change the map view (default, satellite or terrain) or to view traffic on the map, tap
 .
.
Note:
- The colours of the icons and territories customised by Admins on the web will not be displayed on the mobile app.
- You can also create leads outside your territories while using the mobile app.
- If there are parent-child territories (or sub-territories) created, only the parent territory will be displayed on the mobile app. Admins and Sales Managers can view the sub-territories on the web application.

Any Questions?
We’d love to answer your questions or hear your own unique use cases. Feel free to share your experiences in the comments section below.


