


Get Started
Sales Suite
Field Ops
Marketing
Service CRM
Integrations & Apps
FloStack
How to Add a Payment Gateway to a Form (Paytm, Stripe, Razorpay, etc.)
1. Feature Overview
You can integrate a payment gateway directly into your forms to process transactions from leads. We currently support the following payment gateways –
If you’re new to the forms feature, see How to Create a Form.
2. Prerequisites
- You must be an administrator user of your LeadSquared account to access the forms feature.
- You must have an account with a supported payment gateway provider.
- Your form must contain First Name and Email Address fields. It is good practice to make these fields mandatory.
3. Adding a Payment Field to a Form
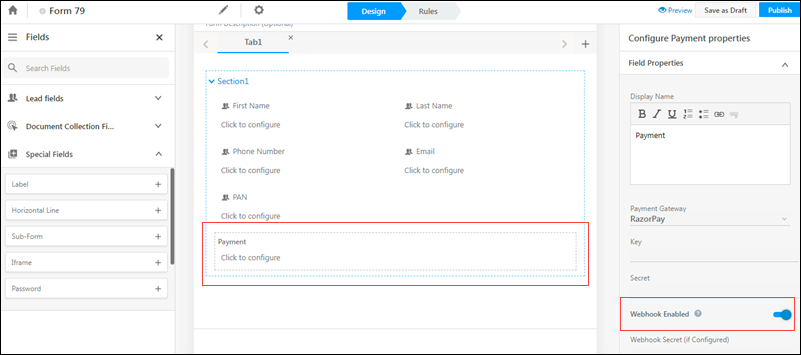
While creating a form, on the left pane click Special Fields, then drag and drop the Payment field into your form.

3.1 Setting Field Properties
Now click the Payment field in your form and choose a provider from the drop-down.
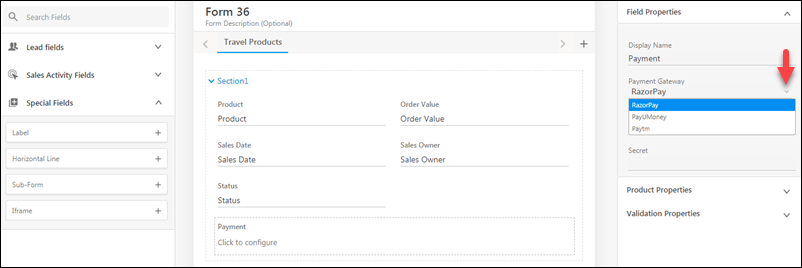
Based on the payment provider you select, you’ll have to enter the corresponding field properties that appear.
Note:
- Users can pass custom parameters to send additional data to all payment providers. An example of this would be to pass additional information, to enable your finance team to carry our reconciliation easily.
- When a payment field is used in a Form, a webhook must be enabled (on payment gateways that support webhooks) to publish that Form.
3.1.1 RazorPay

| Field Property | Description |
| Key | The API keys associated with your payment provider account. |
| Secret | |
| Webhook Enabled | It is mandatory to configure a webhook in your RazorPay account to improve the payment experience for your customers. Configuring a webhook ensures payment status updates are posted back to LeadSquared more reliably (in case of session timeouts, network issues, etc.). To learn more, contact your account manager. Once you configure the webhook in your RazorPay account, toggle this setting to activate the webhook. |
| Webhook Secret | Enter your RazorPay account webhook secret key. |
| Show Button in Footer | When enabled, the Pay button will show up on the bottom right side of the form.
When the Pay button is placed in any form step beside the last step, leads tend to make the payment and close the form immediately. When the setting is enabled, leads will automatically be taken to the next step after they’ve made the payment, which ensures they’ll complete the rest of the steps before submitting it. In cases when the Pay button is placed in the form’s last step, it ensures leads can complete the payment and submit the form in one go. To know more, reach out to your account manager. |
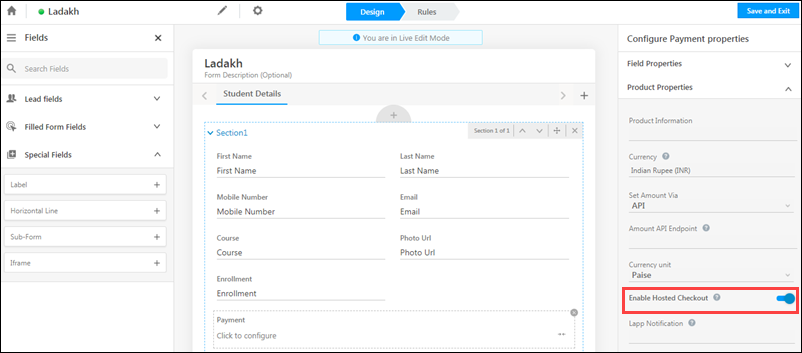
We support hosted check-out for Razorpay. So instead of using the default LeadSquared pop-up, you can redirect users to a checkout process in a new tab.
3.1.2 PayUMoney

| Field Property | Description |
| Key | The API keys associated with your payment provider account. |
| Salt | |
| Transaction ID Generator | Let’s you generate a transaction ID using a particular convention. |
| Webhook Enabled | It is mandatory to configure a webhook in your PayUMoney account to improve the payment experience for your customers. Configuring a webhook ensures payment status updates are posted back to LeadSquared more reliably (in case of session timeouts, network issues, etc.). To learn more, contact your account manager. Once you configure the webhook in your PayUMoney account, toggle this setting to activate the webhook. |
| Show Button in Footer | When enabled, the Pay button will show up on the bottom right side of the form.
When the Pay button is placed in any form step besides the last step, leads tend to make the payment and close the form immediately. When the setting is enabled, leads will automatically be taken to the next step after they’ve made the payment, which ensures they’ll complete the rest of the steps before submitting it. In cases when the Pay button is placed in the form’s last step, it ensures leads can complete the payment and submit the form in one go. To know more, reach out to your account manager. |
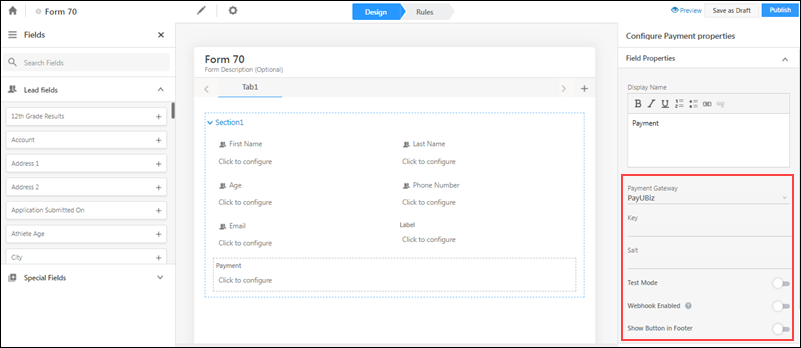
3.1.3 PayUBiz
| Field Property | Description |
| Key | The API keys associated with your payment provider account. |
| Salt | |
| Test Mode |
Allows you to test payments on a staging environment.
|
| Webhook Enabled | It is mandatory to configure a webhook in your PayUBiz account to improve the payment experience for your customers. Configuring a webhook ensures payment status updates are posted back to LeadSquared more reliably (in case of session timeouts, network issues, etc.). To learn more, contact your account manager. Once you configure the webhook in your PayUBiz account, toggle this setting to activate the webhook. |
| Show Button in Footer | When enabled, the Pay button will show up on the bottom right side of the form.
When the Pay button is placed in any form step beside the last step, leads tend to make the payment and close the form immediately. When the setting is enabled, leads will automatically be taken to the next step after they’ve made the payment, which ensures they’ll complete the rest of the steps before submitting it. In cases when the Pay button is placed in the form’s last step, it ensures leads can complete the payment and submit the form in one go. To know more, reach out to your account manager. |
3.1.4 PayTM

| Field Property | Description |
| Merchant ID | The Merchant Id associated with your PayTM account. |
| Merchant Key | The Merchant Key associated with your PayTM account. |
| Industry Type Id |
Industry ID (MCC) which the Tenant has registered with Paytm
|
| Website | URL of the tenant registered with PayTM. |
| Test Mode |
Allows you to test payments on a staging environment.
|
| Show Button in Footer | When enabled, the Pay button will show up on the bottom right side of the form.
When the Pay button is placed in any form step beside the last step, leads tend to make the payment and close the form immediately. When the setting is enabled, leads will automatically be taken to the next step after they’ve made the payment, which ensures they’ll complete the rest of the steps before submitting it. In cases when the Pay button is placed in the form’s last step, it ensures leads can complete the payment and submit the form in one go. To know more, reach out to your account manager. |
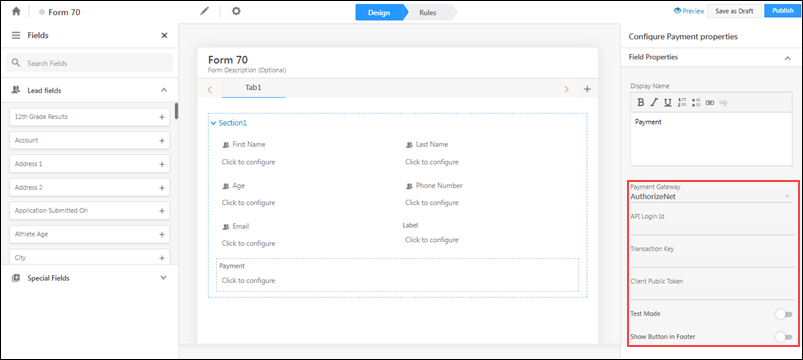
3.1.5 Authorize.Net
| Field Property | Description |
| API Login Id | The API Login Id and Transaction Key associated with your Authorize.Net account. Login to your Authorize.Net merchant account and check under ‘Settings’. |
| Transaction Key | |
| Public Client Token | The public client token generated for the transaction. For more information, see Authorize.Net API Docs. |
| Test Mode | Allows you to test payments on a staging environment. |
| Show Button in Footer | When enabled, the Pay button will show up on the bottom right side of the form.
When the Pay button is placed in any form step beside the last step, leads tend to make the payment and close the form immediately. When the setting is enabled, leads will automatically be taken to the next step after they’ve made the payment, which ensures they’ll complete the rest of the steps before submitting it. In cases when the Pay button is placed in the form’s last step, it ensures leads can complete the payment and submit the form in one go. To know more, reach out to your account manager. |
3.1.6 PayFast
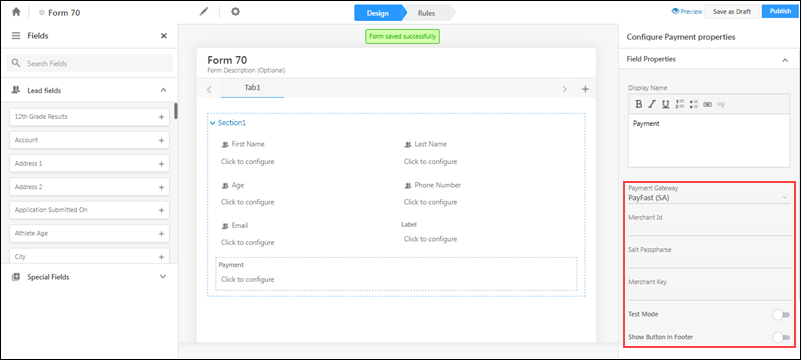
| Field Property | Description |
| Merchant Id | The Merchant Id, Salt Passphrase and Merchant Key associated with your PayFast account are available on your PayFast Dashboard. |
| Salt Passphrase | |
| Merchant Key | |
| Test Mode | Allows you to test payments on a staging environment. |
| Show Button in Footer | When enabled, the Pay button will show up on the bottom right side of the form.
When the Pay button is placed in any form step beside the last step, leads tend to make the payment and close the form immediately. When the setting is enabled, leads will automatically be taken to the next step after they’ve made the payment, which ensures they’ll complete the rest of the steps before submitting it. In cases when the Pay button is placed in the form’s last step, it ensures leads can complete the payment and submit the form in one go. To know more, reach out to your account manager. |
3.1.7 Easebuzz
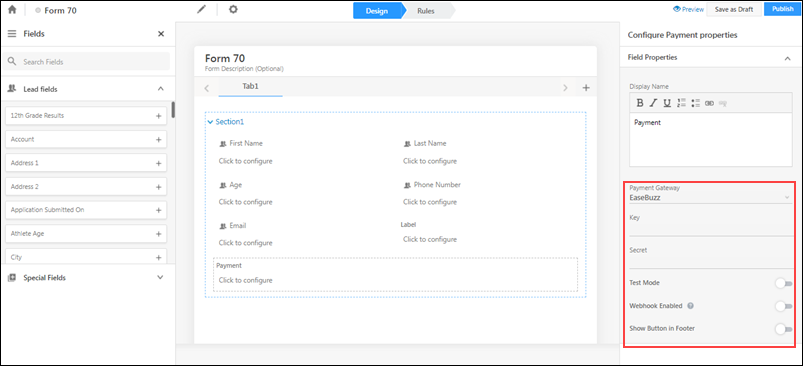
| Field Property | Description |
| Key | The API keys associated with your Easebuzz account. |
| Secret | |
| Test Mode | Allows you to test payments on a staging environment. |
| Webhook Enabled | It is mandatory to configure a webhook in your EaseBuzz account to improve the payment experience for your customers. Configuring a webhook ensures payment status updates are posted back to LeadSquared more reliably (in case of session timeouts, network issues, etc.). To learn more, contact your account manager. Once you configure the webhook in your Easebuzz account, toggle this setting to activate the webhook. |
| Show Button in Footer | When enabled, the Pay button will show up on the bottom right side of the form.
When the Pay button is placed in any form step beside the last step, leads tend to make the payment and close the form immediately. When the setting is enabled, leads will automatically be taken to the next step after they’ve made the payment, which ensures they’ll complete the rest of the steps before submitting it. In cases when the Pay button is placed in the form’s last step, it ensures leads can complete the payment and submit the form in one go. To know more, reach out to your account manager. |
3.1.8 Stripe

| Field Property | Description |
| Publishable Key | The API and Secret Key associated with your Stripe account. To know how to obtain it, please refer to Locate API keys in the Stripe Dashboard. |
| Secret Key | |
| Show Button in Footer | When enabled, the Pay button will show up on the bottom right side of the form.
When the Pay button is placed in any form step beside the last step, leads tend to make the payment and close the form immediately. When the setting is enabled, leads will automatically be taken to the next step after they’ve made the payment, which ensures they’ll complete the rest of the steps before submitting it. In cases when the Pay button is placed in the form’s last step, it ensures leads can complete the payment and submit the form in one go. To know more, reach out to your account manager. |
3.2 Setting Product Properties
After setting the field properties, click Product Properties on the right pane.
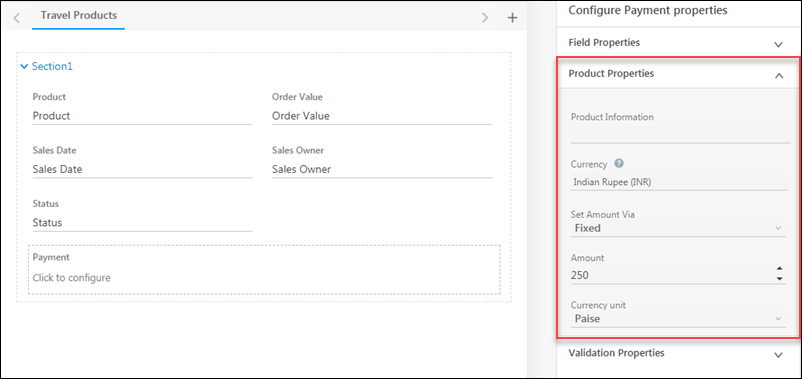
| Field Property | Description |
| Product Information | Details on the product. |
| Currency | Choose between Indian Rupee (INR), US Dollar (USD), European Euro (EUR) and Singapore Dollar (SGD). |
| Set Amount Via | You may either enter an exact amount or set the amount via API.
|
| Currency Unit | The currency unit you’d like to utilize. For example, Rupee or Paise, Dollars or Cents, etc. |
In addition to the field and product properties, you can use the validation properties to make the payment field mandatory and/or hide the field by default (the field will only appear if there is an explicit ‘Show’ form rule associated with it).
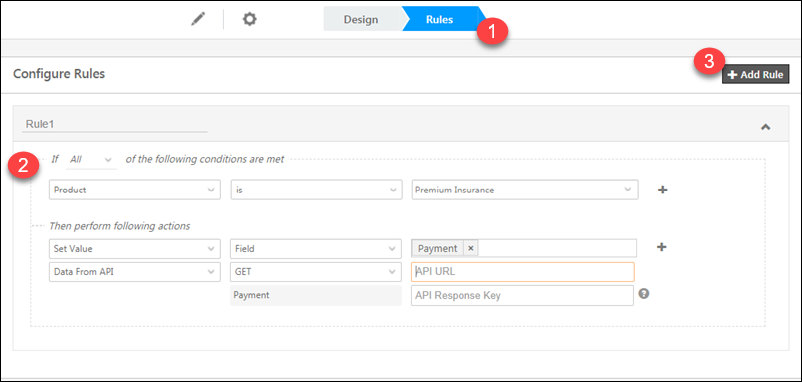
3.3 Setting the Payment Value and Currency Dynamically via Rules
You can set the value of the payment and *currency dynamically using form rules. As a prerequisite, you must write a LeadSquared Lapp, or use Mavis DB or API, from where you can fetch the payment and currency values.
Here’s an example of a simple JSON you can use to dynamically set payment and currency values –
{
"Amount": 500,
"Currency": "GBP"
}
- After adding the payment field to your form, navigate to the Rules tab.
- Create a rule with the conditions and actions as per your requirements.
In this example, we’re setting the value of the payment through API depending on the insurance product being purchased. Be sure to enter the API URL and enter the correct response key to map the payment (and/or currency) parameters, to set the value of the chosen field.
Once you’re done you can Save and Exit. For more information on forms, see How to Create a Form.
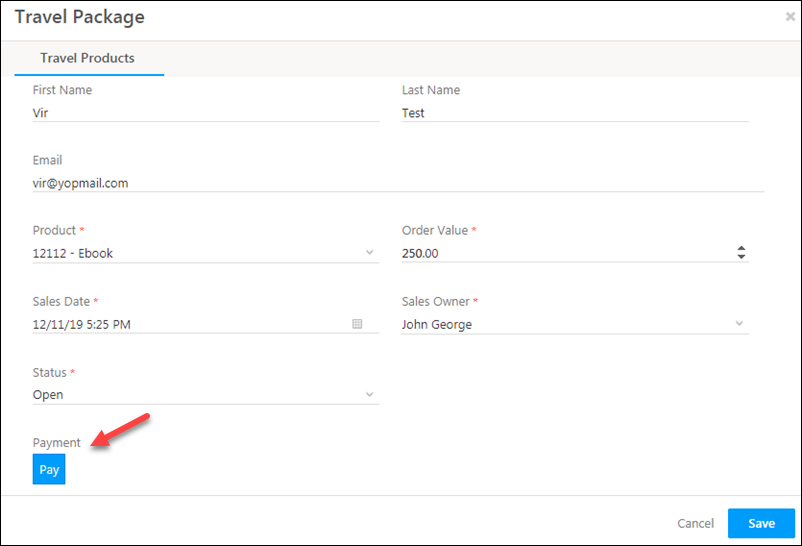
4. Demo
Once you’ve published your form and created a process, you’ll be ready to receive payments through your selected payment provider.
Show Button in Footer is Disabled
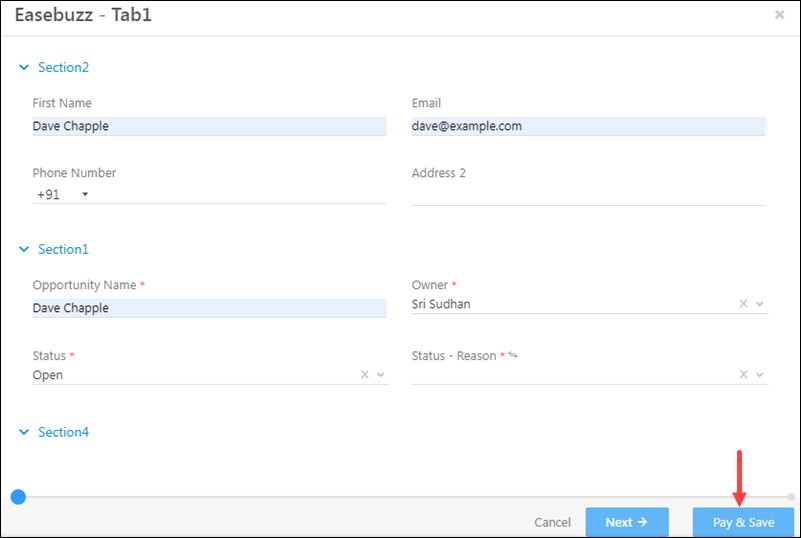
Show Button in Footer is Enabled
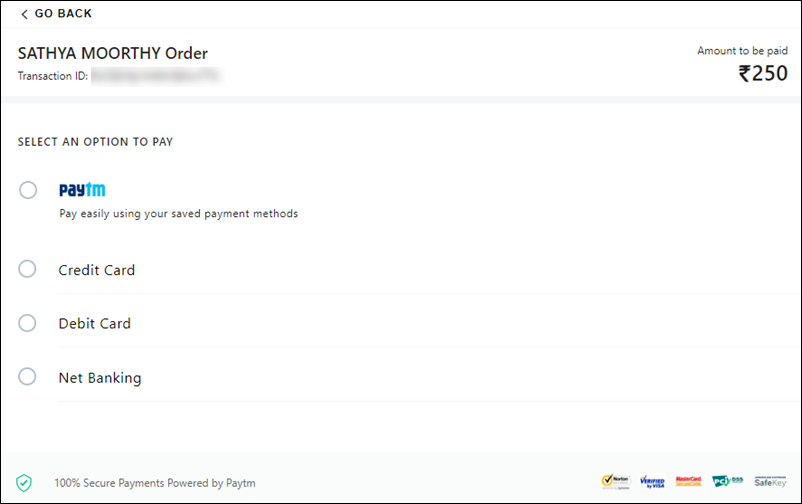
Payment Page
5. Async Payment Processing
You can process payments asynchronously to ensure that payment activities are posted to LeadSquared even if end-users are experiencing internet issues.
- Navigate to Settings>Additional Settings.
- Click
 to Enable Async Processing.
Enabling Webhooks
It is mandatory to generate a webhook and configure it in the payment provider’s account (if it supports webhooks) to ensure that payment events are more reliably delivered to LeadSquared. This helps avoid issues where the payment provider doesn’t pass on the event data to the LeadSquared endpoint due to internet issues, end-user intervention, etc.
Webhooks can be configured for the following providers –
- RazorPay
- PayUBiz
- PayUMoney
- EaseBuzz
- Paytm
To set up a webhook for any of the listed payment providers, contact your account manager or support@leadsquared.com. Alternatively, you may set it up using this guide for Async API Webhook URL Generation Method.
Once the webhook is configured in the payment provider’s account, ensure that the enabled webhook is enabled in the LeadSquared payment form –
Any Questions?
If you have any doubts related to this article, please contact us at support@leadsquared.com or leave us a comment below.
Can we support CCAvenue Payment gateway?
Hi, Vidhan. CCAvenue is supported as a Custom Payment Gateway option. At present, it isn’t supported as an out-of-the-box option.
how to reflect the payment status whether paid or not in portals?
Hi, Vijay. Thank you for your question. Payment transactions with statuses can be displayed on Portals, by linking the ‘Payment’ activity in the Portal page, inside the Application Block component. If you need more clarity, please reach out to your account manager, or write to support@leadsquared.com.