1. Feature Overview
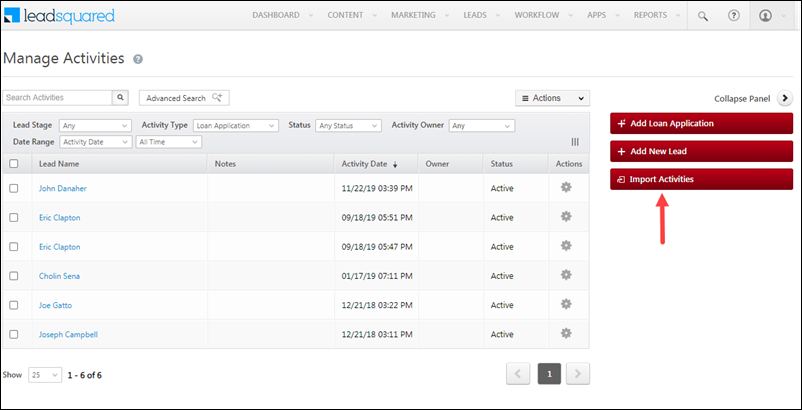
You can import an activity through a CSV file*, and add it to leads and opportunities, from the Manage Activities page. Importing will only create activities, and won’t work for updating them. Before you import activities, you should know-
- Which activity type you’re looking to import. You can only import activities pertaining to one activity type.
For example, you can import multiple entries of a sales activity or you can import multiple instances of a custom activity, but you can’t import both sales and custom activity types in the same CSV file. - How the fields in your CSV will match the fields of that activity type. You’ll have to do the mapping after uploading the file.
* Max file size allowed – 10 MB. Max rows allowed – 25,000.
2. Prerequisites
2.1 Custom Activities
- The CSV file you upload must have only one mandatory lead/opportunity identifier.
- For leads, the unique identifies can be either the Lead Number or Prospect Id/Lead Id or Email or Phone. However, if you’ve set uniqueness for some other lead field (PAN number, Social Security Number, etc.), then you can use this as the identifier as well.
- For opportunities, the unique identifier can be the OpportunityId or the Opportunity Auto ID.
- To obtain the OpportunityId, pass the Get an Opportunity by Id API.
- To obtain the Opportunity Auto ID, enable the Enhanced Data Type For Opportunities Advanced Configuration setting.
- Activity Date is mandatory. You can choose the format while mapping your CSV to the activity type fields.
- For the activity owner, you can pass the User Id or the user’s Email Address.
- You don’t have to pass custom fields in the CSV even if you’ve set them as mandatory manually.
2.2 Custom Activities with Custom Field Sets
In addition to the points listed under custom activities, the field names of the Custom Field Sets in your CSV/excel file must be named as follows*–
<Activity Field Name> – <CFS Field Name>
For example, if the activity display name is “KYC Collection” and the custom field set name is “Street Address Line 1”, your corresponding CSV field should be named-
KYC Collection – Street Address Line 1
*Note:
- If you do not follow the naming convention prescribed above, the fields will not get auto-mapped. However, they will still be available to be mapped manually.
- File type fields cannot be imported.
2.3 Sales Activities
- Points 1 and 2 from Custom Activities are relevant, plus –
- Sales Owner is mandatory, you can pass the User Id or the user’s Email Address.
- Product is mandatory. You can either pass the Product Id available through this API or the product SKU available on the UI under the Id column.
- Order is mandatory.
3. Import Process
To import an activity type –
- From the main menu, navigate to Leads>Manage Activities.
- On the Manage Activities page, click Import Activities.
3.1 Upload CSV
First, upload the CSV file –
- On the Manage Activities page, click the Import Activities button.
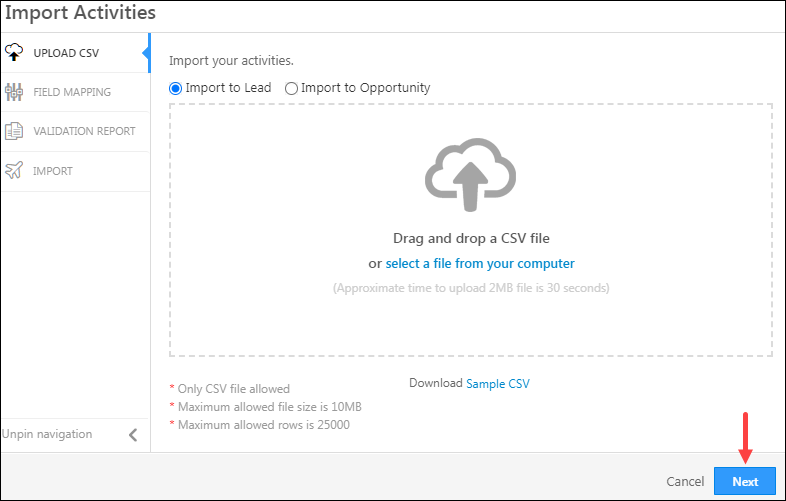
- Select Import to Lead or Import to Opportunity.
- If you want to download a sample file, on the Import Activities pop-up, click Download Sample CSV.
- Or you could directly upload a CSV by dragging and dropping it into the pop-up, or by clicking the select a file from your computer link.
- Once the file has been uploaded, click Next.
3.2 Field Mapping
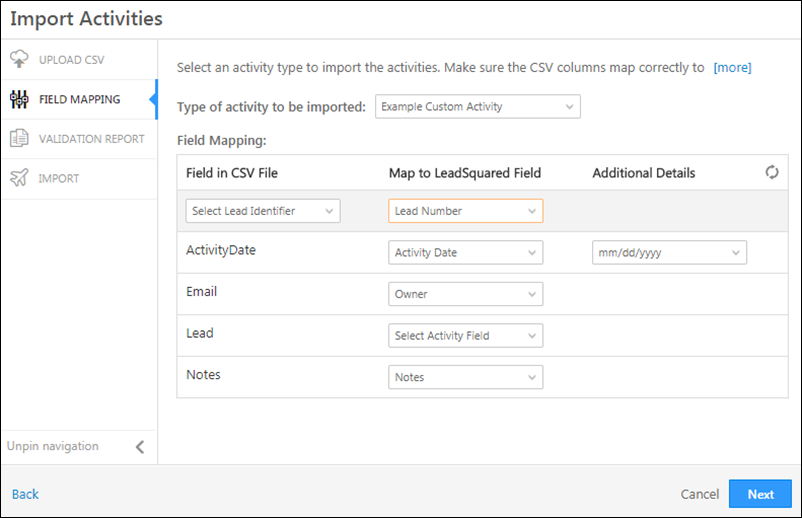
Map the CSV File Columns to the Activity Type Fields –
- Select the type of activity you want to import from the drop-down.
- Map the fields in the CSV file to the activity type fields. The first row marked in grey is the lead/opportunity identifier. Choose the appropriate field in the CSV that matches the identifiers in the activity type fields (Lead Number, OpportunityId, etc.).
- Once you’re done, click Next.
3.3 Validation Report
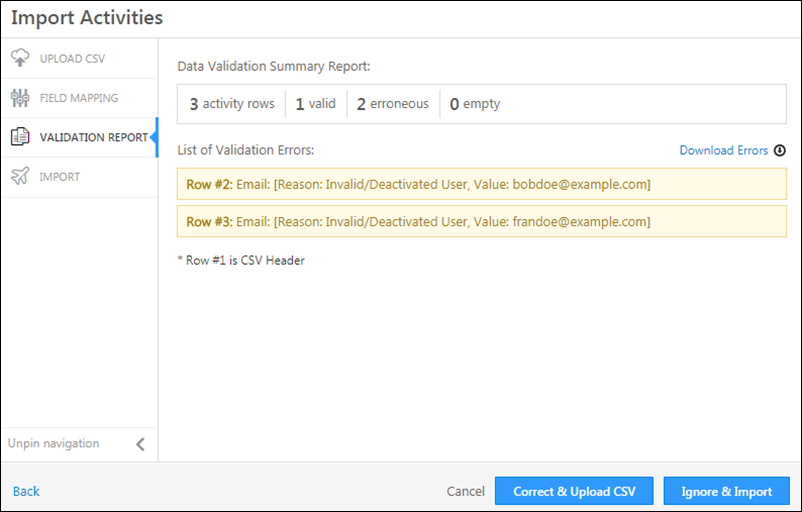
Review the validation report. The validation report will show you errors in your mapping configurations. You can-
- Fix these errors and re-upload the CSV
or - Ignore the errors and continue. If you do so, activities won’t be created for the rows which contained errors.
3.4 Check the status of your import
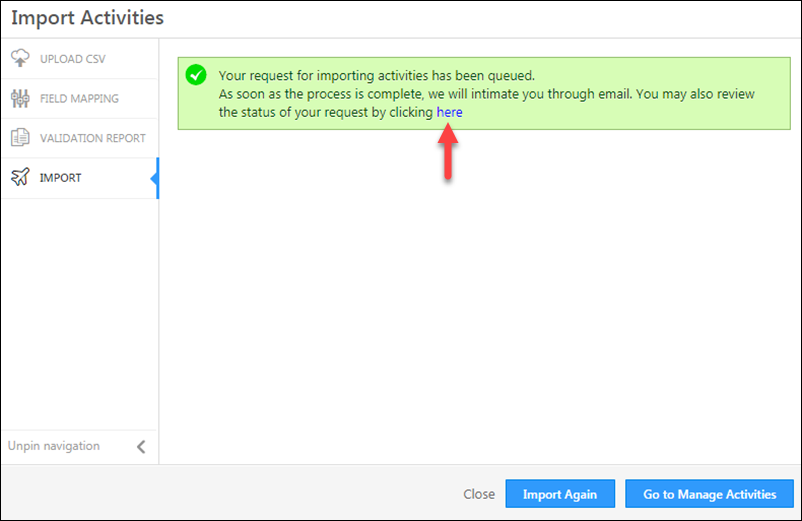
Your import request is now successfully queued. Click the link shown below to view the status of the import. You’ll also be notified by email once the import is complete.
Any Questions?
Did you find this article helpful? Please let us know any feedback you may have in the comments section below. We’d love to hear from you and help you out!


