


Get Started
Sales Suite
Field Ops
Marketing
Service CRM
Integrations & Apps
FloStack
Email Campaign HTML Editor
1. Feature Overview
The HTML Editor of the Email Campaign feature allows you to build custom email templates from scratch or make changes to pre-existing templates/drafts. To know more about how to use this editor, see Bee Editor.
Note:
- If you’re not familiar with HTML, you can also use existing email templates, blank emails, or the ‘copy from sent’ option to send emails.
- If you’re using HTML to send emails, you can opt to create the template from scratch using –
- The rich text editor.
- The ‘Paste your HTML’ option.
- The plain text editor.
- To know more about creating email campaigns, see Create and Schedule Email Campaigns.
- To control email settings related to subscriptions, senders, and recipients, see Email Settings – Feature Guide.
2. Prerequisite
- You must be the Administrator or the Marketing User of your LeadSquared account.
- You must have developer experience using HTML and CSS.
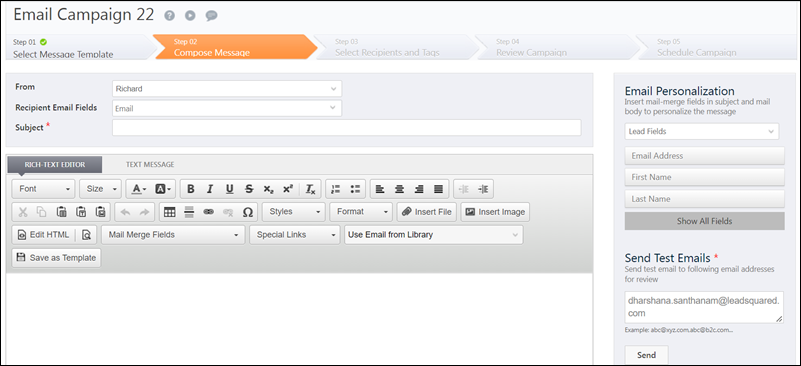
3. Create Email Campaigns using HTML
- Navigate to Marketing>Email Campaign and click Create Email Campaign.
- In step 1, under How would you like to create Email?, click Use HTML.
- Select an HTML Editor.
- If you want to write your own HTML code and add rich text content (like coloured text, bold text, headings, etc.), select Use Rich-Text editor.
- If you have a pre-written or third-party HTML code for the email, you can directly paste it into the editor by selecting the Paste your HTML option. This option is chosen in the gif shown below.
- If you want to create a simple text email campaign without images and attachments, select Use Plain-Text editor.
- Once you finish writing your HTML message, click Text Message.
- Click Copy from HTML Message.
- On the right side of your screen, under Send Test Emails, enter the relevant email address(es) and click Send. It is mandatory to send test emails before moving on to the next step.
- Click Save and then click Next to move on to the next step.
Note: Creating a text message along with HTML is a mandatory requirement to meet the CAN-SPAM guidelines. If the HTML message is not delivered for any reason, the text email is sent to the inbox of the recipient. To know more about the CAN-SPAM guidelines, see

4. Other Actions in HTML Editor
- To add a link in your email, click
 and enter the relevant details.
 - To add an image in your email, click Insert Image. You can upload the image from your computer or from the Image Library.
- To add a document/file in your email, click Insert File.
- To personalise your email, click the Mail Merge Fields dropdown and select the relevant field. For example, if you want to include the lead’s first name in the message, click the dropdown and select First Name. To know more about Mail Merge fields, see How to personalize Email Campaign using Mail Merge fields?
- You can also add mail merge fields in your text by selecting the fields under Email Personalisation on the right side of your screen.
- You can add special links such as Mailing Preference, Unsubscribe, and View in Browser by clicking the Special Links dropdown.
- To use a pre-existing template, click Use Email From Library.
- To save the campaign as an email template, click Save as Template.
Note:
- If you use a pre-existing template after you’ve started writing the code, your work may not be saved.
- To create email templates, navigate to Content>Email Library and click Add Email Template. You can select the type of Email Template you want to add on the Add Email Template pop-up window. The editors you use here are the same as the ones you use while creating an email campaign.
Troubleshooting
Error Occurs While Sending Test Mail for an HTML Template
- Issue Description: When sending a test mail for a particular HTML template, the following error appears:“There was an error processing your request. Please try again later.” Additionally, the template cannot be published.
- Cause: This issue occurs when the HTML content exceeds the system’s character limit. In this case, the template contains approximately 400,000 characters (including spaces), leading to a timeout error when testing the content.
- Solution:
- Optimize the HTML Code: Remove unnecessary spaces and reduce excessive content to stay within system limits.
- Modify and Minify the Code: Optimize the HTML by reducing redundant tags, compressing inline styles, and minifying the code.
- Escalation: If you’re still getting the error, reach out to us at support@leadsquared.com for assistance in optimizing the template.
Invalid Email Content Error – Unsupported Keywords in Email Templates
If you’re seeing the error: – “Invalid Email content. It should not contain any Javascript code, events, embed script, Javascript URIs or Javascript data URIs”, but there’s no visible JavaScript in your email, it might be due to certain restricted keywords or patterns in the HTML.
- Blocked Keywords (event attributes that trigger the error):
onafterprint, onbeforeprint, onbeforeunload, onerror, onhashchange, onload, onmessage, onoffline, ononline, onpagehide, onpageshow, onpopstate, onresize, onstorage, onunload, onblur, onchange, oncontextmenu, onfocus, oninput, oninvalid, onreset, onsearch, onselect, onsubmit,onkeydown, onkeypress, onkeyup, onclick, ondblclick, onmousedown, onmousemove, onmouseout, onmouseover, onmouseup,onmousewheel, onwheel, ondrag, ondragend, ondragenter, ondragleave, ondragover, ondragstart, ondrop, onscroll,oncopy, oncut, onpaste, onabort, oncanplay, oncanplaythrough, oncuechange, ondurationchange, onemptied, onended, onloadeddata, onloadedmetadata, onloadstart, onpause, onplay, onplaying, onprogress,onratechange, onseeked, onseeking, onstalled, onsuspend, ontimeupdate, onvolumechange, onwaiting, ontoggle, onauxclick
- Blocked URI patterns:
javascript:anddata:are not allowed anywhere in the content. - Blocked HTML tags:
<script>and<embed>tags are not supported and will cause the template to fail.
What to do: Carefully review your email HTML content and remove any of the above keywords, URI patterns, or tags to resolve the error.
Any Questions?
We’d love to answer your questions or hear your own unique use cases. Feel free to share your experiences in the comments section below.