


Get Started
Sales Suite
Field Ops
Marketing
Service CRM
Integrations & Apps
FloStack
Integrating Azure AD with LeadSquared Using the ROPC Approach
1. Feature Overview
LeadSquared offers sign-in integration with Azure Active Directory services, using the Resource Owner Password Credential (ROPC) approach. After integration, you won’t need to manage a separate set of credentials for LeadSquared, and can log-in directly with your AD credentials. This integration will also enable you to seamlessly sign in to the LeadSquared mobile app as well.
For information on other ADFS integrations, see ADFS Integration for Signing in to LeadSquared.
2. Prerequisites
- You must have a Microsoft Azure Active Directory.
- You must be an Administrator of your LeadSquared account.
- You must use the same email Id on Azure and LeadSquared.
- You must have the API authentication provider enabled on your LeadSquared account. To enable it, please reach out to support@leadsquared.com.
3. How it Works
- Create an application on Azure.
- Grant application access on Azure.
- Set up authentication on LeadSquared
- Test the application on LeadSquared.
4. Create an Application on Azure
Create a new non-gallery application on Azure.
- Navigate to the Microsoft Azure portals home page, and under Manage Azure Active Directory, click View.
- On the left panel, click Enterprise applications.
- On the Enterprise applications page, click New Application.
- From the available option, click Non-Gallery Application.
- Provide an appropriate name for the application, and click Add.
5. Authenticate Azure Application
To grant application access to the new application you created –
- On the Microsoft Azure portals home page, under Manage Azure Active Directory, click View.
- On the left panel, click App registrations.
- On the App registrations page, click All applications.
- Under Display Name, click the application you’ve created.
- On the application page, on the left-panel, click Authentication.
- On the Authentication page, scroll down to Advanced Settings, and against Default client type, click Yes.
- Once you’re done, click Save.
6. Application Permissions on Azure
6.1 Grant Permissions
To grant application permissions to the new application you created –
- On the Microsoft Azure portals home page, under Manage Azure Active Directory, click View.
- On the left panel, click App registrations.
- On the App registrations page, click All applications.
- Under Display Name, click the application you’ve created.
- On the application page, on the left-panel, click API permissions.
- On the API permissions page, click Add a permission.
- On the Request API permissions pop-up, click Microsoft Graph, and then click Delegated permissions.
- Under Permissions, click the
 checkbox against email and openid.
 - Once you’re done, click Add permissions. This will successfully grant permissions.

6.2 Grant Admin Access
To grant admin access to the new application you created –
- Navigate to the API permissions page, and click Grant admin consent for LeadSquared.
- On the confirmation pop-up, click Yes. This will successfully grant admin access.
6.3 Add Users
To add your LeadSquared users on Azure –
- On the Microsoft Azure portals home page, under Manage Azure Active Directory, click View.
- On the left panel, click Enterprise applications.
- On the Enterprise applications page, under the Name column, click the application you’ve created.
- On the application Overview page, under Getting Started, click Assign users and groups.
- On the Users and groups page, click Add user.
- On the Add Assignment page, click Users, then select from the list of users available on the right panel, and click Select.
- Once you’re done, click Assign. The user is now successfully added.

7. Authenticate Azure Application in LeadSquared
To authenticate the application you’ve created on LeadSquared-
7.1 Obtain the Client Id from Azure
To obtain the client Id for the application you’ve created –
- On the Microsoft Azure portals home page, under Manage Azure Active Directory, click View.
- On the left panel, click App registrations.
- On the App registrations page, click All applications.
- Under Display Name, click the application you’ve created.
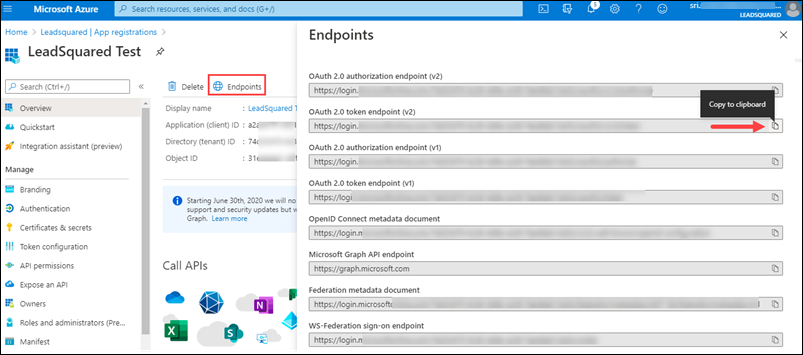
- On the application page, click Endpoints.
- Under OAuth 2.0 token endpoint (v2), click the
 icon to copy the token.
7.2 Authentication on LeadSquared
To authenticate and activate your Azure application on LeadSquared –
- From your LeadSquared main menu, navigate to My Profile>Settings>Security>Authentication Provider.
- Against Enable Third Party Authentication Provider, toggle the
 slider.
 - On the Choose Authentication Provider pop-up, select Generic API.
- On the Configure Authentication Provider pop-up, enter the details of the Azure API.
| Field |
Description | Sample Value | |
| Request Type | Choose HTTP request method as POST. This is a mandatory field. | NA | |
| API URL | Select either http:// or https:// and enter your Azure API OAuth 2.0 token endpoint (v2) URL here. This is a mandatory field. | NA | |
| Content Type | Select “application/x-www-form-urlencoded” as the content type. This is a mandatory field. | NA | |
| Request Headers | You can pass multiple request headers here. This is not a mandatory field. | NA | |
| Request Body | Pass the following key-value pairs in the request body. | ||
client_id |
The Azure application client id. This is available on the application page, and is called Application (client) ID. | a2ae67ff-test-example | |
grant_type |
This is the grant type to capture the password you’ve used to log in to your Azure account.
You must pass the value |
password | |
username |
This is the mailmerge value of the email address you’ve used to log in to your Azure account. The mailmerge field will be replaced with the actual email address when you log in. | @{User:EmailAddress,} | |
password |
This is the mailmerge value of the password you’ve used to log in to your Azure account. The mailmerge field will be replaced with the actual password when you log in. | @{User:Password,} | |
scope |
Scope must be specified as openid |
openid | |
response_type |
The type of response must be specified as token |
token | |
| Success Keyword | This is the success keyword that will show up in a successful response. This is a mandatory field.
You must pass the value |
access_token | |
| Error Keyword | The error keyword that will show up in an unsuccessful response. This is a mandatory field.
You must pass the value |
error | |
7.3 Test the Application on LeadSquared
- Once you’re done entering the values, click Test.
- Enter the password you used to login in to Azure on the verification screen, and click Next.
- Once you get the success message, click Enable.
- On the Enable Authentication Provider confirmation pop-up, click Yes.
- The Azure authentication provider is now enabled on your account. Users can now login to LeadSquared using their Azure AD credentials.
Any Questions?
Did you find this article helpful? Please let us know any feedback you may have in the comments section below. We’d love to hear from you and help you out!