1. Feature Overview
When conducting business interactions via email clients like Gmail, Outlook, and Apple email, capture the sender and recipient details as leads in LeadSquared through the Markcopy Connector. This connector captures the “From Email Address” and “To Email Address”, and posts the email as an activity in your LeadSquared account.
2. Prerequisites
- You must be the Administrator of your LeadSquared account to install and configure this connector.
- This is a paid connector. To enable it, reach out to your account manager, or write to support@leadsquared.com.
3. How it Works
In LeadSquared
This connector effortlessly captures lead details from your emails without requiring an elaborate setup process. Once connector access is enabled on your account, install and configure the connector. Once the connector is enabled, an email ID is generated.
In your email client (Gmail, Outlook, etc.)
For outbound emails, include this email ID in the CC or BCC fields in your email client when sending emails to your leads. For inbound emails, create an auto-forward rule in your email client to forward these emails to the generated email ID. This process captures lead details and posts the email as an activity in your LeadSquared account.
4. Install the Connector
- Navigate to Apps>Apps Marketplace.
- Search for Mark Copy Connector v2.0, and click Install.
- Alternatively, you can find the connector on the left panel, under Email.
- Once installed, hover your cursor over
 , and click Configure.
5. Configure the Connector
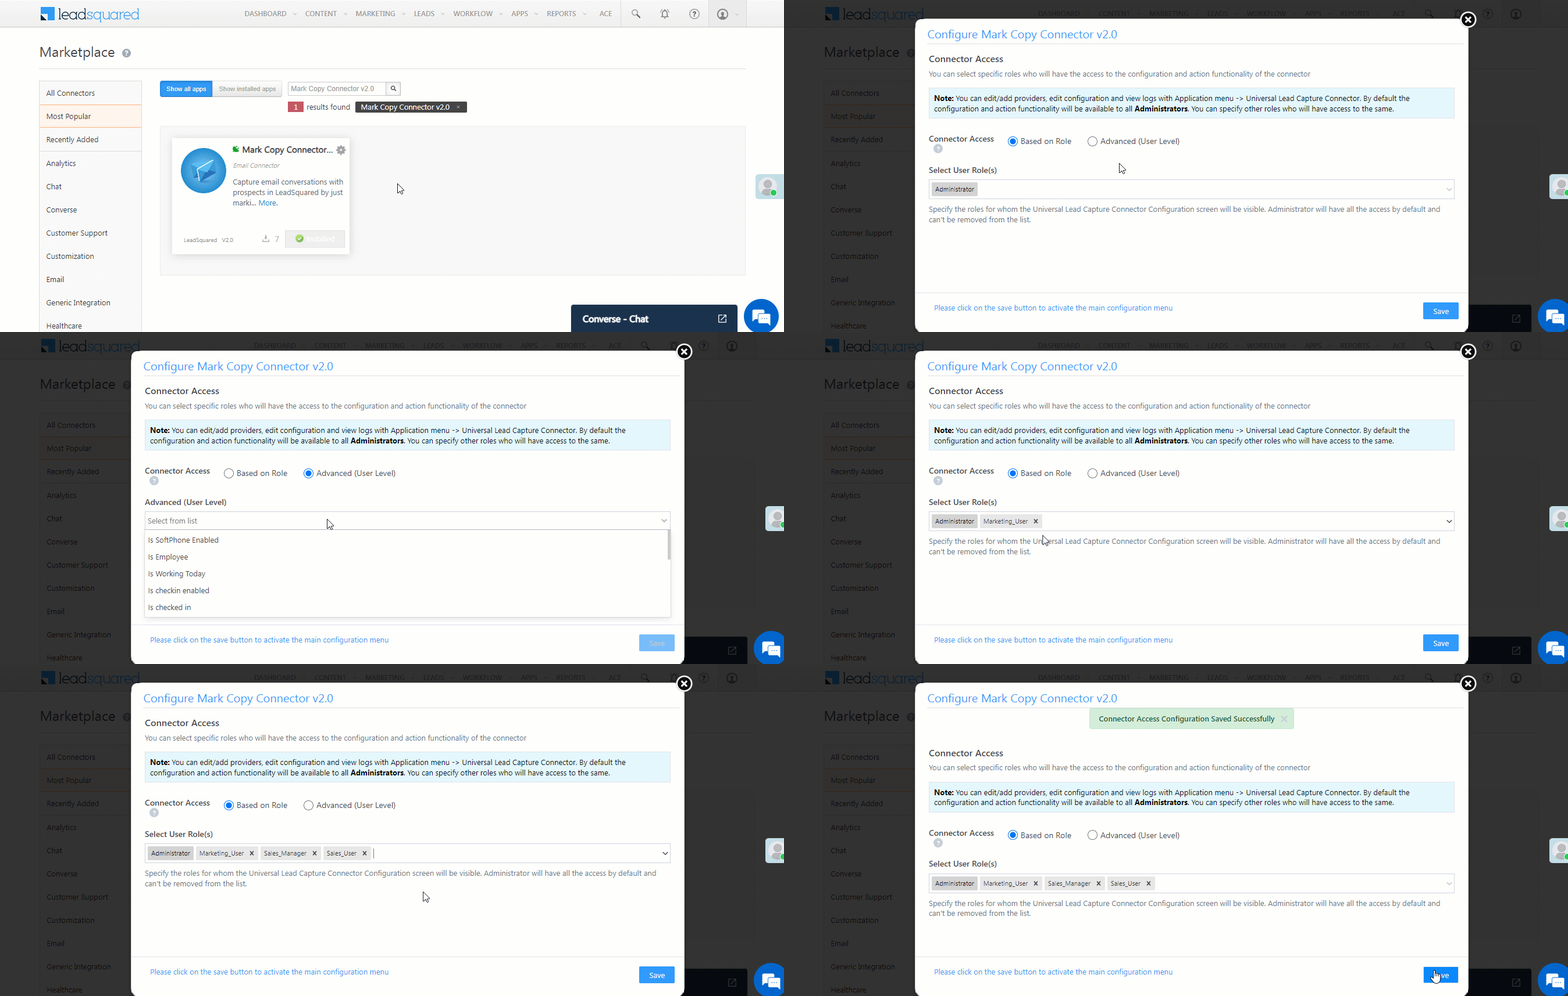
Once you’ve installed the connector, on the Mark Copy Connector v2.0 pop-up, configure the connector access for the non-Admin users in your account. Only those users for whom access is granted can view and access the connector (under the Apps main menu).
- Select if you want to grant Connector Access that’s Based on Role or Advanced (User Level).
- Based on Role – From the Specify Roles dropdown, select the LeadSquared user roles that can use the connector.
- Advanced (User Level) – From the Advanced (User Level) dropdown, select a user boolean field. Based on the value entered in the selected boolean field, the user can access the connector (e.g., for the user Sam, if the “Is Employee” boolean user field contains the value “Yes”, then this user can access the connector).
- Once you’re done, click Save Details. To continue the configuration, refer to the below sections.
6. Admin Configurations
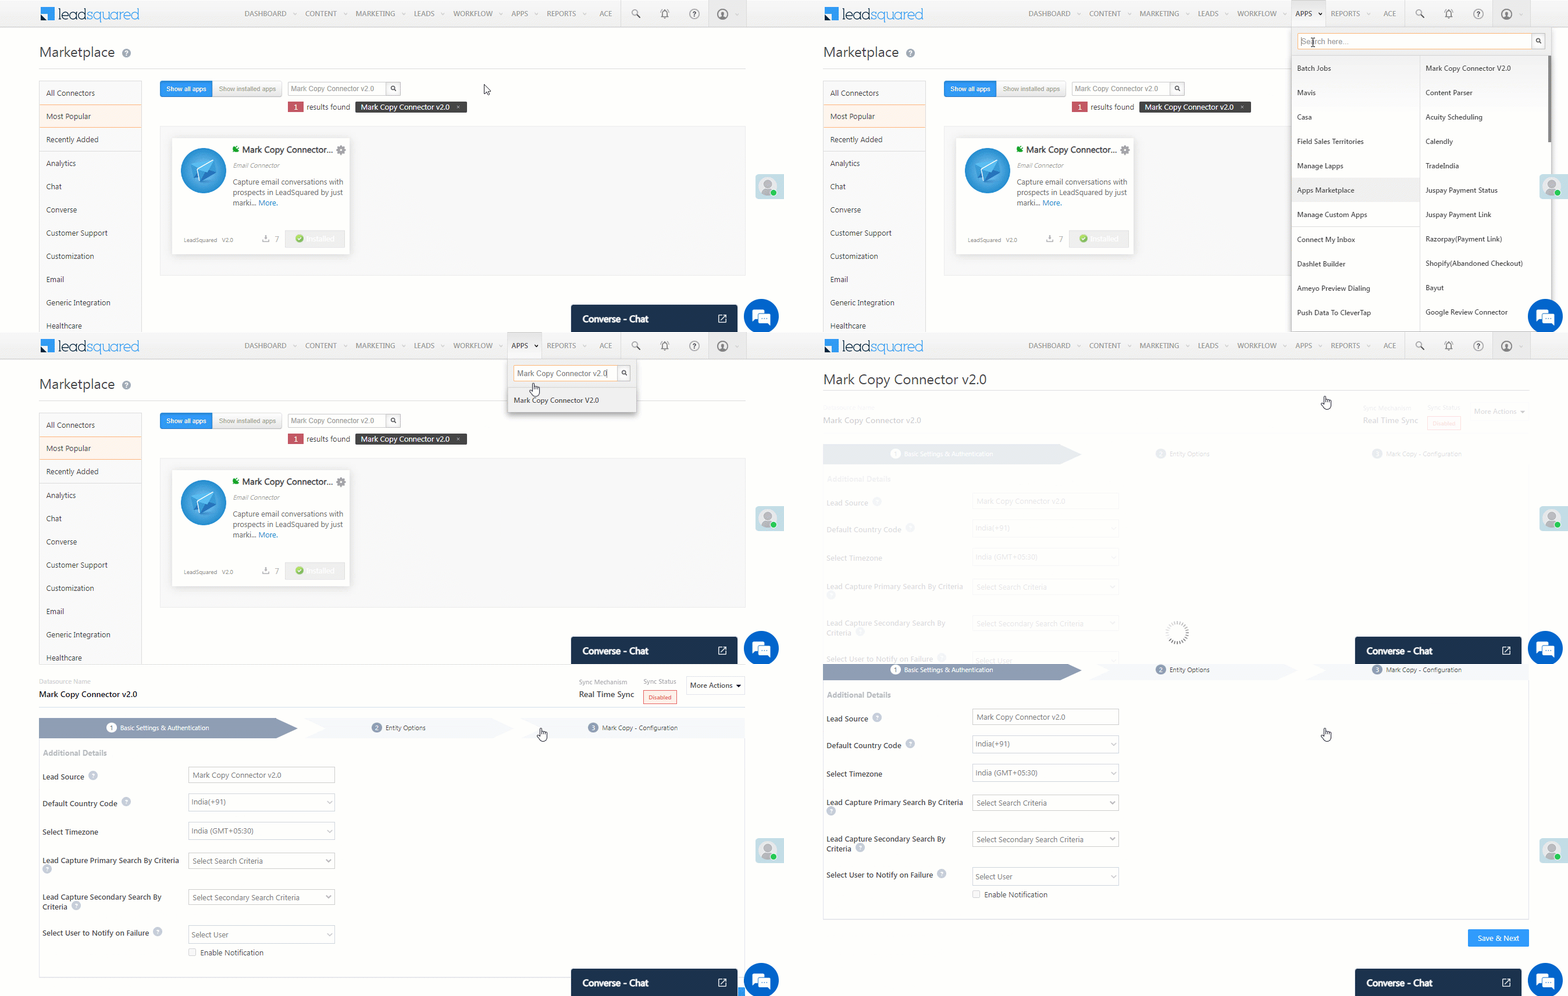
To continue the connector configuration, navigate to Apps>Mark Copy Connector v2.0.
6.1 Basic Details
Enter the following details –
| Property | Description |
| Lead Source | Enter the lead source through which the leads were captured (e.g., Mark Copy, email campaign, etc.). This detail will be displayed on the Lead Details page, under Lead Source. |
| Default Country Code | If the lead’s mobile number is captured without a country code, then the default country code that’s selected from the dropdown will be added to the lead’s mobile number. |
| Select Time Zone | The time zone followed in your Mark Copy account. |
| Lead Capture Search By Criteria | To avoid creating duplicate leads, you must select one unique lead field (e.g., email Id, mobile number, PAN number, etc.) as the search key. To know how to mark a LeadSquared lead field as unique, please refer to How to Make a Custom Field Unique. |
| Lead Capture Secondary Search By Criteria | If lead identification and capture through the primary Search By Criteria fails, it will be re-attempted using the secondary Search By Criteria. |
| Select User to Notify on Failure | If there is an error in fetching leads, the selected user will receive a failure message via email. You can select a user from the list of all the users available in your LeadSquared account. To know more about the type of errors, please refer to Error Notifications. |
| Enable Notification | To ensure notification emails are sent to the selected user when there’s a failed query, enable the |
Once you’re done entering all the details, click Save & Next.
6.2 Mapping
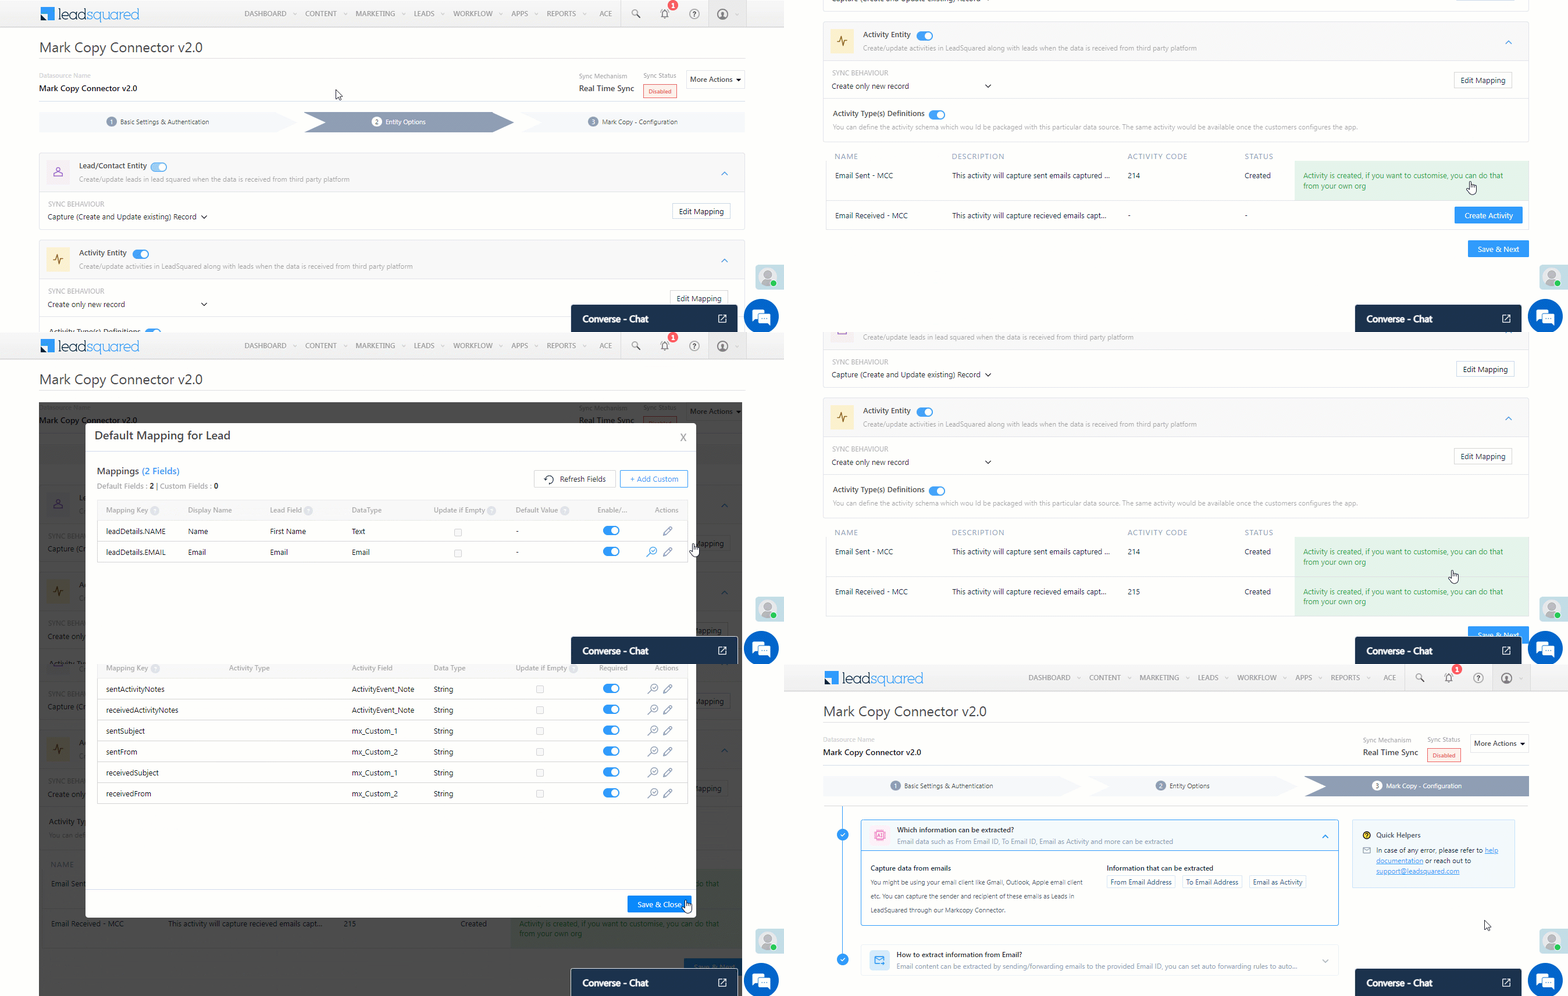
Once you’re done with the basic settings, click Entity Options. By default, all the Mark Copy fields are mapped to the corresponding LeadSquared lead fields. You’ll have to complete two steps here –
- Activity Type(s) Definitions* – Alongside Email Sent – MCC and Email Received – MCC, click the Create Activity button.
- Edit Mapping – Alongside each action (Activity Entity and Lead/Contact Entity) click the Edit Mapping button to verify if the field mapping is accurate. Once verified, click Save & Close. This step is mandatory.
If required, on the Edit Mapping pop-up, you can edit the field mapping –- To edit the Mark Copy mapping field name, click
 , and under Mapping Key, edit the field name.
 - To change the LeadSquared lead field to which the Mark Copy field is mapped, click
 , and from the Lead Field dropdown, select the new lead field.
 - To mark a unique lead field as the search key, click
 .
. - To disable an existing field mapping, alongside the field, disable the slider
 .
. - Click the Update if Empty checkbox if you don’t want to update the value of a field every time the sync takes place.
- This is helpful to prevent re-updating important/sensitive identification-related fields like Social Security Numbers, PAN Card numbers, etc.
- To map an additional field, click the Add Custom button, and add the new mapping field details.
- If you want to capture any additional responses as part of the activity that’s posted on the lead, alongside Activity Entity, click Edit Mapping, and add the response on the Default Mapping for Activity pop-up.
- To edit the Mark Copy mapping field name, click
Once you’re done, click Save & Next.
Note:
- *Ensure you complete the Create Activity steps first, and only then complete the Edit Mapping steps.
- You must mandatorily verify the mapping for Lead/Contact Entity, and Activity Entity, and click Save & Close for each action type, to complete the Mapping.
- When an email sent/received activity is posted, an automatic corresponding invalid activity is generated. This occurs because the email activity can only be categorized as either email sent or email received, and not both. Since both activities are triggered by the movement of the email, the invalid activity is posted. You can ignore this, and it doesn’t impact the connector’s functionality.
6.3 Mark Copy – Configuration
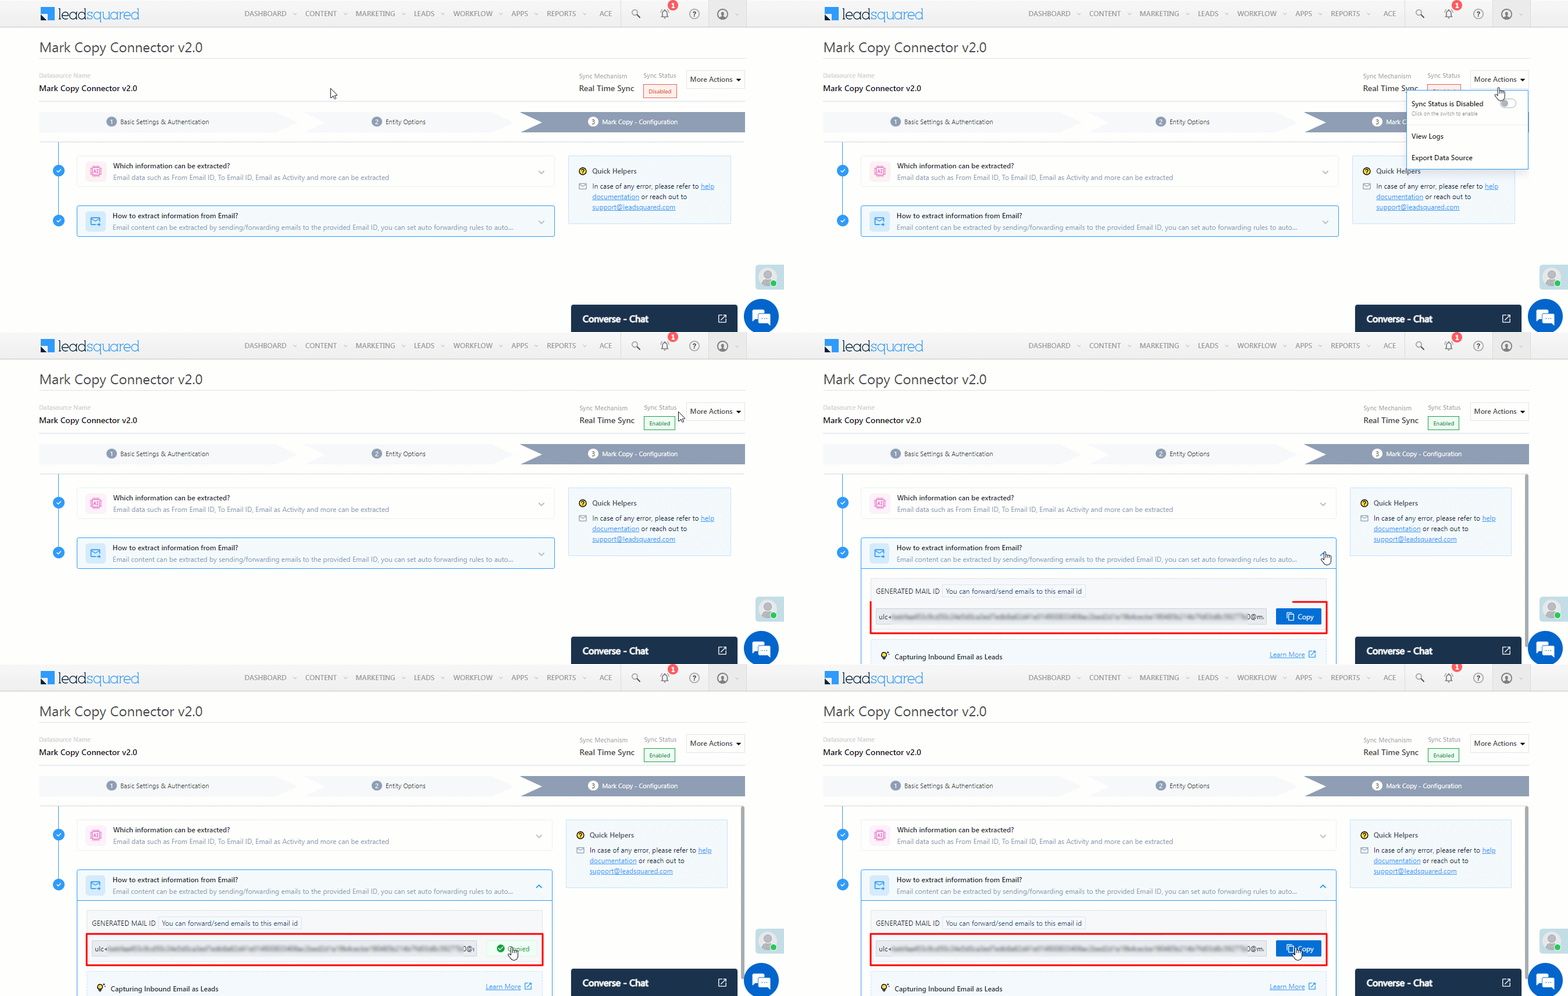
Click More Actions, and enable the sync job. Once enabled, under How to extract information from Email, a custom email ID is generated for your account.
Copy this ID and utilize it to capture lead details in your LeadSquared account.
- For inbound emails, set up an auto-forward rule to send these mails to the generated email ID.
- For outbound emails, paste this email ID in the CC or BCC fields.
This process captures lead details and posts the email as an activity in your LeadSquared account.
7. Steps in your Email Client
Complete the following steps in your email client account (Outlook, Gmail, etc.) –
7.1 To Capture Inbound Emails as Leads
- Set up an auto-forward rule in your email client to send a copy of the email to your Mark Copy email ID.
- The sender becomes a lead, and the email is recorded as a Lead Activity.
7.2 To Capture Outbound Emails as Leads
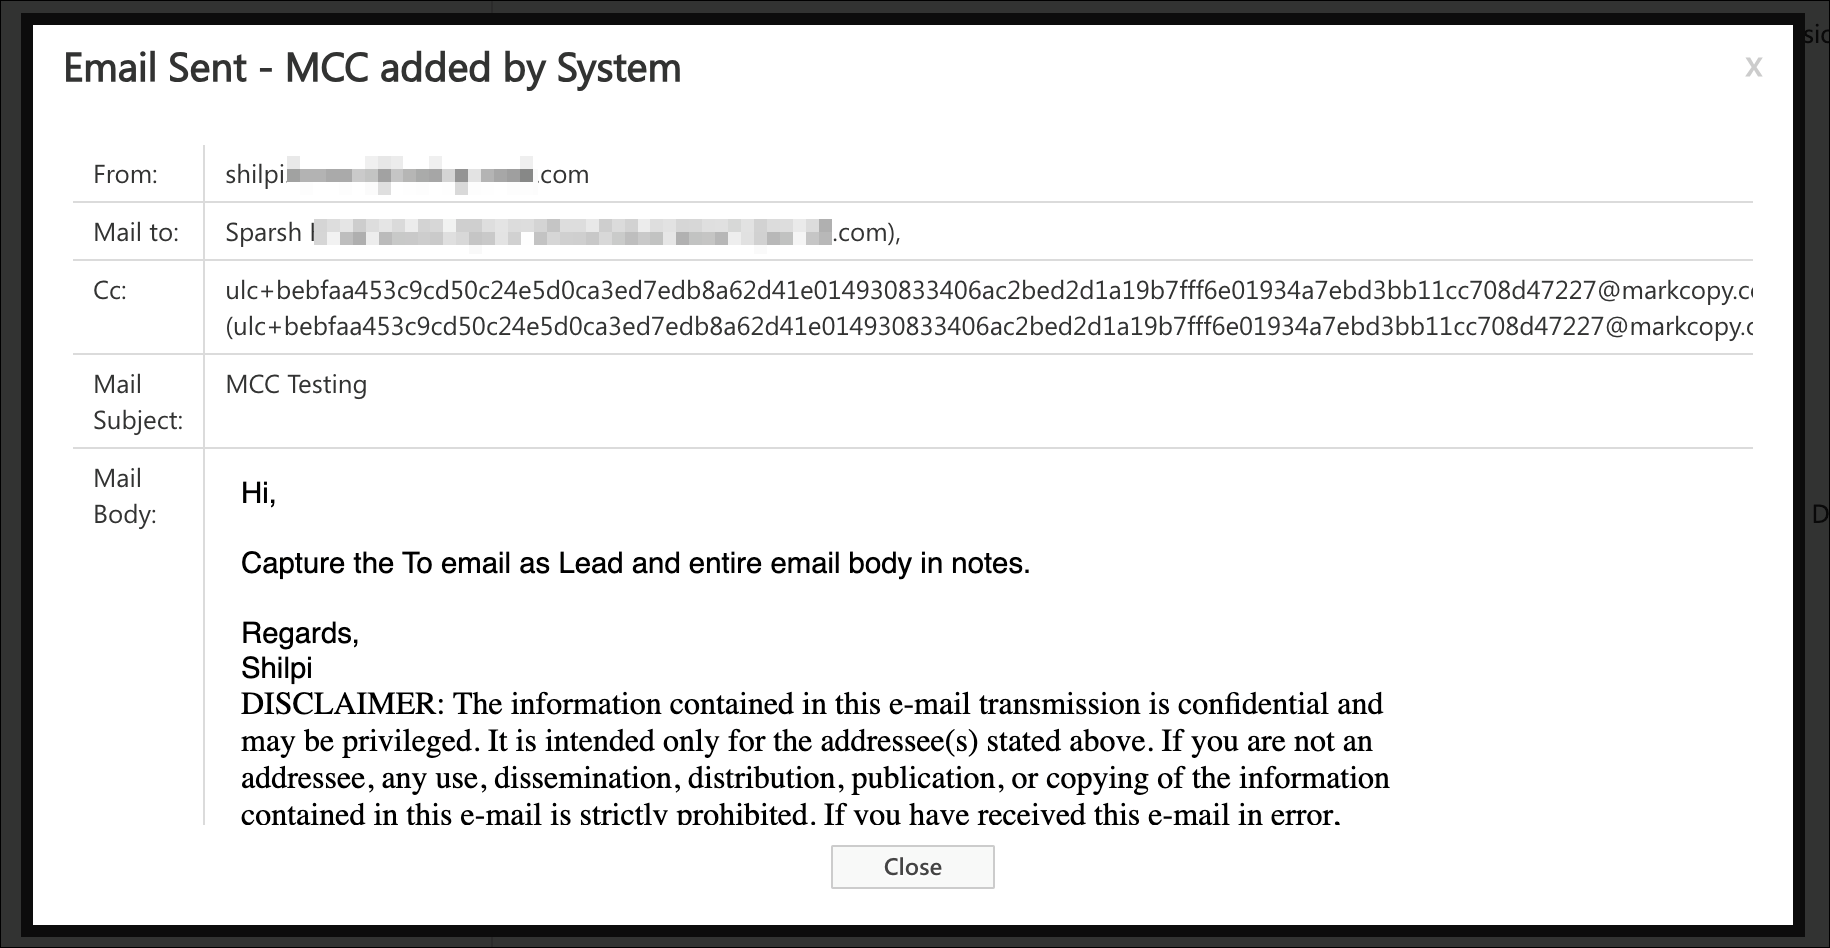
- Paste the Mark Copy email ID in the CC or BCC of your outbound emails.
- The recipients in the “To” field become leads, and the email is recorded as a Lead Activity. Note that addresses in CC or BCC are not considered for lead creation.
- Emails sent using Mark Copy are not trackable, meaning open and click events on such emails are not captured.
- If a recipient’s reply is copied to the Mark Copy email ID, the reply is also captured as a Lead Activity in LeadSquared.

8. View Activities
To view the email activity that’s been captured, navigate to the Leads>Manage Leads, and click on the lead where the activity is posted. In the Lead Details page, the activities will be visible under the Activity History tab.
9. View Logs
Here, you can view logs of all the sync jobs that have taken place.
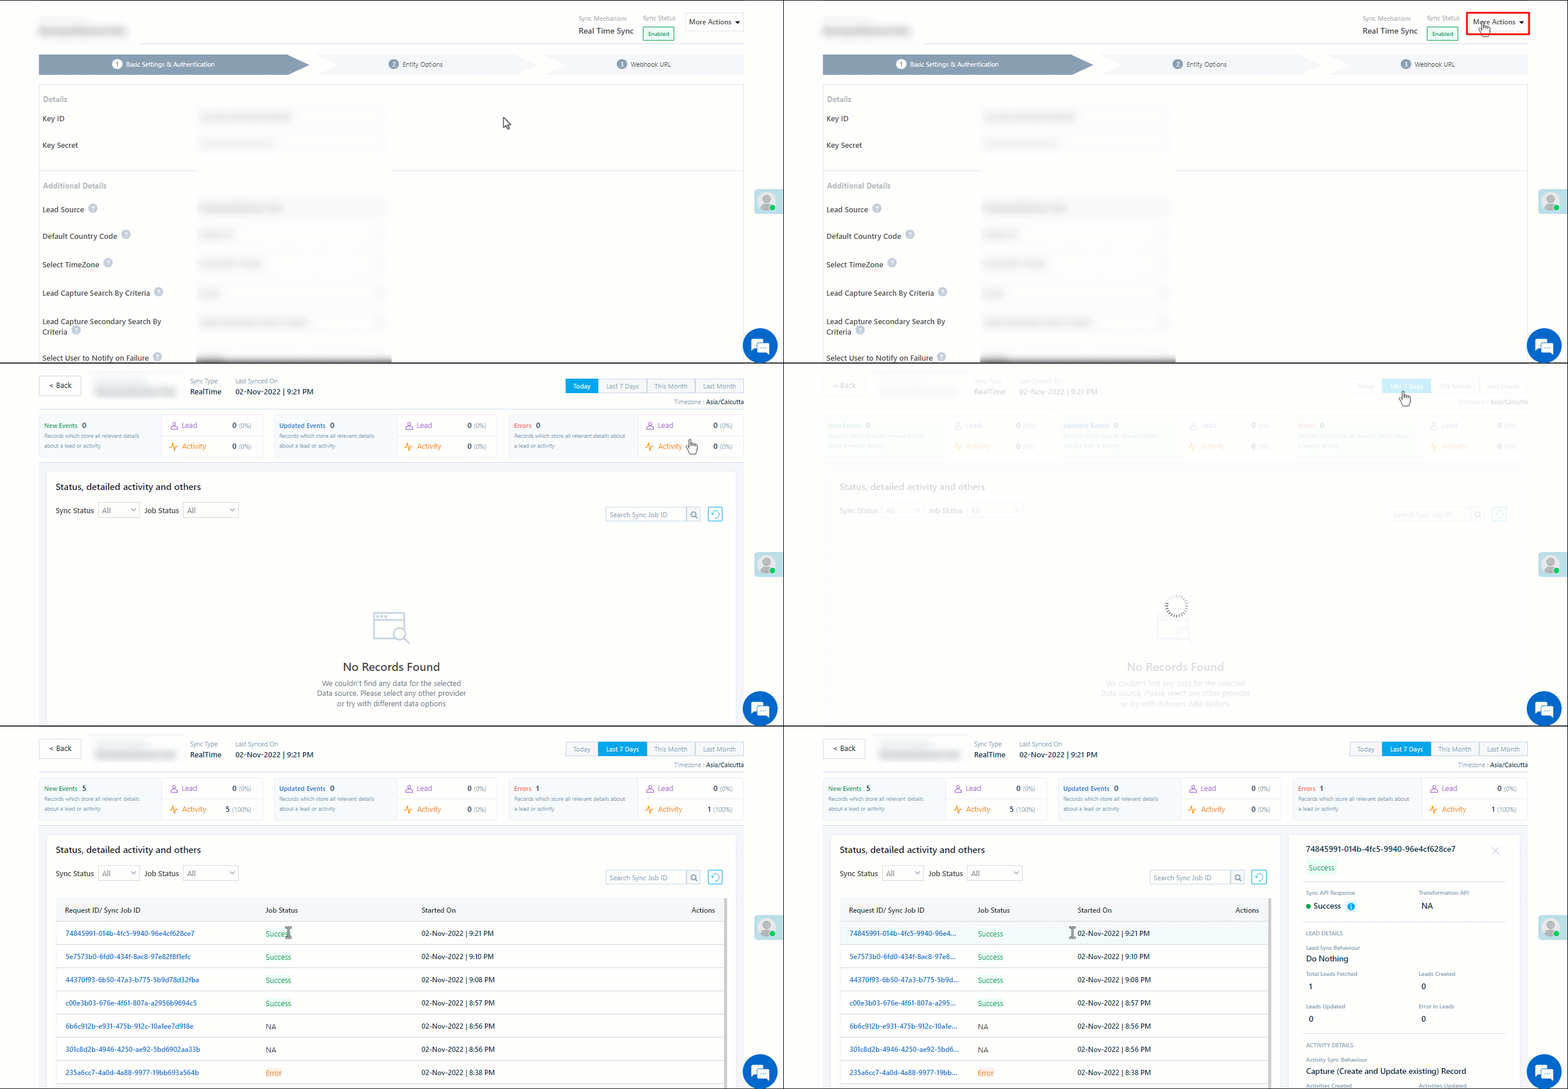
- Navigate to Apps>Mark Copy, and click More Options, and then click View Logs.
- You can filter the logs by selecting a date range (Today, Last 7 Days, This Month, and Last Month), by selecting the Job Status (“All”, “Success” and “Failure”), and by selecting the Sync Status (All, Error, and Success).
- You can view the sync status of the following events –
- New Events – List of all the new payment activities posted in your account.
- Errors – The list of unsuccessful payment activities that have not been captured due to mapping errors (e.g., when a boolean field is mapped to an integer field, etc.).
- To view the Sync Response details, under Request ID/Sync Job ID, click the Id.
- Under the right panel, you can view the response status, the API URL, the request, and the response.
- The successful responses will contain the details of the leads that have been pushed by Razorpay.
- To view the lead capture response under Sync API Response, Leads Updated and Errors in Leads, click
 .
.
Note:
- For a response that contains an error, the reason for the error is listed in the response. Once you fix it, you can click the Retry button to perform the sync again.
- The current Lead/Activity Sync Behaviour will reflect in the Logs screen. This will help identify the sync that’s used (Capture or Update) for the selected Request/Sync Job Id.
10. Other Actions
You can edit or delete the Mark Copy connector that you created. To do this –
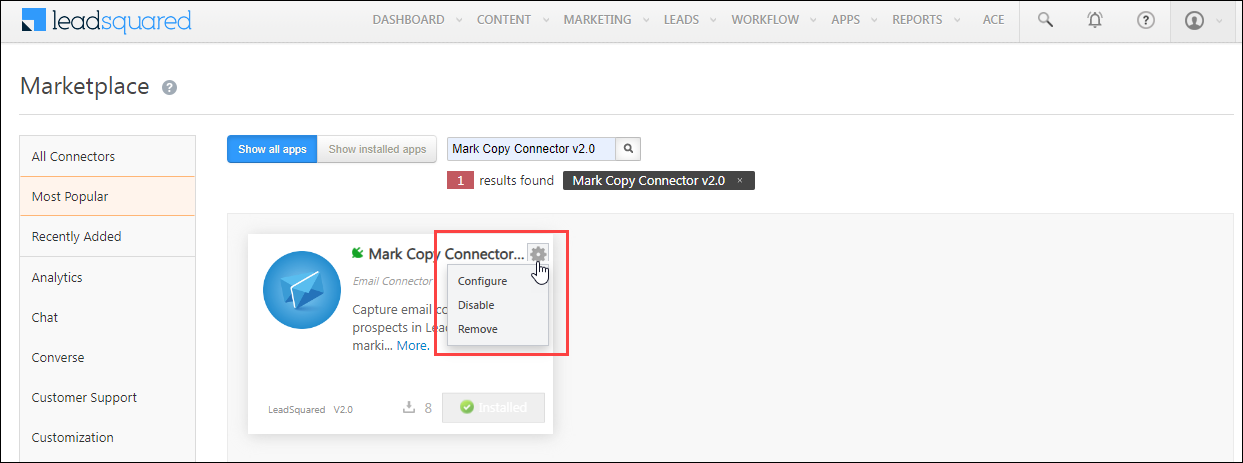
- Navigate to Apps>Apps Marketplace and search for the Mark Copy connector.
- On the Mark Copy connector, click Settings.
- From the list of options, you can perform the following actions –
- Edit Configurations
- Disable the connector
- Remove the connector
11. View Reports
You can view the total number of leads that have been pulled from Mark Copy, by referring to the Lead Source report. To know more, please refer to How to track the source of your Leads using Lead Source Report?
Any Questions?
Did you find this article helpful? Please let us know any feedback you may have in the comments section below. We’d love to hear from you and help you out!


