


Get Started
Sales Suite
Field Ops
Marketing
Service CRM
Integrations & Apps
FloStack
Casa for Mobile
1. Feature Overview
Create and customize the homepage of the LeadSquared mobile application to reflect your business requirements. With the widgets available, you can –
- Create different homepages for different teams.
- Allow users to view their upcoming tasks for the day.
- Allow users to view a webpage (like a help site) without exiting the app.
- Add scouting forms on the homepage and allow users to view any form by just tapping an icon.
- Create shortcuts on the app using icons. For example, you can configure
 to direct users to the Lead List page.
Note:
- You can add a total of 5 sections and a total of 10 widgets within these sections.
- The date preference of the tasks and other filters can be applied by the user.
- Only
httpsURLs are accepted by Casa. - To learn how to customize your web application’s homepage with Casa, see Casa for Web.
2. Prerequisite
- You must be the Administrator of your LeadSquared account.
- This is a paid feature. To enable Casa, contact your account manager or reach out to support@leadsquared.com.
3. How It Works
- Create a Homepage – On the Casa page, create a homepage from scratch or by using the templates available. Add widgets to the homepage and configure them.
- Publish the Homepage – Publish the homepage or save it as a draft. While publishing, you can set the homepage as default and assign it to teams.
- View your Homepages – All the homepages you’ve created will be displayed on the landing page of Casa. You can edit or delete these homepages once you’ve created them. You can also view, edit and manage your templates on the Side Panel.
Note:
- The customized home page will be reflected in the mobile app of the teams you’ve assigned them to. You can also assign the same default homepage to all the users within that organization. If a team doesn’t have a particular homepage assigned to them, they will only be able to view the default homepage on the mobile app.
- You can create multiple homepages for the same team. A team can have a maximum of 4 homepages.
4. Build Your Mobile App Homepage
4.1 Create Your Homepage
To build your mobile app homepage from scratch –
- Navigate to Apps>Casa and click Create New.
- To add a new section in your Homepage, click Add New Section.
- Click on a section, navigate to the widget list, and click Add under the required widget.
- Configure the widget and click Save.
- Once you’re done customising your homepage, click Publish.
- To set this homepage as default, enable Set as default dashboard.
- To assign the homepage to specific teams, click Select Teams and then click on the relevant team. Click Publish.
4.2 Build Your Homepage Using a Template
- Navigate to Apps>Casa.
- On the side panel, click
 .
. - Select a template and click Apply.
- Make any customisations to the template, if necessary.
- Click Publish.
Note: All the homepage designs are autosaved.
5. Customize Themes
Personalize the LeadSquared Mobile App to align with your organization’s branding. Admins have the ability to customize the app’s primary, secondary, and neutral colors by entering specific hex codes, allowing for a unique and cohesive visual identity. Additionally, there are two predefined themes in green and orange available for quick customization. To make these changes,
- On your LeadSquared Web App, navigate to Apps>Casa>Theming.
- Select Custom from the list of themes.
- Enter the relevant hex codes for your primary, secondary and neutral colours.
- Click Apply to get a preview of the theme on the mobile screens shown on the page.
- Click Publish to apply this theme for all users across your organization.
You can reset the theme by clicking Reset and selecting another set of colours. When you Unpublish an existing theme, your application will revert to the default theme.
6. Create Announcements
Spotlight important messages to your users directly while logging in or launching the LeadSquared Mobile App. With the Announcement Widget, you can create and publish announcements from Casa web app settings. Here, you can add custom title, description, CTA button label, and an image. You can schedule the announcement and assign it to specific teams.
To create an announcement –
- Navigate to Casa>Announcements from your LeadSquared dashboard.
- On the Announcements page, click Create New.
- On the configuration page, enter –
- Display Name – The title of the announcement
- Description – The content of the announcement (include all details here briefly, within 1500 characters)
- Button Name – The CTA button
- Image – Add an image (optional)
- Start Date & End Date – The duration for which the announcement is to be displayed
- Display On – The schedule of the announcement (Login, Launch, Alternate Days, Weekly, Monthly)
- Once all the details are entered, click Save. You can reset the announcement whenever necessary.
Note:
- The current limit of announcements for an account is 25.
- Only one announcement can be published per team at a time (similar to Casa homepage configuration).
7. Sync your Mobile App
Once published, the customized homepage will be automatically displayed on the mobile app within 4 hours. You can also manually update the homepage on the mobile app –
- On the dashboard of the mobile app, tap
 .
. - Tap Sync.
8. Task Counter Widget
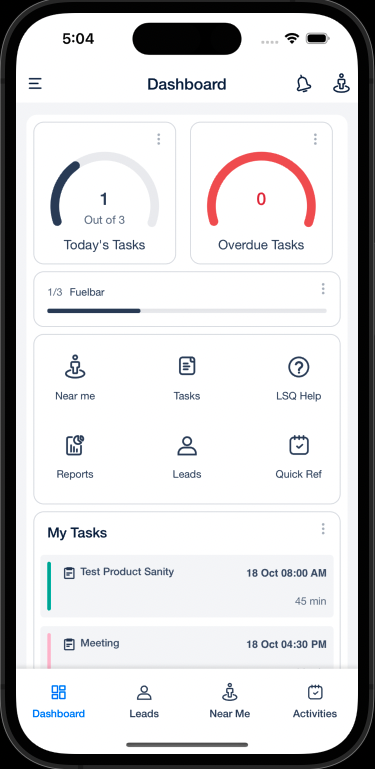
The Task Counter widget gives an overview of the user’s tasks, either completed and pending or overdue ones. It can be displayed as a speedometer, fuel bar or a numeric widget.
9. Task List Widget
The Task List widget lists the user’s immediate upcoming tasks (for example, an appointment or a follow-up call) which may include pending or overdue tasks. Users can view the top three upcoming tasks on the homepage along with the start time and duration of the tasks. Tapping on View More will direct the user to the task list screen with appropriate filters applied by the user.
10. Web View Widget
The Web View widget displays a web view of the target URL within the section in a standard or extended view.
11. Launcher Widget
Displays a maximum of 9 icons that quick launch items from the homepage. You can choose to display these icons in grid view or scroll view. The icons and the destination they lead to can be configured. There are more than 3500 different ways you can configure these icons. For example, you can configure![]() to direct users to the Lead List page. You can also configure an icon to navigate to a different website (like a helpsite).
to direct users to the Lead List page. You can also configure an icon to navigate to a different website (like a helpsite).
These default forms are now supported in the Launcher widget –
- Lead.
- Task.
- Activity.
- Opportunity.
- Accounts.
12. Banner Widget
Add banners (a carousel view of images) on the homepage to display company announcements or navigate users to internal or external destinations. You can choose the size of your banner image (standard or edge-to-egde).
These default forms are now supported in the Banner widget –
- Lead.
- Task.
- Opportunity.
- Accounts.
13. Lead Shortcut Widget
Add a shortcut to the Lead Details page of a list of Recently Added or Recently Modified leads. You can scroll horizontally to view the recent 10 leads in the list. To view more, on the mobile app –
- Click on any lead.
- Scroll to the bottom of the Lead Details page.
- Click >.
14. Lead List Widget
Add a list of leads on your homepage based on the selected lead fields to directly navigate users to the leads. Only the top three leads will be displayed on the homepage along with the number of leads in the list. The rest can be accessed by clicking the View More button. For example, you can add a list of leads in India and assign it to teams working exclusively in that location. Users can also call and find directions to the lead directly from this list.

15. My Opportunities Widget
This widget displays a count of all the open, lost, and won opportunities as well as those in a particular stage. Admins can configure the default Opportunity Type and Date Range for all the opportunities displayed on this widget. Users can also edit the Opportunity Type and Date Range on their homepage when required. Admins can select multiple opportunity types to be displayed to sales users.
16. Smart Views Counter Widget
With this widget, users can get an overview of the data count present in the smart views (for example, open opportunities for the day, new leads assigned for the day, etc.), which can include accounts, leads, opportunities, activities, and tasks. Based on the team you’re assigning this homepage to, you can assign the relevant smart views tab. You can also configure counter widgets for Mavis smart views.
Note: You can only add two tabs on your Smart Views Counter Widget.
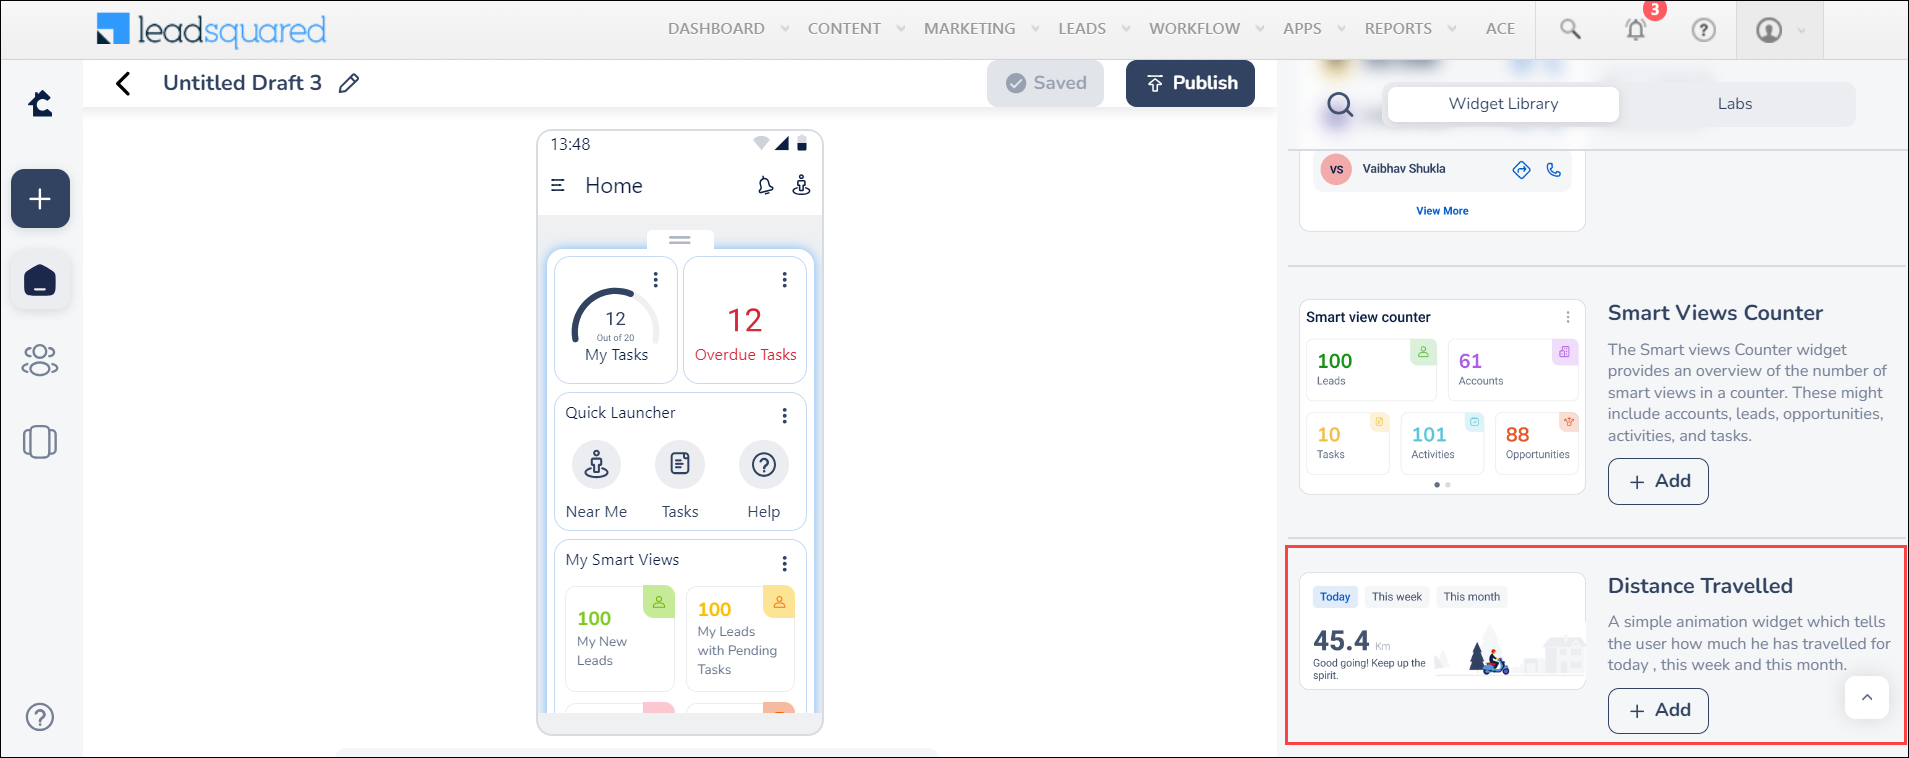
17. Distance Travelled Widget
Users can track the distance they have traveled over different timeframes (like yesterday, weekly, or monthly) using the Distance Travelled Widget. It helps users record how far they have travelled and stay informed about their travel habits and activities. The widget’s accuracy in distance tracking improves as users log more activities. Users can also navigate directly to the Field Force Insights Report by tapping on the distance displayed on this widget.
18. Task Counter 2.0 Widget
The Task Counter 2.0 widget provides a comprehensive view of all tasks within a selected date range, including both pending and overdue tasks. Offering greater functionality than the Task Counter Widget—which is limited to showing either completed and pending tasks or overdue tasks—it also supports display styles, such as numeric, donut and fuel bar.
19. Lead Metrics Widget
Track and analyse the leads added over time. Explore your lead count history, gain instant insights, and optimize your lead management strategies with the Lead Metrics widget in Casa.
20. Image Tiles Widget
The Image Tiles widget enables users to quick launch items from a predefined image layout. Users can upload images from the library and select the navigation destination of the image. With this widget, users can navigate to the relevant page (E.g., My Teams) within the app or even to external URLS upon tapping the image. However, certain selections may be hidden depending on the end user permissions. To add this widget –
- Under Image Tiles, click Add.
- To add your image, alongside Upload Image, click Add. Select the image from your device’s library.
- Position the image according to your preference.
- To reposition your image, click and drag it.
- To zoom into your image, hold and drag the Zoom slider.
- To rotate your image, click

- To change the image you’ve added, click

- To undo your last action, click

- To remove this widget after a specific period of time, under End Date, select your end date. If you don’t select an end date, this widget will be displayed till you remove it from the homepage.
- Under Navigate to, select the destination for this image. You can add an external URL here as well.
- To select the destination as an external URL, under External Link, click —–.
- A new Launch field will now be visible. Add your URL here.
- Click Confirm. Then, add more pictures, if needed, and click Save.
21. SIERA Widget
The SIERA WebView widget displays a web view of the SIERA webpages within the section in a standard or extended view.
22. User Check-In Status Widget
Sales group managers and Reporting managers can view user attendance with the User Check-in Status widget. You can see the total number of users who have checked in, checked out, and who have not checked in for the day. You can also configure this widget to further navigate to any report to gain detailed insights. This widget supports donut and fuelbar display styles.
Note:
- The widget will be hidden for Admin users unless they are a reporting manager for at least one user.
- Team member count displayed in the widget excludes the currently logged-in user.
23. Check In/Out Widget
Check in and out of the mobile app directly from your homepage. The Check In/Out Widget pinned to the top of your homepage reduces the time you spend on navigating through menus to perform the check-in action. If you haven’t checked in yet, a message will appear saying “You haven’t checked in yet”. Simply swipe right on the Check-In button. When your day ends, swipe left on the Check-Out button if you’ve already checked in. This will display your check-in time along with a live timer showing your checked-in duration. If you forget to check out the previous day, the widget will display your last check-in date and time, along with a running duration in a clear Day-Hr-Min format.
24. Edit Your Homepage
On the Casa landing page, click on the homepage you want to edit.
- On the top right corner of the widget, click
 .
.
- To edit your widget, click
 .
. - To delete your widget, click
 .
.
- To edit your widget, click
- To delete an entire section, drag the section to the bottom left corner of the screen.
- To rearrange the sections or widgets, drag them and drop them in the desired location.
- To preview the published homepage without the edits you’ve made, click
 .
. - To discard the changes you’ve made to the homepage, click
 .
.
25. Casa Landing Page
View all the homepages you’ve created (published, unpublished, and published homepages with unpublished edits) on the Casa landing page.
- In Teams View, homepages are arranged based on the teams they are assigned to. To open the Teams View, click
 .
. - To open the Dashboard View, click
 .
. - To star any homepage, on its name block, click
 .
. - On the Teams View, drag and drop homepages to rearrange their order.
- To view the actions you can perform on the homepages, click
 . You can clone, publish/unpublish, or unassign the homepages.
 - On the top right corner of the screen, click All dropdown, and select Favourite, Published or Unpublished homepages to be displayed.
- To arrange the homepages based on Alphabetical order or date of modification (Recently Modified), click the dropdown on the top right corner of the screen and select the order.
26. Side Panel
While creating or editing a homepage, a side panel will be displayed on the left side of the page. On the panel –
- You can view other homepages side by side for reference while creating your homepage. To view all the homepages you’ve created (published, unpublished, and published homepages with unpublished edits), click
 . This window lets you perform all the actions available on the landing page (for example, assign teams, star leads, etc.). By clicking on any homepage, a preview of the homepage will be displayed along with a note of all the widgets used. You can also navigate to the Casa landing page directly from this window by clicking on
  . As you are redirected to the landing page, the homepage you’ve been working on will be saved as a draft.
 - To view templates for the homepage, click .
- To view the editing page again, click
 .
. - To customise the side and bottom navigation bars on the mobile app, click
 .
.
27. Menu Builder
You can customise the tabs displayed on the side and bottom navigation menu on the mobile app using Casa’s menu builder. You can also create custom tabs on these menus for team-specific requirements.
27.1 Create a Menu
- On the side panel of the Casa landing page, click . Then, click Create New.
- On the right side of the page, you can choose to add tabs in the bottom or side navigation menu.
- To add tabs to the mobile app’s navigation bar, alongside the default/available menu tabs, click
 .
. - To remove a tab from the navigation bar, alongside the visible tab, click
 .
. - To create custom tabs –
- Under Visible Menu Tabs, click Create New Tab.
- On the Configure Custom Tab pop-up, enter the relevant details (i.e., label, icon, and navigation). You can configure this tab to navigate to an external link as well.
- Once you’ve created the custom tab, under Custom Menu Tabs, alongside the tab you’ve created-
- To add the tab to the side menu, click .
- To edit the tab, click
 .
. - To delete the tab, click
 .
.
- To add the tab to the side menu, click
- To rearrange the tabs, drag and drop them in the desired order.
- Once you’re done building the menu, click Publish. Enter the menu title and assign it to teams.
27.2 Actions on Menu Builder
On the Menu Builder page, you can view a list of all the published and unpublished menus you’ve created.
- Alongside a menu, under Teams, click on the data displayed to view or edit the team you’ve assigned it to. To set this menu as the default tab, enable Set as default menu.
- To edit a menu, alongside the relevant menu, click .
- To clone, delete, or unpublish a menu, alongside the menu, click and select the relevant option.
28. Configure the Lead Details Page using Lead 360
Lead 360 allows you to fully customize the Lead Details Page on the LeadSquared Mobile App, giving users a complete and visually organized view of each lead’s journey. This feature lets admins:
- Design layouts using either classic tabs or widget-based landing pages
- Configure a Quick View Card with identifiers, fields, and quick actions
- Set up an Actions Panel for instant engagement options like calls, emails, or WhatsApp.
You can preview layouts in real time, publish them as defaults, or assign them to specific teams, ensuring that field users get quick access to the most relevant lead data in a format tailored to their business needs.

29. Experiment with Upcoming Widgets
You can view a list of the upcoming widgets on Casa for the next quarter and preview them.
- To view the upcoming widgets, on the top right corner of the page, click
 .
. - To preview any of the widgets, below the relevant widget, click Preview.

Any Questions?
We’d love to answer your questions or hear your own unique use cases. Feel free to share your experiences in the comments section below.