


Get Started
Sales Suite
Field Ops
Marketing
Service CRM
Integrations & Apps
FloStack
Opportunity Mapping in Converse
1. Feature Overview
LeadSquared’s Opportunities feature can be used to manage your potential deals. On LeadSquared Converse, Opportunities in the form of incoming messages can be automatically routed to the respective Opportunity Owners, Chat Groups, or specific users.
In this article, you will learn how to set up Opportunity mapping on Converse, and how to route those Opportunities to the correct users in your account.
2. Prerequisites
- You must be the Administrator of your account.
- You must have LeadSquared Converse enabled in your account. To enable Converse in your account, please reach out to your account manager, or write to support@leadsquared.com.
- You must have LeadSquared Opportunities enabled in your account. To enable Opportunities in your account, please reach out to your account manager, or write to support@leadsquared.com.
- You must integrate LeadSquared’s WhatsApp connector with Converse.
3. How it Works
- Create a routing rule that will route the incoming Opportunities to an Opportunity Owner; or a Chat Group, Admin, or Specific user, if the Opportunity Owner is unavailable.
- Map an Opportunity Type to your Business Number, configure auto responses for the incoming message, and apply a relevant routing rule from the previous step.
3.1 Example Use Case
This example illustrates the Opportunity mapping feature on Converse. We will use a similar example in this article –
| Industry | Use Case |
| Education | A student enrolled in a graduate computer course at a particular university also shows interest in a postgraduate course in AI or Data Science. The courses the student has shown interest in are Opportunities. When the student enquires about these Opportunities on Converse, they will be routed to the relevant Opportunity Owner or Chat Group based on your Converse Opportunity settings. |
4. Routing Management
Routing management will route the Opportunity to the relevant Opportunity Owner or to a Chat Group, Admin, or Specific User.
4.1 Chat Group Settings
You can create multiple chat groups in your account. Incoming Opportunities can be assigned to these users in a round-robin manner. For example, we can create two Chat Groups, one to receive Opportunities for AI courses and the other to receive Opportunities for Data Science courses, both under the Postgraduate Course Opportunity Type.
- Navigate to My Profile>Settings>Converse, and select Chat Group Settings.
- Click on + Add a New Group.
- Assign a set of users to this group.
- Enter a Group Name and Group Description.
- Click Save.

4.2 Configure Routing Management
- Navigate to Settings>Converse Settings>Routing Management.
- On the Routing Management page, click + Add New Rule.
- Enter a Rule Name.
- Select your routing preference –
- Default Routing – When there is an incoming Opportunity, the lead will first be routed to this user/group. For example, if the customer chooses an existing opportunity, through the default rule, you can route it to the opportunity owner.
- Fallback 1– When the user/group in default routing is unavailable, the Opportunity will then be routed to the Fallback 1 user/group. For example, if the customer chooses a new Opportunity (there’s no Opportunity Owner associated), the Opportunity can then be routed to a Chat Group (we have selected the Chat Group created in section 4.1), where it will be assigned to a user via round-robin.
- Once done, click on the
 icon.
icon.

5. Opportunity Mapping
Map incoming messages for the Opportunity Type to the relevant Business Number. You can configure auto-responses when the lead sends a message. Lastly, we will apply the routing rules to route each Opportunity to the correct user/chat group.
5.1 Connect to Opportunities
Here, you can connect different Opportunity Types to your Business Numbers. For example, you can map the Opportunity Types Postgraduate Course and Undergraduate Course to a single business number, and map an Opportunity Type Education Loan to a separate Business Number.
In our example, we will be mapping the Postgraduate Opportunity Type to a Business Number. Further, under the Postgraduate Opportunity Type, we will select only AI and Data Science course enquires to be routed to this number.
- Navigate to My Profile>Settings>Converse, and select Number Rule Mapping.
- From the Select Mapping Type to Continue dropdown, select Map to Opportunity.
- Click on Map Opportunities.
- On the Connect to Opportunities step, select a Business Number.
- Map an Opportunity Type to this Business Number.
- Further, you can also specify the Opportunity Fields (of dropdown datatype) and Opportunity Value(s). For example, If the Opportunity Type is Postgraduate Courses, and you have multiple listed courses, you can specify which ones will be routed to the Business number.
- Click Next.
5.2 Set up Autoresponses
Autoresponses are WhatsApp messages sent to your leads that present them with a list of options (Opportunities) to choose from. They allow leads to raise new inquiries (create new opportunities) or discuss an existing opportunity.
There are 3 settings to select and configure in this step –
- Creates New Opportunity – When a lead without existing Opportunities sends an incoming message, this option will automatically create a default Opportunity Type you have selected.
- First Response Message – The First Response Message shows a list of Opportunities for the lead to select. The lead can engage to specify which Opportunity they are interested in, and based on their response, they will be routed to an appropriate user.

- Second Response Message – The Second Response Message is useful when a lead with multiple existing Opportunities sends an incoming message. After the lead makes a selection in the First Response Message, the Second Response Message will trigger so the lead can specify which existing Opportunity they want to discuss. Or, they can choose to enquire about something else. Based on their response, they will be routed to the Opportunity Owner, or a specific user. In the example below, the Second Response Message shows a list of existing Opportunity Owners the lead can choose from.
5.2.1 Creates New Opportunity
When a lead without existing Opportunities sends an incoming message, this option will automatically create a default Opportunity Type you have selected.
In our example, when a lead sends an incoming message we will automatically create a Postgraduate Opportunity Type against the lead.
- Select Creates New Opportunity.
- Select the Opportunity Type that must be created under Select Default Opportunity Type.
5.2.2 First Response Message
If configured: When a lead sends an incoming message, the First Response Message will trigger and ask the lead to select from a list of Opportunities. Based on the selection, the lead will be routed to the appropriate user or chat group.
In our example, when a lead sends an incoming message, they will be asked to choose between an AI postgraduate course or a Data Science postgraduate course.
Note:
- If you select Creates New Opportunity (refer to section 6.2.1) and also configure the First Response Message, then an Opportunity will be automatically created based on the Opportunity the lead has selected in the First Response Message instead of the Default Opportunity Type.
- If Creates New Opportunity is not selected, and the First Response Message is configured, then the user will have to manually create the Opportunity against the lead.
- Click on the
 icon to configure the First Response Message. A preview of your First Response Message will be displayed on the right-side panel.
 - Display option as –
- List – Select this option if you want the quick responses (Opportunities) to be displayed as a list that is selectable.
- Add list header – Enter the header name for the list.
- Button – Select this option if you want the quick responses (Opportunities) to be displayed as button(s) that are clickable. You can only accommodate 3 quick responses. For more than 3 responses, the display option will change to a List view.
- List – Select this option if you want the quick responses (Opportunities) to be displayed as a list that is selectable.
- Add Message –
- Message Header – Add a header for your message, this step is optional.
- Message – Add a message.
- Message Footer – Add a footer for your message, this step is optional.
- Add Quick Responses – Once configured, Opportunities mapped with the Business Number (refer to section 6.1) will be listed as quick response options.
- Click on + Add Responses.
- From the drop-down, select the fields to be mail-merged.
- Add “Other queries” as an action – If you select this option, an additional quick response will be added. This can be selected by leads who cannot find the product they are looking for. You can create a specific routing rule for these leads to be routed to a different user/Chat Group (refer to section 5).
- Option Label – You can edit the text for the additional quick response.
5.2.3 Second Response Message
The Second Response Message will trigger in the following case –
If the First Response Message is configured, and a lead with multiple existing Opportunities sends an incoming message, the First Response Message will trigger first. Once the lead submits a selection, the Second Response Message will trigger. Here, the lead can specify which one of the multiple existing Opportunities they want to discuss.
For example, if a lead has 3 existing Opportunities (one for himself, and two others for his siblings), and the lead selects AI in the First Response Message, then in the Second Response Message, he can specify if he wants to discuss his existing Opportunity, or the existing Opportunity of one of his two siblings.
The configuration for the Second Response Message is similar to the First Response Message (refer to section 6.2.2), but with an additional setting –
- New Opportunity – This setting allows the lead to enquire about a different product apart from their existing Opportunity.
- Edit Label – Enter a quick response label for the New Opportunity.
Once you are done configuring the Set up Autoresponses section, click Next.
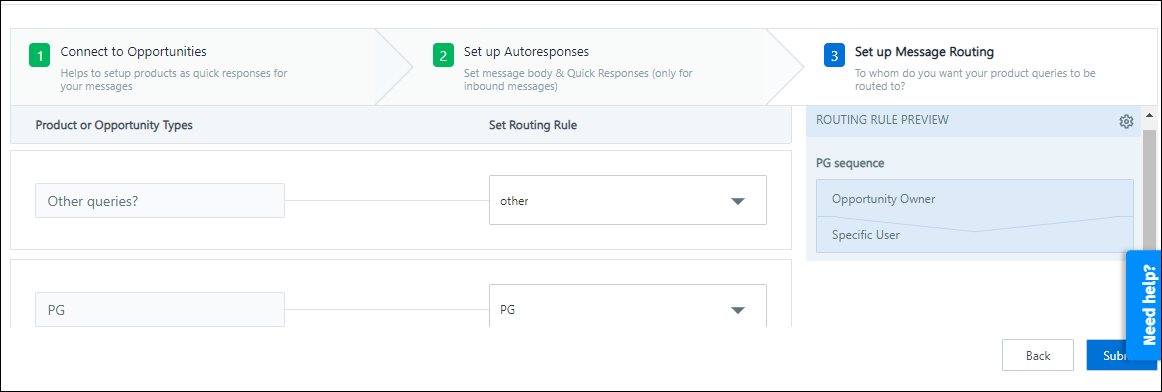
5.3 Set up Message Routing
In this step, you can route each Opportunity to the respective user(s). Under the Set Routing Rule dropdown, select a rule for each Product or Opportunity Types (these rules were created in section 5). Once done, click Submit.
Any Questions?
Did you find this article helpful? Please let us know any feedback you may have in the comments section below. We’d love to hear from you and help you out!