


Get Started
Sales Suite
Field Ops
Marketing
Service CRM
Integrations & Apps
FloStack
Publisher Connector & Publisher Portal
1. Feature Overview
Education institutions and publishers can use LeadSquared to maintain transparency on lead delivery and track leads in real-time. There are two features available –
- The Publisher Connector gives education institutions a dashboard to view and compare the performance of different publishers.
- The Publisher Portal helps publishers analyze the outcomes and real-time statuses of leads delivered to different educational institutions.
2. Publisher Connector
If you’re an educational institution with a LeadSquared account, you can download the Publisher Connector from the Apps Marketplace. You’ll get access to a similar dashboard where you can monitor the performance of your associated publishers –
2.1 Prerequisites
- This feature isn’t available by default. To enable it, please reach out to your account manager, or write to publisher.support@leadsquared.com.
- You must be the administrator of your LeadSquared account to install and configure this connector.
- The Publisher Connector will work as intended when colleges use student portals powered by LeadSquared. To know more, please refer to Portal Management – Feature Guide.
- You can enable the Enable Portal Publisher Tracking setting to track the applicant’s journey. This step is optional. To enable this –
- Navigate to Workflow>Manage Forms.
- You can build a new form from scratch, or edit an existing form.
- On the Forms Designer, click the
 icon to open the settings menu.
 - Here, enable the Enable Portal Publisher Tracking setting.

2.2 Installation
- From the main menu, navigate to Apps>Apps Marketplace.
- Search for Publisher Connector, and click Install.
- Alternatively, you can find the connector on the left panel, under Publisher.
2.3 Configuration
Once the connector is installed, hover your cursor over ![]() , and click Configure.
, and click Configure.
Manage Publishers
- On the Configure Publisher Connector pop-up, from the list of available publishers, Select Publishers who can access and push lead data to your account.
- Alongside the publishers you’ve selected, to configure lead limits and permissions, click
 . This step is optional.
- Lead Push Settings – To Allow Lead Push via Publisher API, enable the
 slider. Once enabled*, publishers can send leads using the Publisher API.
- If the slider is enabled, you can set limits on the maximum number of leads publishers can send in a day through the Publisher API. If you choose to leave the field empty, then no limits are set on the number of leads the publisher can push. Once you enter the lead limit, click Save.
- Permissions – Configure the following permissions –
- Allow Viewing of Sensitive Information of leads – To allow your publishers to view your lead’s email Id and phone number lead fields, enable the slider.
- Allow Export of Lead Details – To allow your publishers to export leads out of the Publisher Portal, enable the slider.
- Once you’re done, click Save.
- Allow Viewing of Sensitive Information of leads – To allow your publishers to view your lead’s email Id and phone number lead fields, enable the
- Column Sharing – To allow your publishers to view the following lead columns on the Publisher Portal, alongside the relevant column, enable the slider –
- Priority
- Campus
- Lead Stage
- Remarks
- To Apply this settings for all selected publishers, enable the
 checkbox.
 - Once you’re done, click Save.
- Lead Push Settings – To Allow Lead Push via Publisher API, enable the
Note:
- *When this setting is disabled, publishers will not be able to push leads through the Publisher API.
- The Allow Lead Push via Publisher API setting does not affect leads that are sent through other sources (such as Landing Pages, LeadSquared Portals, etc.).
- Based on your LeadSquared plan, there are rate limits imposed on the number of API calls you can make. To know more, refer to LeadSquared Rate Limits.
- It’ll take 24-hours for the lead limit on the Publisher API to become live.
Map Fields
- After you select the publishers, navigate to the Map Fields tab. Here, to capture a lead’s Cours, Priority, Campus, City, State and Remarks fields, map these to the corresponding LeadSquared lead fields. If a corresponding field doesn’t exist in your LeadSquared account, we’d recommend you Create a Custom Lead Field to capture this information.
- Once you’re done, click Save Mapping.
- No further action is required from your end. You can now track the lead data pushed by your publishers.
2.4 View Lead Data
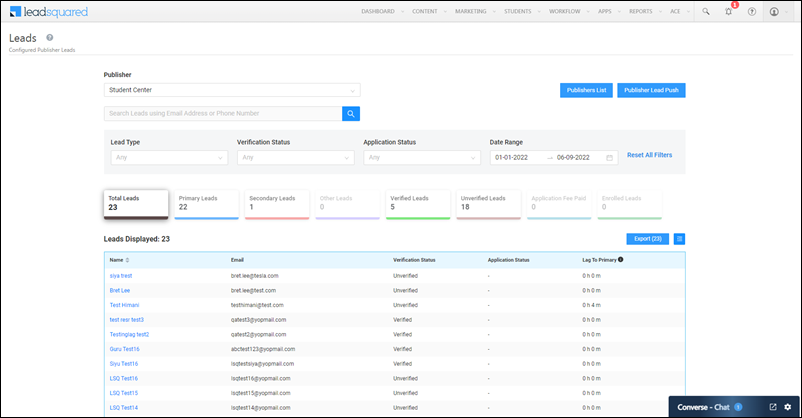
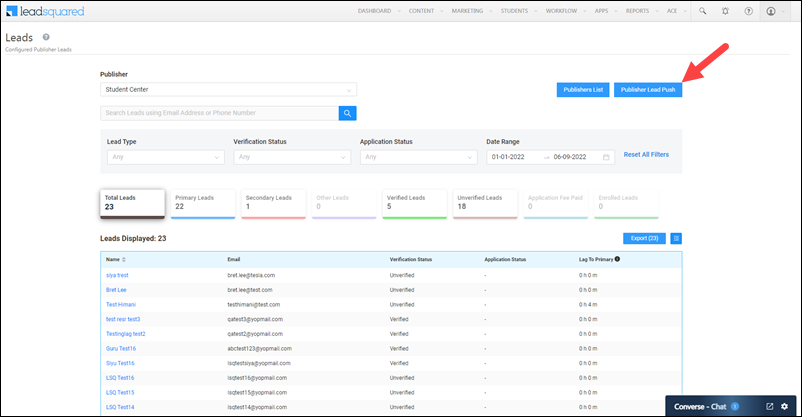
Once you’ve installed and configured the connector, you can now view the leads pushed by each publisher. To view the lead data, navigate to Apps>Publisher Leads.
On this page, you can perform the following actions –
- Publisher – Select the publisher whose data you want to view, from where the leads have been pushed.
- Lead Type – Filter by the lead type that’s been pushed to your account (Primary, Secondary, or Others).
- Verification Status – Filter by the verification status (Verified, Not Verified) of the leads that have been pushed to your account.
- Application Status – Filter by the lead’s student application status (Application Initiated, Enrolled, etc.) on your portal.
- Date Range – Filter by the date range for which you want to view the lead data. By default, the last 30-days are displayed.
- Export Leads – To export the leads as a CSV file, click Export Leads, and once the file is rendered, click Download.
Publisher List – Click here to view a report that displays the total number of leads sent by each publisher.
- To render the numbers as a percentage, alongside Show Percentages, enable the
 slider.
 - To change the time frame of the list, use the date interval dropdown present alongside Export.
- To export the list as a CSV file out of LeadSquared, click Export, and once the file is rendered, click Download.
Publisher Lead Push
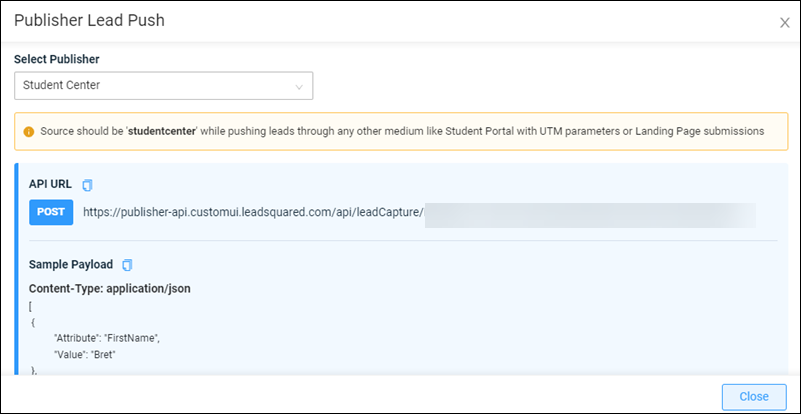
To share the API details with your publishers on how to push leads, click the Publisher Lead Push button.
The API details will appear on the pop-up. From the drop-down, select the publisher with whom you want to share the API details. The API URL will change accordingly. Copy the URL and share it with your publisher.
3. Publisher Portal
If you’re a publisher, you can log in to the portal using the URL and credentials provided to you. For more details, contact your account manager or write to publisher.support@leadsquared.com.
3.1 Push Leads
For details on how to push leads to the education institution, click the How to Push Leads button.
The API details will appear on the pop-up. From the drop-down, select the education institution to push leads to. The API URL will change accordingly. Copy the URL and ensure that the POST HTTP method is used while calling the URL from your system/application.
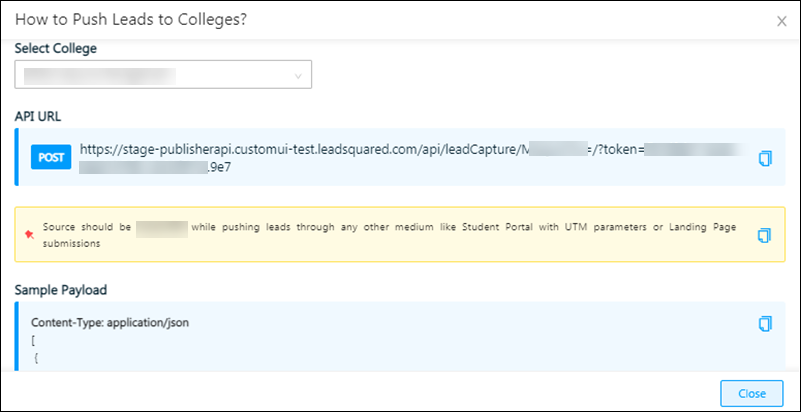
In the JSON payload, pass the lead details of the leads as attribute-value pairs, where –
- Attribute – Schema name of the Lead field. To get the Schema name for all Lead fields, use the LeadsMetaData API.
- Value – Value assigned to the given attribute.
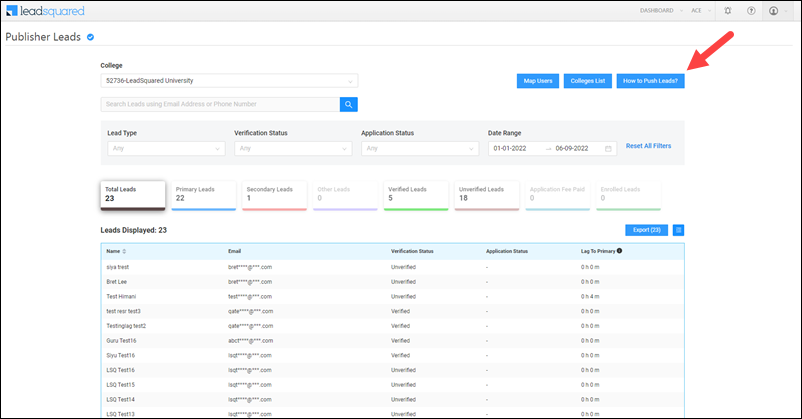
3.2 View Lead Data
Once you’ve installed and configured the connector, on the dashboard, you can now view the lead data that’s captured. On this page, you can apply the following filters when viewing your leads –
- College – Select the education institute to which the lead data has been pushed.
- Lead Type – The lead type that’s been pushed to the college (Primary, Secondary, or Others).
- Verification Status – The verification status (Verified, Not Verified) of the leads that have been pushed to a college.
- Application Status – The lead’s current application status (Application Initiated, Enrolled, etc.).
- Date Range – The date range for which you want to view the lead data. By default, the last 30-days are displayed.

3.3 Export Lead Data
To export lead data, click the Export button, and once the export file is ready, click Download.
3.4 Map Users
By default, only Admin users can view and access the Publisher Portal. Through the Map Users setting, Admins can give permissions to other user roles to view the student data pertaining to specific colleges in the Publisher Portal. To do this –
- Click the Map Users button.
- Alongside the user you want to whom you want to give permission to view the Publisher Portal, click
 .
. - From the list of colleges, select the colleges for which you want to give the view permission.
- Once you’re done, click Save.
3.5 College Lists
To view the report that displays the total number of leads sent to each college, click the Colleges List button.
- To render the numbers as a percentage, alongside Show Percentages, enable the slider.
- To change the time frame of the list, use the date interval dropdown present alongside Export.
- To export the list as a CSV file out of LeadSquared, click Export, and once the file is rendered, click Download.

Any Questions?
Did you find this article helpful? Please let us know any feedback you may have in the comments section below. We’d love to hear from you and help you out!