


Get Started
Sales Suite
Field Ops
Marketing
Service CRM
Integrations & Apps
FloStack
Distance Travelled Report
1. Feature Overview
Track and monitor the distance travelled (in kilometres or miles) by your field sales users on any particular day. The distance travelled is calculated based on the check-in/check-out activities, and location coordinates identified by the LeadSquared Mobile App. Admins and Sales Managers can also apply filters on the report and export data.
2. Prerequisites
- You must have the LeadSquared Mobile app installed on your device, and location permission access must be enabled. To know more, please refer to Location Tracking on LeadSquared Mobile.
- Enable Location Insights on your account. To do so, contact your account manager or write to us at support@leadsquared.com.
- Admins must enable location tracking permissions for their users. To do so, navigate to Settings>Mobile App>Permissions. Under Location Tracking, enable all the permissions.
- Enable user check-in in your account for location tracking and distance calculation. To do so, navigate to Settings>Users and Permissions>User Check-in and enable the Show check-in widget to web users setting.
- All mobile users must Check-In/Check-Out daily for the system to effectively track their location and calculate the distance travelled during the day. Distance calculation will not be initiated for the day if the mobile user has not checked in.
- To get data with highest location accuracy, refer to
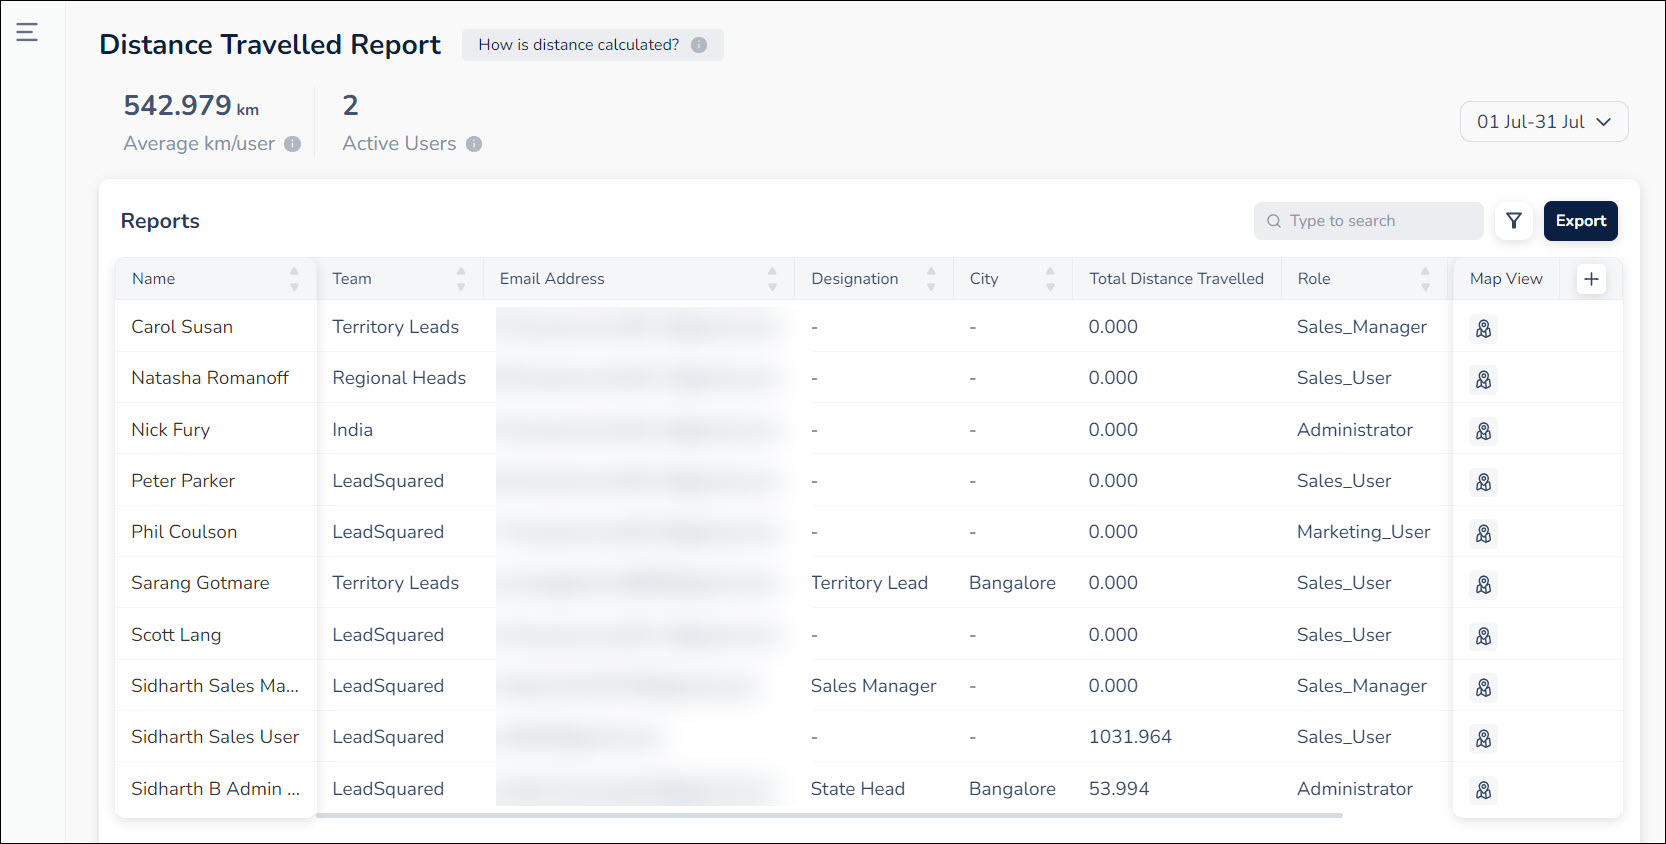
3. Distance Travelled Report
To view the Distance Travelled Report, navigate to Reports>Reports Home>Field Sales Tracking>Distance Travelled Report. On this page, based on your user role and organisational hierarchy, you can view the list of users and their corresponding distance travelled during the specified date range.
- To edit the date range, above the list of users, click on the date dropdown and select the relevant date range. You can also create a custom date range here.
- To add and/or reorder columns, alongside the column headers, click
 .
. - To find a specific user, enter the user’s name or email ID on the search bar.
- To view a user’s location history, alongside the user name, click
 .
. - To filter the report by teams or sales groups, click
 .
. - To export the report, on the top right side of the page, click Export. The data available for the selected date range will be exported in CSV format.
Note:
- To view a user’s location history, you must select a specific date in the date range.
- Distance calculation will not be initiated for the day if the mobile user has not checked in.
- Sales Users cannot export the distance travelled report or perform any search/filter-related operations on the report.
- The Distance Travelled Report cannot be accessed on mobile.
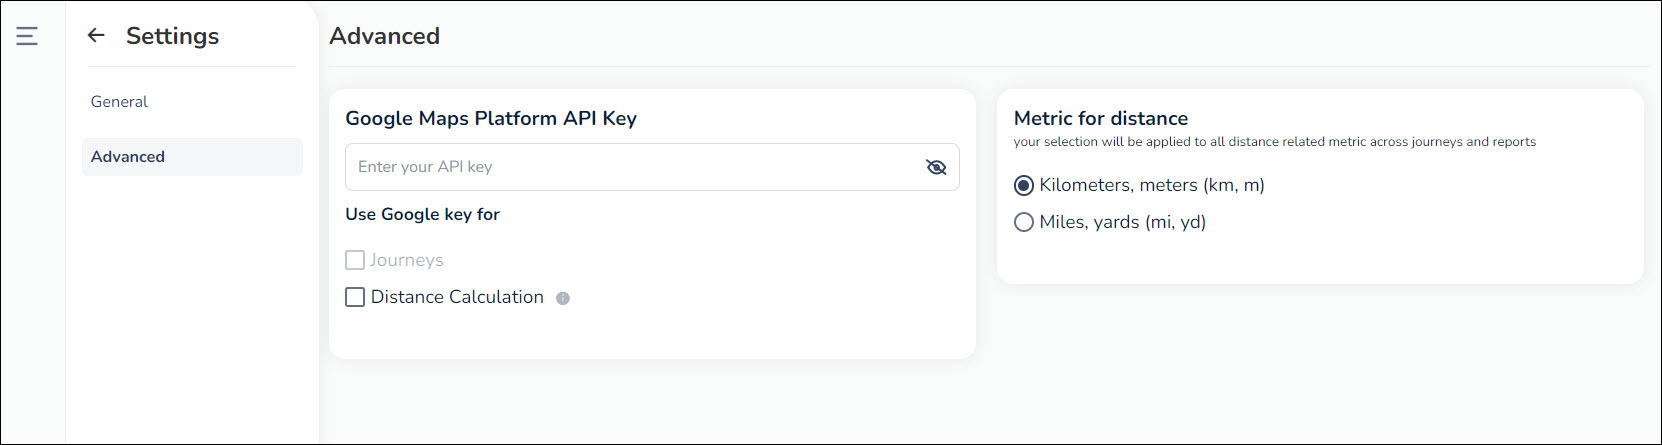
4. Settings
To view the settings, on the bottom left corner of the page, click ![]() . On this page, you can configure the following advanced setting –
. On this page, you can configure the following advanced setting –
- Metric for distance – You can set the metric for distance as Kilometres and metres (km, m) or Miles and yards (mi, yd). Your selection will be applied to all distance related metric across journeys and reports.
Note:
- LeadSquared’s Proprietary Distance Computation Algorithm (Recommended) utilizes location coordinates from the mobile device of a checked-in user to estimate the distance travelled fairly accurately for any given day.
- The Google Direction Maps API records the latitude and longitude coordinates and returns the distance travelled by your users, by assuming a specific path of travel.
Any Questions?
We’d love to answer your questions or hear your unique use cases. Feel free to share your experiences in the comments section below.
as i can see both active and inactive users in DTR report, how can i segregate them , how do i find out which user is active and odd one out?
Hello, Athira.
Segregating active and inactive users is a feature that’s currently unavailable. To raise a feature request, please reach out to support@leadsquared.com