


Get Started
Sales Suite
Field Ops
Marketing
Service CRM
Integrations & Apps
FloStack
Ticket Creation Channel – Email
1. Feature Overview
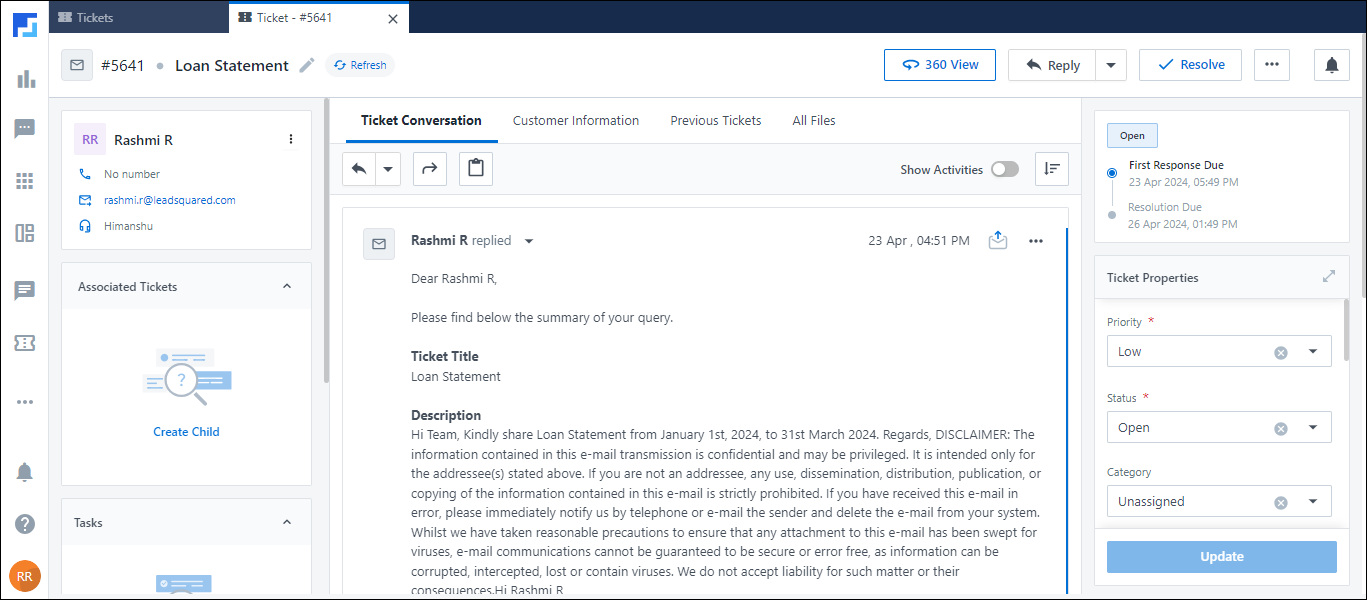
In LeadSquared’s Service CRM, customers can raise tickets through various channels, such as Email, Chat, Calls, Social Media, Portals, etc. This article focuses on Emails.
When a customer writes to the email IDs configured in Service CRM, this is automatically captured as a ticket in your LeadSquared account.
Once a ticket is created, you can set up assignment rules to automatically assign these tickets to your agents. Group Managers can also manually assign them to the agents in their groups. Once assigned, agents can work on resolving the tickets. Agents can reply to your customer’s emails directly from your LeadSquared account, by either typing out the responses or using our Quick Reply feature.
2. Prerequisites
- Service CRM is a paid feature. To enable it, contact your account manager, or write to scsupport@leadsquared.com.
- You must be a Service CRM Admin to configure emails in your account.
3. How it Works
This feature automatically captures inbound emails as tickets in your LeadSquared account.
- In the first step, select the method you want to use to capture emails as tickets in your account –
- Auto-forwarding – Set up an auto-forwarding rule in your email account to send inbound customer emails to the LeadSquared email ID generated during configuration. Once we receive this email, a corresponding ticket is created.
- OAuth – This lets you integrate your Gmail or Outlook account with LeadSquared. Once integrated, all inbound emails received on these accounts will be created as tickets.
- Once you’ve completed the setup, send a test email to check if the tickets are getting captured successfully in LeadSquared.
- In the final step, complete the following Advanced Configurations –
- If you’ve set up auto-forwarding, CNAME records are generated. Add these to your organization’s email domains. This is mandatory to ensure the emails you send always end up in your customer’s inbox.
- Ensure the email signature is updated. This will be used on outbound emails.
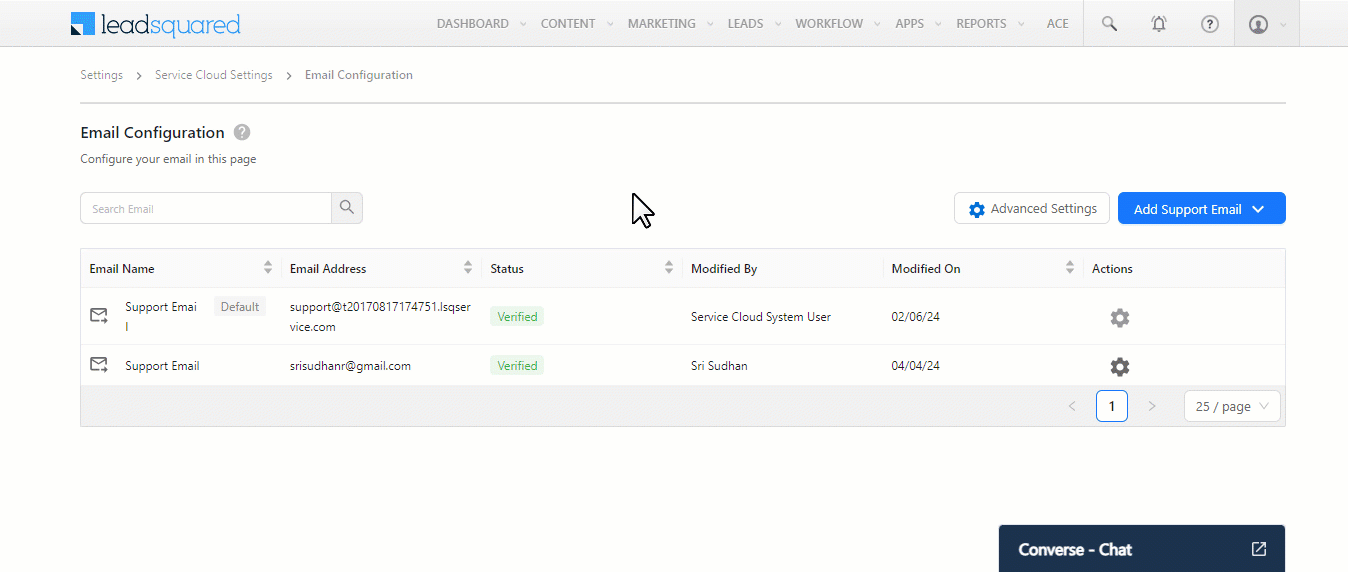
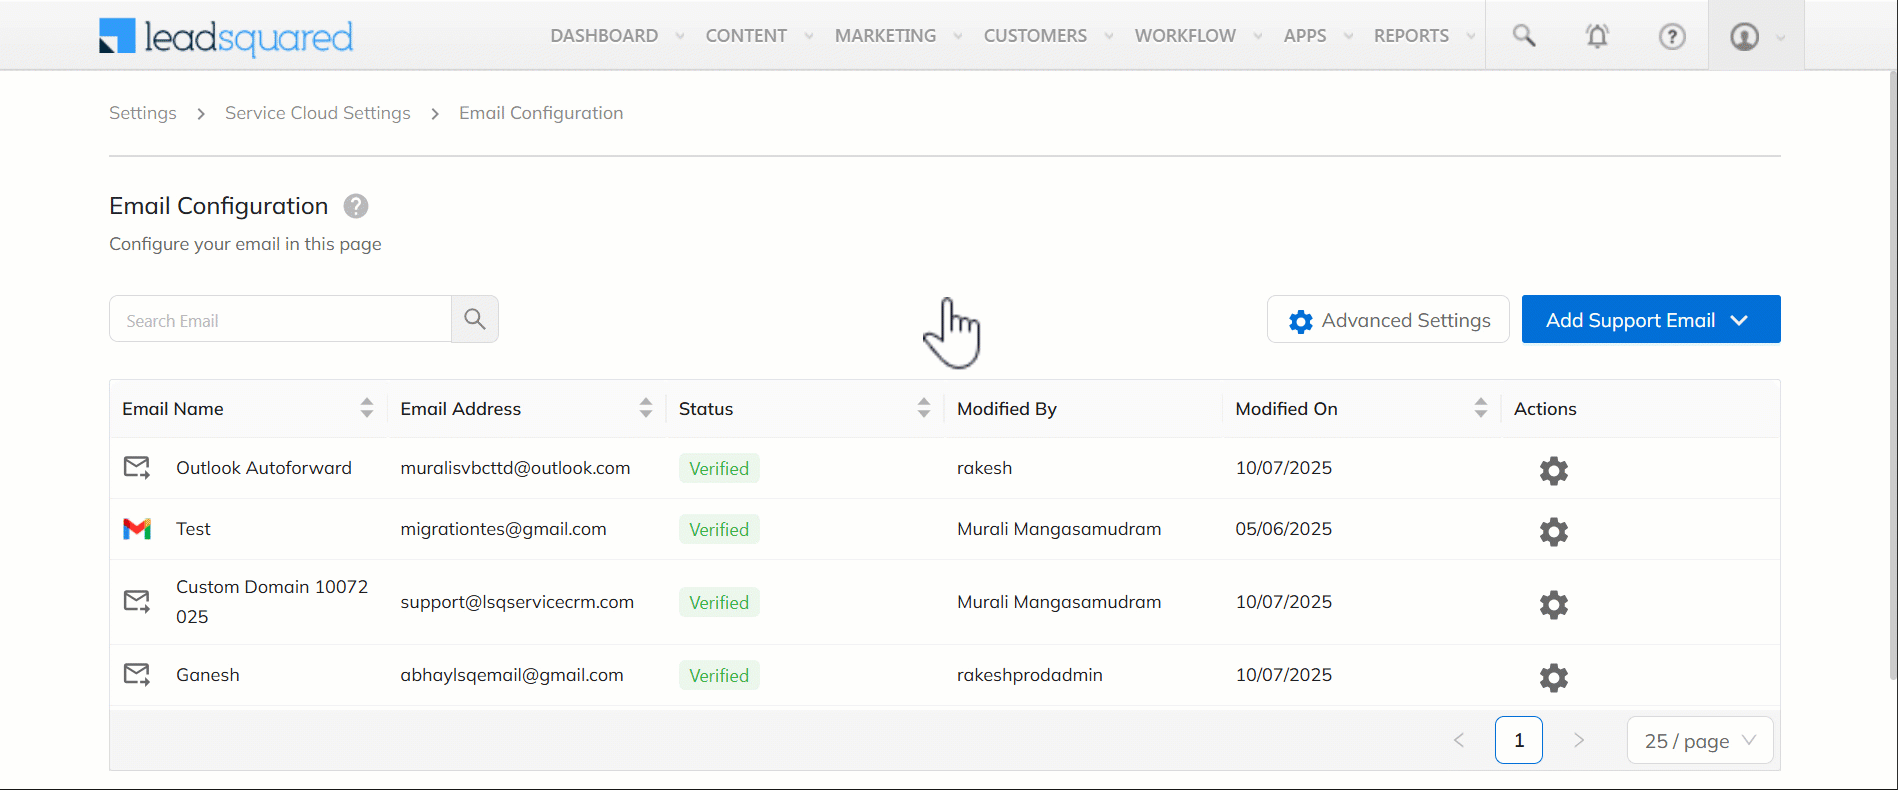
4. Email Configuration
By default, a support email address is automatically created in your account. You can share this email ID with your customers, and whenever they write to it, a ticket is automatically created in LeadSquared. However, if you want to create custom email IDs, that include your business’s email domains, this section will help you achieve that.
Once you log in to LeadSquared (https://in21.leadsquared.com/), to configure the support email in your account –
- Navigate to My Profile>Settings>Service Cloud.
- On the Service Cloud Settings page, under Channel Configurations, click Email.
- On the Email Configuration page, click the Add Support Email button. You can further choose to go with –
- By Auto Forwarding – Set up a rule to capture inbound emails as tickets in your LeadSquared account.
- By OAuth – Integrate your Gmail or Outlook email account with Service CRM.
4.1 Auto Forwarding
When you select this option, add the email IDs (e.g., support@whogg.com) on which you’ll receive customer emails. LeadSquared now generates a new email ID (e.g., gmailcomsupport@scprodtest6.lsqservice.com). Copy this email ID and use it to set up an auto forwarding rule in your email provider’s account (support@whogg.com in our example). Once the rule is set up, emails are automatically forwarded to the new LeadSquared email ID, creating tickets in LeadSquared –
- On the Email Configuration page, hover your cursor over the Add Support Email button, and click By Auto Forwarding.
- On the Add Support Email: Auto Forwarding page, enter the –
- Name – The name entered here is displayed on the outbound emails sent to your customers. For example, if you enter “Support Email”, when you reply to your customer from the email account you’re linking with LeadSquared’s Service CRM, the sender will be shown as “Support Email”.
- Email Address – Enter the email ID (e.g., support@whogg.com) from which you want to capture customer emails.
- Once you’re done, click Save and Verify.
- Alternatively, you can click Save, but this will not complete the configuration. You must revisit the verification steps listed below later. Emails will be auto-forwarded to the LeadSquared email account only after completing the verification.
- On the Verification pop-up –
- Copy the email ID that’s generated, and use it to set up an auto-forward rule in your email account.
- To set up an auto-forwarding rule in your Outlook account, refer to Turn on automatic forwarding in Outlook.
- To set up an auto-forwarding rule in your Gmail account, refer to Automatically forward Gmail messages to another account.
- Once the rule is set up, click Next.
- On the Verification tab, once verification is successful, click Next. In this step, no other action is required from your end, as we’ll be carrying out the verification from our backend.
- On the Complete Forwarding tab, once we’ve successfully received the test mail, click Close. In this step, no other action is required from your end, as we’ll be carrying out the verification from our backend.
- This step will only show up when you’re adding a Gmail account.
- Once the setup is complete, we suggest you send a test email to your email ID and verify if the ticket is successfully created, as shown in the GIF below.
- Copy the email ID that’s generated, and use it to set up an auto-forward rule in your email account.
After you’ve successfully set up auto-forwarding, ensure you verify your email domain. This step is mandatory to ensure the emails you send always end up in your customer’s inbox folder (and not junk or spam folders).
Note:
- If a customer sends an email from an email ID that’s not present in your LeadSquared account (as a lead), a new lead is automatically created with the customer’s details, and the ticket is tagged to this lead.
- If multiple leads are created in your account with the same email ID, the ticket will be posted on the lead created most recently.

4.2 OAuth
This method lets you integrate your Gmail or Outlook account directly with Service CRM. Once you’ve integrated your account, all inbound emails received on this account will get created as tickets in LeadSquared. To integrate your account –
- On the Email Configuration page, hover your cursor over the Add Support Email button, and click OAuth.
- On the Add Support Email: OAuth page, enter the –
- Name – The name entered here is displayed on the outbound emails sent to your customers. For example, if you enter “Support Email”, when you reply to your customer from the email account you’re linking with LeadSquared’s Service CRM, the sender will be shown as “Support Email”.
- Email Service – Select which email provider you want to integrate between Outlook and Gmail, and click the Sign in button.
- Once you’re done, click Save.
- Once the setup is complete, we suggest you send a test email to your email ID and verify if the ticket is successfully created, as shown in the GIF below.
5. Advanced Settings
After setting up an auto-forward rule or OAuth email integration, complete the following additional settings to ensure the email feature works seamlessly –
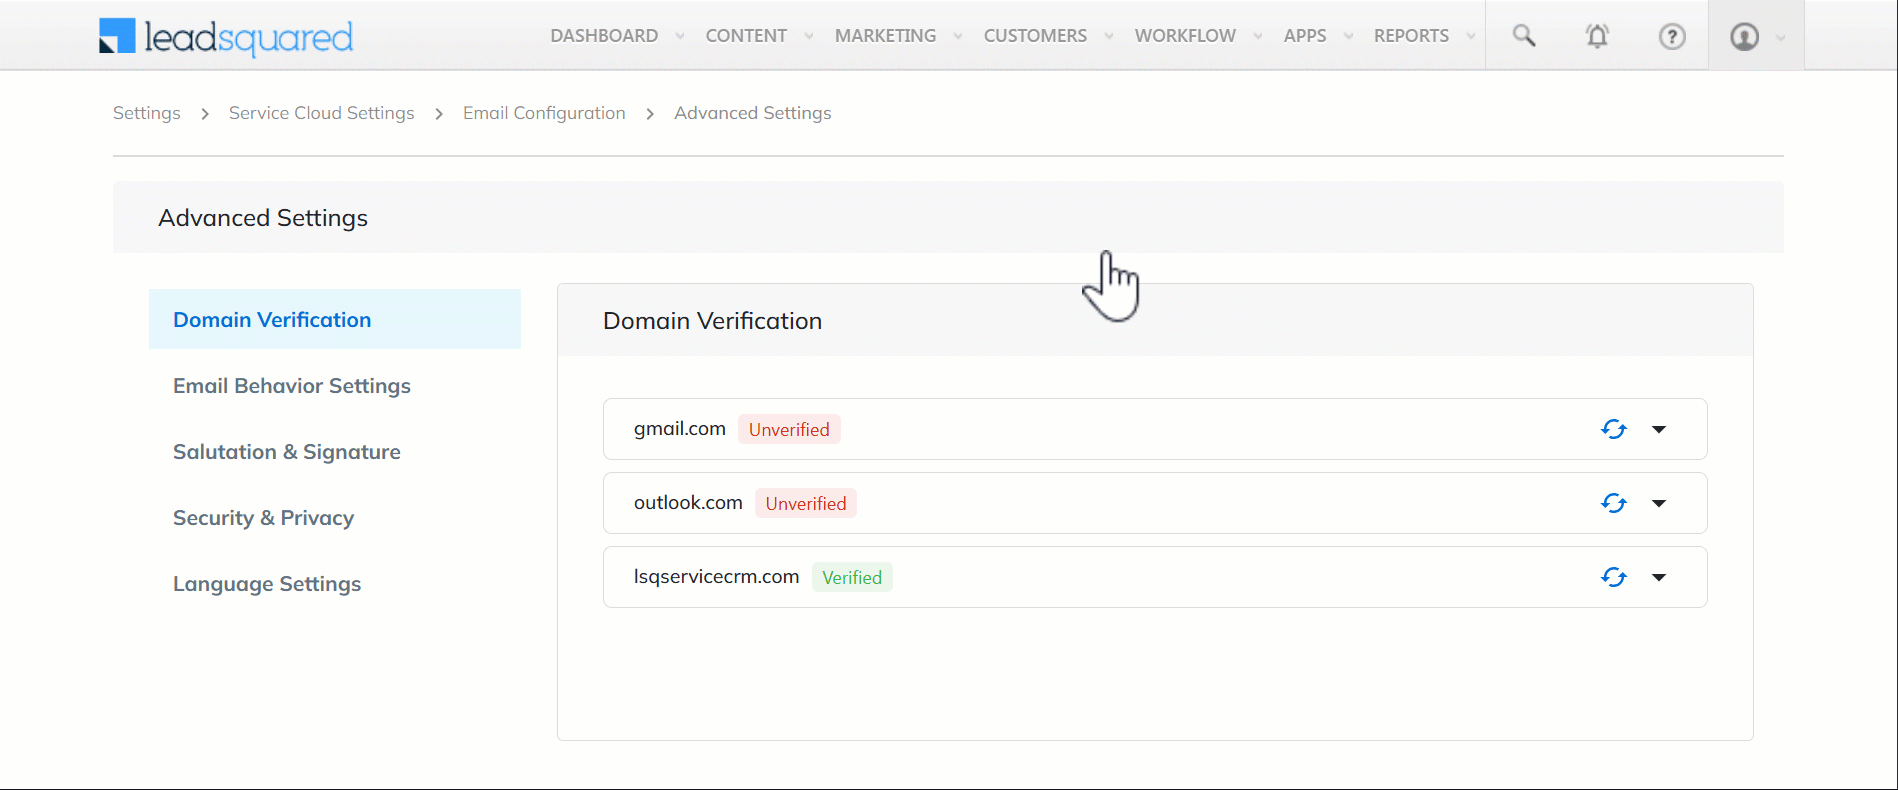
5.1 Domain Verification
After successfully setting up auto-forwarding, ensure you verify your email domain. This step is mandatory to ensure the emails you send always end up in your customer’s inbox folder (and not junk or spam folders). Copy the CNAME values generated here, and add them at the domain level of your organization. Once the records are added and verified, all the outbound emails sent to your customers will go to their inboxes.
You can also send these CNAME records by email directly from LeadSquared to any user in your organization (such as the one handling email domains in the IT team). Enter the relevant email ID in the Send records via email box and click Send. All the records generated in your account will be sent to them. They can copy the CNAME records from their email and add them to the domain.
5.2 Email Behavior Settings
- Create New Ticket on Subject Change – When enabled, if a customer updates an existing ticket’s subject line (when replying via email), the system automatically creates a new ticket with the new subject line.
- Send Outbound from the Source Email – When enabled, the Sender ID for outbound emails can be sent from any email ID configured in your account. When disabled, admins must define the email IDs on the Allowed Outbound Emails list, and agents can choose a sender from those email IDs.
For example, if your account has support@leadsquared.com, sri@leadsquared.com, and vir@leadsquared.com configured, agents can choose any of these as the sender ID when the setting is enabled. However, if the setting is disabled and the admin selects only support@leadsquared.com and sri@leadsquared.com under Allowed Outbound Emails, agents can choose only one of the two. - Allowed Outbound Emails – The list of email IDs agents can use as the sender ID when replying to a ticket. All email IDs configured on your account appear here by default, and you can add or remove them as needed.
- Default Outbound Email – Select the default sender ID for outbound emails sent to customers from a ticket.
Once you’re done, click Save.

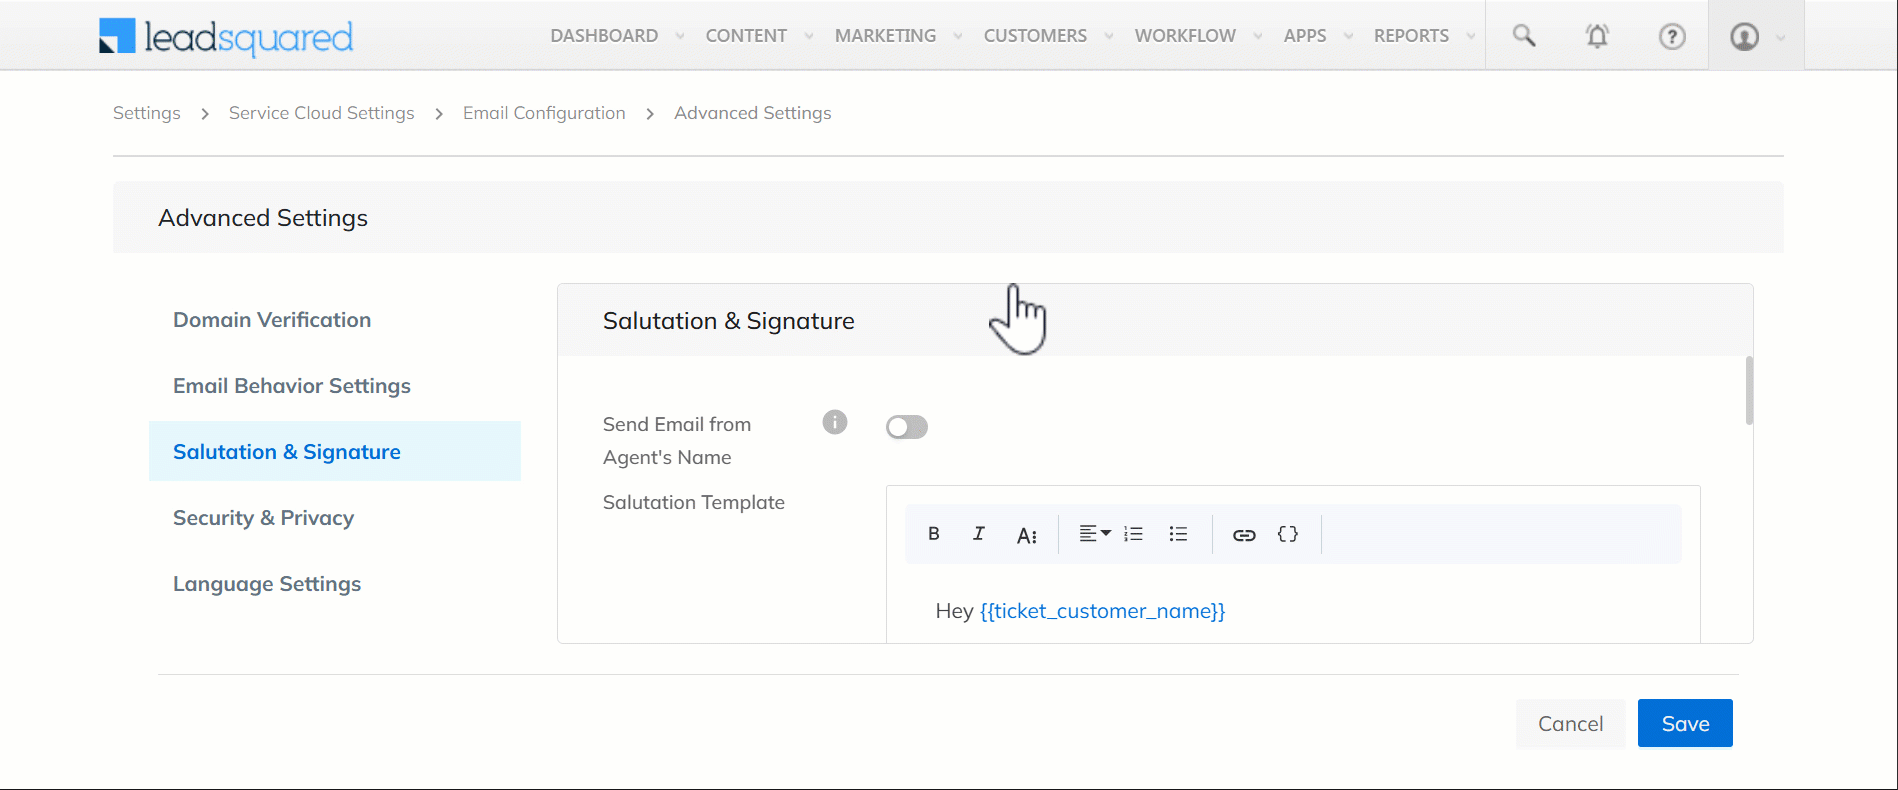
5.3 Salutation & Signature
- Send Email from Agent’s Name – When enabled, the email sender’s (your agent’s) name will be displayed on outbound emails, and not the Default Outbound Email configured in the previous section.
- Salutation Template – Add a greeting that appears at the beginning of your outbound email.
- Add Salutation by default – When enabled, the salutation you’ve configured here will be added to your emails.
- Signature Template – Add an email signature that appears at the end of your outbound email.
- Add Signature by default – When enabled, the signature you’ve configured here will be added to your emails.
- Allow Signature overriding – When enabled, agents can overwrite the default email signature that’s configured.
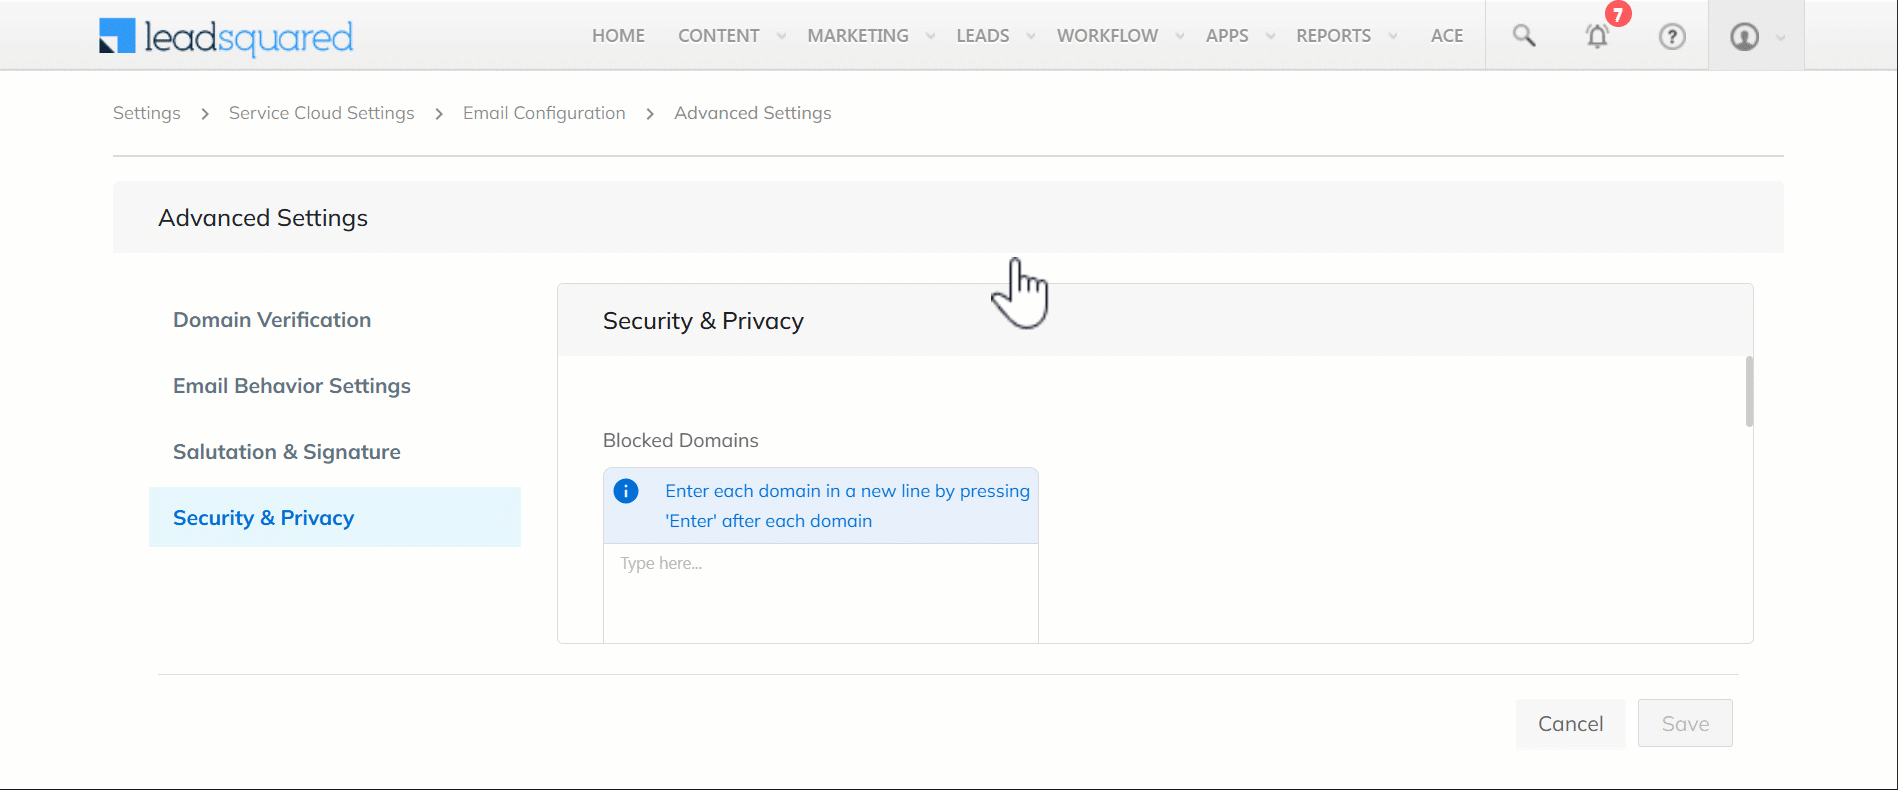
5.4 Security and Privacy settings
- Blocked Domains – Enter the email domains you want to block. If you receive an email from a blocked domain, a ticket will NOT be created in LeadSquared. This helps prevent junk tickets and avoids turning internal employee emails into tickets.
- Add Exception Email – Based on the blocked domains, add exception email IDs. Tickets are created from emails sent by these IDs, even if the domain is blocked. For example, if you block “leadsquared.com” but add exceptions for “sri.sudhan@leadsquared.com” and “sri@leadsquared.com”, tickets still get created from emails sent by these IDs.
- Blocked Emails – Enter a list of individual email IDs you want to block. When you receive an email from any blocked email ID, a corresponding ticket will NOT be created in LeadSquared.
Once you’re done, click Save. This completes the set-up and configuration process.
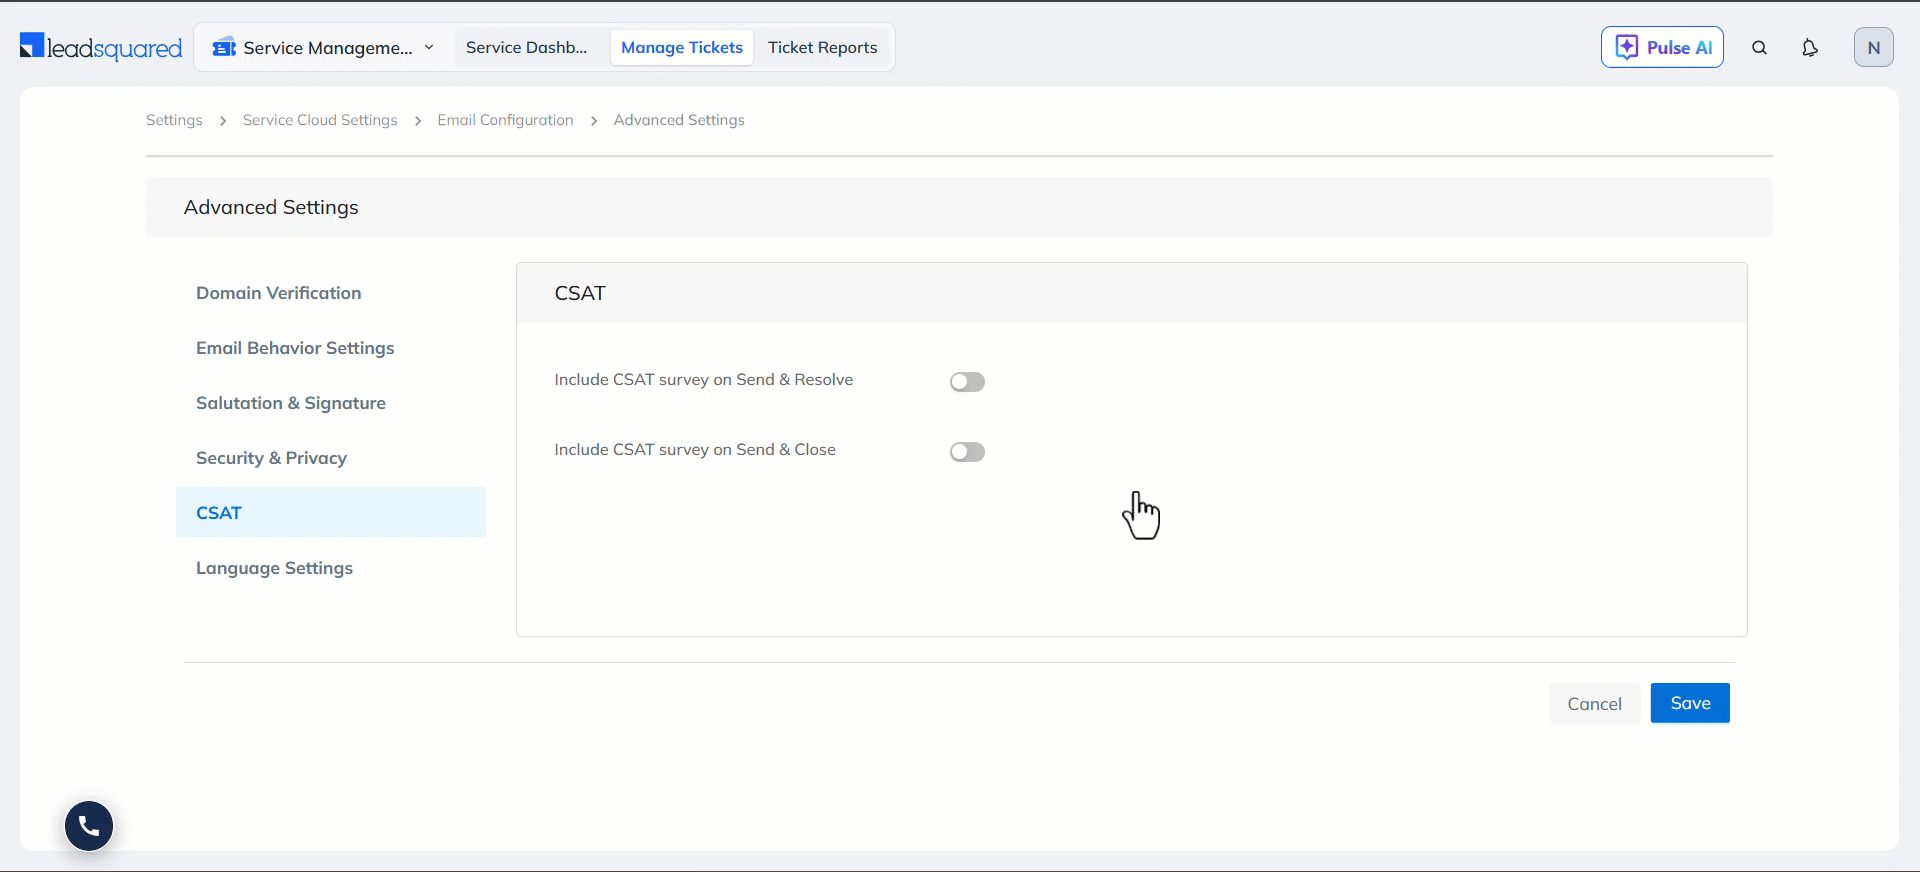
5.5 CSAT
Enable these settings to automatically add CSAT survey links to emails sent to customers when you close or resolve a ticket.
- Include CSAT survey on Send & Resolve – When enabled, the system automatically attaches a CSAT link to the email you send to a customer when you use the Send & Resolve option on the Ticket Details page while replying to an email.
- Include CSAT survey on Send & Close – When enabled, the system automatically attaches a CSAT link to the email you send to a customer when you use the Send & Close option on the Ticket Details page while replying to an email.
Note: You can enable only one of these settings at a time.
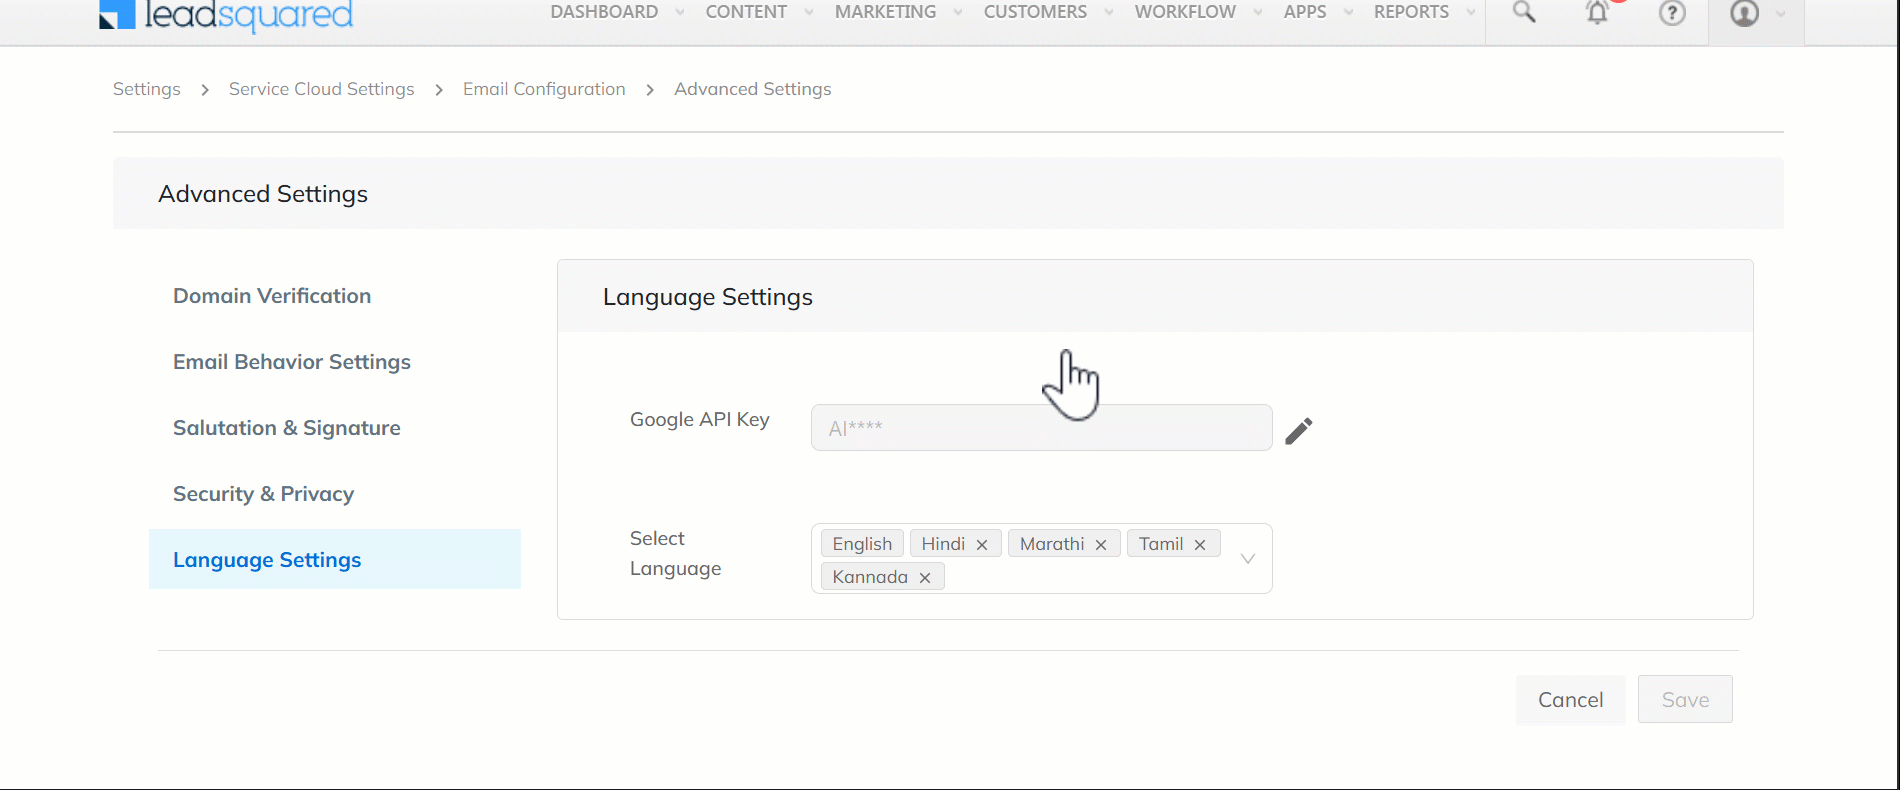
5.6 Language Settings
When configured, the Ticket Details page lets agents instantly translate queries from other languages using the built-in Google Translate feature. Agents can view messages in their language and reply in the customer’s language.
- Google API Key – Pass your Google Cloud Translation API key here.
- Select Language – From the list of languages, select the ones you want the translate feature to support. Currently supported languages are Kannada, English, Tamil, Malayalam, Marathi, and Hindi.
Once you’re done, click Save.
Any Questions?
Did you find this article helpful? Please let us know your feedback in the comments section below. We’d love to hear from you and help you out!