


Get Started
Sales Suite
Field Ops
Marketing
Service CRM
Integrations & Apps
FloStack
Ticket Fields and Form Configuration for Admins
1. Feature Overview
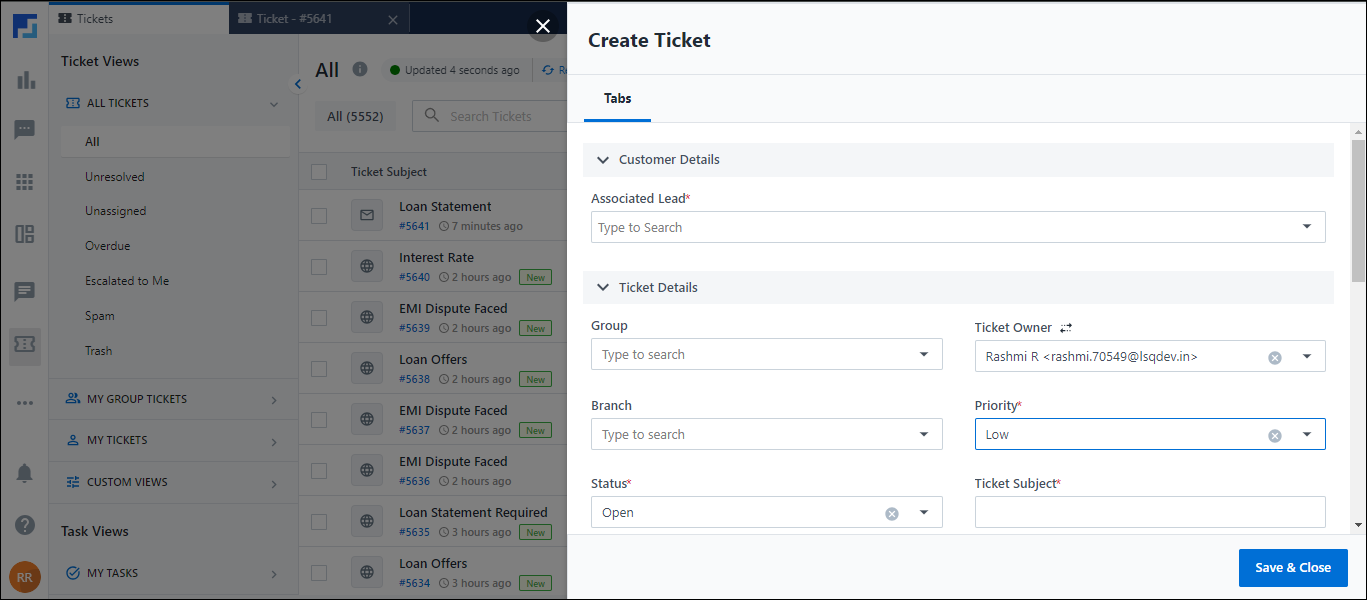
When a customer raises a service-related query or concern through any channel (email, call, etc.), Service CRM automatically generates a support ticket, with a unique ticket ID. Alternatively, service agents can manually create tickets through the Create Ticket form (from the Marvin – Tickets page). This article covers the configurations that need to be carried out before a ticket can be manually created –
- Fields Configuration – Ticket fields contain information relevant to the issue being addressed, such as Ticket Subject, Status, Ticket Owner, etc. These include –
- System-generated default ticket fields (e.g., Customer, Channel, Type, etc.).
- Custom ticket fields you create (e.g., Attachments, Ticket Requester, etc.).
Add these fields to the Create Ticket Form, Child Ticket Form and Disposition Form.
- Form Configuration – Ticket forms contain the tickets fields created in your account. You can configure two types of forms –
- The Create Ticket Form and the Create Child Ticket Form. Child tickets are tickets associated with an existing Parent ticket, used when dealing with interconnected issues. Inside these forms, you can view the –
- Customer Details (such as Associated Leads, etc.).
- Ticket Details (such as Status, Priority, custom ticket fields, etc.).
- You can also add custom sections.
- The Create Ticket Form and the Create Child Ticket Form. Child tickets are tickets associated with an existing Parent ticket, used when dealing with interconnected issues. Inside these forms, you can view the –
- Disposition Form Configuration – Enables agents to record important details related to the ticket’s resolution (such as TAT). This ticket form is optional, and there are no default ticket fields for the Disposition Form.

2. Prerequisites
- LeadSquared’s Service CRM offering is a paid feature. To enable it on your account, contact your account manager, or write to scsupport@leadsquared.com.
- The ticket field and form configurations listed in this article can only accessed by Service Platform Admin and Service Admin users.
3. Access Ticket Settings
Once you log in to LeadSquared (https://login.leadsquared.com/), to access the tickets and forms configuration screen –
- Navigate to My Profile>Settings>Service Cloud.
- On the Service Cloud Settings screen, under Ticket Settings, click Ticket Field and Form Configuration.

4. Ticket Fields Configuration
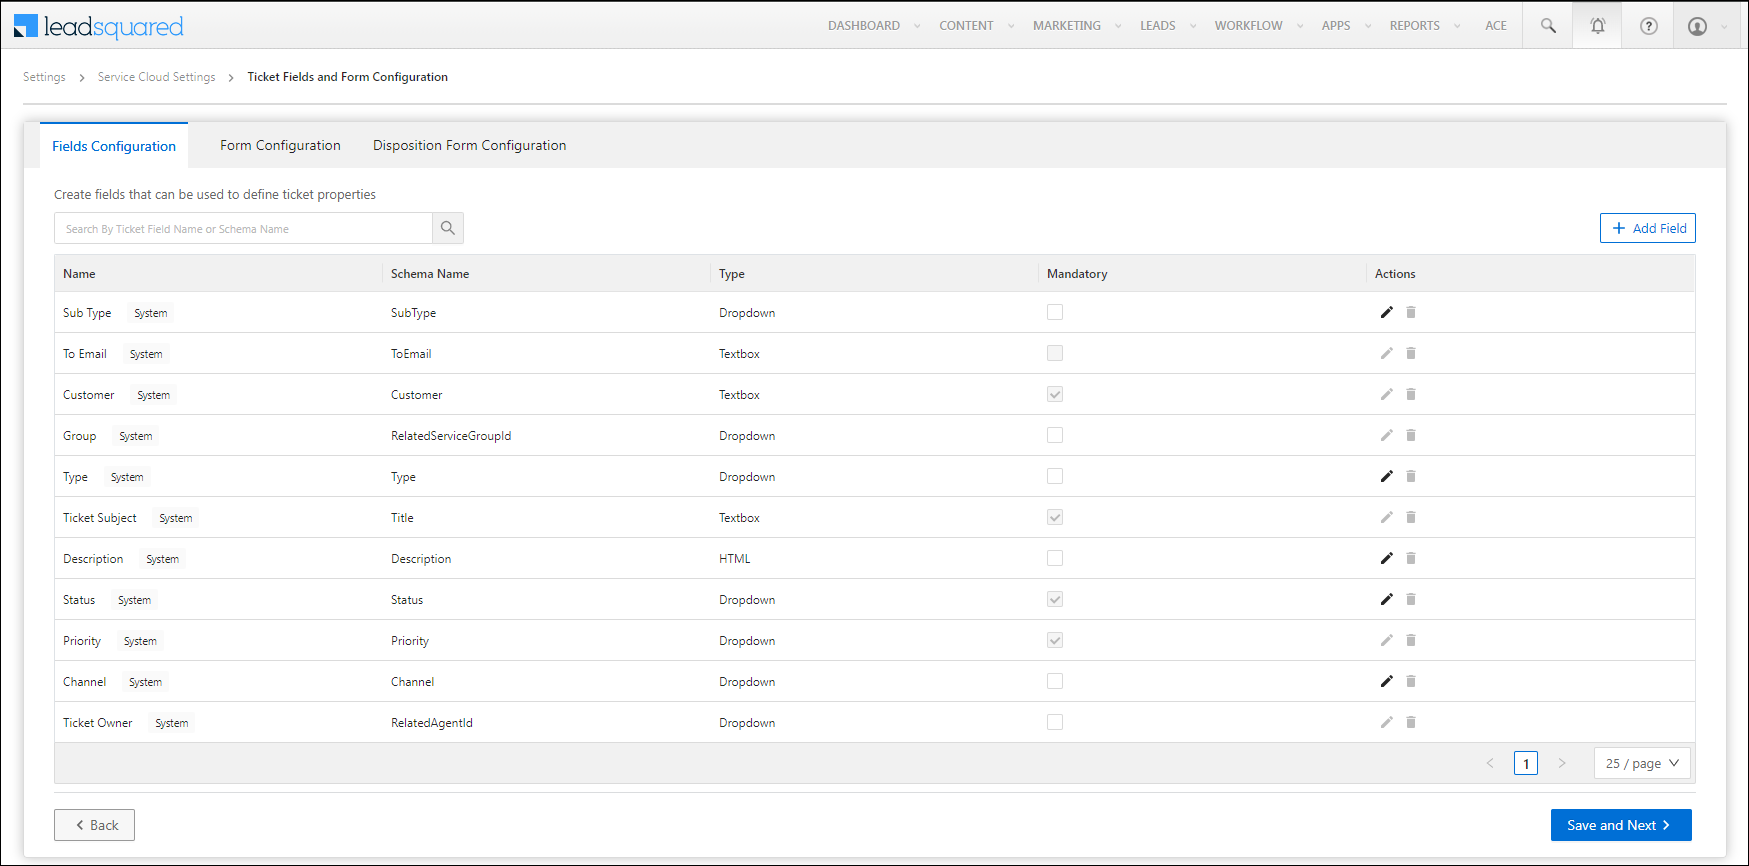
On the Ticket Fields and Form Configuration screen, you’ll find a list of default ticket fields under the Fields Configuration tab. In addition to these, you can also create custom ticket fields. From this tab, you can view, create, update, and delete ticket fields.
4.1 Ticket Field Columns
The following columns are available –
- Name – The display name of the ticket field. It can be used to search for a field through the search box.
- Schema Name – The schema name of the ticket field. This is generated by default, and it cannot be edited. It can be used to search for a field through the search box.
- Type – The field type (e.g., text, dropdown, etc.).
- Mandatory – Displays whether the field is required or optional when filling in the ticket form. The following System fields are marked as mandatory, and this cannot be changed –
- Customer
- Ticket Subject
- Status
- Priority
- Actions – For eligible fields, you can perform the Update (
 ) and/or Delete (
 )actions.
Note: You cannot delete any of the default System fields. For the following System fields, you cannot perform the Update action –
- To Email
- Customer
- Group
- Ticket Subject
- Priority
- Ticket Owner
4.2 Add Custom Ticket Fields
To create custom ticket fields in your account, on the Ticket Fields and Form Configuration screen, from the Fields Configuration tab, click Add New and enter the following details –
- Display Name – The name that will be shown for the custom field in the ticket form. The display name can be used to search for a field from the search box.
- Data Type – Once you configure a field with a specific data type, you cannot update it in the future. This selection will be permanent. You can configure the field with any of the following data types –
| Data Type | Show As | Notes |
| Text |
|
|
| Rich Text | HTML | The maximum character length supported is 4,000 characters. |
| Website | URL | |
| The maximum character length supported for an email ID is 250 characters. | ||
| Number | Textbox | Can be an integer (e.g., 5) or a decimal (e.g., 5.05). |
| Phone | Phone | |
| Date |
|
|
| Boolean |
|
|
| Dropdown |
|
|
| Multi Select | Multi Select | Users can select multiple options from the dropdown list. The first option is considered as the default option. |
In addition to the data types listed in the table above, you have –
- Auto-fill using AI – Using AI, our system can automatically assign values to this ticket field. To know more, refer to Service CRM Ticket Field Enrichment with AI.
- Mandatory – Enable this checkbox to make the field mandatory for users when filling the form.
- Add in Search – Enable this checkbox to make the field searchable for your users.
Once you’re done creating the field, click Save.

4.3 Add Custom Tags
Ticket tags enable agents to quickly label and identify tickets by associating them with relevant keywords (e.g., difficulty level – Easy, Hard, etc.), helping capture attributes not included in ticket fields. Your account includes a set of system tags that cannot be modified.
However, this section lets you define custom tags for your account. These custom tags will be available on the Ticket Details page, where agents can easily apply them to their tickets. To define these tags –
- Alongside Tags, under Actions, click .
- On the Update System Field pop-up, under Custom options section, enter your list of custom tags.
- Press ENTER after each tag to add it as a new entry.
- To make adding these tags mandatory, enable the checkbox alongside Mandatory.
- To allow users to search for and find tickets using these custom tags, enable Add in Search.
- Once you’re done, click Save. Your agents will now be able to add these tags on the Ticket Details Page.

4.4 Other Actions
You can perform the following actions on a ticket field –
Update
- To update/edit a ticket field, click .
- You cannot update the Data Type of a field.
- Once you’re done, click Save.
Delete
- To delete a ticket field, click .
- On the Confirm pop-up, click Yes.
Note:
- You cannot delete a custom field linked to a section in the Ticket Details page or the Create Ticket, Create Child Ticket and Disposition form.
- To delete a parent field, you must first unlink it from any associated child field.

5. Ticket Form Configuration
Once all the necessary ticket fields are available in your account, configure the Create Ticket Form and Child Ticket Form –
- From the Select Form to Configure dropdown, choose the form type you want to configure.
- If you’ve selected Create Ticket Form –
- There are two sections available by default –
- Customer Details – The customer’s (lead’s) details are stored in this section. The Associated Leads field is selected by default, and it cannot be removed.
- Ticket Details – The ticket details (such as Status, Priority, etc.) are stored in this section.
- You can edit the names of both these sections by clicking
 , and entering a relevant new name for the section.
- To add additional sections, click Add Section, and enter a relevant name for the section.
- There are two sections available by default –
- If you’ve selected Create Child Ticket Form, there’s only a single section available by default.
- From the list of Available Fields, add fields to the form by dragging and dropping them.
- To remove an existing field from the form, alongside the field, click
 .
. - To expand a field, click
 .
. - To contract a field, click
 .
.
Once you’re done, click Save and Next or Save and Exit.
Note:
- The Ticket Subject field cannot be removed from the form.
- When you add a Parent dropdown field, the related Child fields are added automatically to the form.
- You will not be able to add any ticket field in between a Parent-Child field(s). The Parent-Child field(s) must always be listed sequentially.
- If a Parent field (e.g., Country) has a Child field (e.g., State), and that field further has another Child field (e.g., City), then you can only remove the middle Child field (State) AFTER removing the last Child field (City), at the bottom of the hierarchy.
- Conversely, if the Parent field (Country) is removed, then both the corresponding Child field (State) and the next Child field (City) in the hierarchy will be automatically removed.
- You cannot drag and drop a field between parent-child fields present in the form.
The below GIF shows how you can add parent-child fields to the form –

6. Disposition Form Configuration
Agents can record important information related to the ticket’s resolution (such as TAT). This ticket form is optional, and there are no default ticket fields present in it. To create this form –
- Alongside Activate Form, enable the
 slider.
 - From the list of Available Fields, add fields to the form by dragging and dropping them.
- To remove an existing field from the form, alongside the field, click .
- To expand a field, click .
- To contract a field, click .
Once you’re done, click Save.
Any Questions?
Did you find this article helpful? Please let us know any feedback you may have in the comments section below. We’d love to hear from you and help you out!