


Get Started

Sales Suite
Field Ops
Marketing
Service CRM
Integrations & Apps
FloStack
User Automation Actions – User Check-In and Check-Out

1. Feature Overview
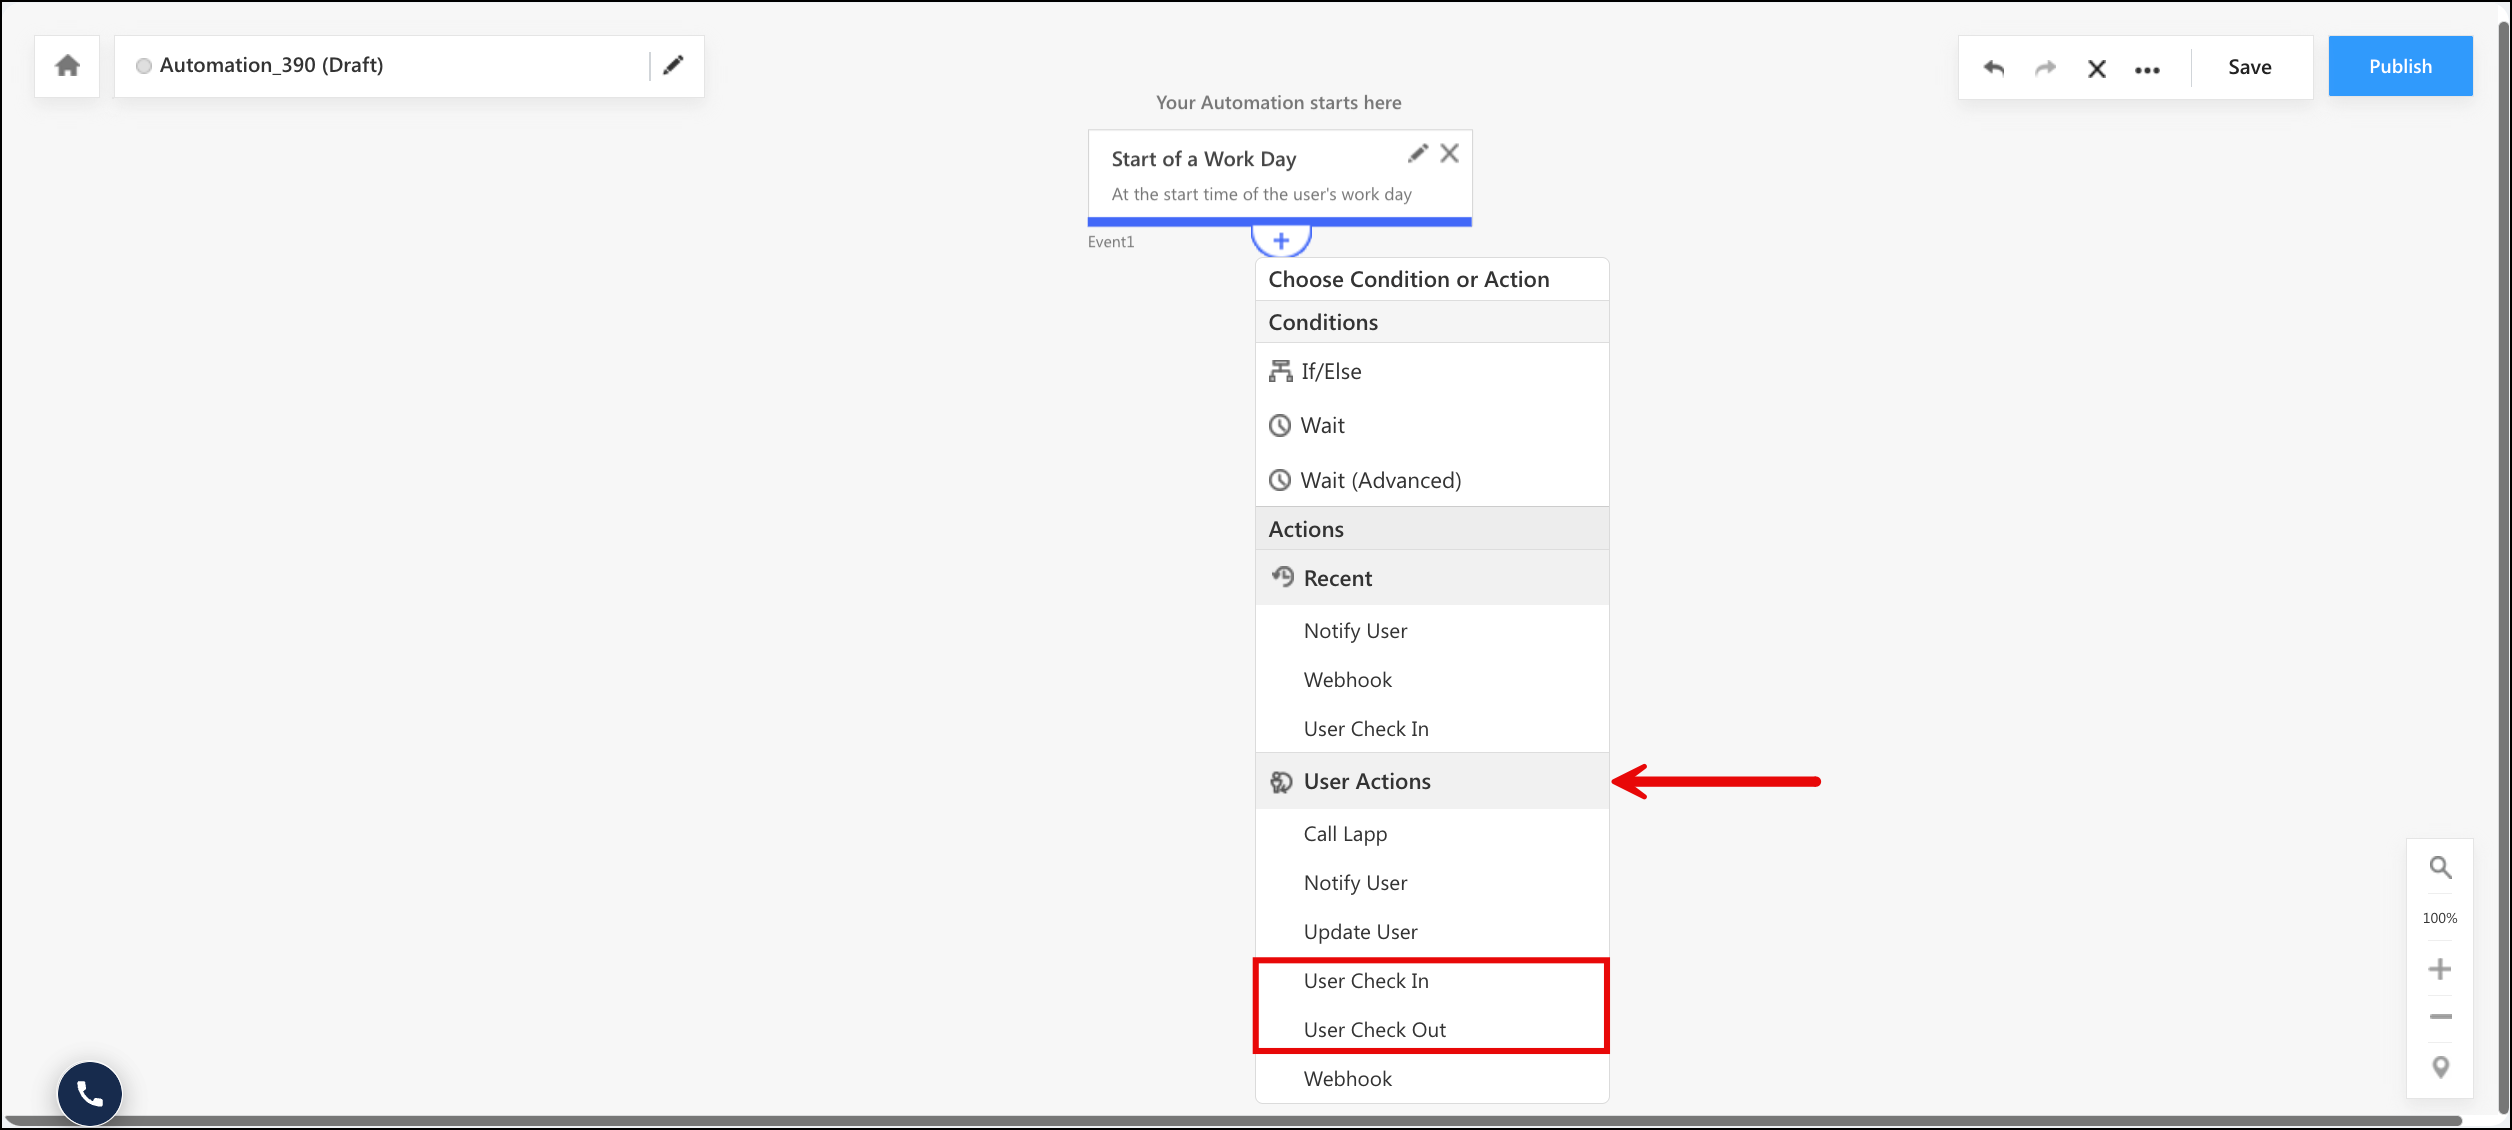
The User Check In and User Check Out actions check your users in and out of LeadSquared automatically, so they do not have to do it themselves at the start and end of their shift. Both actions are available under the User Actions group of the Choose Condition or Action menu.
Each action is paired with the matching trigger, and the timing of both comes from the workday template assigned to the user or the user’s team.
| Action | Trigger | What It Does |
| User Check In | Start of a Work Day | Checks the user in at the start time on the workday template. The user’s availability status changes to Online, their working hours start being tracked, their location is tracked on the mobile app, and they become eligible to receive records from distribution rules set to assign to available users only. |
| User Check Out | End of a Work Day | Checks the user out at the end time on the workday template. The user’s working hours stop being tracked, location tracking stops, and the user stops receiving records from distribution rules set to assign to available users only. |
2. Prerequisites
- Enable the check-in and check-out feature for your users from My Account>Settings>Users and Permissions>User Check-In. For more information, see User Management Features: Check-In and Check-Out.
- Create a workday template and assign it to the teams or users you want to check in and out. Both actions read their timings from this template. For more information, see Work Day Templates.
- To prevent auto check-in and auto check-out on non-working days, set up a Holiday Calendar and the Leave Tracker.
- To track user location between check-in and check-out, turn on Track real-time location from My Account>Settings>Mobile App>Permissions>Location Tracking. For more information, see Location Tracking on LeadSquared Mobile.
3. How It Works
Once a day, at 12 a.m. in the time zone configured on the workday template, LeadSquared identifies the users whose workday falls on that day. Those users enter the automation at the time set on the trigger. Users who are on a holiday or on approved leave on that date do not enter the automation.
3.1 User Check In
- At the time set on the Start of a Work Day trigger, the users whose workday starts that day enter the automation. The trigger can run at the exact start time of the workday, or a set number of minutes before or after it.
- Users who do not meet the trigger’s additional conditions, or the criteria on an If/Else card, do not continue to the next card. For example, a condition on Availability Status set to Offline restricts the automation to users who have not already checked in themselves.
- When a user reaches the User Check In card, LeadSquared checks that user in and starts tracking their working hours for the day.
- The automation then moves to the next card. A Webhook card placed after the check-in card sends the corresponding notification to the user’s mobile app.
3.2 User Check Out
- At the time set on the End of a Work Day trigger, the users whose workday ends that day enter the automation. The trigger can run at the exact end time of the workday, or a set number of minutes before or after it.
- Users who do not meet the trigger’s additional conditions, or the criteria on an If/Else card, do not continue to the next card. For example, a condition on Availability Status set to Online and Away restricts the automation to users who are still checked in.
- When a user reaches the User Check Out card, LeadSquared checks that user out. Their working hours stop being tracked for the day, and their location is no longer tracked.
- The automation then moves to the next card. A Webhook card placed after the check-out card sends the corresponding notification to the user’s mobile app.
4. Add the User Check In Action
- From the main menu, navigate to Workflow>Automation.
- Open an existing user automation, or click Create Automation and select Build From Scratch.
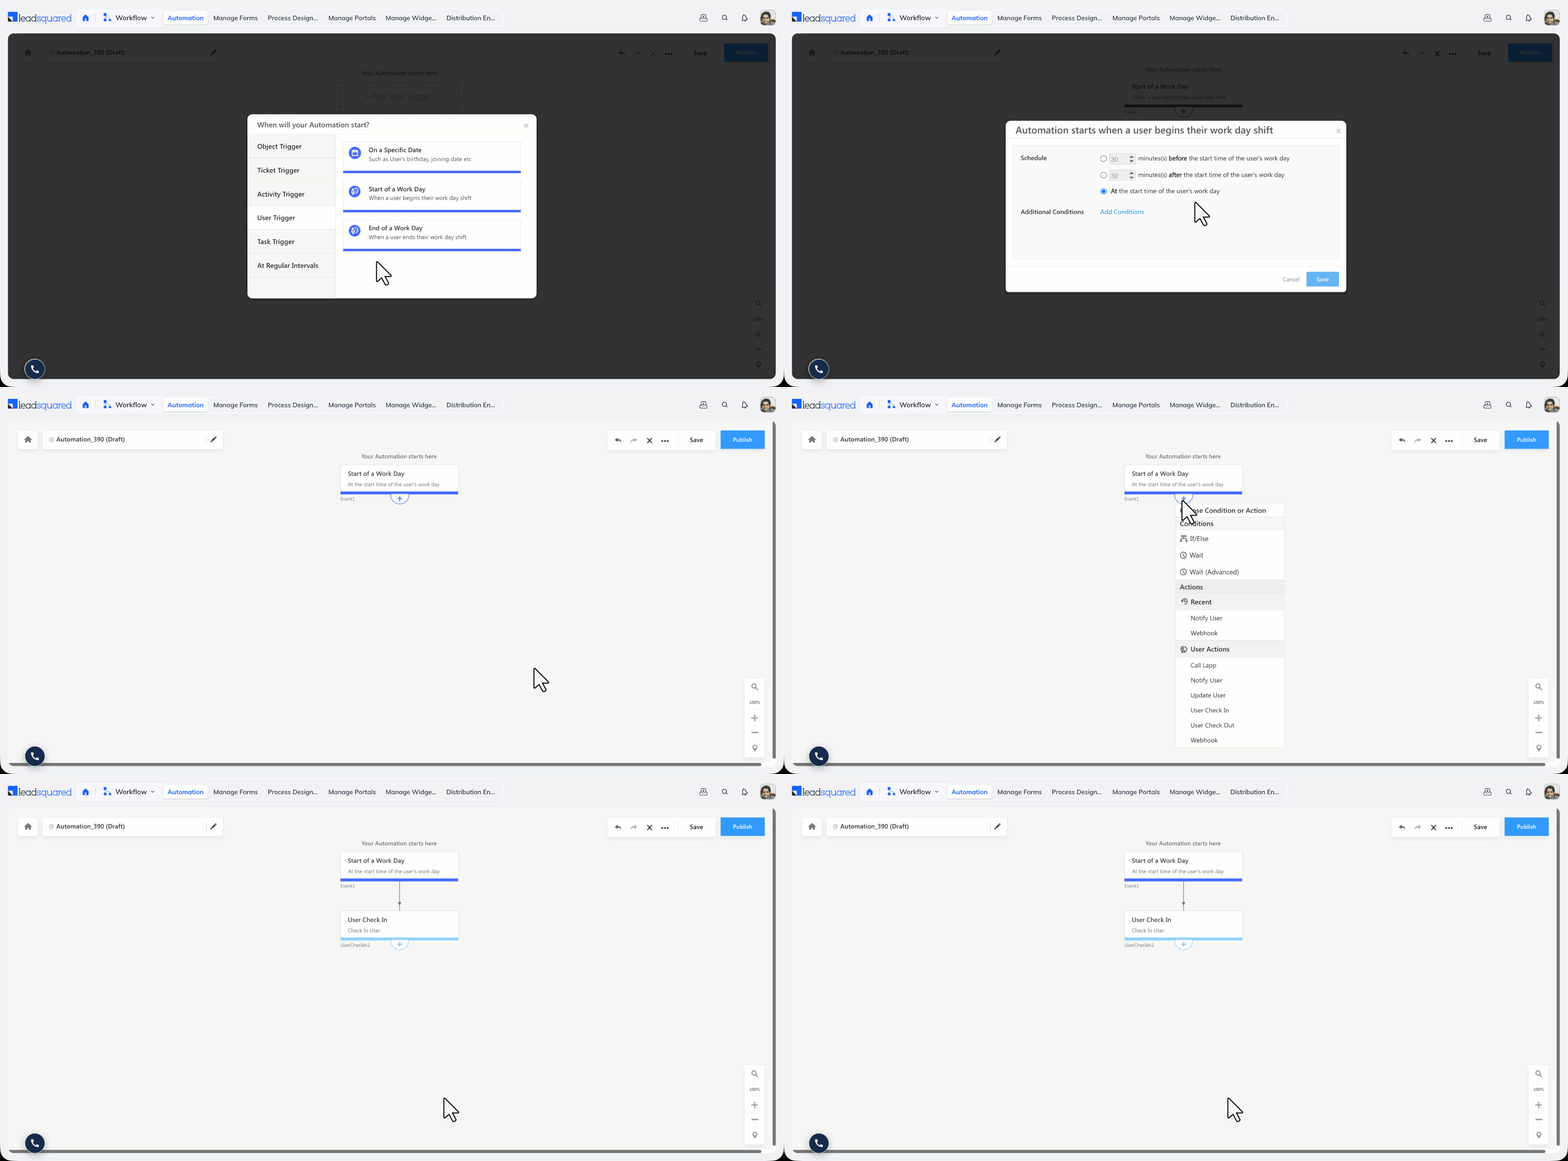
- Select the Start of a Work Day trigger, set the schedule and any additional conditions, then click Save.
- On the automation canvas, click the Add icon on the trigger card, or on the card you want this action to follow.
- Under Actions, click User Actions, then click User Check In. The action card is added to the canvas. The card requires no further configuration.
- Click Save.
- Click Publish to make the automation live.
5. Add the User Check Out Action
- From the main menu, navigate to Workflow>Automation.
- Open an existing user automation, or click Create Automation and select Build From Scratch.
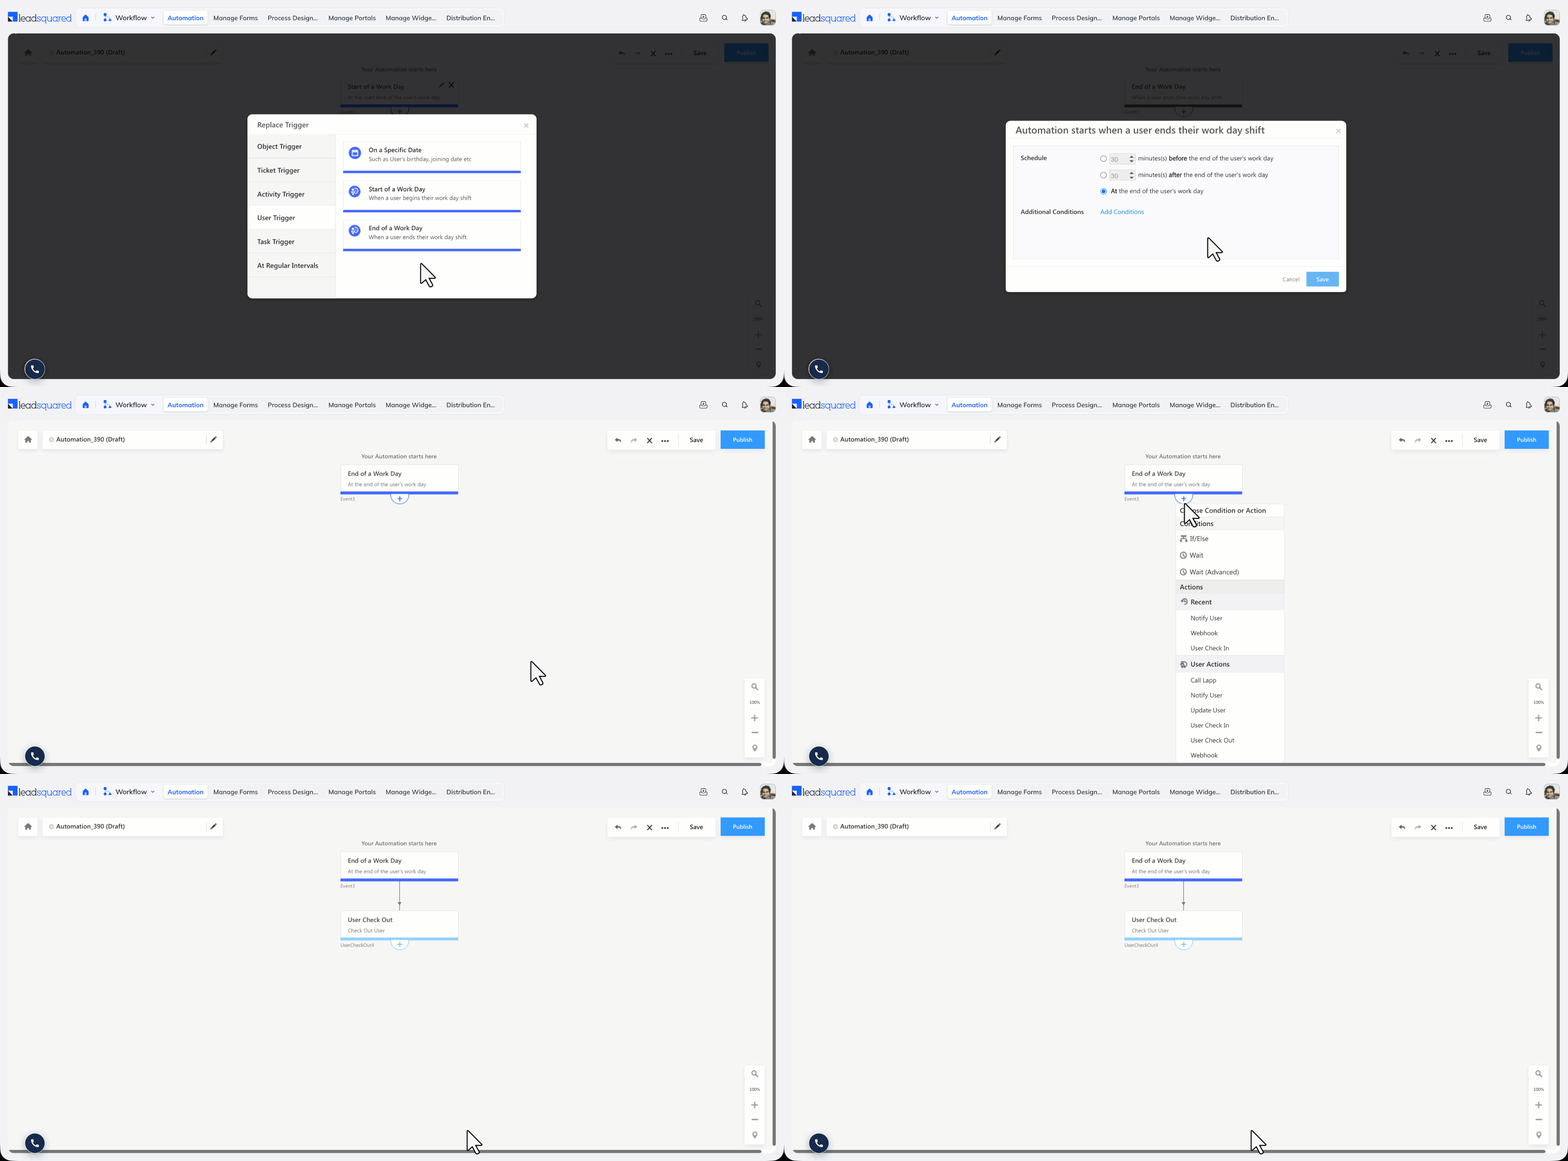
- Select the End of a Work Day trigger, set the schedule and any additional conditions, then click Save.
- On the automation canvas, click the Add icon on the trigger card, or on the card you want this action to follow.
- Under Actions, click User Actions, then click User Check Out. The action card is added to the canvas. The card requires no further configuration.
- Click Save.
- Click Publish to make the automation live.
6. Use the Auto Check-In and Auto Check-Out Templates
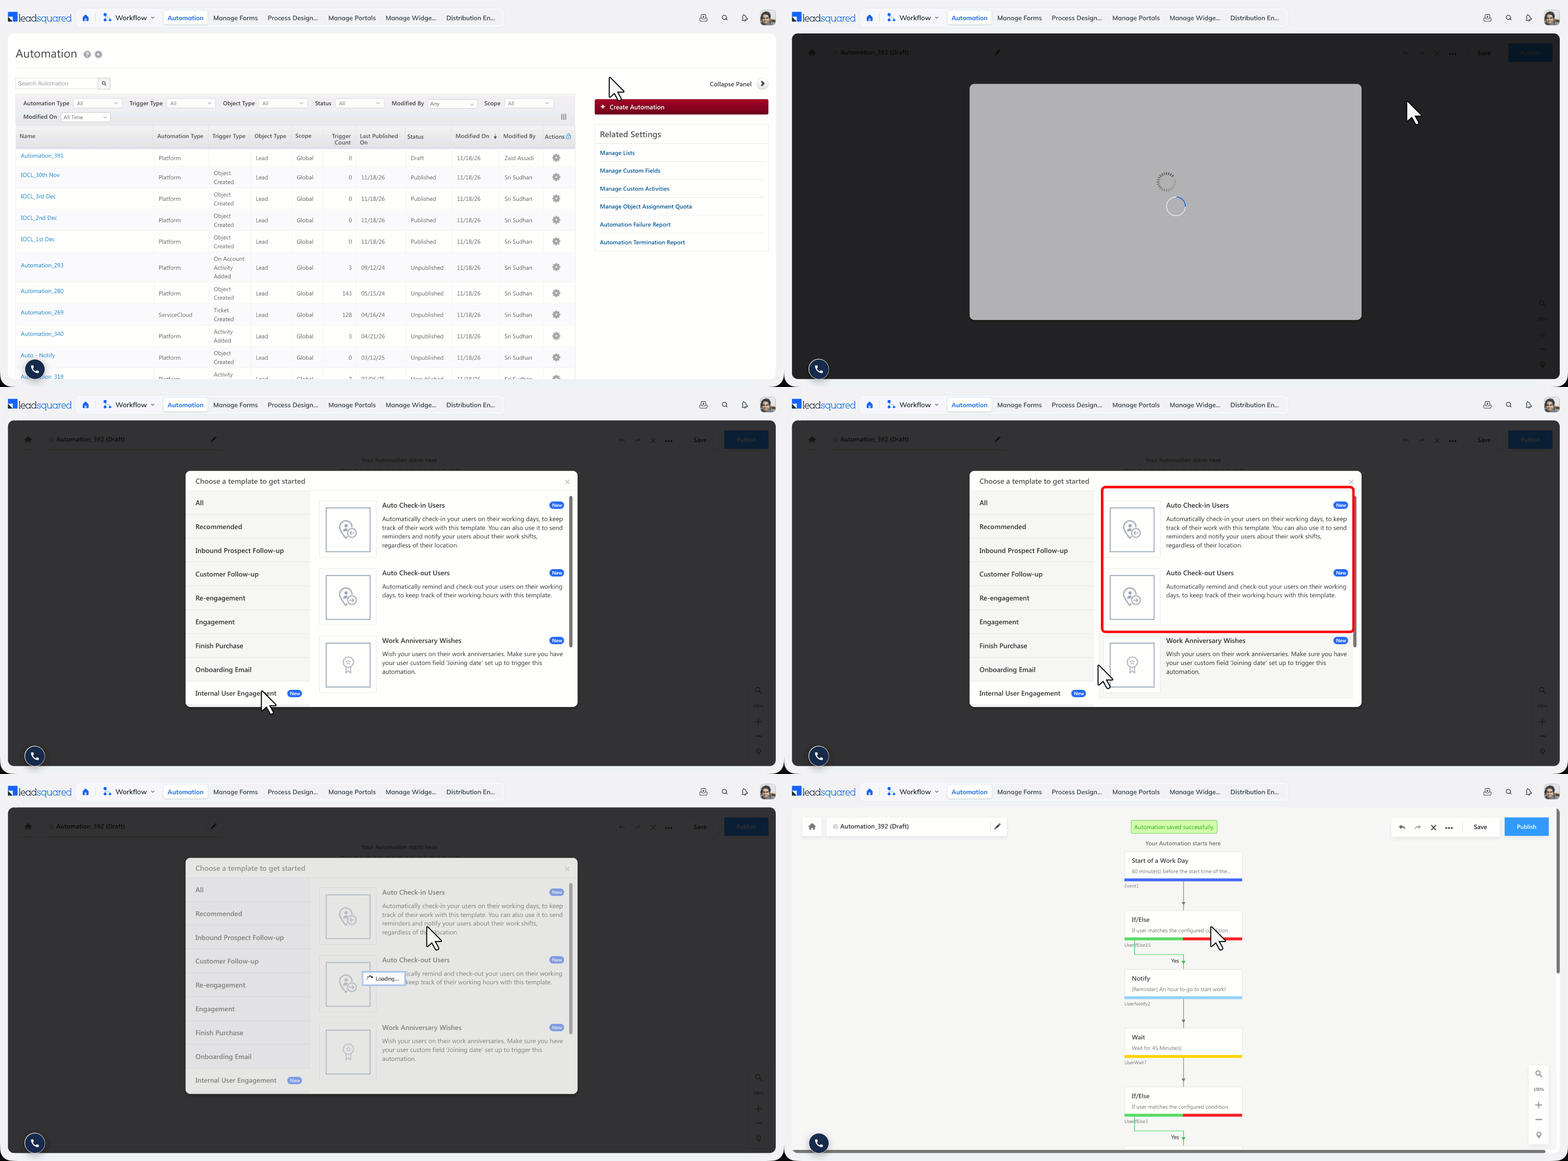
Instead of building each automation from scratch, you can start from the ready-made templates and edit them. Each template is a separate automation, so set up both if you want users checked in and out automatically.
- From the main menu, navigate to Workflow>Automation and click Create Automation.
- On the Choose a Template pop-up window, go to the Internal User Engagement
- Select the Auto Check-In Users or Auto Check-Out Users
- Edit the trigger schedule, conditions, and cards to suit your requirements.
- Click Save, then click Publish.
The check-in template reminds users to check in before the workday begins, then checks in the users who have not done so by the start time. The check-out template works the same way at the end of the workday.
Neither template covers the mobile app. To send reminders and notifications to the mobile app, add webhooks after the If/Else cards in each automation. For more information, see Auto Check-In/Check-Out for Mobile.
7. Points to Remember
- An automation you publish today does not run on the same day. The service that evaluates workday templates runs once a day at 12 a.m. in the configured time zone, so users enter the automation from the following day.
- If no workday template is assigned to your users, the automation has no start or end time to work with, and no users enter it.
- Auto check-in and auto check-out work even if check-in is disabled for a user role in the user role settings.
- Users on a holiday or on leave are not checked in or out automatically, but they can still check in and out manually.
- If a workday template has multiple time blocks for different shifts, only the first check-in time and the last check-out time are considered. Breaks between shifts are not.
- To avoid acting on users who have already checked in or out themselves, set the Availability Status criteria on the trigger or on an If/Else Use Offline for check-in, and Online and Away for check-out.
- A user who is checked out automatically at the end of the workday can check in again manually if they continue working.
- Both actions apply to the web application. Mobile notifications and mobile check-in and check-out require webhooks in the same automation.
- To review check-in and check-out activity, use the User Check-in and Check-Out History report on Analytics.
Any Questions?
We’d love to hear your feedback to help improve this article. Feel free to enter your questions or in the comments section below.