


Get Started
Sales Suite
Field Ops
Marketing
Service CRM
Integrations & Apps
FloStack
Workday Templates
Updated
05 Feb 2025 | 04:28 PM
1. Feature Overview
Workday templates define your organization’s schedule and working hours across the Sales Cloud and Service Cloud platforms. This enables automatic user check-ins and allow you to set the timezone, working days, and office hours for your users.
Once created, you can assign the templates to Teams and Service Groups. So if you have multiple teams working different shifts in different regions, all you have to do is create the appropriate work day templates and apply them to your teams.
Note: *See Auto Check-In/Check-Out Guide.
2. Prerequisites
- You must be the Admin of your LeadSquared Sales Cloud and/or Service Cloud account.
- You must create Teams in your account.
3. Create a Workday Template
- Navigate to My Account>Settings>Users and Permissions>Work Day Templates and click Create.
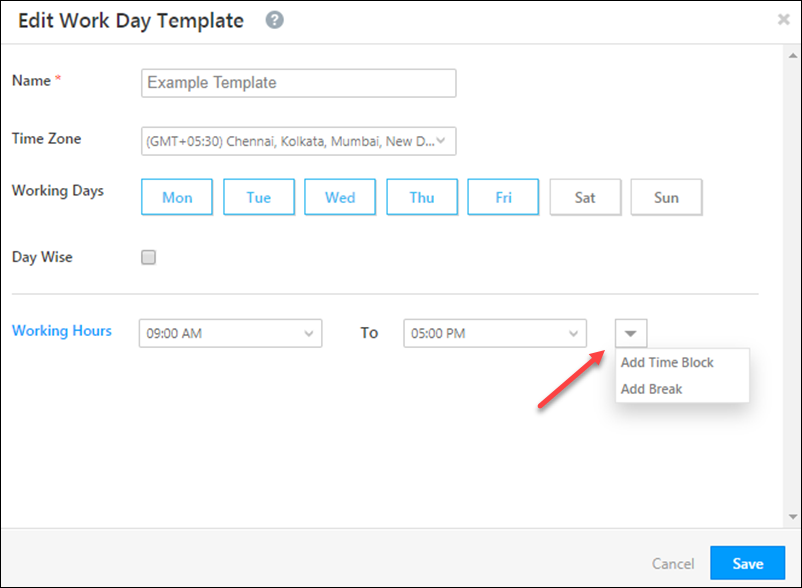
- Set your work day template configurations –
- Enter a Name for the template.
- Choose a Time Zone.
- Select the Working Days.
- Set the Working Hours.
- Click the Day Wise checkbox if you want to set different office hours for each day of the work week.
- Click Save.
- Once created, you can Edit or Delete your template by clicking the Settings
 icon.
icon.
Note: You’ll see a default template on the Manage Work Day Templates page. This template is pre-created by the system. You can choose to edit it or create new templates from scratch.
You can also,
- Add more time blocks for users who work in 2 shifts (for example, 9 a.m. – 2 p.m. and 6 p.m. – 9 p.m.)
- Add breaks (for example, lunch break between 2 p.m. and 3 p.m.). These breaks will reflect in the user’s task calendar as well (see How to Create Tasks).
Click the arrow icon alongside the Working Hours, to access these options –
4. Assign a Work Day Template to a Sales Team
- Navigate to My Profile>Settings>Users and Permissions>Teams.
- Alongside the team you want to assign the Work Day Template to, click
 .
. - Click Apply Work Day Template.
- In the drop-down under the Work Day Template column of the pop-up window, select the template you want to assign the team. If the team you’re applying a template to has a parent team, you can select the Inherit from Team option and inherit the template assigned to the parent team.
- Click Save.
Note: The following GIF assumes you’re using the new Teams V2 UI, which makes it easier to assign features (dashboards, workday templates, smart views, etc.,) to teams. You can enable it from Profile>Organziation Settings>Advanced Configuration, search for ‘Teams’ and enable Switch to teams UI V2.
5. Assign a Work Day Template to a Service Group
- Navigate to My Profile>Settings>Service Cloud.
- Under User Management, click Service Groups.
- Alongside an existing group, click
 , and then click Edit.
- To create a new group, refer to Service Groups.
- Under Basic Details, from the Select workday template dropdown, choose a relevant template.
- Once you’re done, click Next, and then click Save. The selected template is now actively applied to this group.

6. Assign a Work Day Template to a User
To assign a work day template to a user –
- Navigate to My Profile>Settings>Users and Permissions>Users.
- You can alternatively navigate to My Profile>Manage Users, and perform the steps listed below.
- Alongside an existing user, hover your cursor over and click Edit.
- To create a new Sales User, refer to User Management – Feature Guide.
- To create a new Service User, refer to Service Cloud Roles and Permissions.
- In the Edit User popup, navigate to the Work Details tab, and click Edit.
- From the Work Day Template dropdown, select the template you want to apply to this user.
- Click Save. The selected template is now actively applied to this user.
Note: The steps to assign a Work Day template to a Sales and/or Service User are the same. To filter by user type, use the Type dropdown.

Any Questions?
Did you find this article helpful? Let us know your thoughts in the comments section below.
Hi, if I change my work day template during business working hours and apply it to my teams will that be applicable from same day itself or tomorrow onwards?
Hello, Puja.
The workday template will be reflected on your accounts on the same day.
If I keep start time 10AM and end time as 7AM, then would it take end time on the same day or next day?
Hi, Shobhit. In this scenario, 7AM the next day is considered as the end time.