


Distribution Engine

1. Feature Overview
Distribution Engine assigns incoming records to the right user automatically. You define the rules, and the engine applies them as records arrive, so you no longer need an automation workflow for every assignment scenario.
It assigns three kinds of records:
Use Distribution Engine to:
- Assign records from forms, imports, APIs, and integrations the moment they arrive.
- Replace automation rules you maintain only to set an owner.
- Share work evenly, by a ratio you set, or by how much each user is already carrying.
- Run shift-based distribution, and hold after-hours records in a queue instead of sending them to one user.
- Reassign a record when the assigned user misses the first response deadline.
2. Prerequisites
- Distribution Engine is a paid feature. To enable it, contact your account manager or write to support@leadsquared.com.
- The feature is available only on NextGen.
- To enable Automation Trigger Mode, write to support@leadsquared.com.
3. How it Works
Every rule answers four questions, one per step of the rule builder.
| Question | Where you answer it |
| Which records does this rule handle? | Step 1, Rule Criteria |
| Who can receive them? | Step 2, Select Users |
| How are they shared out? | Step 3, Distribution Method |
| What happens if nobody is available, or nobody responds? | Step 4, Fallback & SLA |
How a Record Reaches a User
- A record is created or updated, and matches the entry event of one or more rules.
- The engine evaluates active rules in priority order, from the top of the list down.
- The first rule whose criteria the record matches takes it. No further rules are evaluated.
- That rule picks an eligible user using its distribution method.
- If no user is eligible, the record goes to the rule’s default user.
4. Trigger Modes in Distribution Engine
4.1 Entity Trigger Mode
This is the default. Each rule listens for an entry event, such as an object being created or a task being updated. When that event fires on a record, the record enters the engine and the rule evaluates it. You select the entry event in Step 1 of the rule.
4.2 Automation Trigger Mode
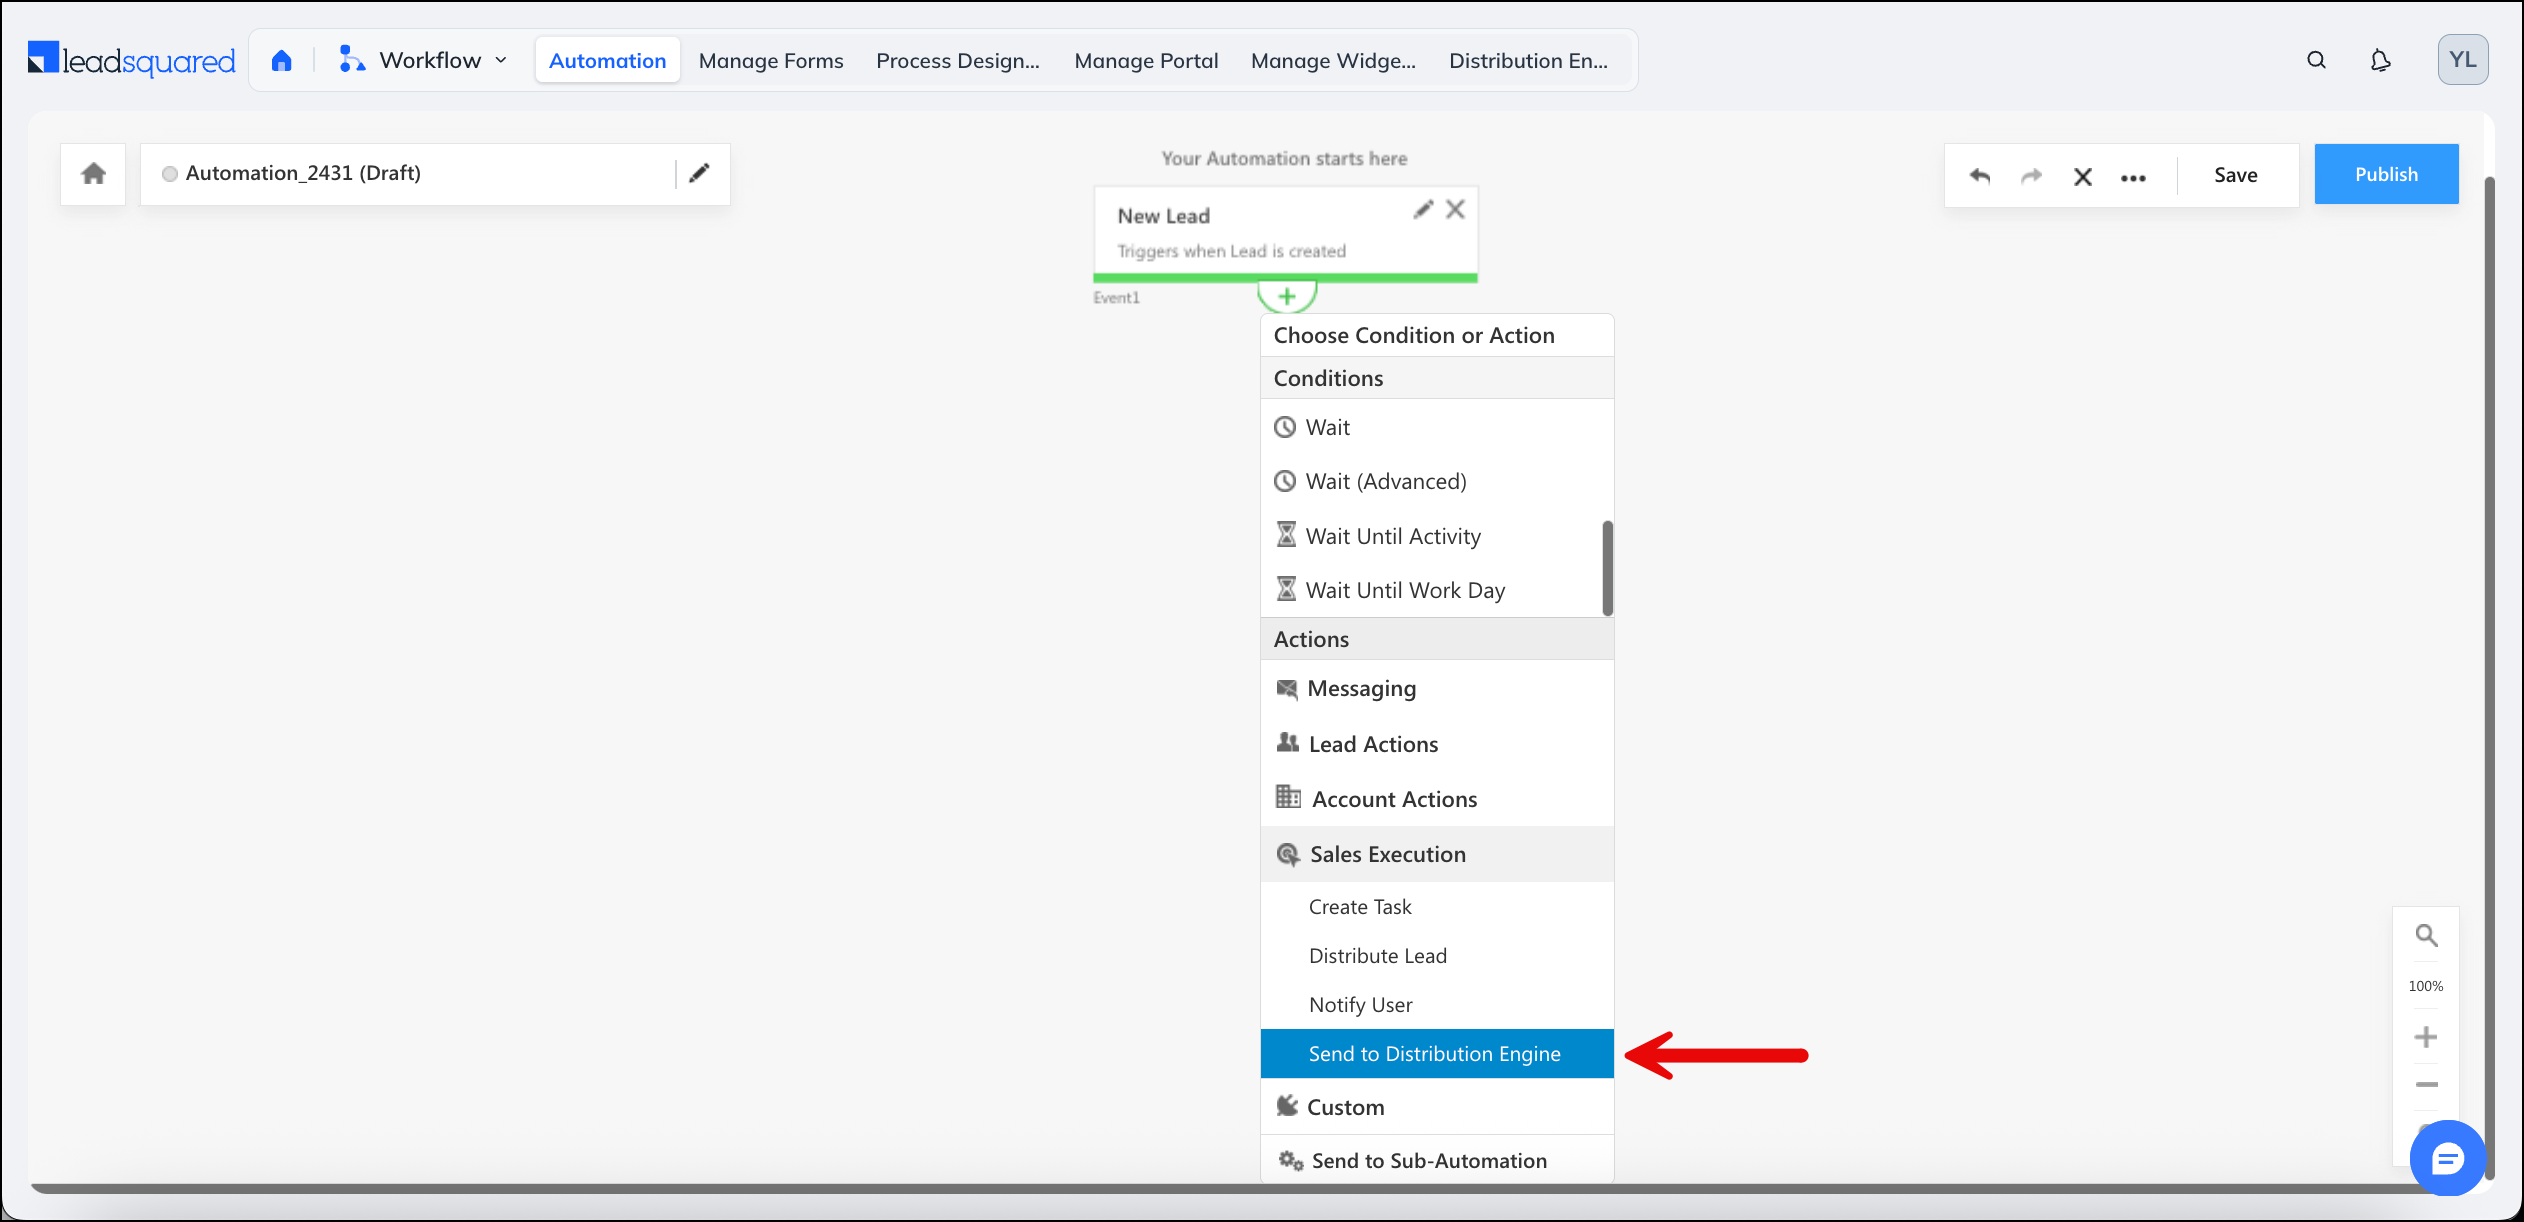
In this mode, a record enters the engine only when an automation sends it there. Add the Send to Distribution Engine card to your automation at the point where the record should be assigned.
The automation pauses at the card while the engine assigns the record, then continues once the engine sends its callback. If the engine does not respond within 10 minutes, the card assigns the record to the default user set inside the card, and the automation moves on.
The card is available on the following automation triggers.
| Automation On | Available Triggers |
| Leads | Lead Created, Lead Updated, Activity Posted on Lead, Opportunity Created, Task Created |
| Opportunities | Opportunity Created, Opportunity Updated, Activity Posted, Task Created |
4. Create a Distribution Rule
Rule creation is a four-step process. You can save your progress at any step.
4.1 Start the Rule
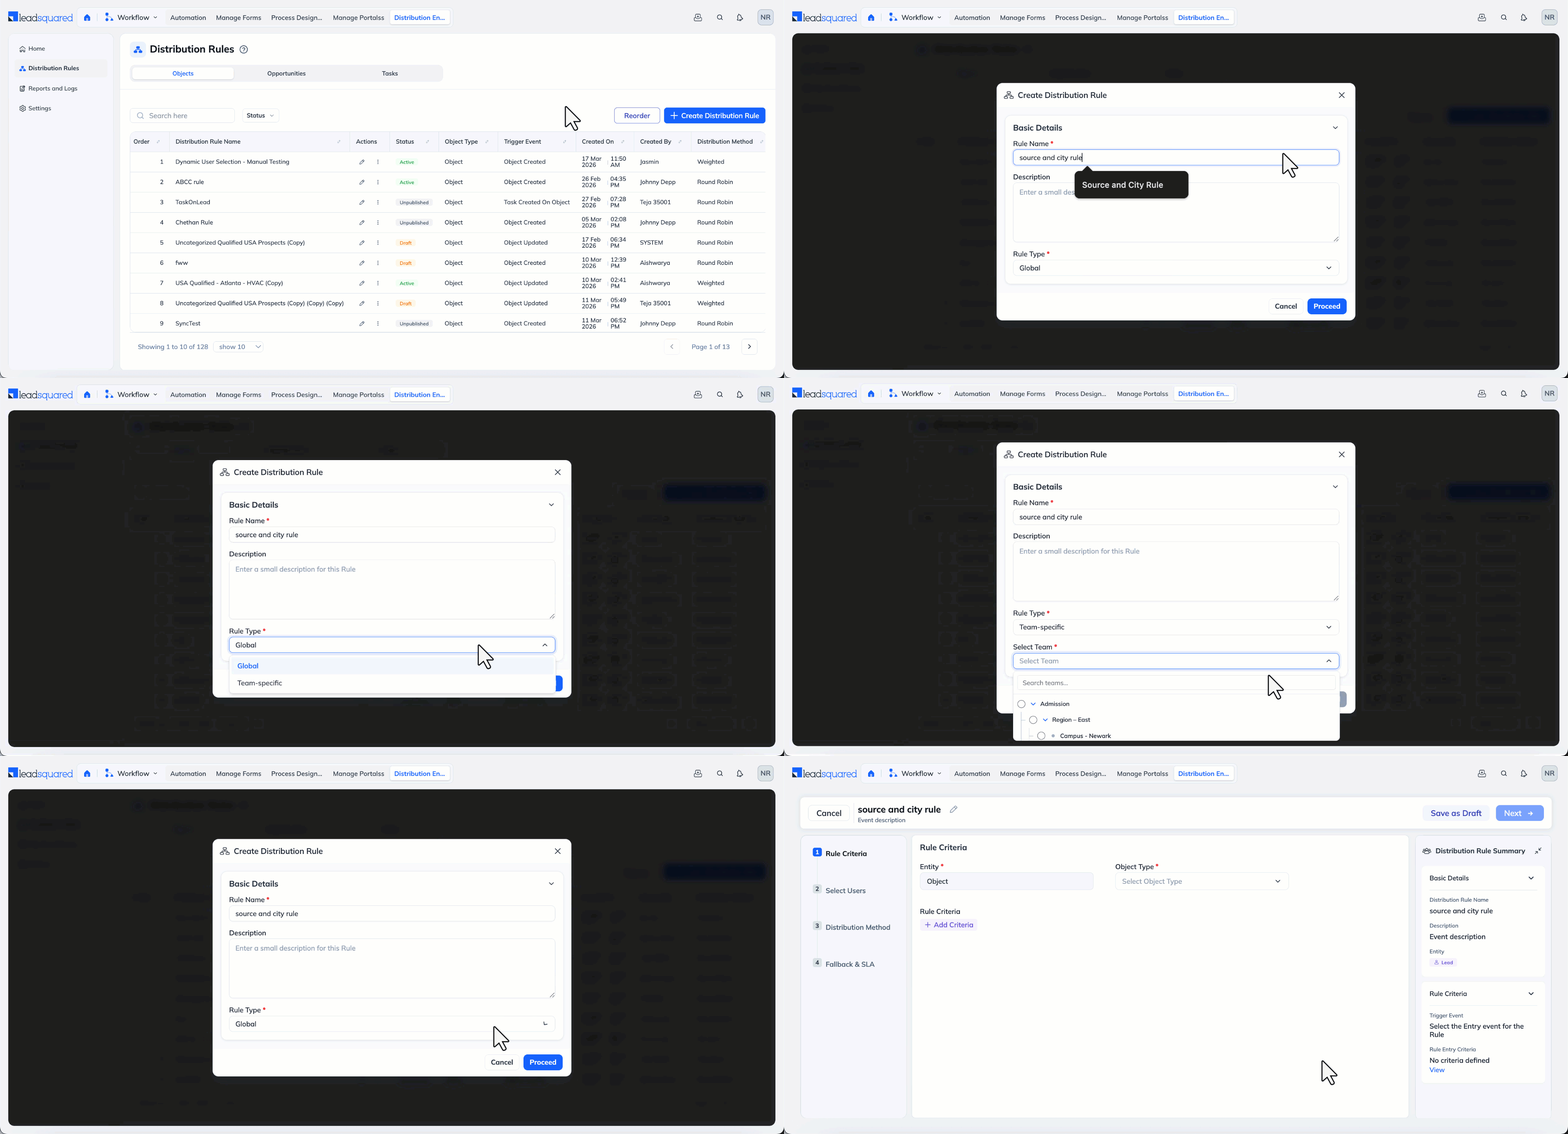
- Navigate to Distribution Engine>Distribution Rules. The page has one tab per record type, and each tab lists only the rules for that type:
- Open the tab for the record type you want to assign.
- Click + Create Distribution Rule.
- Enter the rule details , then click Next.
| Field | Description |
| Rule Name | Required. Must be unique. |
| Description | Optional. |
| Rule Type | Global rules can assign to any user in the account, and everyone with Distribution Engine access can see them. Team-Specific rules can assign only to members of one team, and only that team and admins can see them. Select the team when you choose this option. |
4.2 Step 1: Rule Criteria
This step decides which records the rule handles, and when it accepts them.
Select the record type
The Entity is fixed by the tab you started from. Next to it, select the specific type the rule applies to.
| Entity | Select |
| Object | The Object Type, for example Lead, Contact, Parent, or School, including custom object types enabled on your account. |
| Opportunity | The Opportunity Type configured on your account. |
| Task | The Task Type configured on your account, for example Appointment. |
Select the entry event
The entry event is what brings a record into the rule.
| Entity | Available entry events |
| Object | Object Created, Object Updated, Activity Created On Object, Opportunity Created On Object, Task Created On Object |
| Opportunity | Opportunity Created, Opportunity Import, Opportunity Updated, Activity Created On Opportunity, Task Created On Opportunity |
| Task | On Task Create, On Task Update |
Add rule criteria
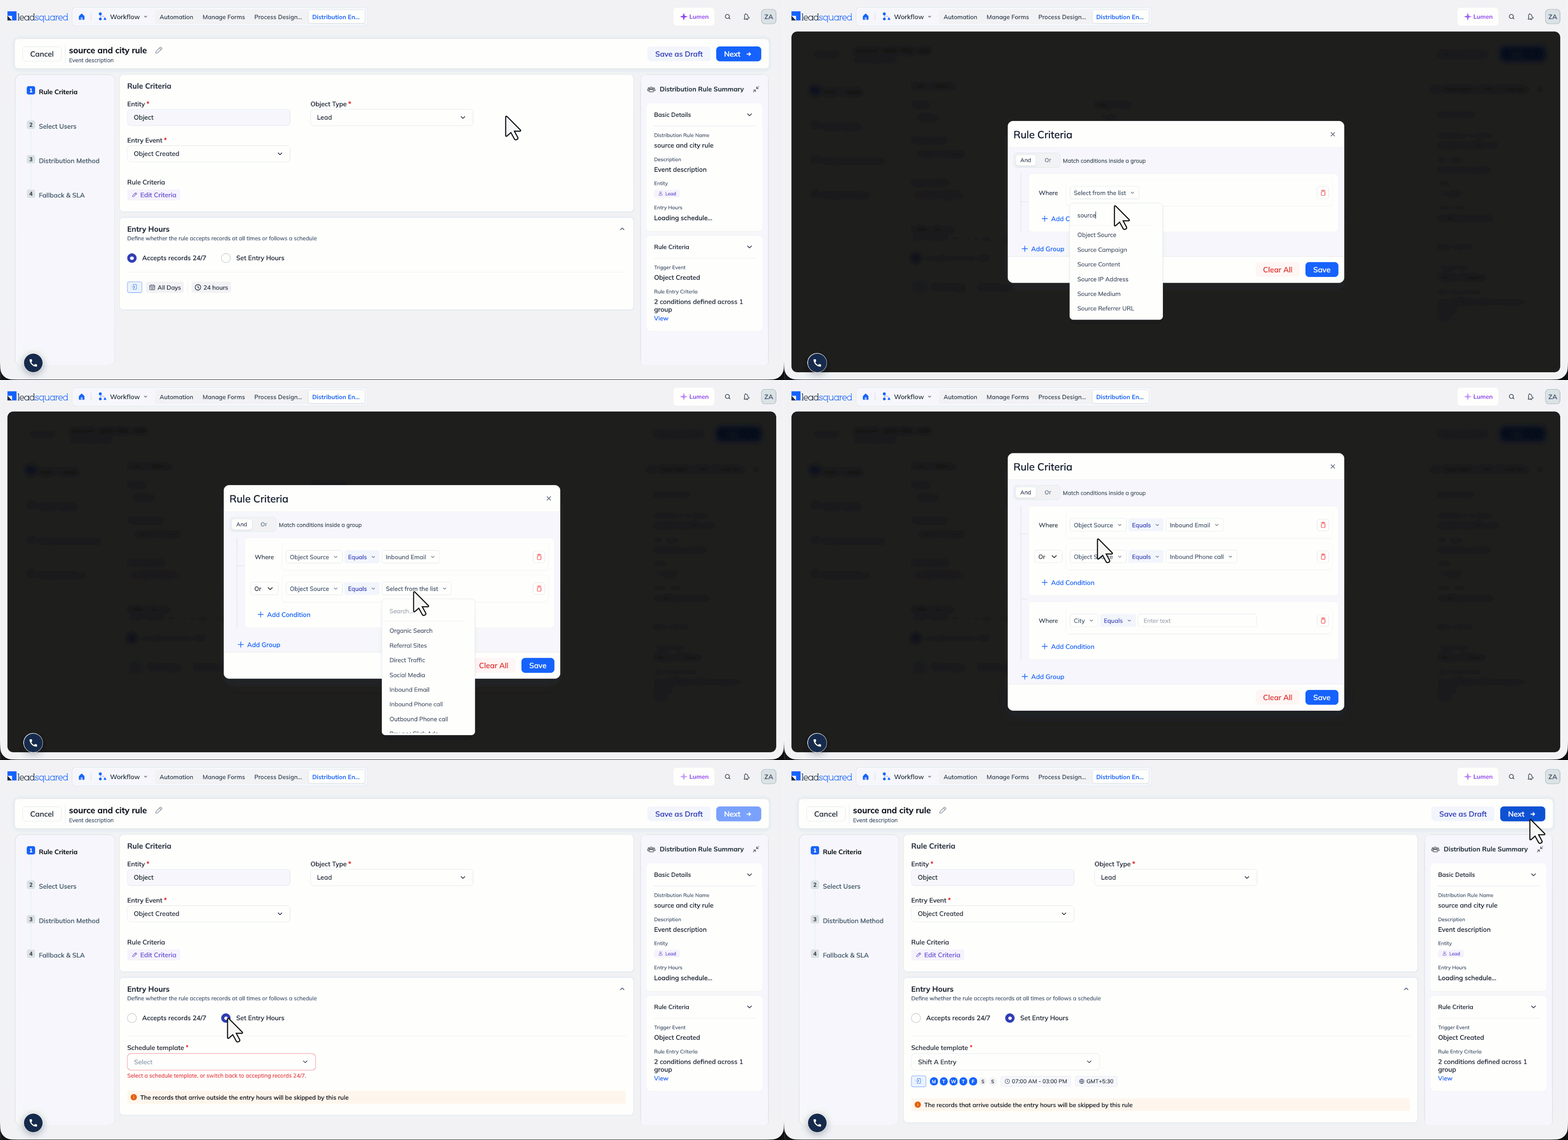
Criteria narrow the rule down to the records you want it to handle. Click + Add Criteria, then build your conditions. A rule with no criteria accepts every record of the selected type.
| Operator | Matches When | Example |
| AND | Every condition is true |
|
| OR | Any one condition is true |
|
| Groups | You need both operators in one rule |
|
Set entry hours
Under the Entry Hours section, choose whether the rule accepts records around the clock, or only during set hours. A record that arrives outside those hours skips this rule, and the engine moves on to the next one. Use this when several shifts share the same criteria but need different users. For more information, refer to Schedule Templates, Entry Hours, and Assignment Hours.
4.3 Step 2: Select Users
This step builds the pool of users who can receive records from the rule.
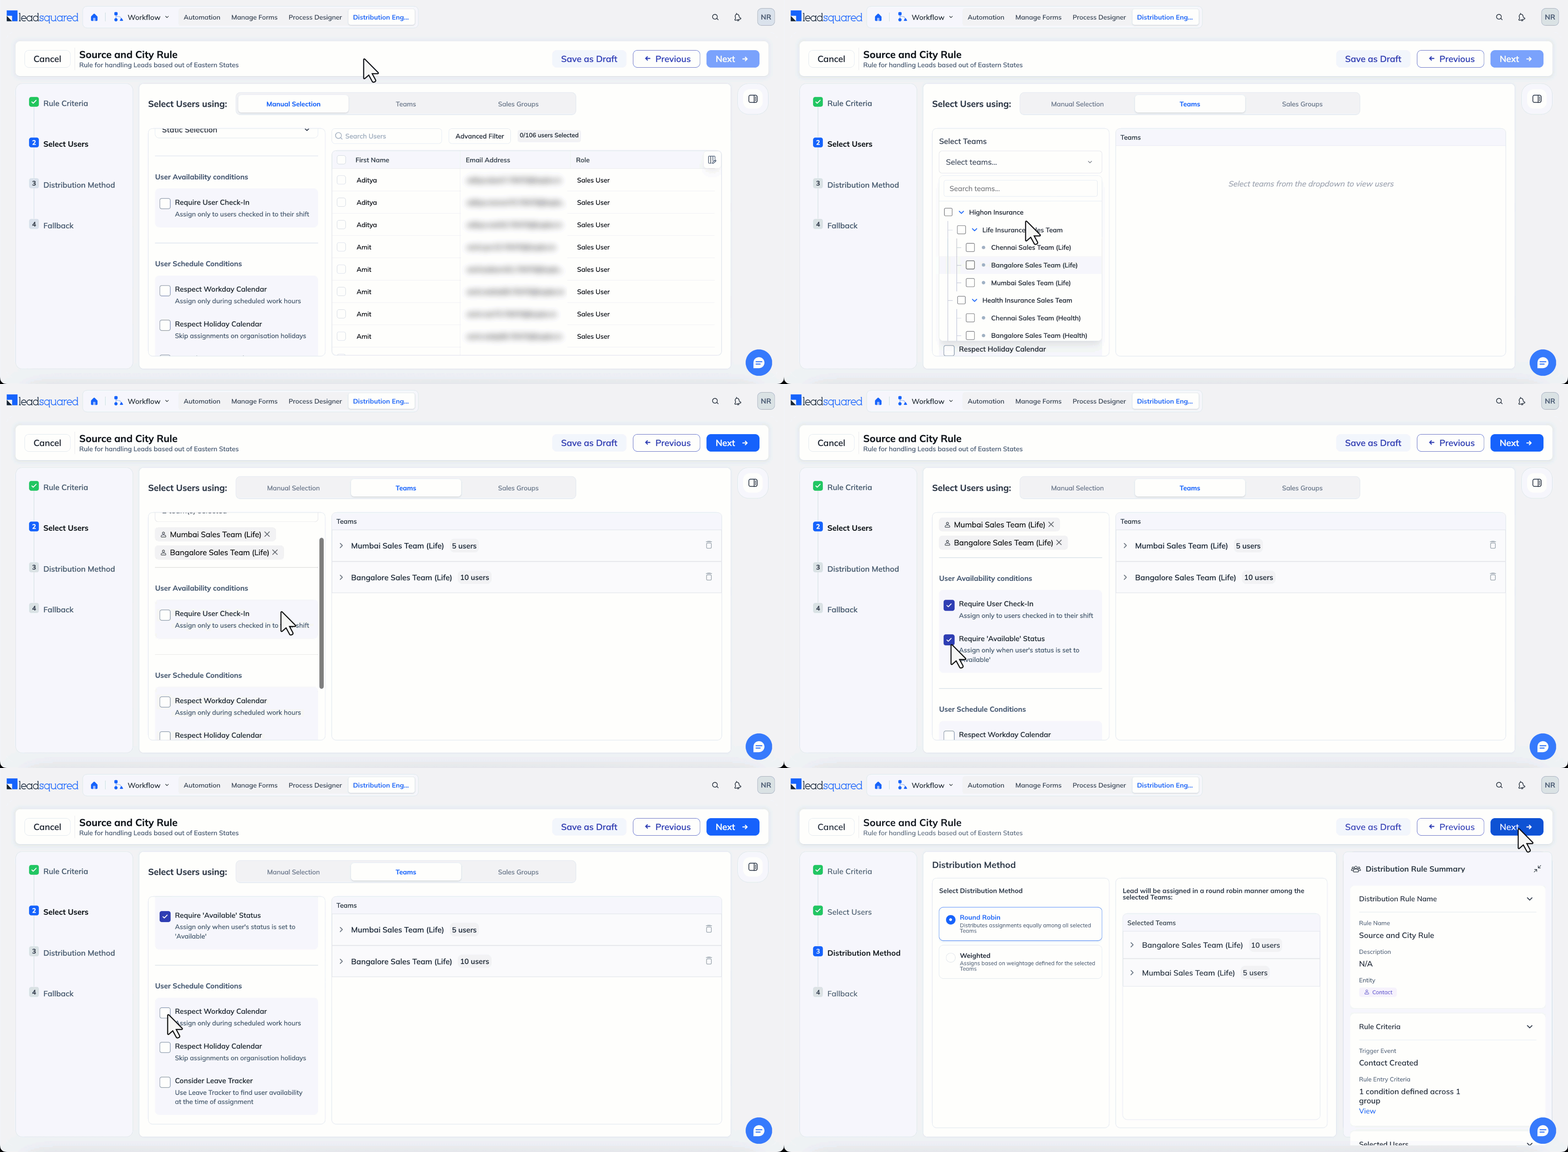
Select one of the following user selection types. They cannot be combined.
| Selection type | Records go to | Notes |
| Manual Selection | Users you name, or users who match criteria you define | Choose static or dynamic selection |
| Teams | Members of the teams you select | Round Robin runs inside the team |
| Sales Groups | Members of the sales groups you select | Not available on team-specific rules |
| Performance Criteria (ACE) | Users ranked by their ACE performance | Requires ACE on your account. For more information, refer to Distribute Based on ACE Performance |
Restrict assignment to available users
Turn on Assign only if the User is available, then select the checks that apply.
| Condition | Assigns only when | Account settings it depends on |
| Require User Check-In | The user is checked in to their shift | Enable User Check-in Status for Distribution |
| Require ‘Available’ Status | The user’s status is set to Available | Enable User Check-in Status for Distribution |
| Respect Workday Calendar | The current time falls inside the user’s workday template | Consider Workday Templates for Distribution |
| Respect Holiday Calendar | The day is not an organisation holiday | Consider Holiday Calendar for Distribution |
| Consider Leave Tracker | The user has no leave applied in Leave Tracker | Consider Leave Tracker for Distribution |
A condition appears in the rule only after an admin turns on the matching setting in Distribution Engine>Settings>Additional Settings. For more information, refer to section 8.2, Additional Settings.
Choose static or dynamic selection
Under Manual Selection, choose how the user list is built:
- Static – You pick the users yourself. The list changes only when you edit the rule.
- Dynamic – You set criteria on user properties, such as department or role, and the engine works out who qualifies at the moment of assignment. A new joiner who matches the criteria is included without you touching the rule.
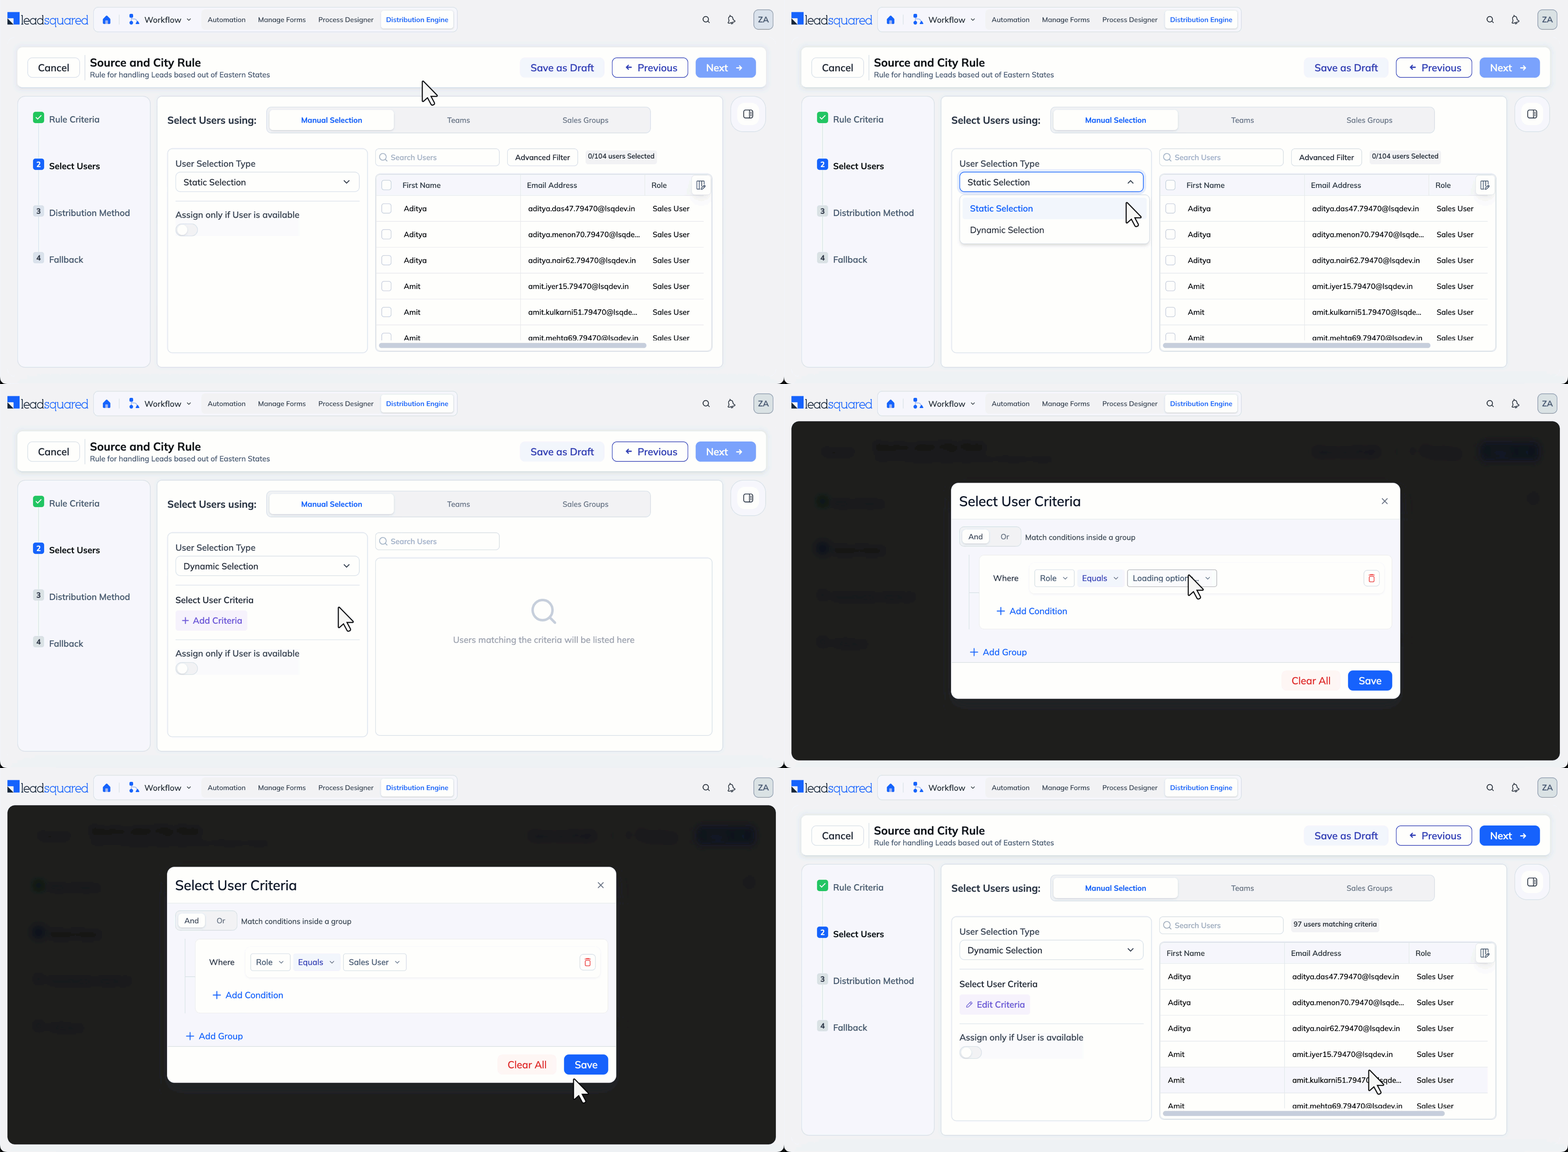
To narrow a long user list while picking users, use the Advanced User Filter. It accepts several criteria at once, such as user type, team, and other user properties.
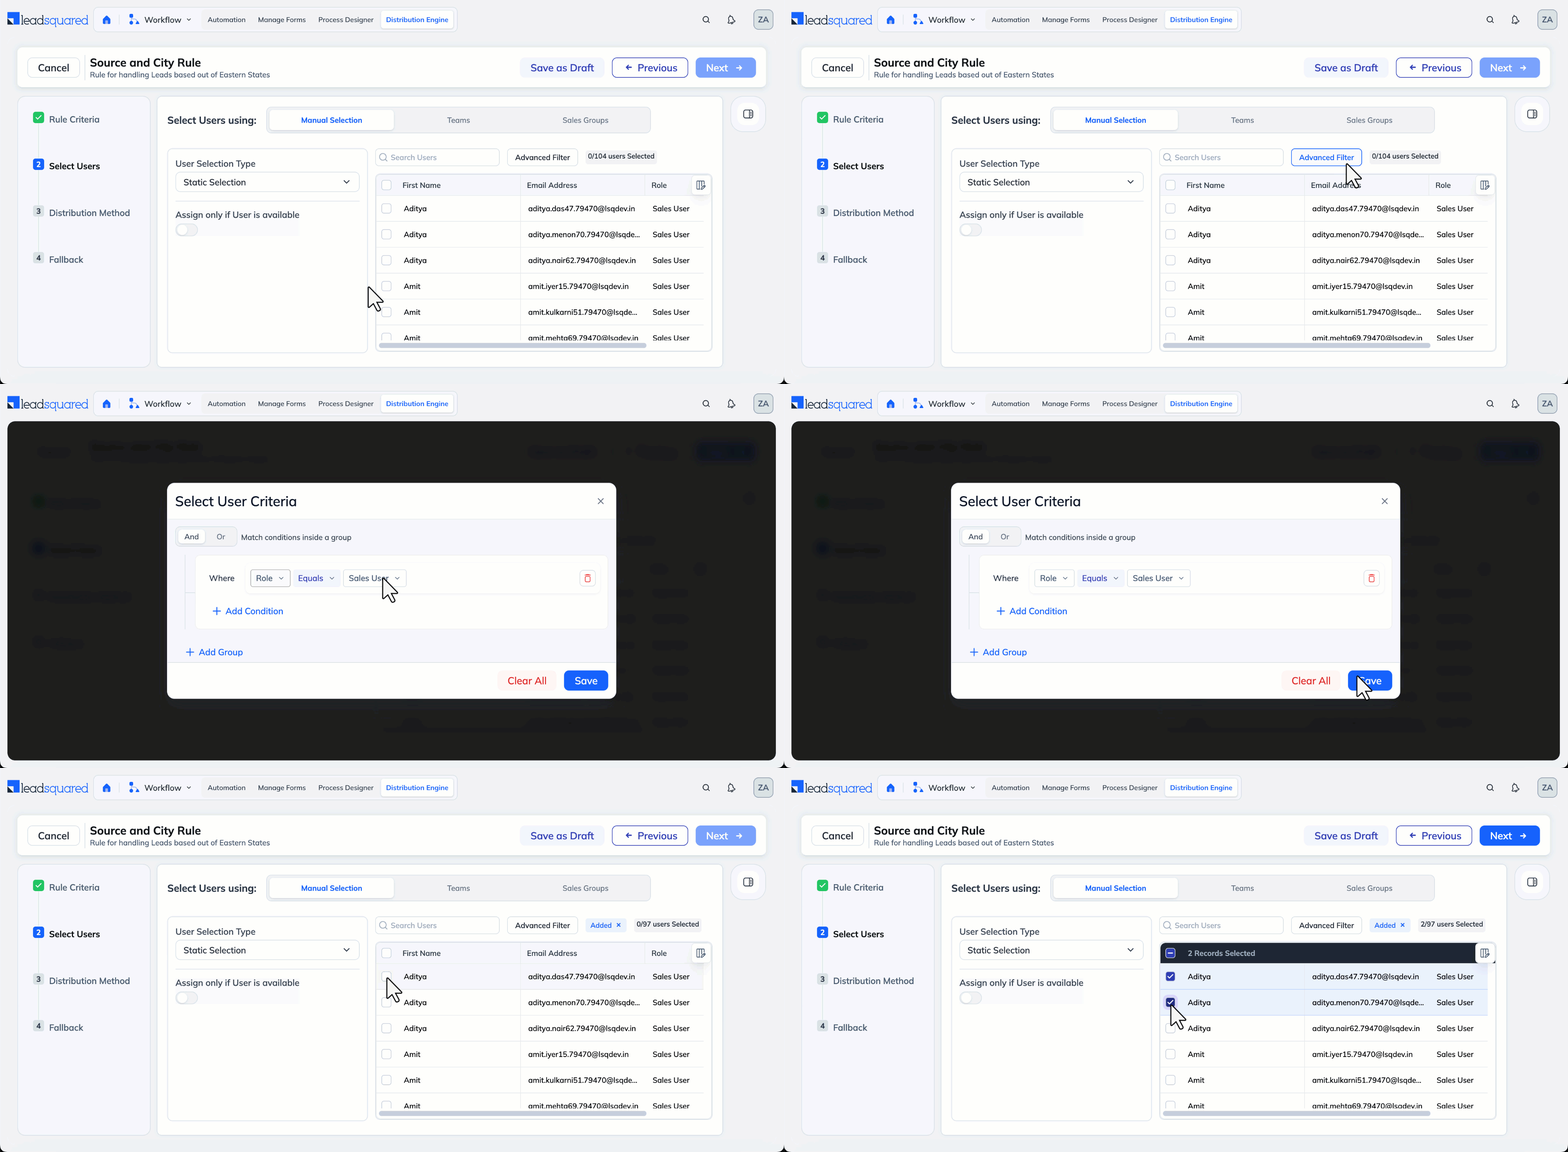
Note: On a team-specific rule, Sales Groups are unavailable, the team is locked to the one you chose when creating the rule, and only that team’s members can be selected.
4.4 Step 3: Distribution Method
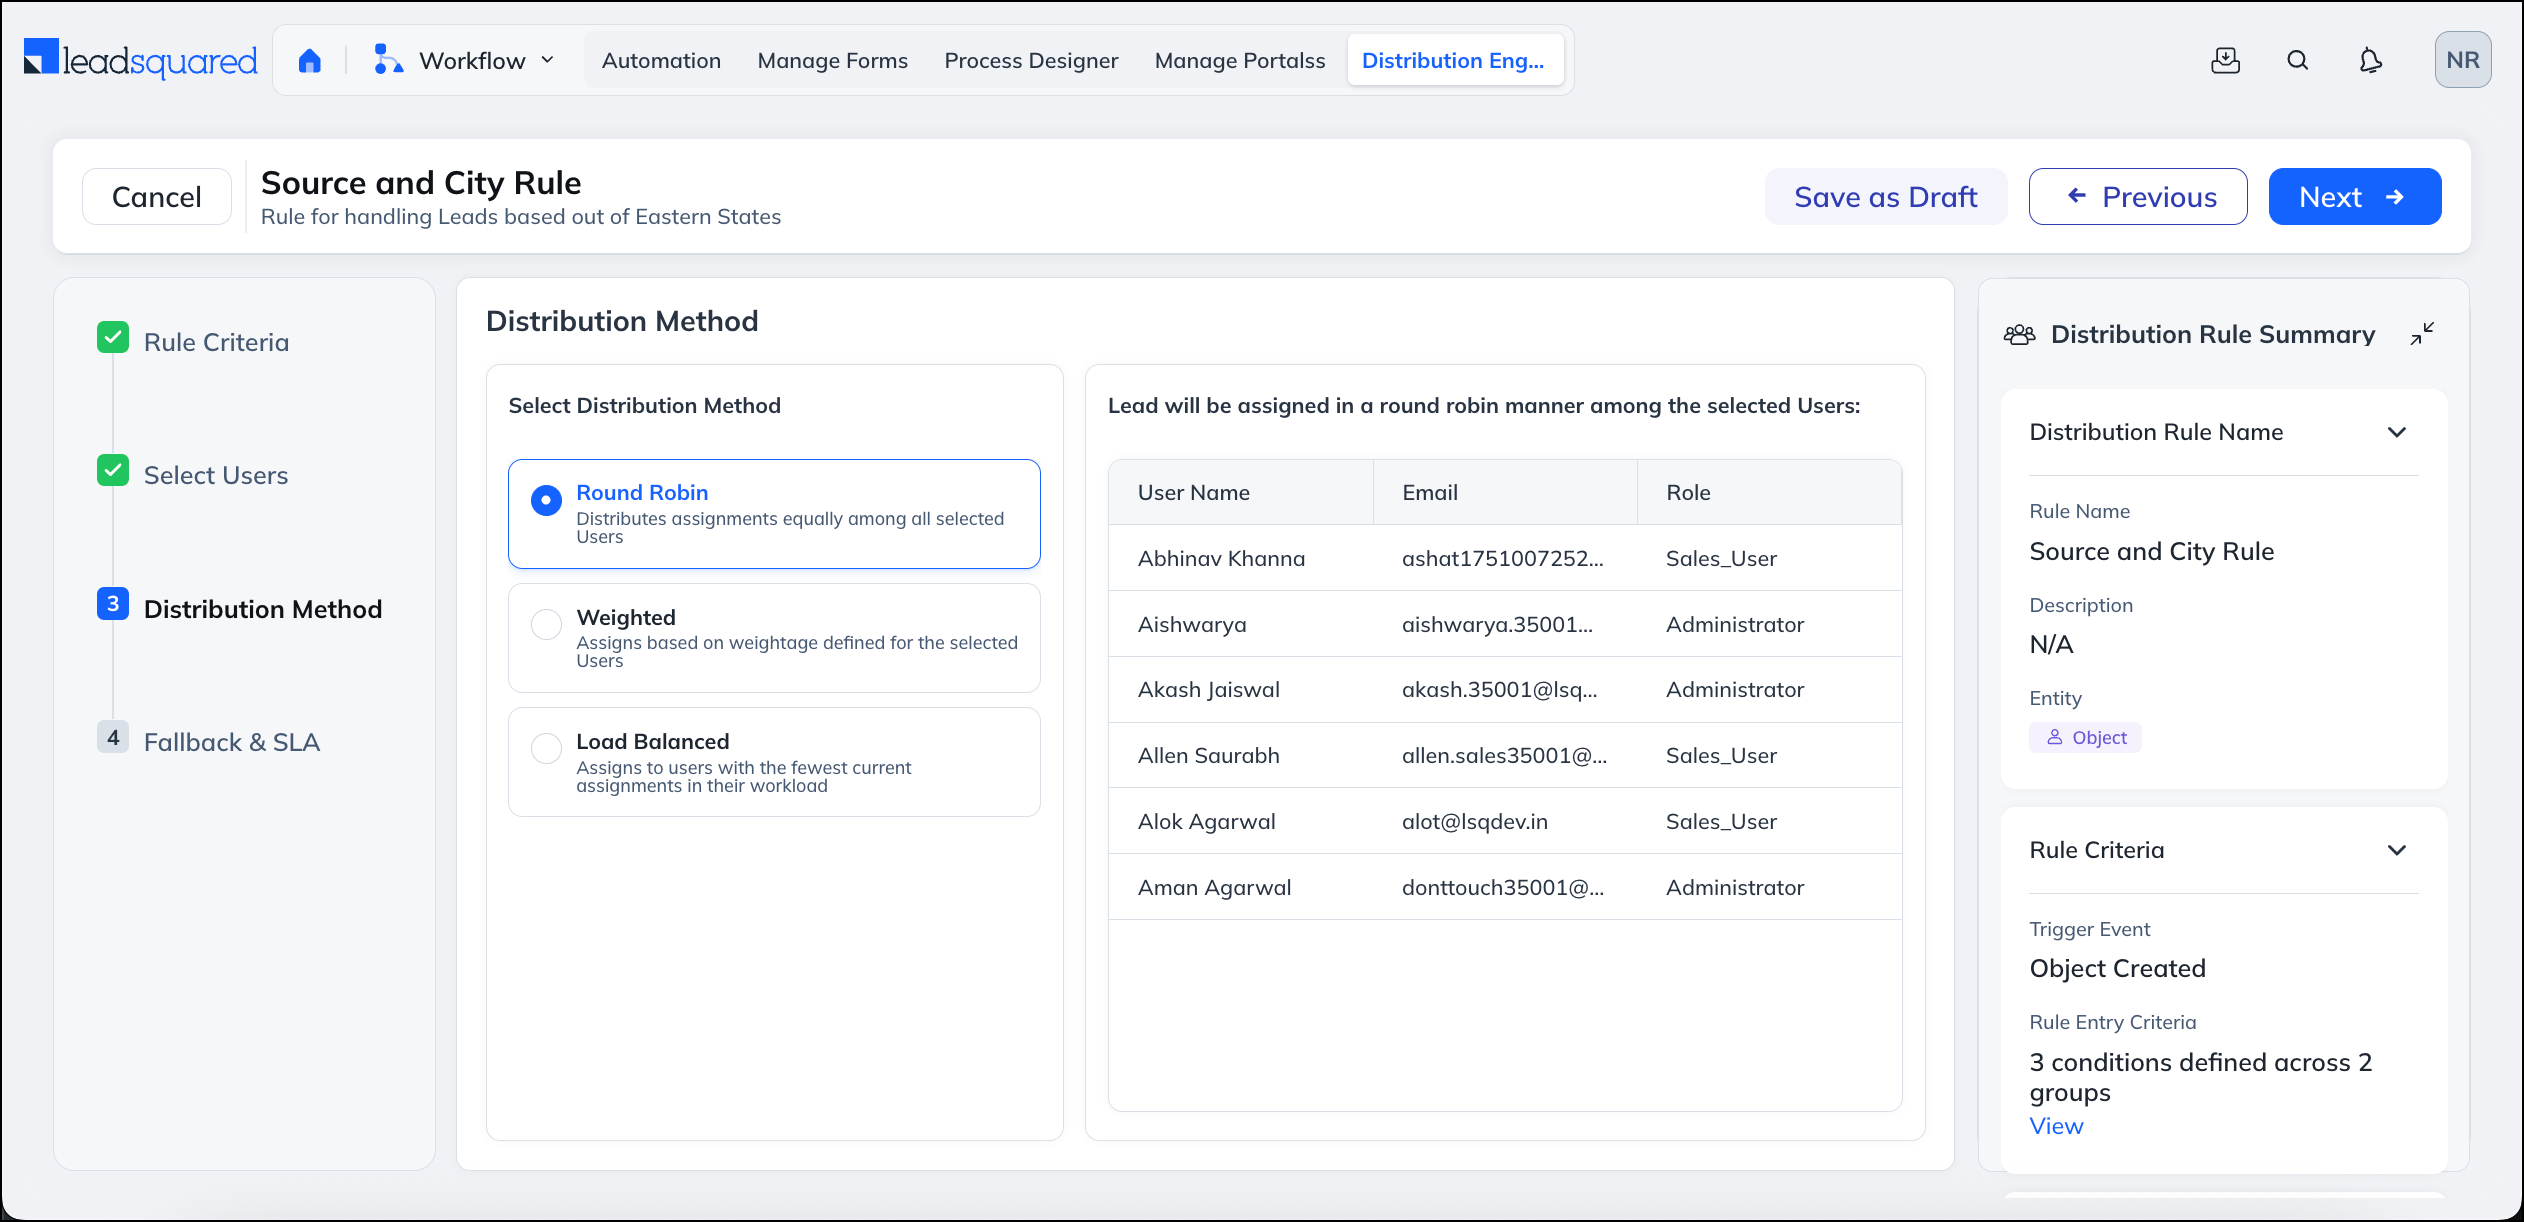
The distribution method decides how records are shared among the users you selected. Select one of the following.
| Method | Shares records by | Select it when |
| Round Robin | Rotating through users in a fixed sequence | Everyone should get an equal share, in turn |
| Weighted | Rotating through users in a ratio you define | Some users, teams, or groups should carry more than others |
| Load Balanced | Giving the next record to whoever is behind | Users start at different times, or hold very different volumes |
For how each method behaves, including worked examples, refer to Distribution Methods in Distribution Engine.
4.5 Step 4: Fallback & SLA
This step covers what happens when distribution does not go to plan, and when the rule is allowed to assign.
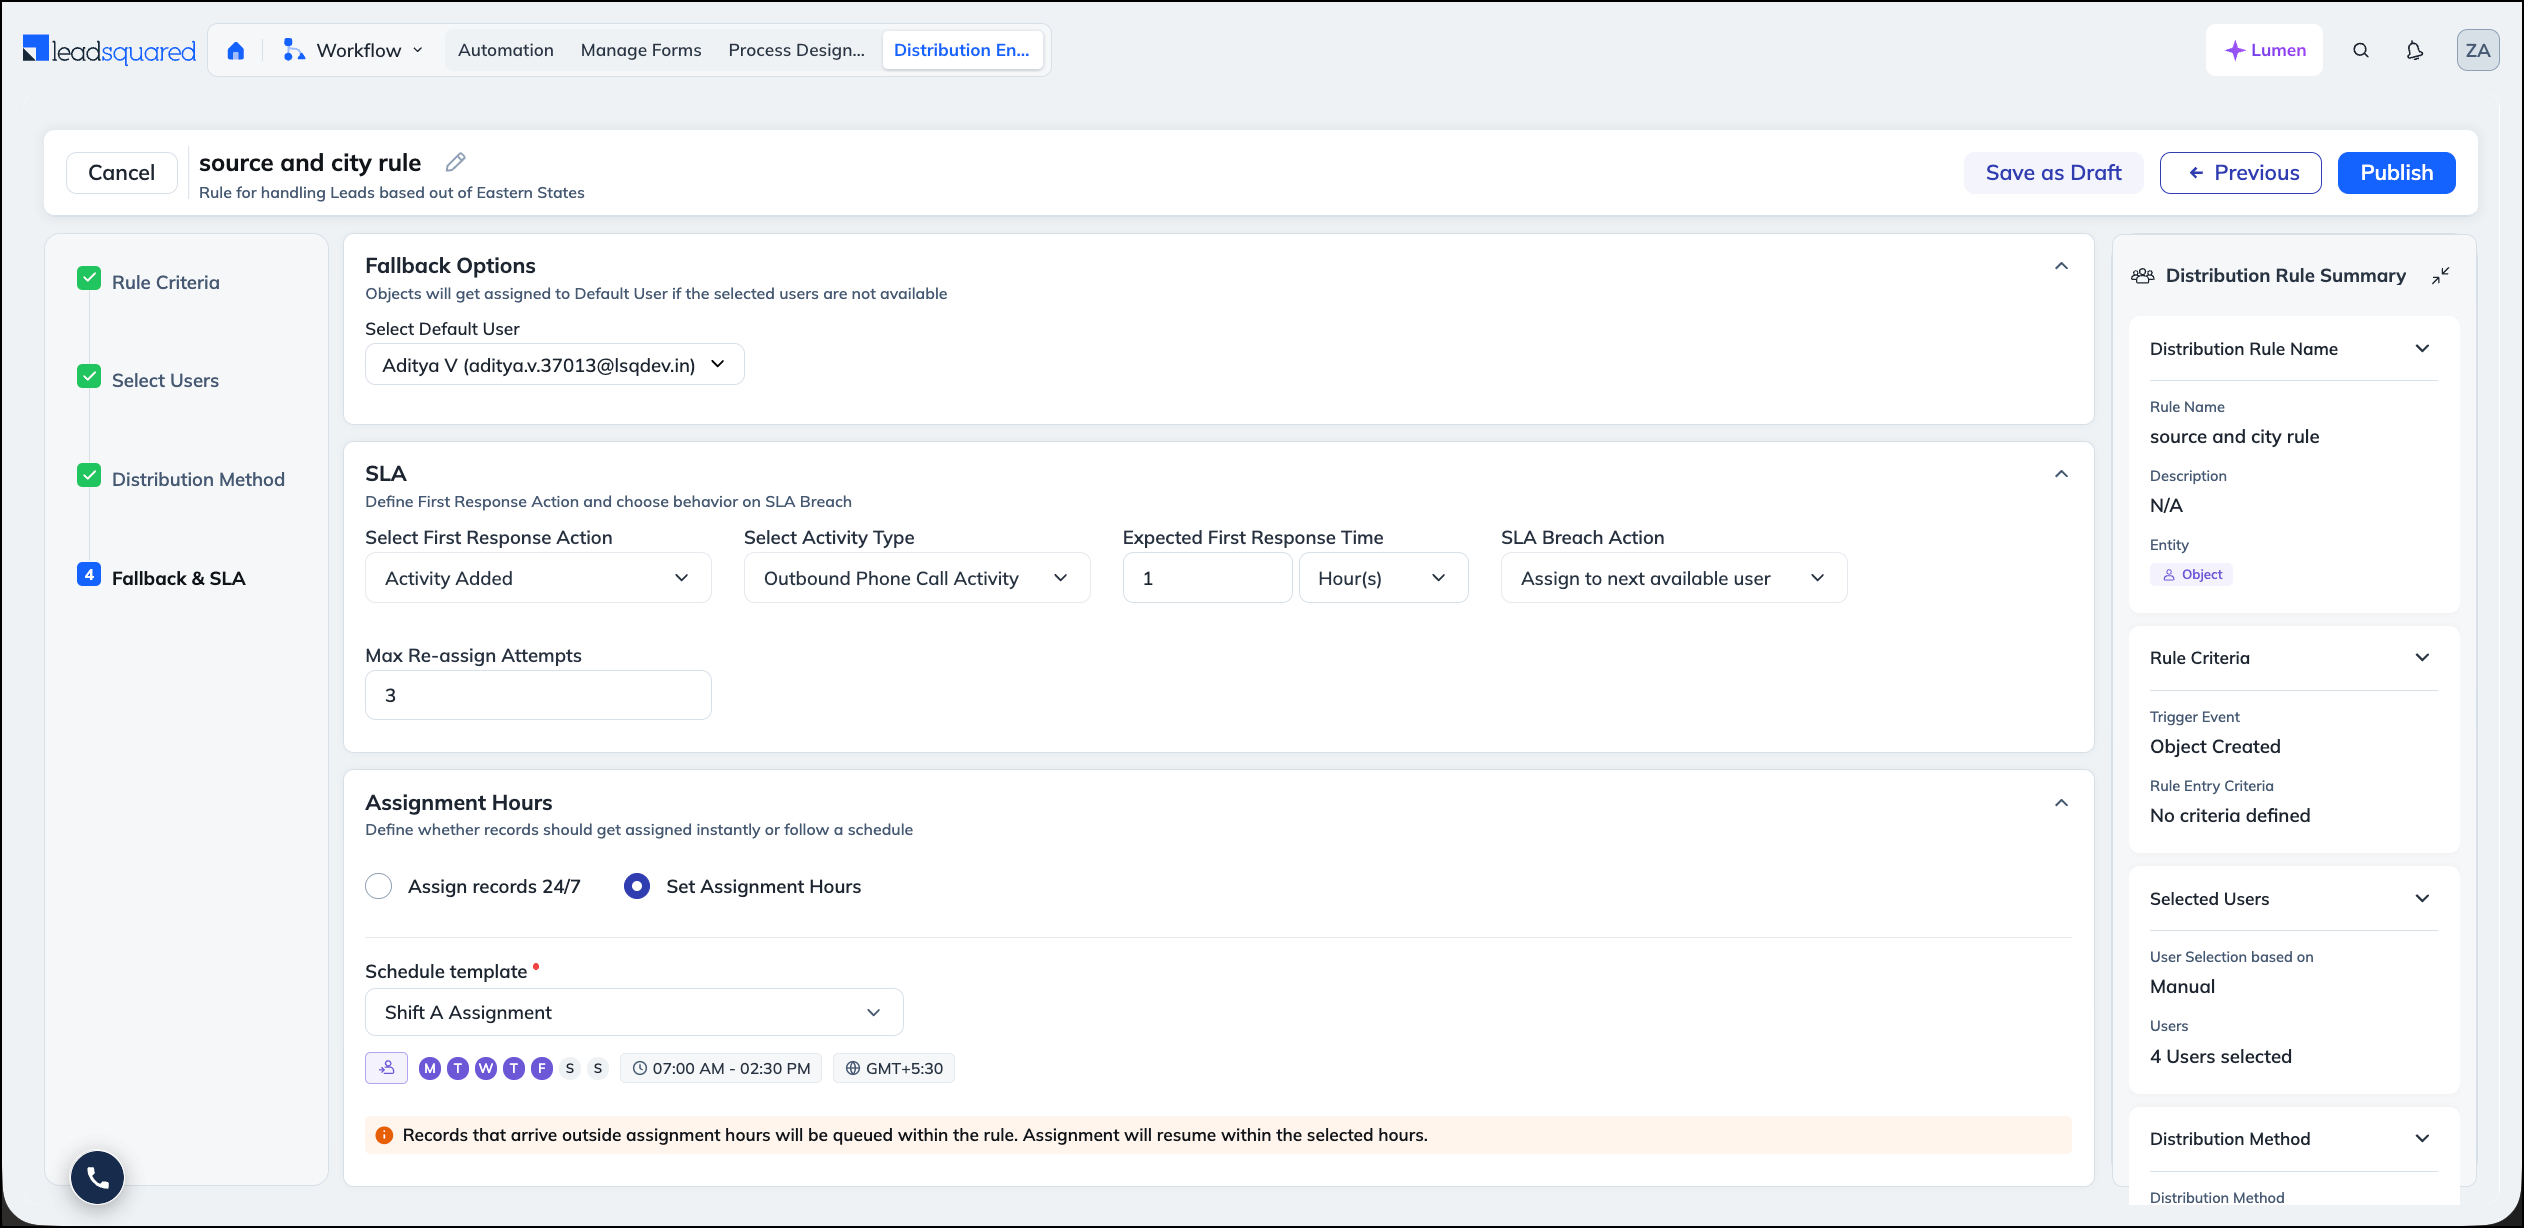
Select a default user
Under the Fallback Options section, select the Default User. This user receives the records the rule cannot place because no user is eligible.
Set an SLA
An SLA sets a first response deadline on every record the rule assigns. Miss it, and the engine moves the record to someone else. The SLA is optional. To skip it, leave Select First Response Action set to None.
| Field | Description |
| Select First Response Action | The action that counts as a response: Activity Added, Mark Task as Completed, Stage Change, or Field Change. |
| Activity Type, Task Type, or Field | Appears next to the action you selected, and pins it down to one activity type, task type, or field. Stage Change needs nothing here, because any stage move counts. |
| Expected First Response Time | How long the user has. Enter a number, then select Minutes, Hours, or Days. |
| SLA Breach Action | What happens when the timer runs out. Assign to next available user passes the record to the next eligible user with a fresh timer. Assign to default user sends it straight to the default user. |
| Max Re-assign Attempts | How many users the engine tries before falling back to the default user. Applies only to Assign to next available user. Default is 3. |
For example, a rule asks for a phone conversation activity within 1 hour, breaches to the next available user, and allows 3 attempts. A lead goes to User A at 10:00 AM. If User A logs the activity by 11:00 AM, the SLA is met. If not, the lead moves to User B with a fresh hour, and then to User C. If none of the three respond in time, the lead lands with the default user.
Set assignment hours
Under the Assignment Hours section, choose whether the rule assigns records around the clock, or only during set hours. Records that arrive outside those hours wait in a queue on the rule instead of going to the default user. For more information, refer to Schedule Templates, Entry Hours, and Assignment Hours.
Save or Publish the Rule
- Save as Draft – Keeps the rule inactive. Drafts never receive records.
- Publish – Makes the rule live and places it at the bottom of the priority order. Reorder it from the rule list.
5. Manage Distribution Rules
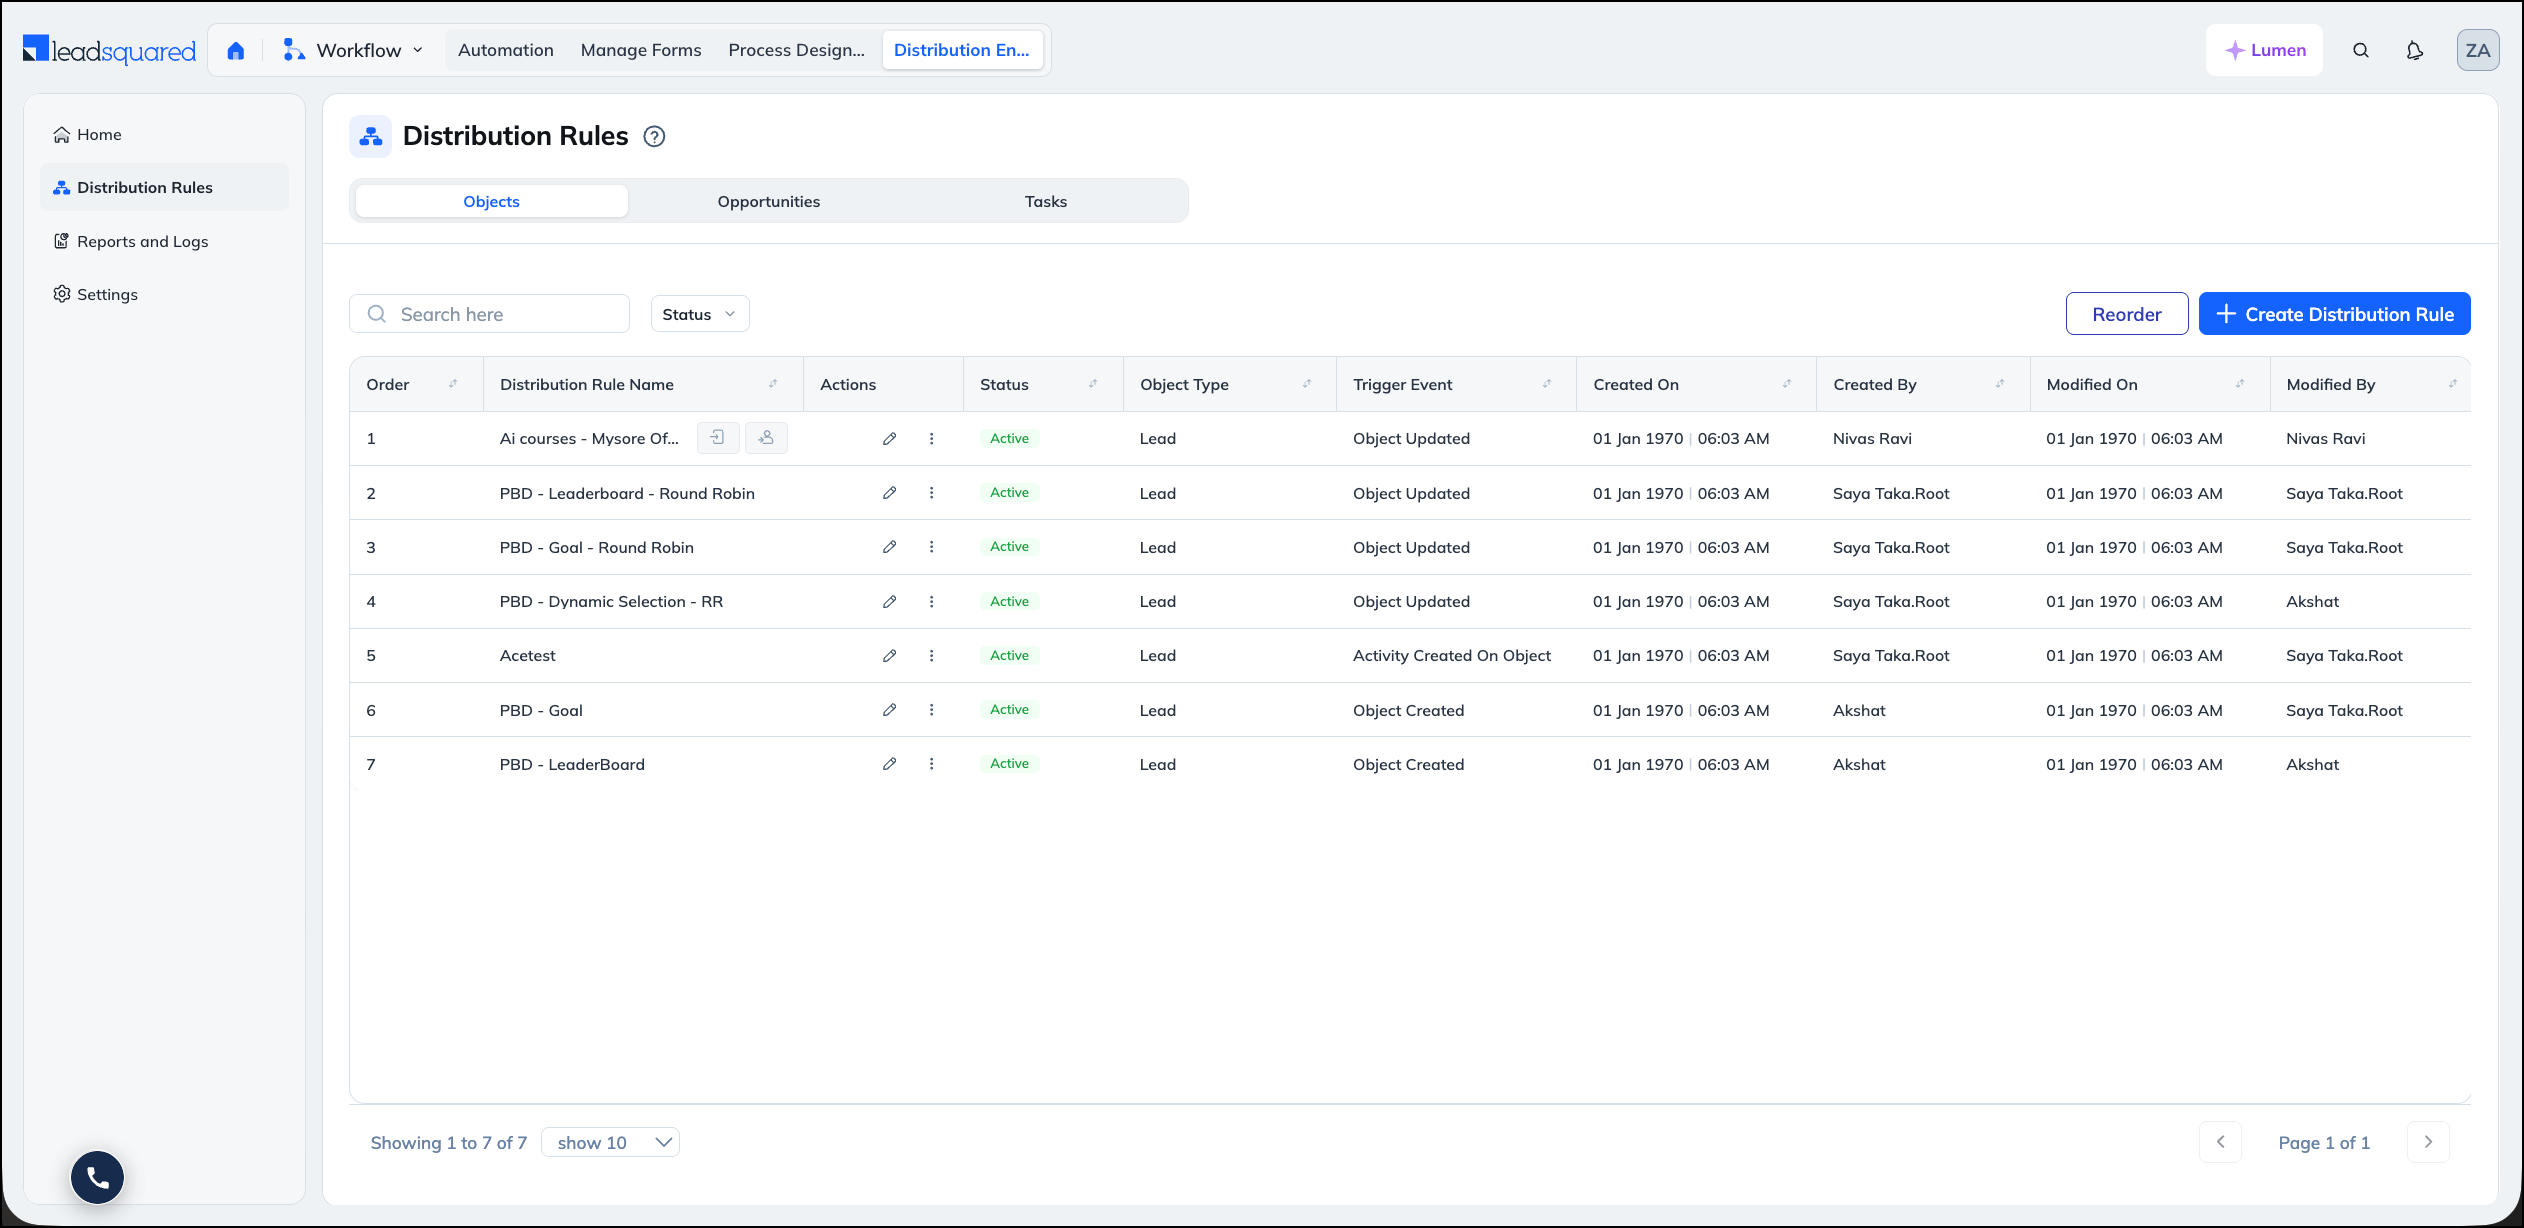
Navigate to Distribution Engine>Distribution Rules. The rule list on each tab shows the order (priority), rule name, action, status, created on, and created by. Where a rule uses schedule templates, the list also shows its entry hours and assignment hours.
From the list you can open a rule, search by name or creator, filter by status, creator, or distribution method, and work with records the rule has queued.
You can edit a rule while it is running. Records already moving through it finish under the old configuration, and your changes take effect for new records the moment you click Save.
5.1 Set Rule Priority
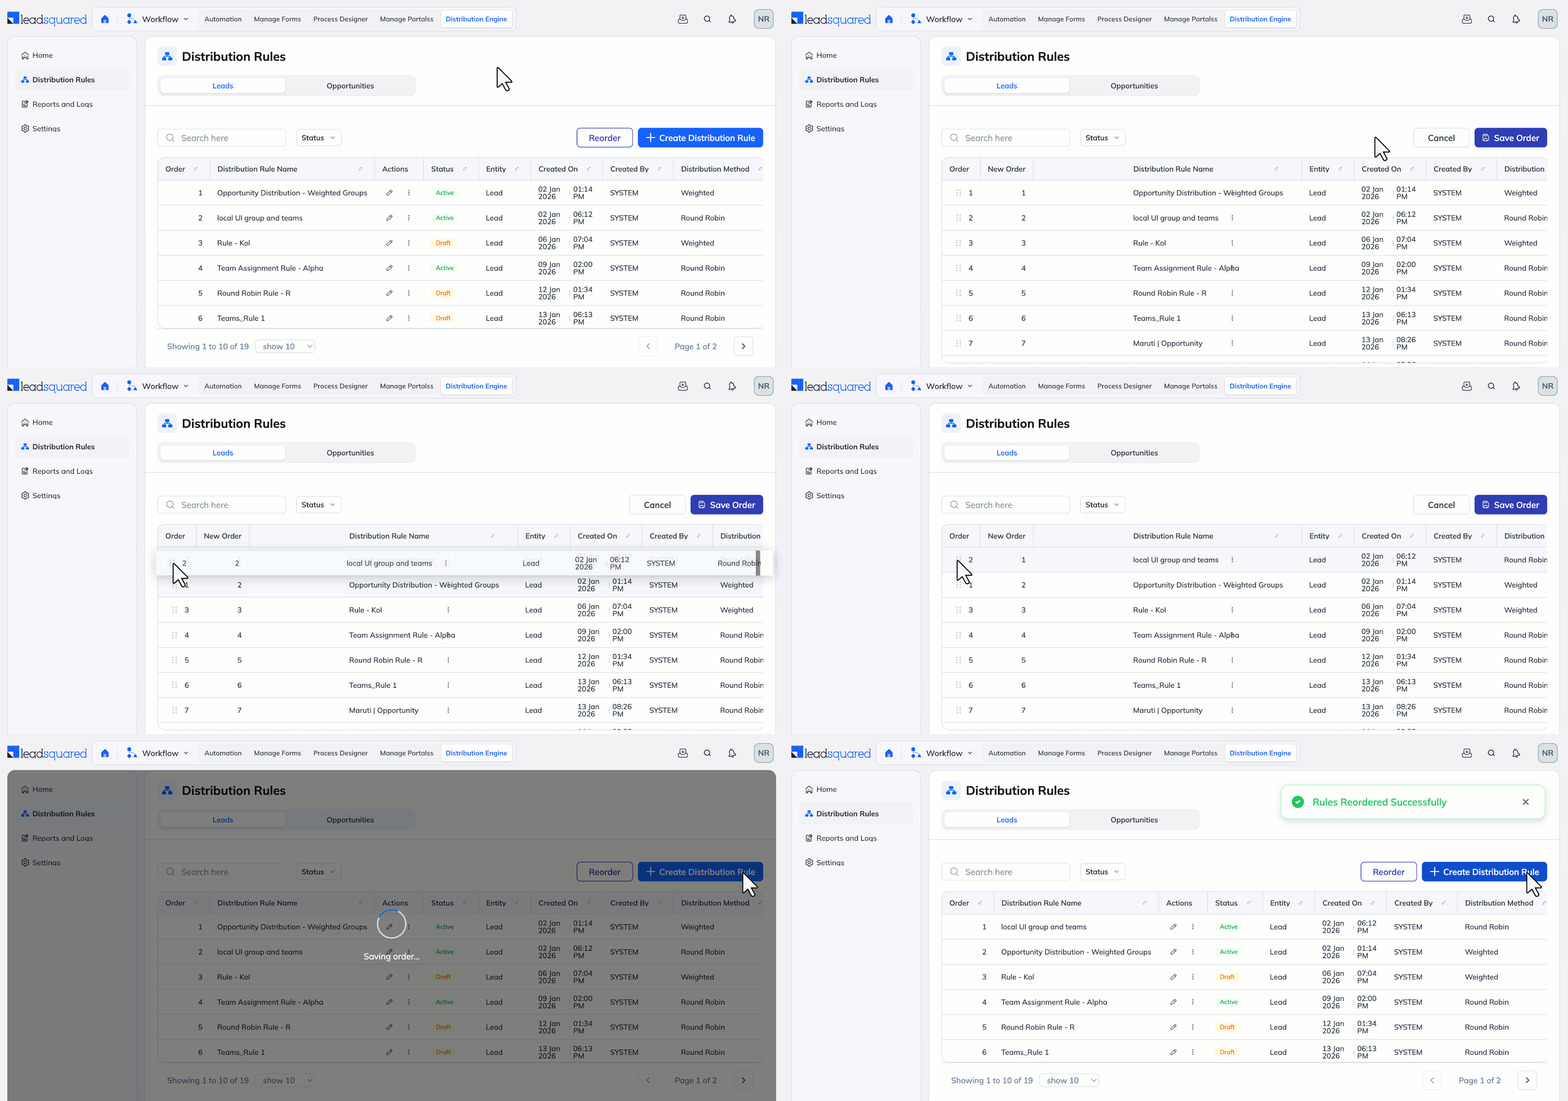
Rule order decides which rule gets applied first when a record enters the Distribute Engine.
When a Lead, Opportunity, or Task evaluated:
- The engine checks the first active rule in the list.
- If the record matches the rule’s entry criteria, the assignment is made.
- Once a record is assigned, no further rules are evaluated.
- If the record does not match, the engine moves to the next rule in the order.
Why rule order matters
If multiple rules can apply to the same record, only the highest‑priority rule will run.
Example:
- Rule 1: Assign All Website Leads to Team A
- Rule 2: Assign High‑Score Website Leads to Team B
If Rule 1 is above Rule 2, all website leads (including high‑score ones) will be assigned to Team A.
To ensure high‑score leads go to Team B, place Rule 2 above Rule 1.
Note:
- Only Active rules can be reordered
- Use drag and drop to change priority
5.2 Manage Queued Records
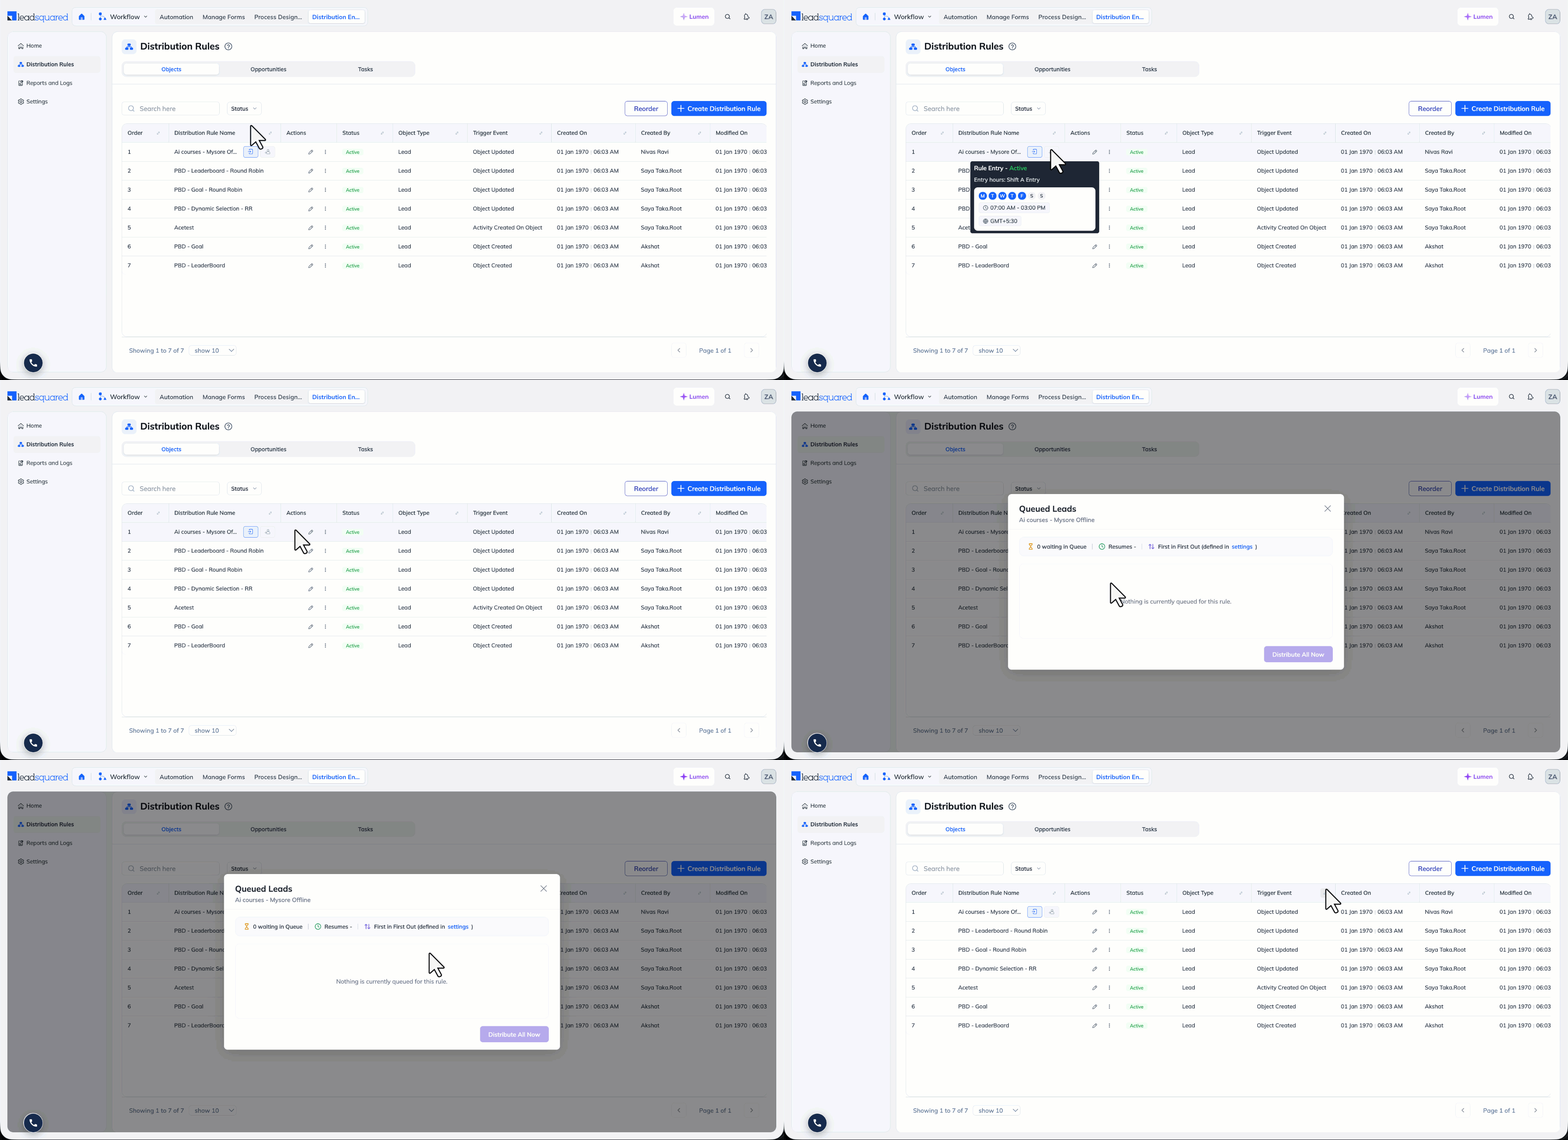
A rule that uses assignment hours holds its after-hours records in a queue. From the rule list you can view the queue, release selected records immediately, or clear the queue. For more information, refer to Schedule Templates, Entry Hours, and Assignment Hours.
6. Permissions
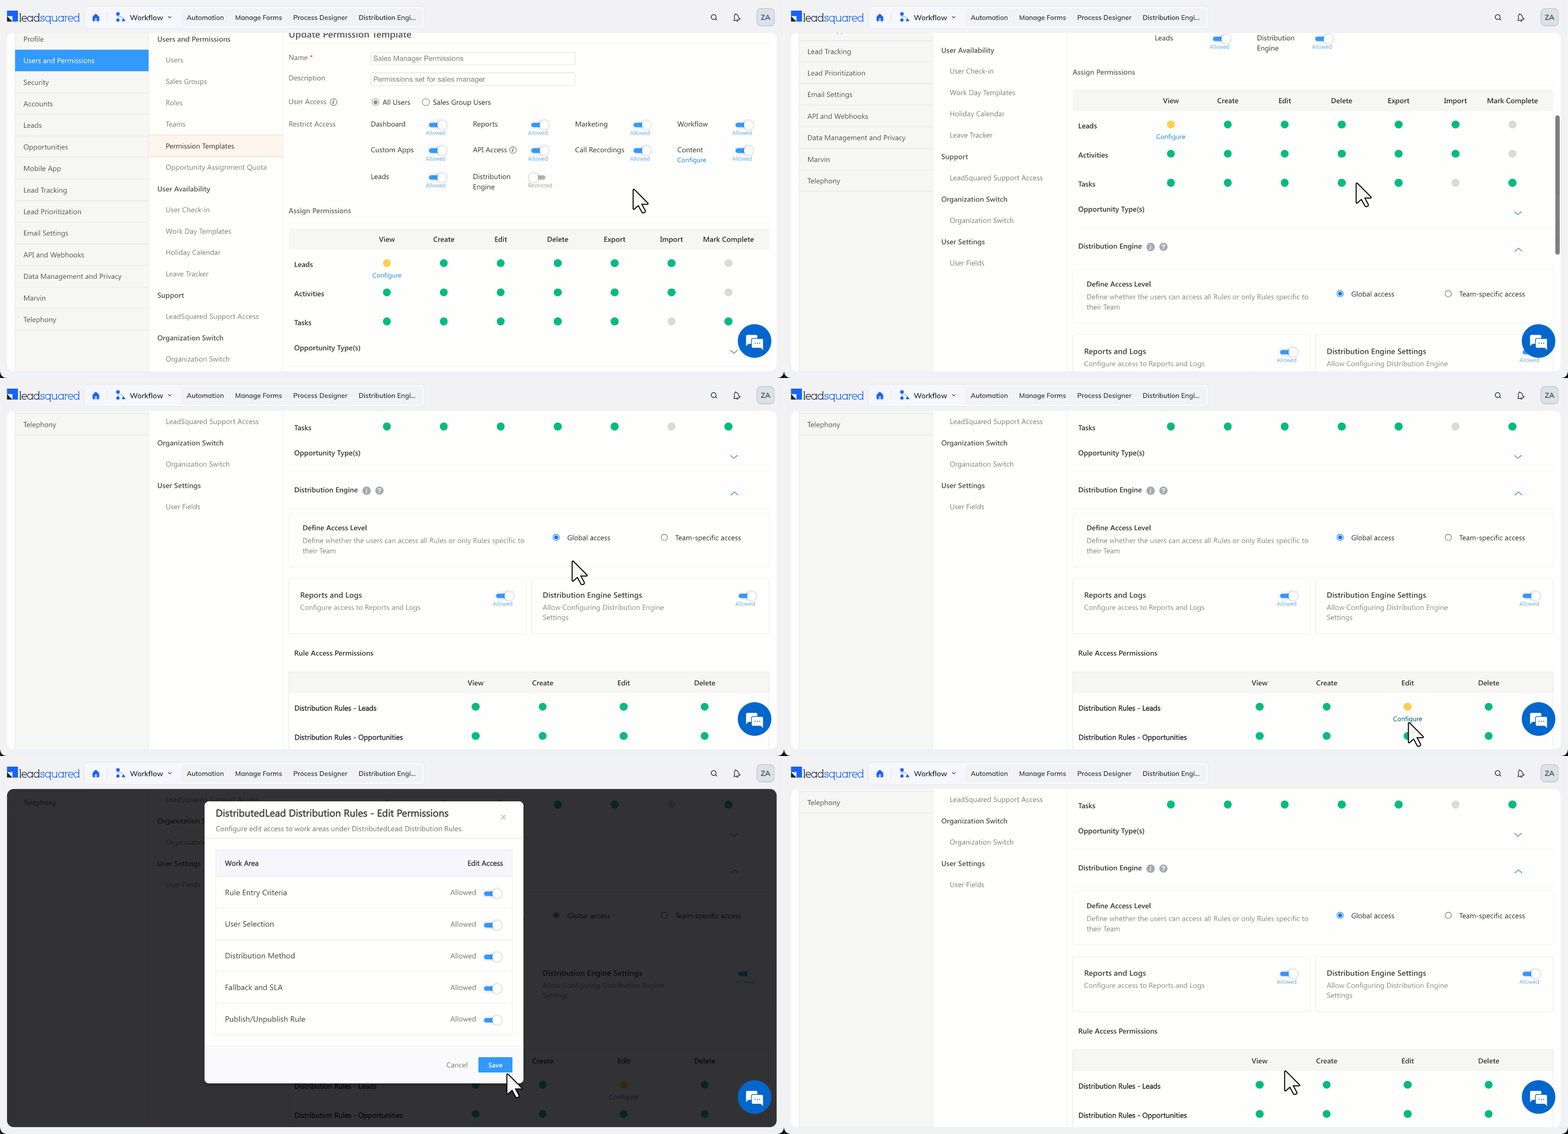
Distribution Engine access is granted through Permission Templates, so you can open the feature up beyond admins.
For each user or role, you control the following.
| Setting | Controls |
| Access type | Global, meaning all rules, or Team-Specific, meaning only the rules of the user’s own team |
| Feature visibility | Access to Reports, Logs, and Distribution Settings |
| Rule permissions | View, Create, Edit, and Delete. Removing View removes the rest |
| Modify permissions | Which parts of a rule the user can edit: Rule Entry Criteria, User Selection, Distribution Method, Fallback and SLA, and Publisher Rules |
For example, give a sales manager team-specific access with permission to edit user selection and weightage. They can rebalance their own team’s rules without being able to change the criteria or create new rules.
7. Track Distribution Performance
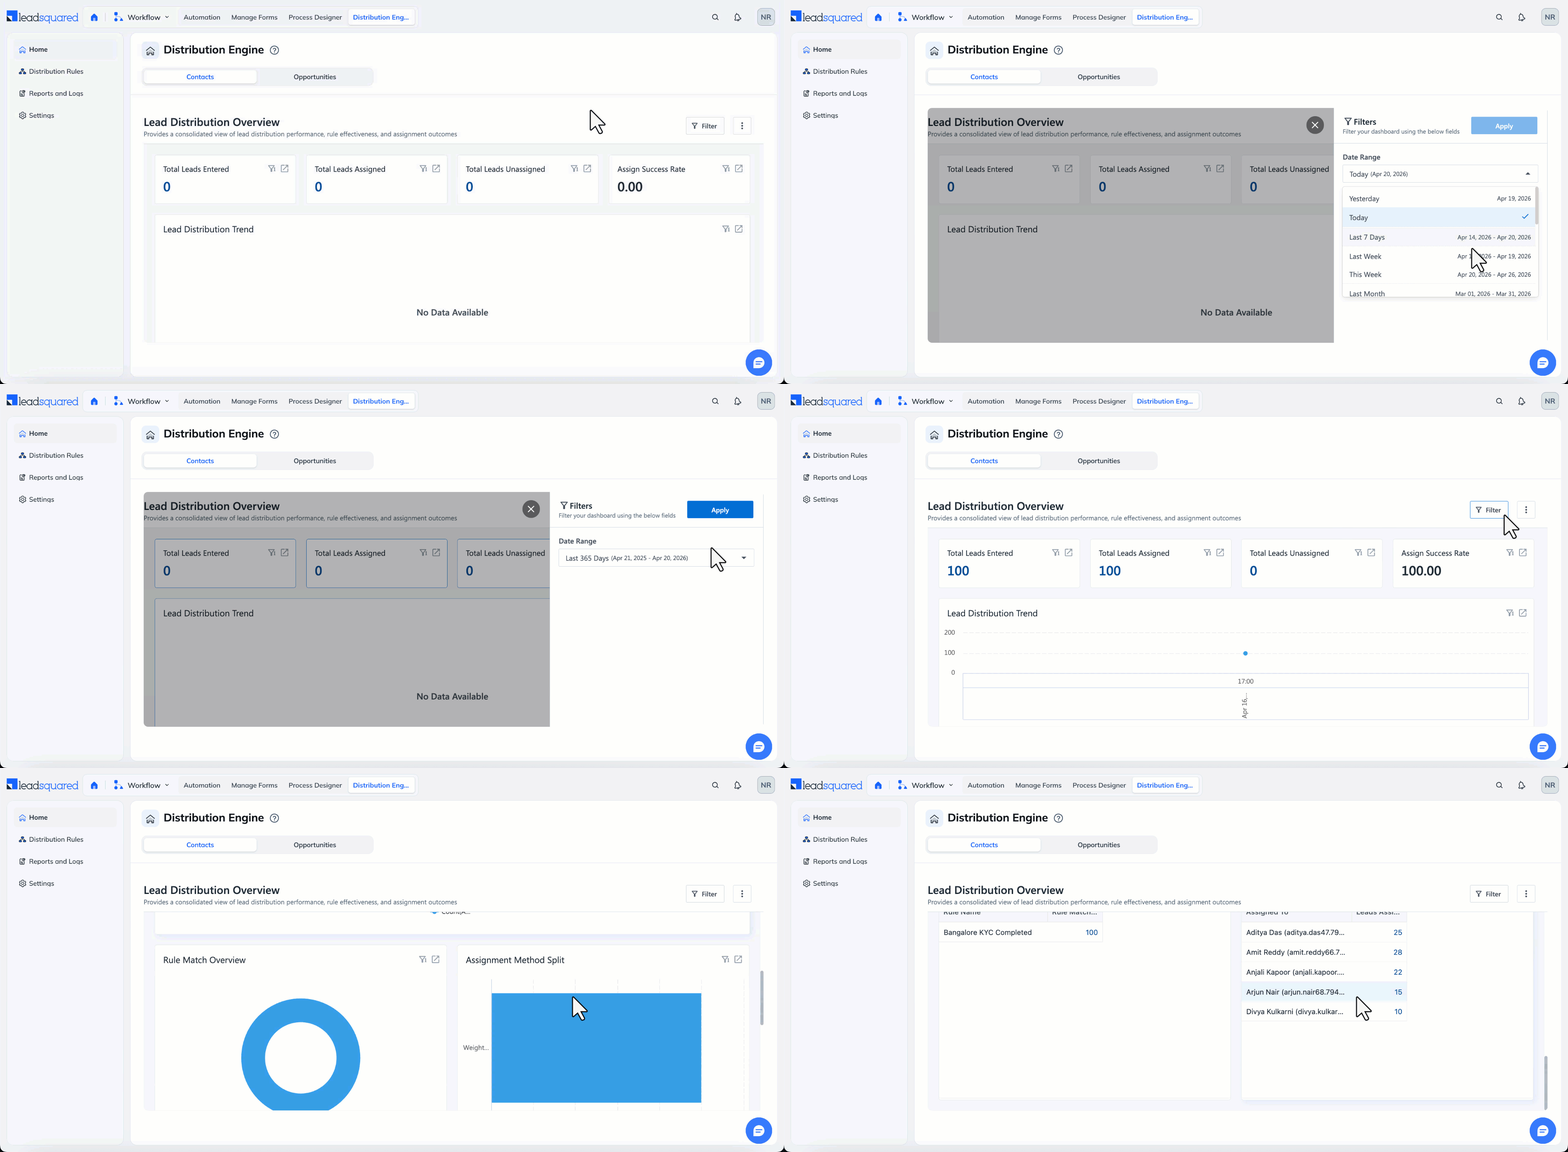
Navigate to Distribution Engine>Home for an overview of how distribution is running. To set a date range, click the filter icon.
| Metric | Shows |
| Records Created | Records that entered the engine in the selected period |
| Records Assigned | Records the engine successfully assigned |
| Assignment Success Rate | Assigned records as a percentage of created records |
| Records Unassigned | Records the engine could not place, because no rule matched or no user was eligible |
| Rule Match Overview | How many records each rule matched |
| Assignment Method Split | How records were spread across distribution methods |
8. Logs and Reports
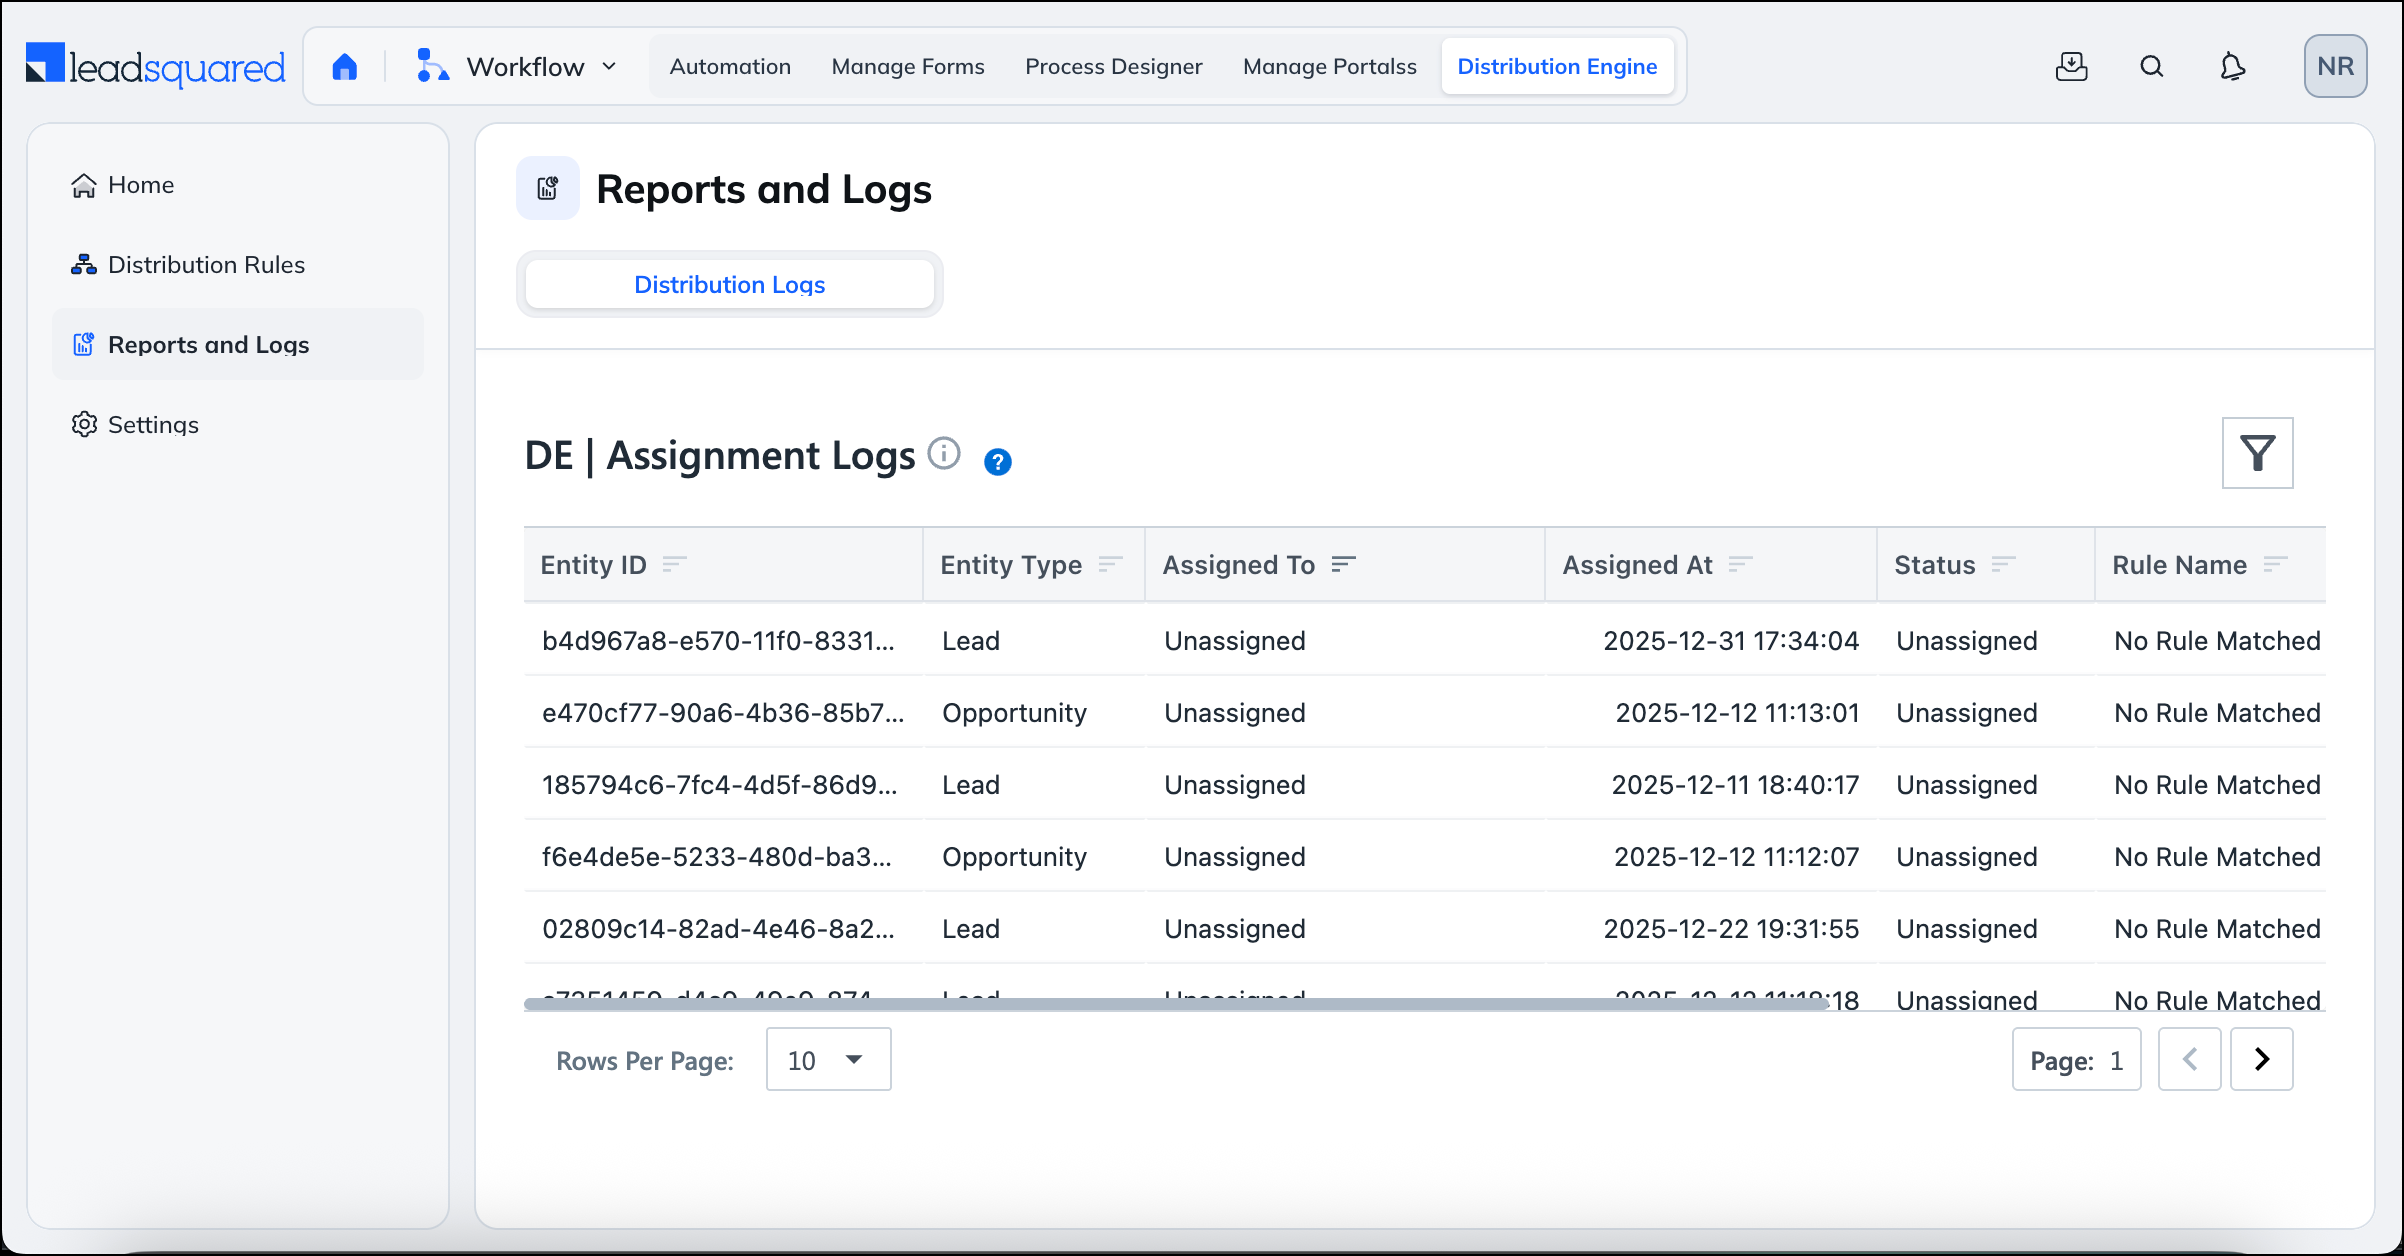
The Reports & Logs section helps you understand how records are being assigned and identify issues such as missed assignments.
You can use these reports to:
- View assignment history for each record
- See when and why fallback assignment was used
- Troubleshoot rule execution issues
All reports can be filtered by date range, sales group, assigned user, and entity type to quickly narrow down the data you need.
9. Settings
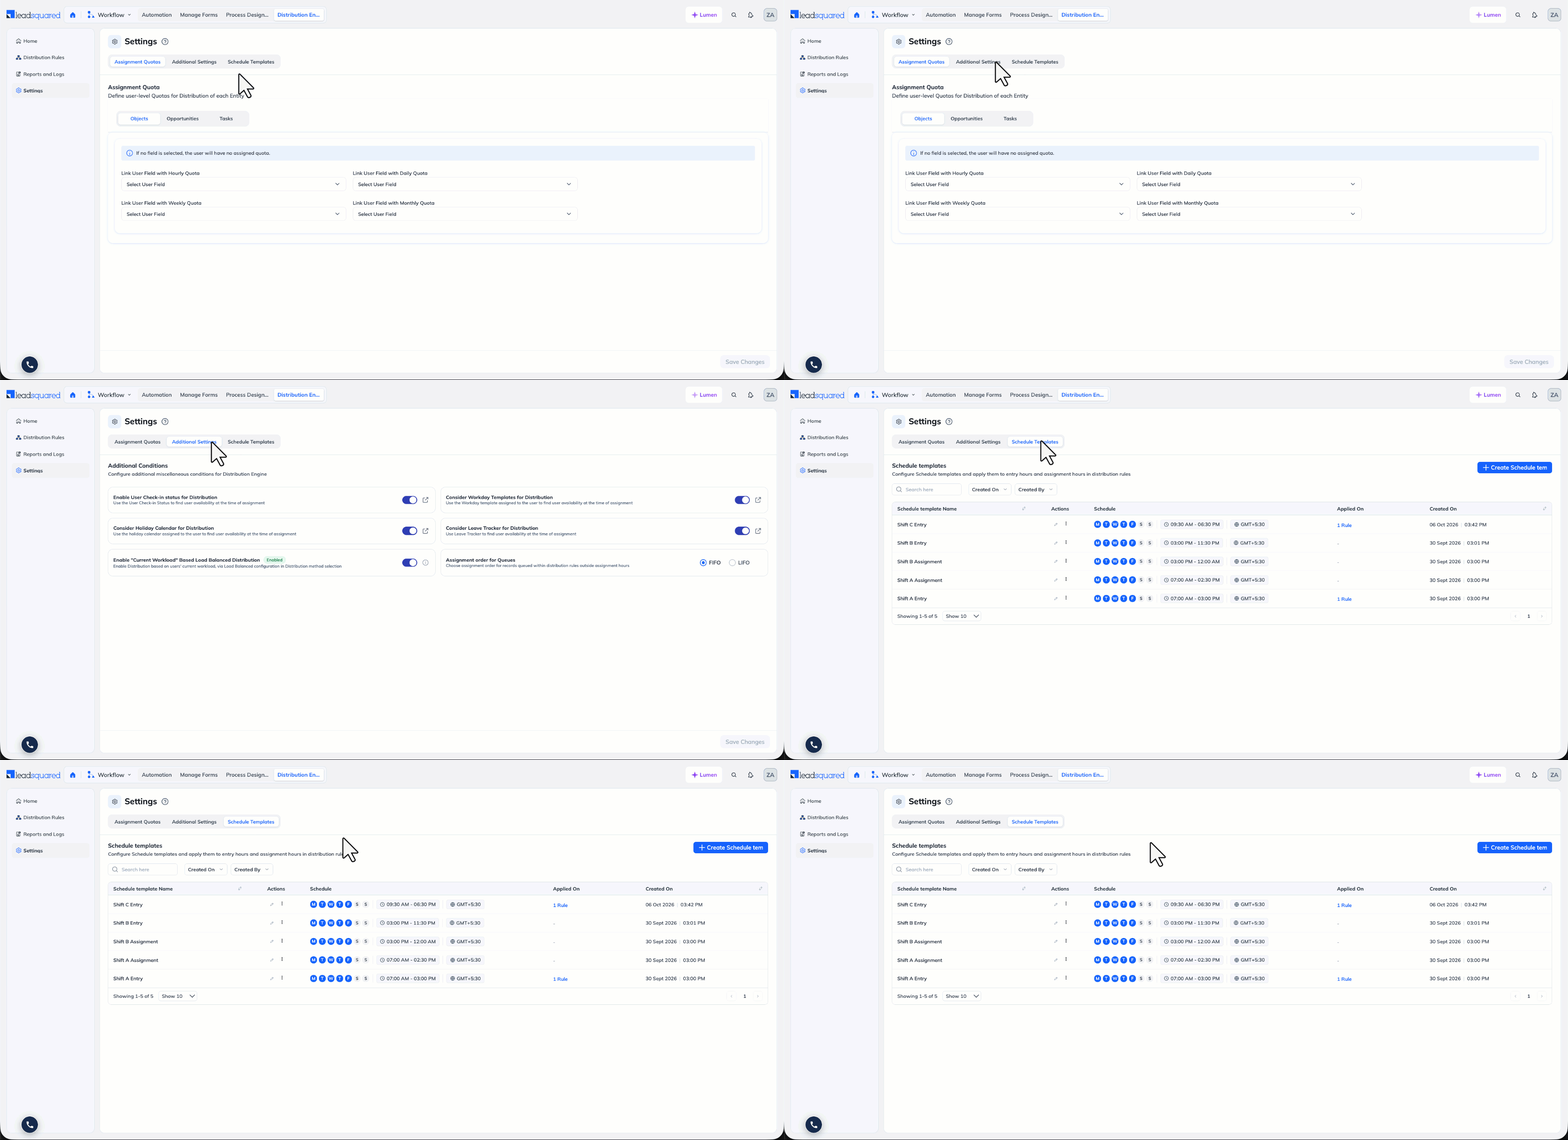
Navigate to Distribution Engine>Settings. The page has three tabs.
9.1 Assignment Quotas
Map a user field to a cap on how many records a user can receive per hour, day, week, or month. A user with no quota configured has unlimited capacity.
9.2 Additional Settings
These account-level toggles decide which conditions your rules can use.
| Setting | Effect |
| Enable User Check-in Status for Distribution | Makes check-in status and Available status usable as conditions in Step 2 |
| Consider Workday Templates for Distribution | Makes the user’s workday template usable as a condition in Step 2 |
| Consider Holiday Calendar for Distribution | Makes the user’s holiday calendar usable as a condition in Step 2 |
| Consider Leave Tracker for Distribution | Makes Leave Tracker usable as a condition in Step 2 |
| Enable “Current Workload” Based Load Balanced Distribution | Makes Current Workload selectable as a Load Balanced method in Step 3 |
| Assignment order for Queues | Sets whether queued records are released in FIFO or LIFO order |
9.3 Schedule Templates
Build the reusable day and time windows that rules apply as entry hours and assignment hours. For more information, refer to Schedule Templates, Entry Hours, and Assignment Hours.
10. Related Articles
- Distribution Methods in Distribution Engine
- Schedule Templates, Entry Hours, and Assignment Hours
- Distribution Engine: How Weighted Distribution Works
- Distribute Based on ACE Performance
FAQs
1. What happens when no user is available?
The record goes to the default user set in Step 4 of the rule. The one exception is a rule using assignment hours, where after-hours records wait in a queue instead.
2. How do I stop sending records to one user for a few days?
Apply their leave, mark them unavailable, or remove them from the rule.
3. Can I edit a rule that is already running?
Yes. Records already moving through the rule finish under the old configuration, and your changes apply to new records as soon as you save.
4. What is the difference between a global rule and a team-specific rule?
A global rule can assign to anyone in the account, and everyone with Distribution Engine access can see it. A team-specific rule can assign only to one team’s members, and only that team and admins can see it.
5. Who can create and edit rules?
Admins, by default, plus anyone whose Permission Template grants it. A sales manager with team-specific access and create permission can build rules for their own team, choosing from their own team’s users.
6. Two rules match the same lead. Which one runs?
Whichever sits higher in the list. Once a rule assigns the record, the engine stops.
Any Questions?
We’d love to hear your feedback to help improve this article. Feel free to enter your questions or in the comments section below.