


Get Started

Sales Suite
Field Ops
Marketing
Service CRM
Integrations & Apps
FloStack
Lead Automation Actions – Custom

1. Feature Overview
Custom actions let your automation exchange data with systems outside LeadSquared. Use them to push record data to an external application, call your own hosted code, or run a connector you have installed on your account.
This articles covers 2 types of custom actions:
- Webhook – Posts data from the automation to a URL you specify.
- Call Lapp – Runs a Lapp (a custom script hosted on LeadSquared) from the automation.
Any connector or app you install from the Apps Marketplace adds its own card under Custom. For example, if the Universal Data Sync and Nudge connectors are installed and configured on your account, Universal Data Sync and Nudge Users appear in the same list. These cards are documented in the help article for each connector.
2. Prerequisites
- You must be an Administrator to create and configure an automation.
- To use Call Lapp, the Lapp must already exist on your account. For more information, see Lapps.
- To use Webhook, you need the endpoint URL that will receive the data. For more information, see Webhooks.
3. How It Works
A custom action runs as one step inside an automation. It does not run on its own.
- The trigger starts the automation for a record, such as a lead, an opportunity, an activity, or a task.
- The automation runs each condition and action on the canvas, in the order you placed them.
- When the record reaches the custom action, the automation builds the payload and sends the request.
- For a Webhook, the request goes to the URL you entered.
- For a Call Lapp, the automation runs the selected Lapp and passes the query string.
- The automation waits up to 30 seconds for a response.
- If Save Response is set to Yes, the automation stores the response so that later cards can read it.
- The automation moves to the next card.
4. Add a Custom Action
- Navigate to Workflow>Automation.
- Open an existing automation, or click Create Automation and select a trigger.
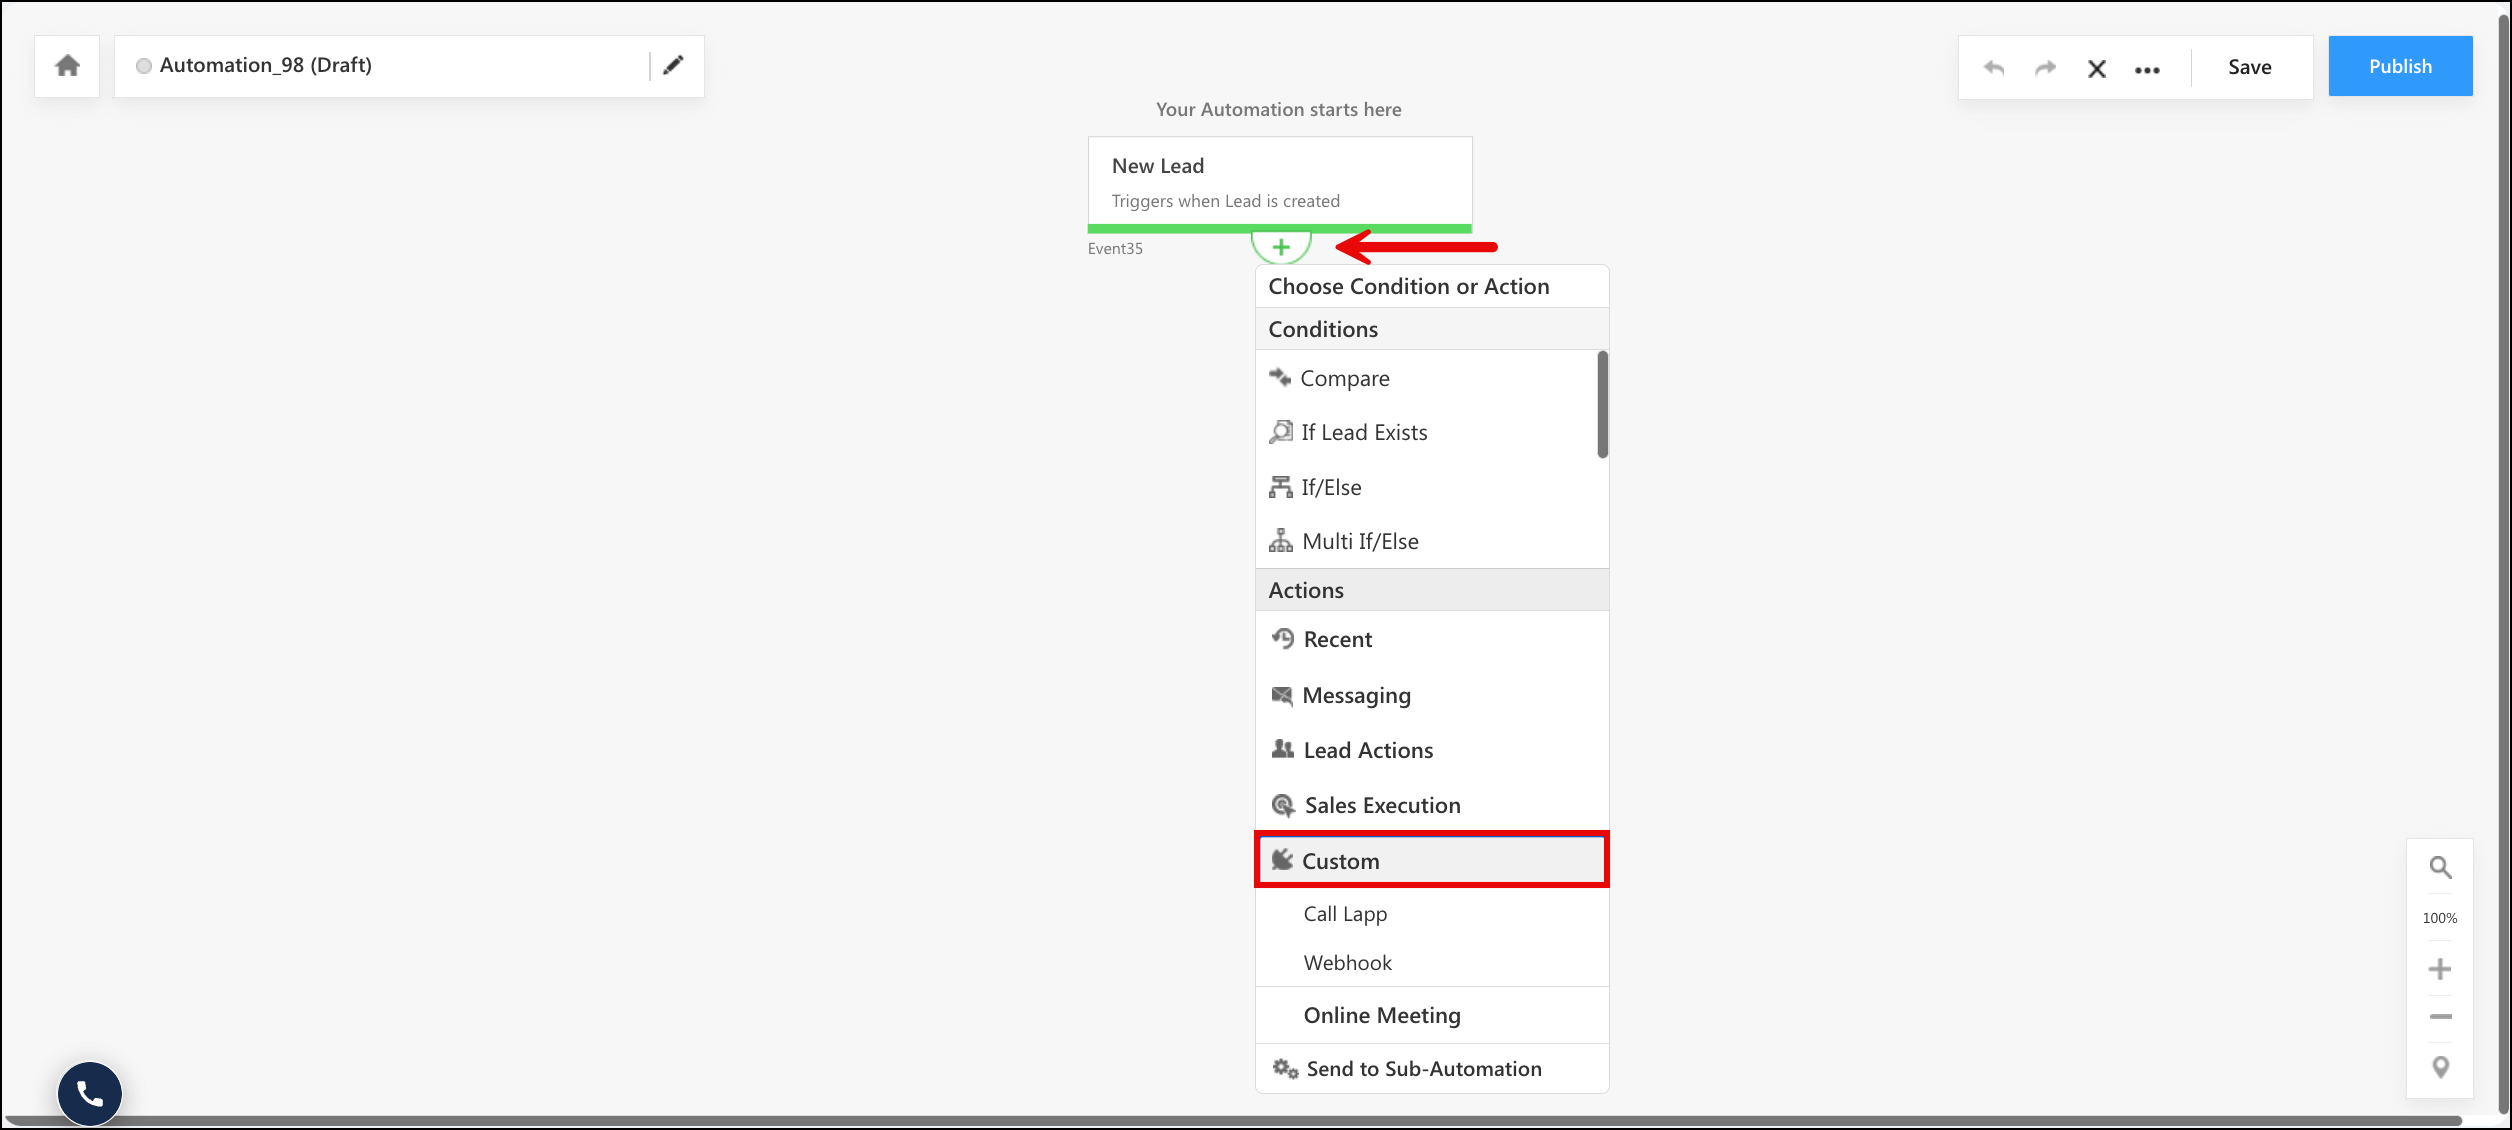
- On the canvas, below the trigger or the previous card, click the + The Choose Condition or Action menu appears.
- Under Actions, click Custom.
- Click the action you want to add.
- Configure the card, and then click Save.
5. Webhook
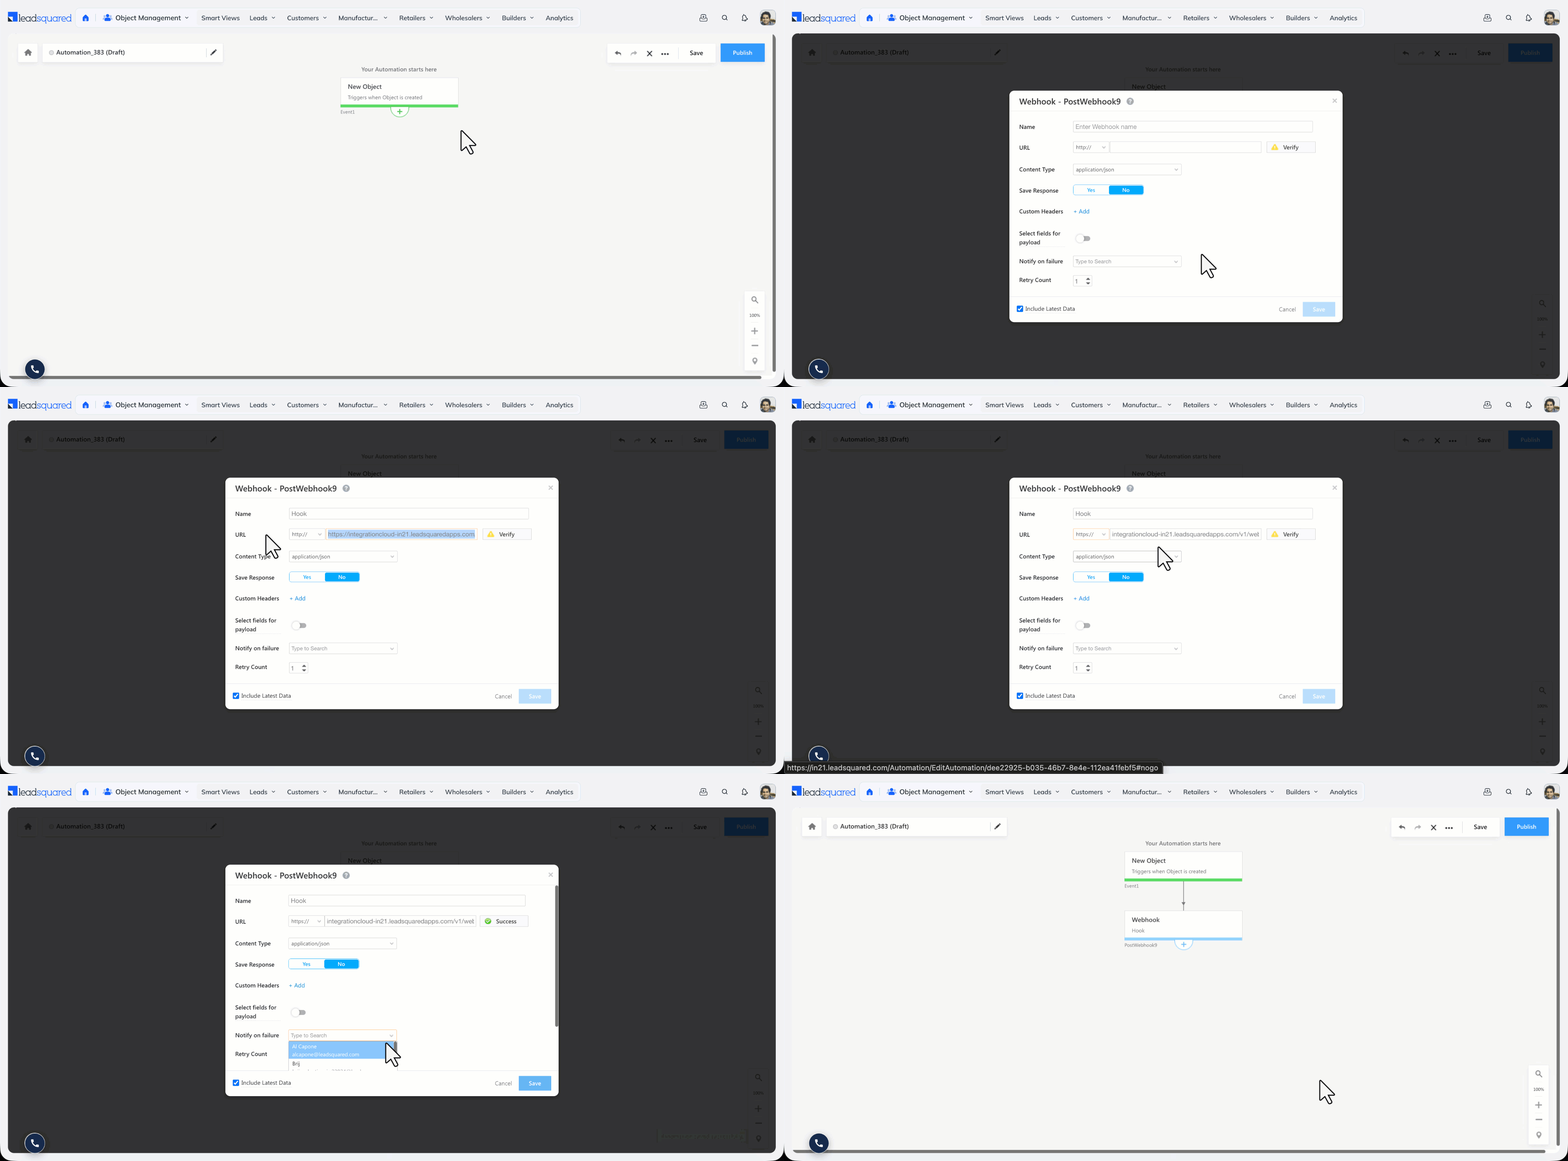
A webhook posts the record’s data to a URL as an HTTP request. Use it to send lead, opportunity, activity, or task data to a third-party application at a specific point in the workflow.
Under Custom, click Webhook. The Webhook pop-up window appears. Enter the following details, and then click Save.
| Field | Description |
| Name | A name that identifies the webhook on the canvas. This name also prefixes the saved response, so use something descriptive. |
| URL | Select the protocol (http:// or https://), and then enter the endpoint that receives the data. Do not repeat the protocol in the text box. Click Verify to confirm the endpoint is reachable. |
| Content Type | The format in which the data is posted. The default is application/json. |
| Save Response | Set to Yes to store the response returned by the endpoint. You can then use the response in later cards in the same automation. For more information, see section 7. |
| Custom Headers | Click + Add to pass a name and value pair in the request header. Use this to authenticate the call at your endpoint, and to reject any request that does not carry the header. |
| Select fields for payload | Enable this toggle to choose the specific fields to include in the payload. When the toggle is off, the standard payload for the automation trigger is sent. |
| Notify on failure | Select the users who receive an email when the webhook fails. |
| Retry Count | The number of times the automation retries the call after a failure. The maximum is 3 and the minimum is 0. The automation waits five minutes before each retry. |
| Include Latest Data | Select this checkbox to send the field values as they exist when the card runs. If it is cleared, the values captured when the record entered the automation are sent. |
Note:
- The structure of the payload depends on the automation trigger. For the exact fields posted by each trigger, see Data Posted by Automation Triggers.
- For more information on webhooks, see Webhooks.
6. Call Lapp
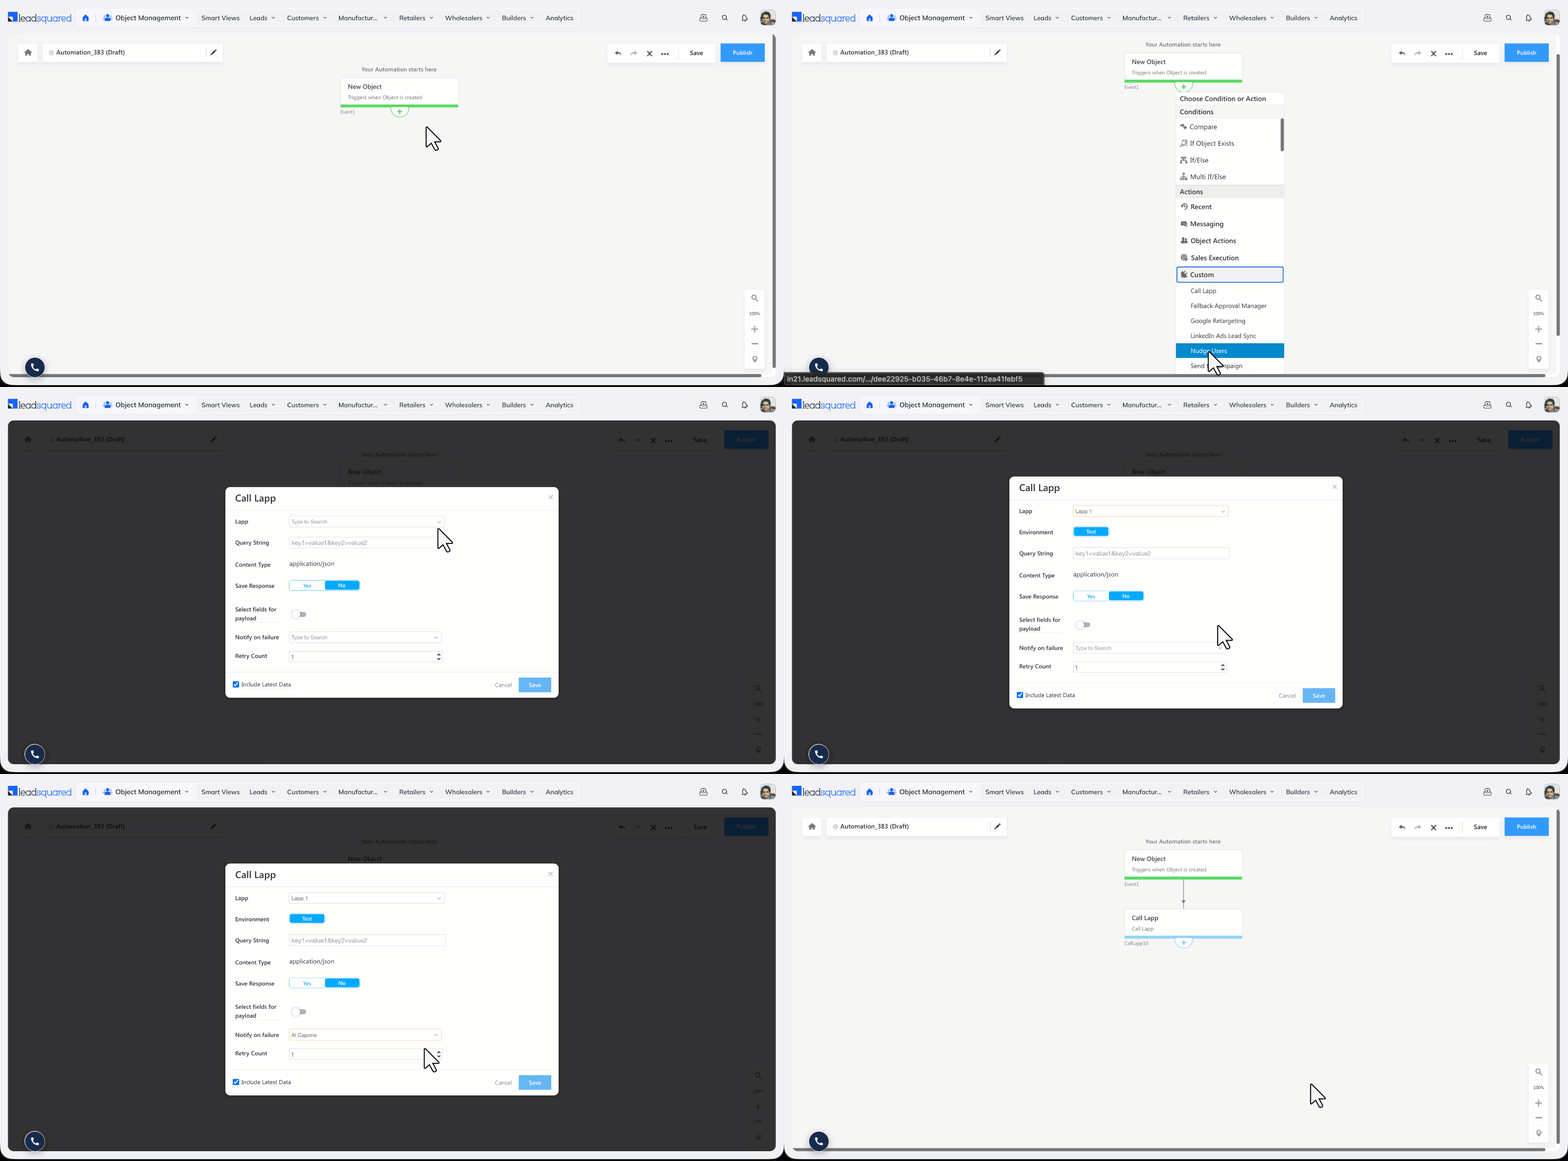
A Lapp is a script you host on LeadSquared. Use the Call Lapp action to run it as a step in the automation, for example to perform a calculation on field values or to fetch data from another system.
Under Custom, click Call Lapp. The Call Lapp pop-up window appears. Enter the following details, and then click Save.
| Field | Description |
| Lapp | Search for and select the Lapp you want to run. |
| Query String | The parameters passed to the Lapp, in the format key1=value1&key2=value2. You can also pass a response saved by an earlier card here. |
| Content Type | Fixed as application/json for Lapps. |
| Save Response | Set to Yes to store the value returned by the Lapp for use in later cards. For more information, see section 7. |
| Select fields for payload | Enable this toggle to choose the specific fields to include in the payload. |
| Notify on failure | Select the users who receive an email when the Lapp call fails. |
| Retry Count | The number of times the automation retries the call after a failure. The maximum is 3 and the minimum is 0. The automation waits five minutes before each retry. |
| Include Latest Data | Select this checkbox to send the field values as they exist when the card runs. |
7. Connector and App Actions
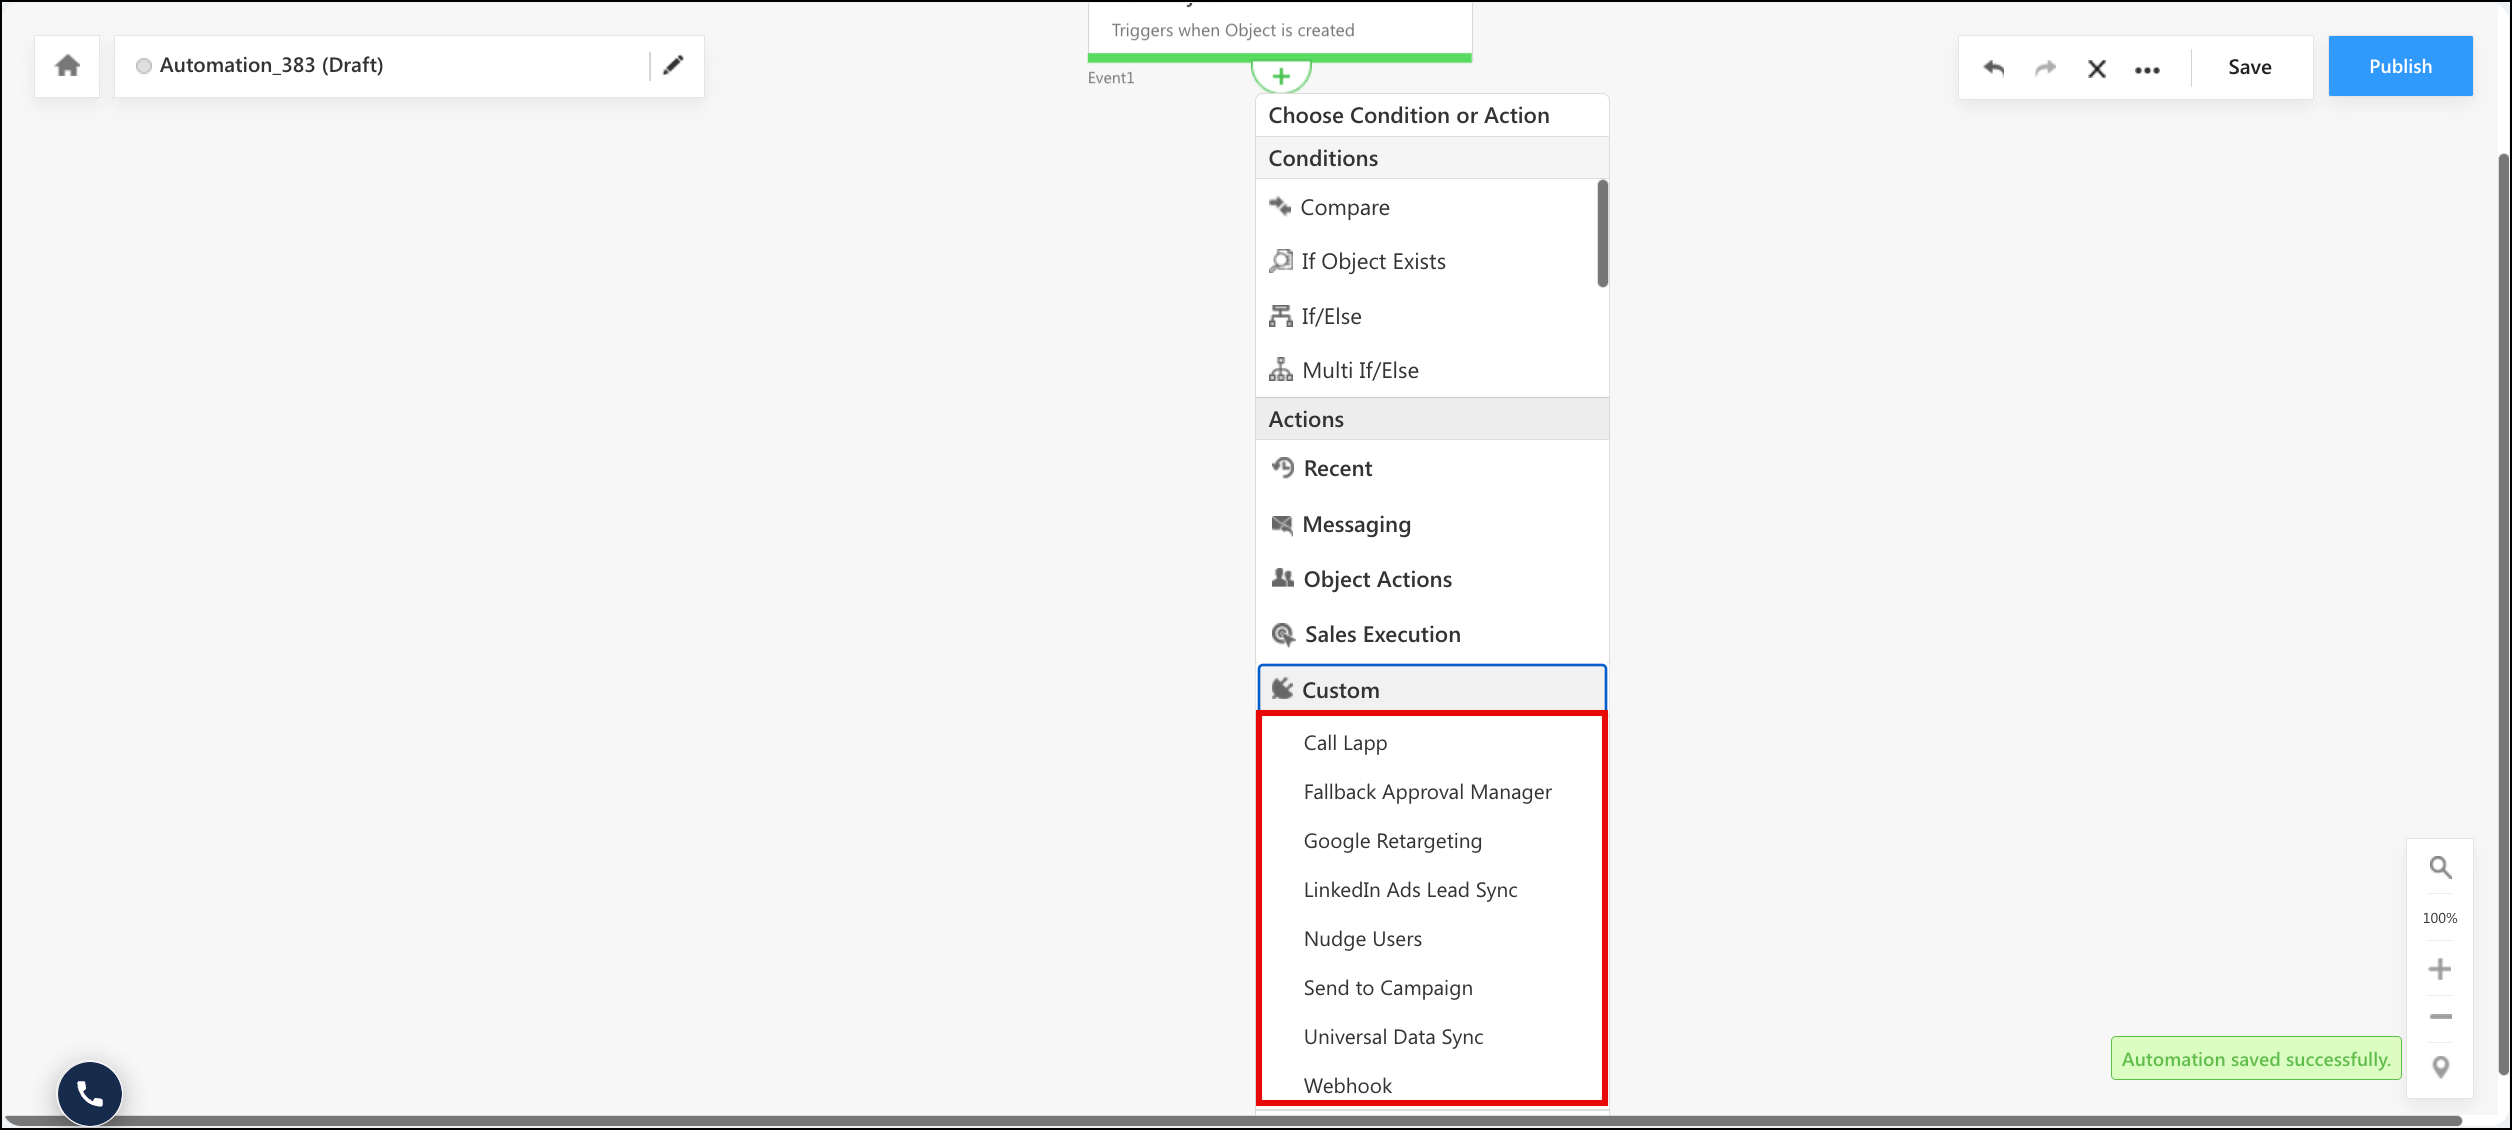
Connectors and apps installed from the Apps Marketplace publish their own cards under Custom. These cards are pre-built, so you select the connector action and map its fields instead of constructing a request yourself.
The cards available to you depend on what is installed on your account. Examples include Universal Data Sync, Google Retargeting, LinkedIn Ads Lead Sync, Nudge Users, etc.
To find the setup steps and field reference for a card, see the help article for that connector. To install a connector, navigate to Apps>Apps Marketplace.
8. Save and Use the Response
Both Webhook and Call Lapp can store what the endpoint or Lapp returns, so later cards in the same automation can read it.
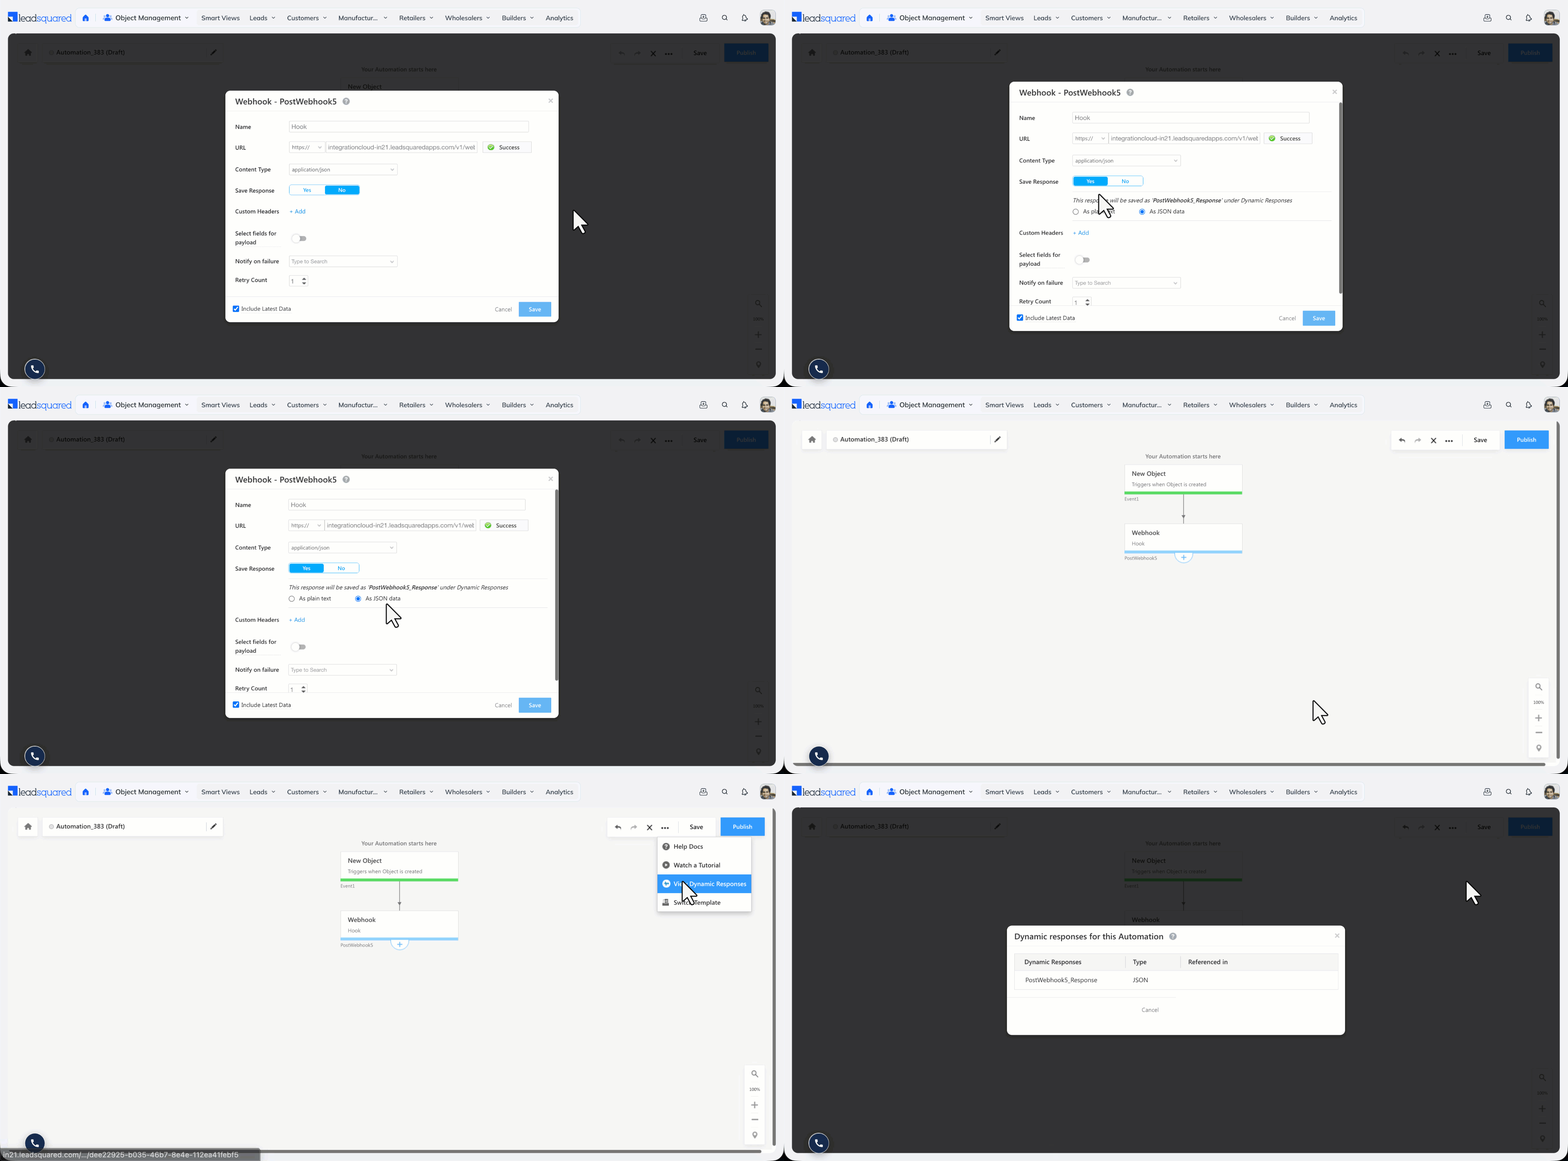
- On the Webhook or Call Lapp card, set Save Response to Yes.
- Select the format of the response:
- Plain text – Stores the response as a single value. Key and value pairs cannot be read separately.
- JSON data – Stores the response as structured data, so individual keys can be read.
- Click Save.
- In the automation, click the more icon, and then click View Dynamic Responses to see the saved response and every card that references it.
You can then use the response to update a lead field, populate an activity field, insert dynamic content in an email, compare values with the Compare condition, or pass data to another Webhook or Call Lapp card.
For the syntax and worked examples, see Dynamic Responses in Lead Automation Actions.
9. Troubleshooting
Failed Webhook and Call Lapp cards appear in the Automation Failure Report, where you can view the reason for the failure and retry the card after making the required changes.
| Error | Cause and resolution |
| 429 | The call exceeded the API rate limit configured on your account. To view your limits, navigate to My Profile>Settings>Profile>Manage Subscriptions. |
| 504 | The endpoint or Lapp did not respond within 30 seconds. Reduce the processing time at the endpoint. |
| 403 | The URL is not valid. This occurs when the endpoint changes after the automation is published. Update the URL and republish the automation. |
Keep the following points in mind:
- Set Retry Count to 0 or 1 wherever possible. Each retry adds a five-minute wait and holds the record in the automation for longer. For more information, see Automation Best Practices.
- Avoid indirect loops. For example, if an automation uses the Lead Update trigger on the City field and a Call Lapp card in that automation updates the City field, the automation triggers itself repeatedly. An automation stops after it triggers 50 times for a single record in a day.
Any Questions?
Did you find this article helpful? Please let us know any feedback you may have in the comments section below.