


Get Started

Sales Suite
Field Ops
Marketing
Service CRM
Integrations & Apps
FloStack
Lead Automation Actions – Sales Execution

1. Feature Overview
Sales execution actions let you involve your sales users in an automation. Use these actions to notify users, create tasks for them, and assign leads, opportunities, activities, and tasks to them.
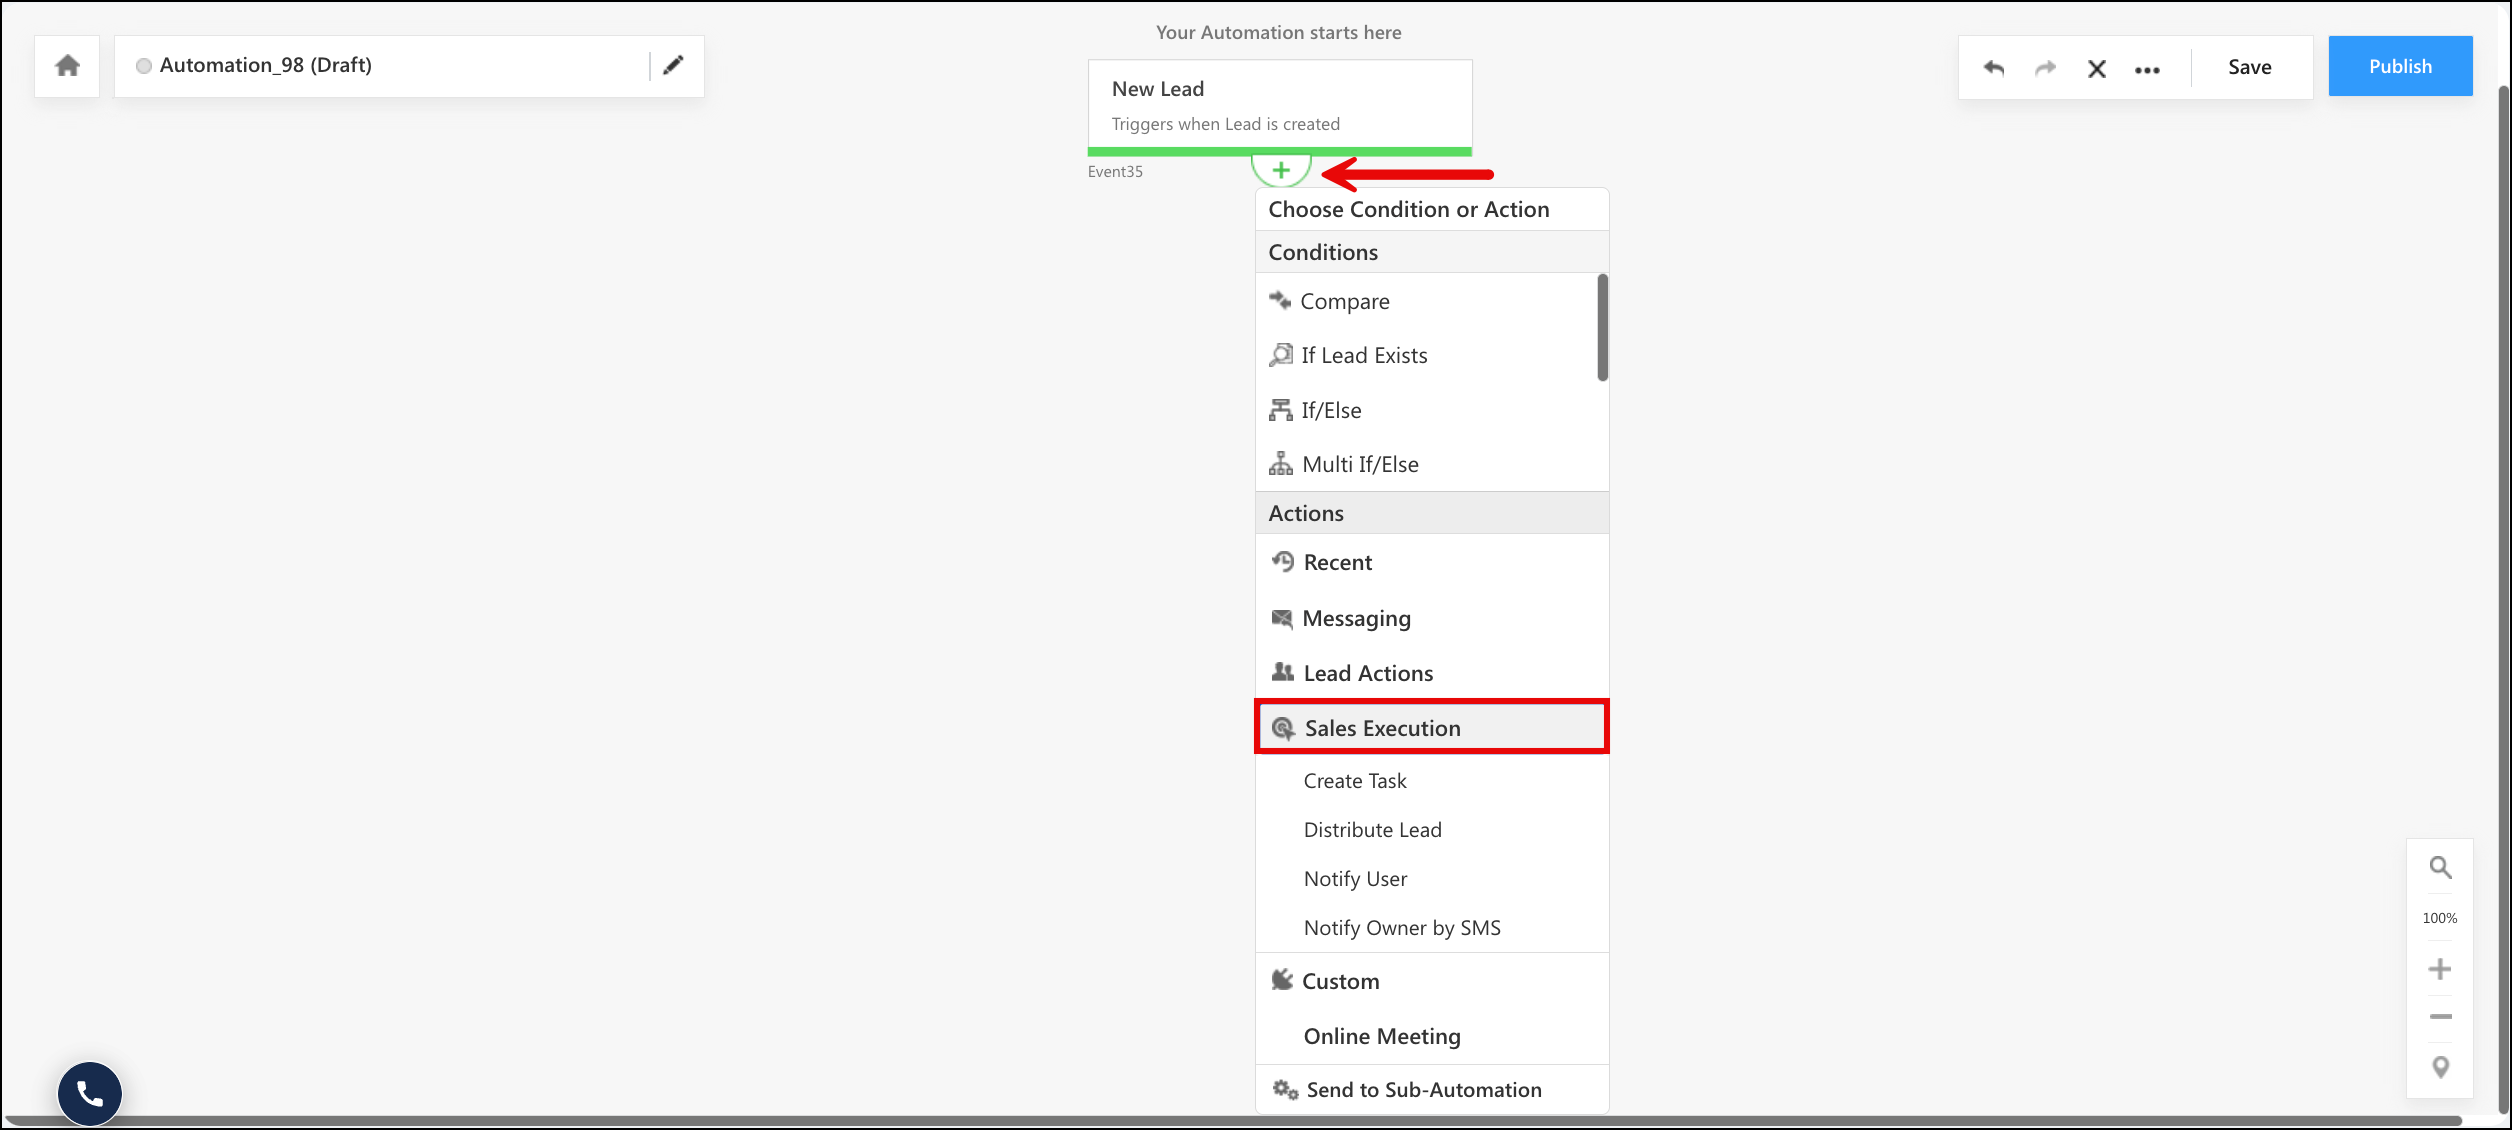
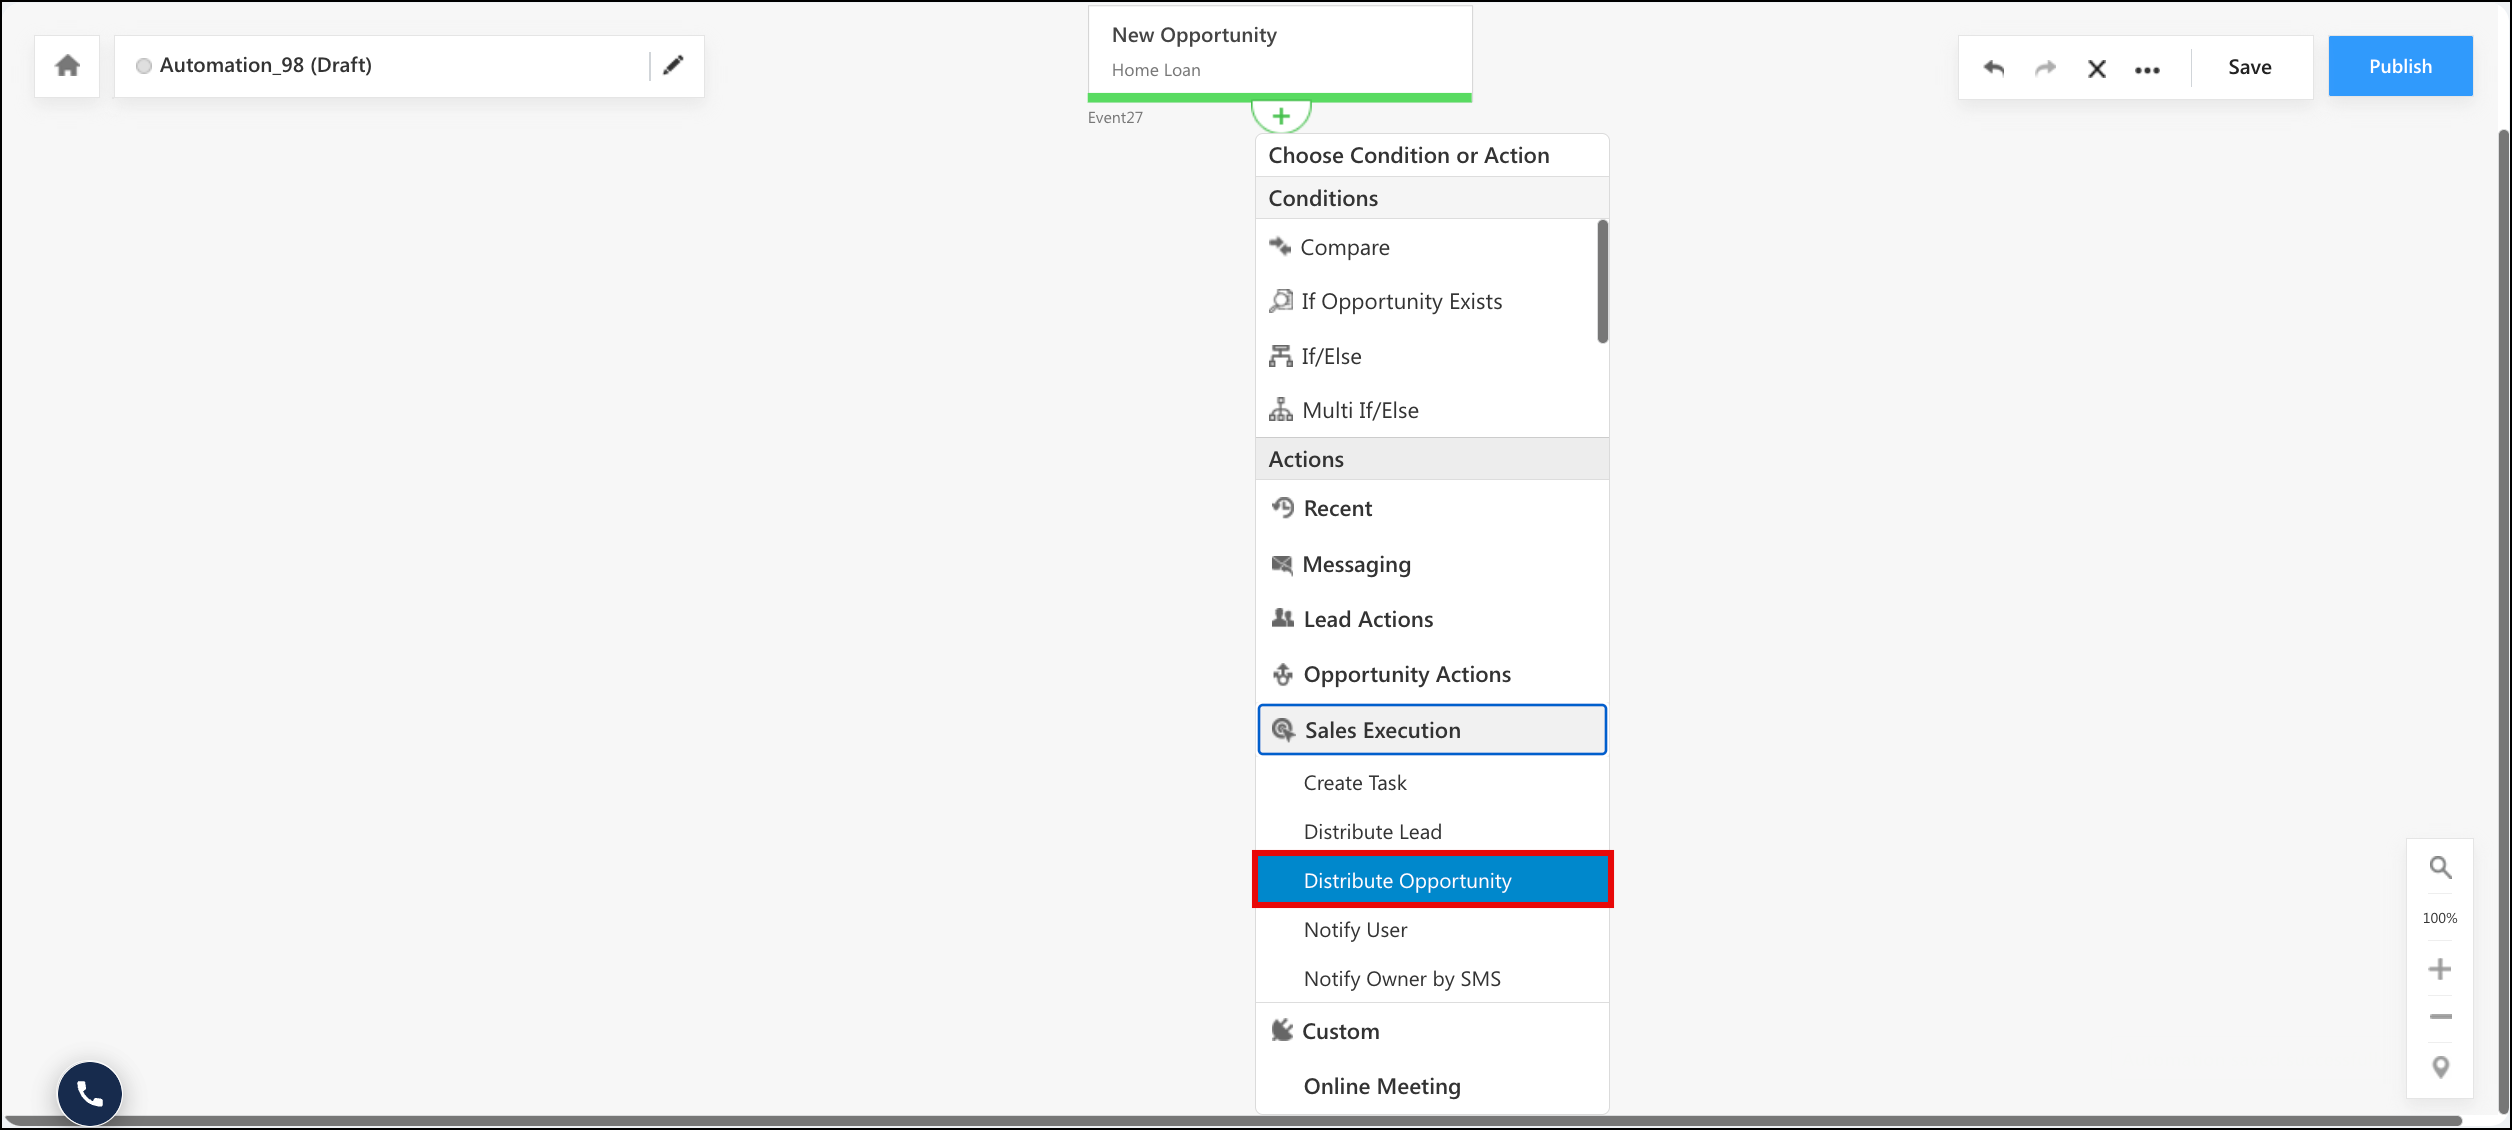
To add a sales execution action, navigate to Workflow>Automation, open an automation, click Choose Condition or Action, and then click Sales Execution.
| Action | Description |
| Notify User | Sends a notification email to one or more LeadSquared users. |
| Create Task | Creates an appointment or to-do task, and repeats it on a schedule if required. |
| Distribute Lead | Assigns leads to users through a set of rules. |
| Distribute Opportunity | Assigns opportunities to users through a set of rules. |
| Distribute Activity | Assigns activities to users through a set of rules. |
| Distribute Task | Assigns tasks to users through a set of rules. |
For the actions available in user automations and account automations, see Actions in User Automation and Account Automation Actions.
2. Prerequisites
- You must be an Administrator to create and configure an automation.
- To use the Distribute Opportunity action, opportunities must be enabled on your account. To enable them, write to support@leadsquared.com.
3. How It Works
A sales execution action runs as one step inside an automation. It does not run on its own.
- The trigger starts the automation for a record, such as a lead, an activity, or a task.
- The automation runs each condition and action on the canvas, in the order you placed them.
- When the record reaches a sales execution action, the action runs once for that record.
- The automation then moves to the next card.
Two things decide what you can do at this step.
- The trigger decides which actions are available. Notify User, Create Task, Distribute Lead, and Distribute Opportunity appear after any lead automation trigger. Distribute Activity and Distribute Task appear only after the activity and task triggers listed in section 1.
- The action decides what it acts on. Notify User and Create Task act on the record in the automation. The four distribute actions assign a record to a user by running a set of rules. For how those rules are evaluated, see section 6, How Distribution Rules Work.
4. Notify Users
Use the Notify User action to send an email to a LeadSquared user.
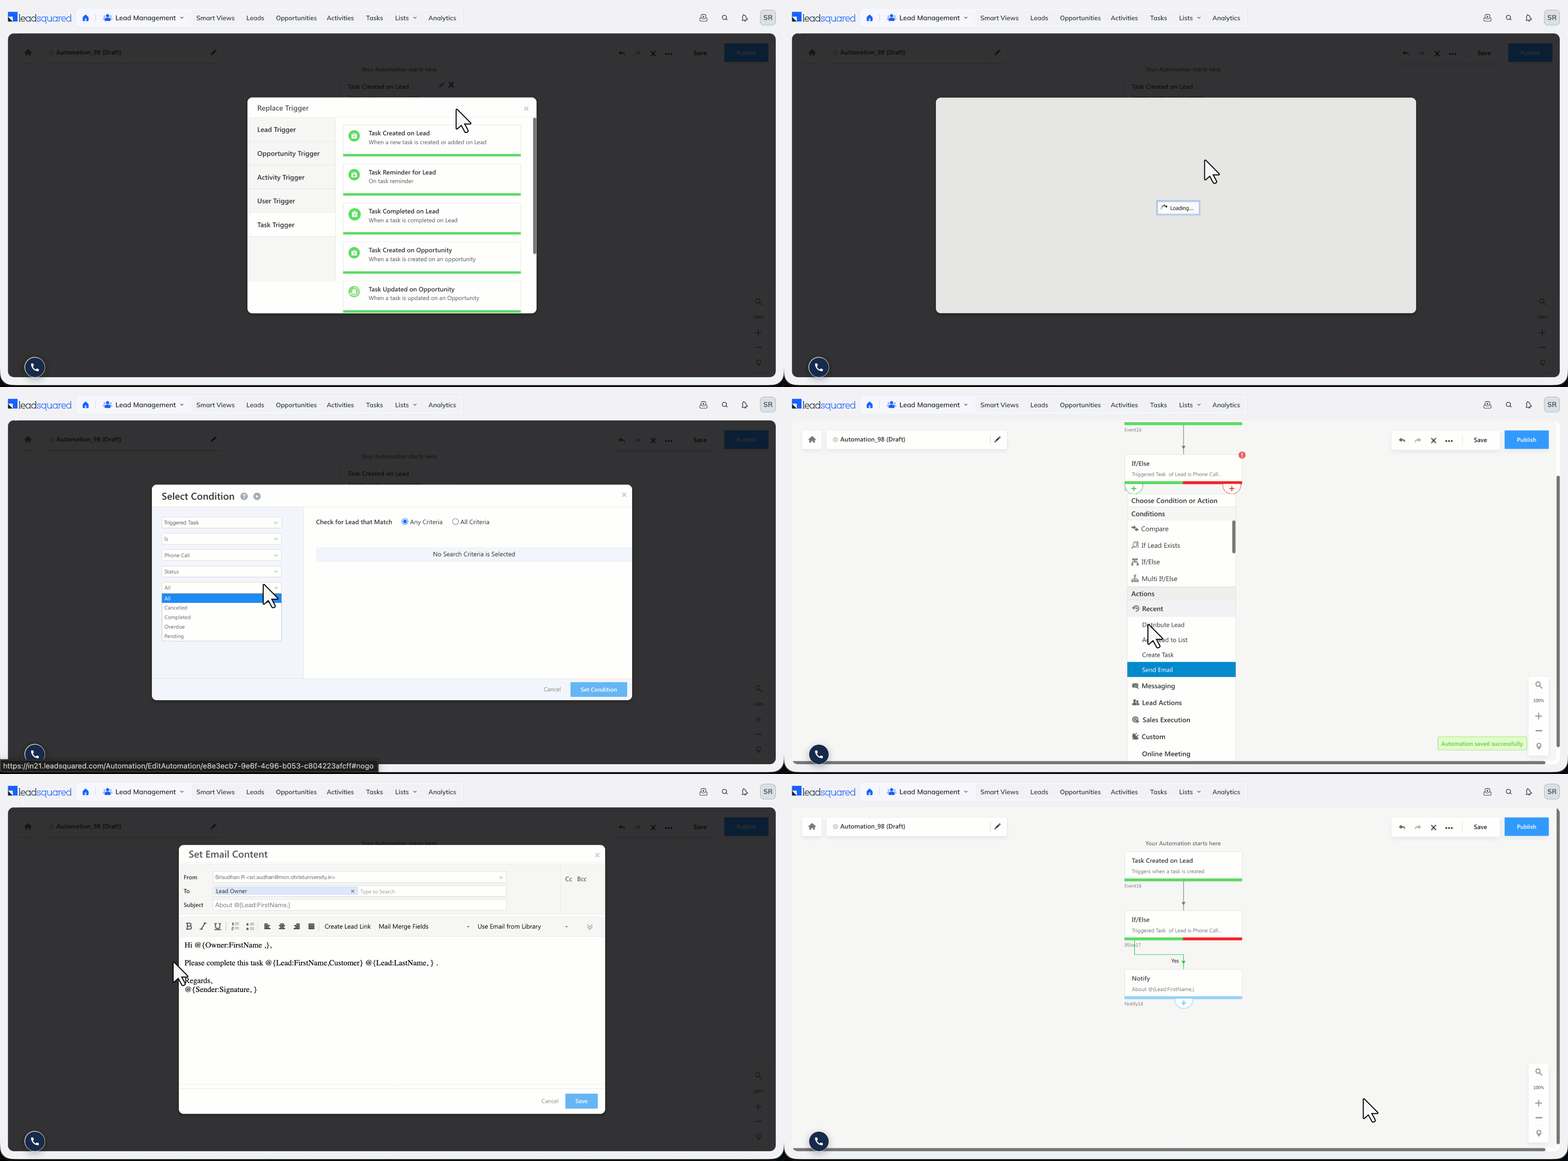
- On the automation canvas, click Sales Execution, and then click Notify User.
- On the Set Email Content pop-up window, add the recipients in the To The lead owner is added by default. You can also add the activity owner, or add users to the Cc and Bcc fields.
- Enter the subject and the email content.
- To personalize the email, use the mail merge option to insert lead fields, owner fields, sender fields, and activity fields.
- Click Save.
Example
The following automation notifies a user when a task is overdue.
5. Create Tasks
Use the Create Task action to create appointment and to-do type tasks. For more information on task types, see Managing Task Types.
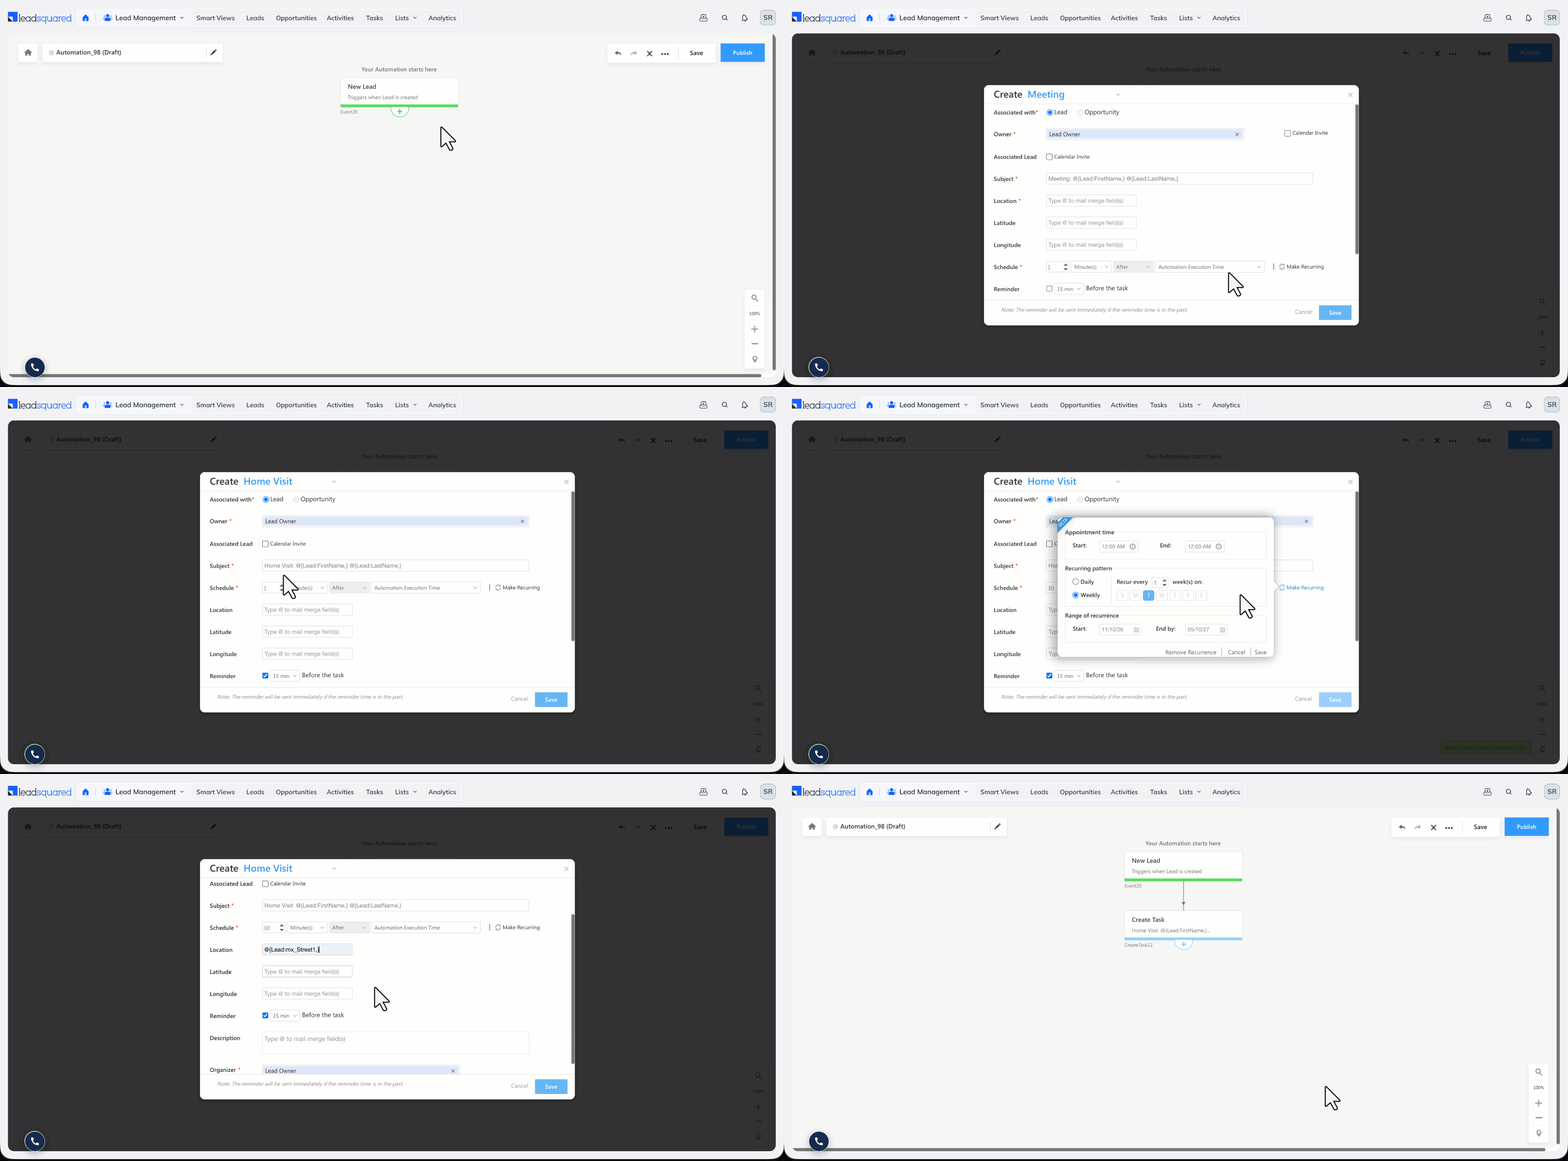
- On the automation canvas, click Sales Execution, and then click Create Task.
- Select the task type, and enter the task details.
- To repeat an appointment type task, click Make Recurring, and then set the recurrence details.
- Click Save.
Note:
- You can mail merge lead fields and activity fields into the task subject and description.
- In automations that use an activity trigger, you can schedule the task using a date-time field from the activity.
- If you mail merge a date field into the Schedule field, that field must hold a value on the lead. If the field is empty, the action fails. For more information, see Automation Best Practices.
6. How Distribution Rules Work
The Distribute Lead, Distribute Opportunity, Distribute Activity, and Distribute Task actions all use the same rule structure. Read this section before you configure any of them.
- A single distribute card holds one or more rules. Name each rule, and reorder the rules by dragging and dropping them. The rules run in the order they appear on the card.
- The card evaluates the rules one by one. The first rule whose conditions the record matches assigns the record. No further rules are evaluated. For example, if a lead matches both Rule 1 (City) and Rule 2 (Language), the card applies Rule 1.
- You must set a default rule. The default rule runs when no other rule matches, and assigns the record to the user you select.
- Within each rule, you can assign records to Users, to Sales Groups, or based on User Properties. When you assign to sales groups, select Exclude all group managers if group managers must not receive records.
- If the Check-In and Check-Out feature is enabled, an Availability Status section appears when you select users. Set it to All or Available. If you select Available and no user is available when the automation runs, the record goes to the user set in the default rule.
- For lead and opportunity distribution, Evaluate on latest data decides which version of the record the rule reads. When it is enabled, the rule reads the current field values. When it is disabled, the rule reads the values the record held when it entered the automation.
7. Distribute Leads
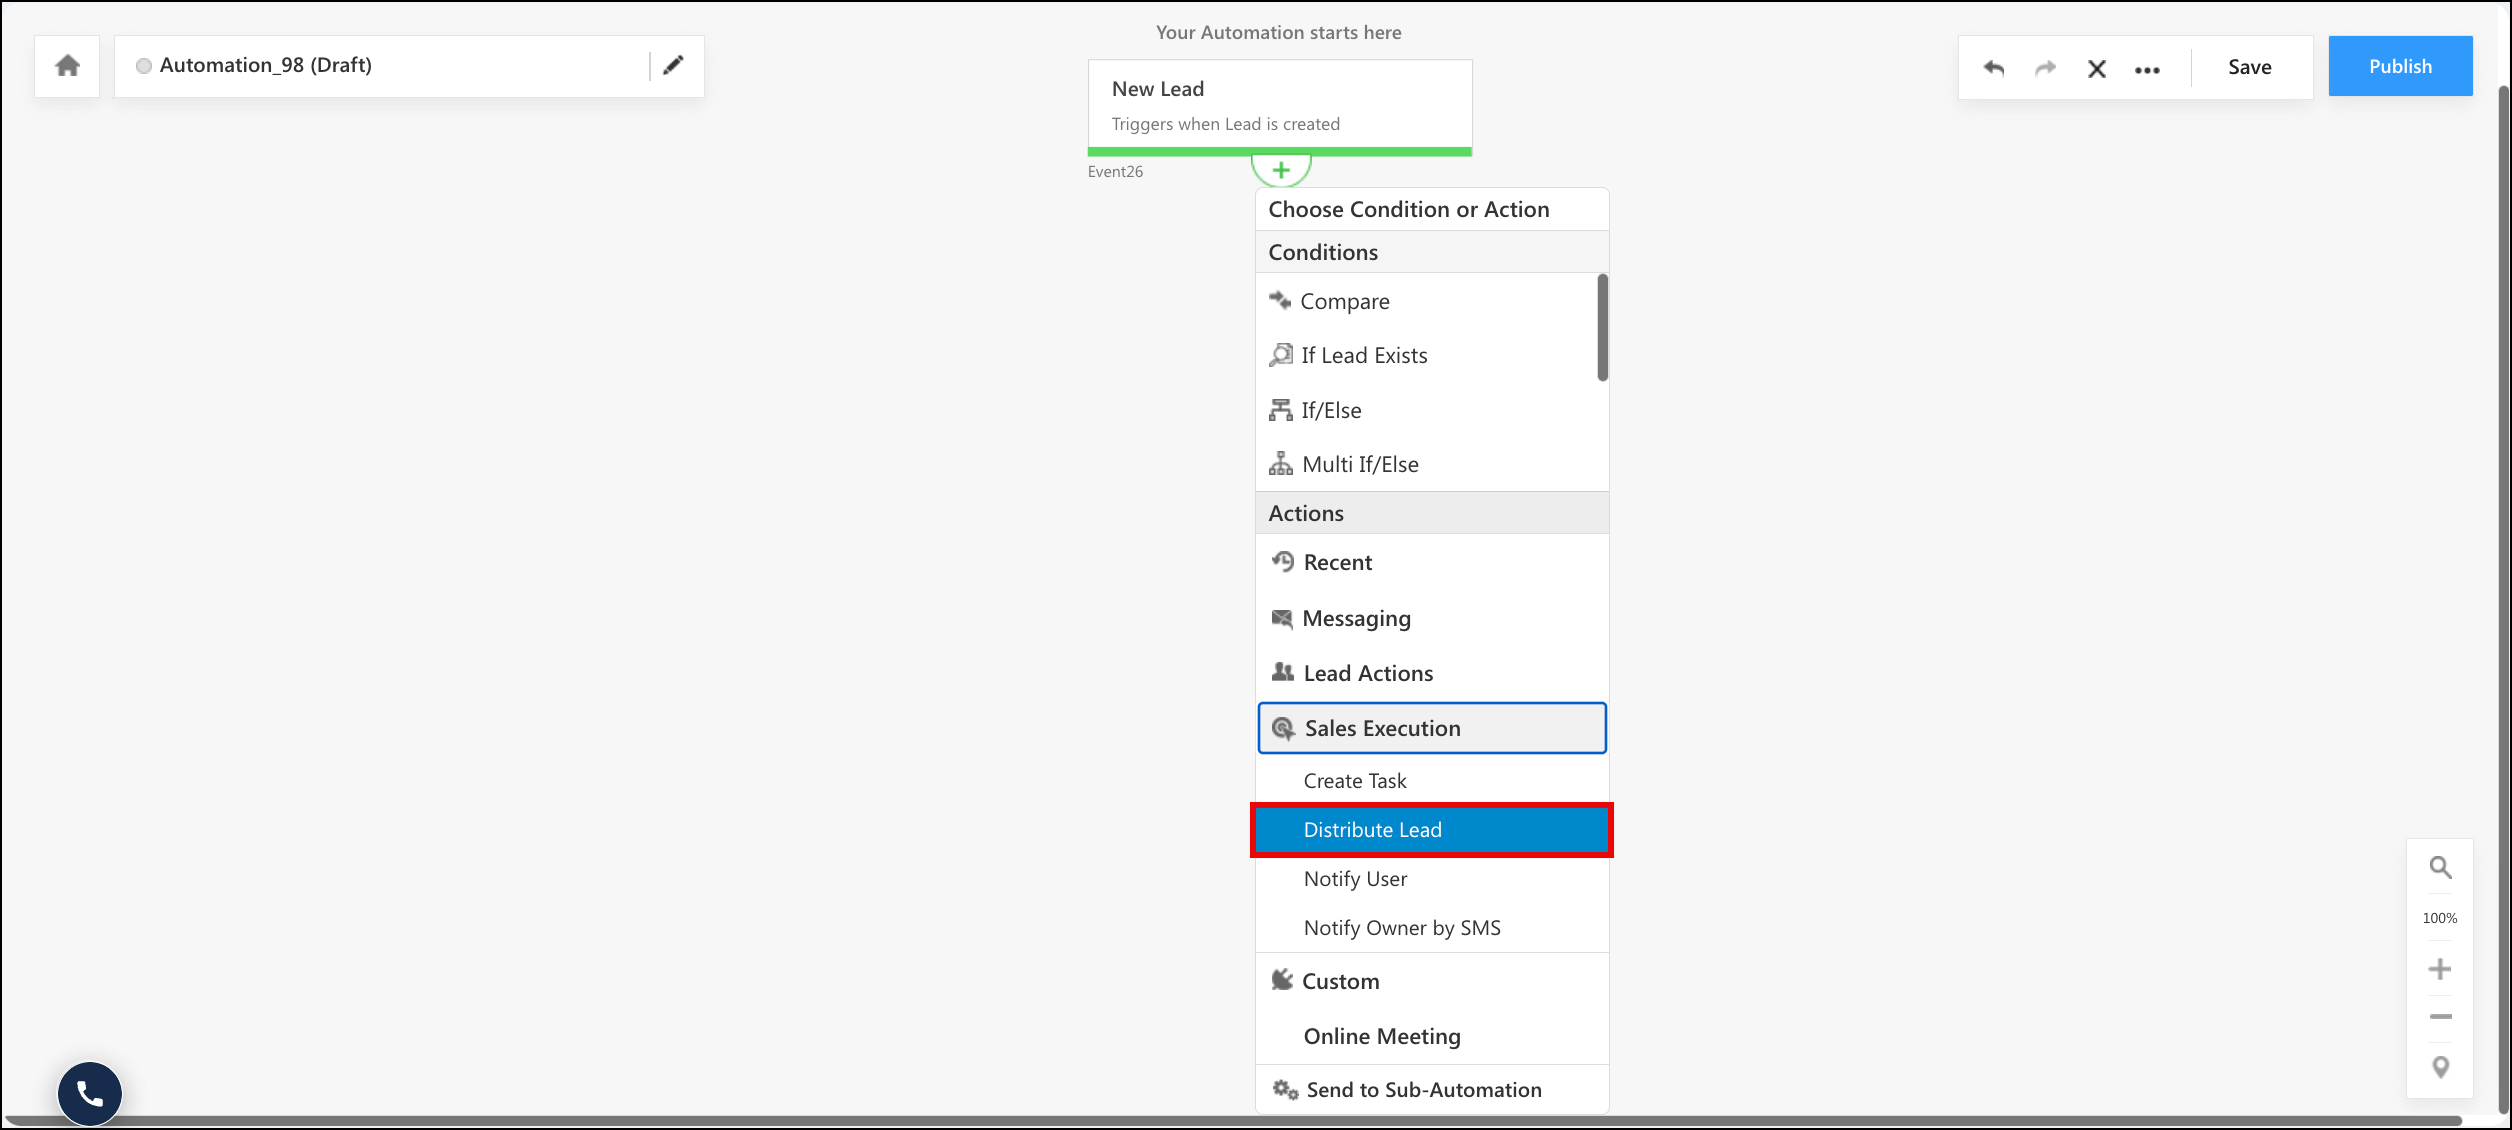
Use the Distribute Lead action to assign leads to your users. For example, you can assign leads to users based on the lead’s city, interest, or industry.
To limit how many leads each user receives, set a lead assignment quota. The quota applies across all automations in your account, so a lead assigned by any automation increases the same counter. For more information, see Lead Assignment Quotas.
For the full configuration procedure, see Lead Distribution Automation in LeadSquared.
8. Distribute Opportunities
Use the Distribute Opportunity action to assign opportunities to your users. For example, you can assign opportunities to users based on the actual deal size.
To limit how many opportunities each user receives, apply an opportunity assignment quota on the Distribute Opportunity card. Configure the quota before you build the automation. For more information, see Opportunity Assignment Quotas.
For the full configuration procedure, see Opportunity Distribution Automation.
9. Distribute Activities
Use the Distribute Activity action to assign an activity to a user. The action appears only when both of the following conditions are met.
- The automation uses one of these activity triggers: New Activity on Lead or Activity Update on Lead.
- The activity type set in the trigger is a custom activity or a sales activity.
9.1 Example Use Cases
Use activity distribution to assign the stages of a process to different users, sales groups, or teams. For example, you can assign –
- A Document Collection activity to a field sales team, to collect identification documents.
- An Account Creation activity to a supervisor or a manager, for approval.
- A Loan Application activity to a risk assessment team, to determine eligibility.
9.2 Configure Activity Distribution
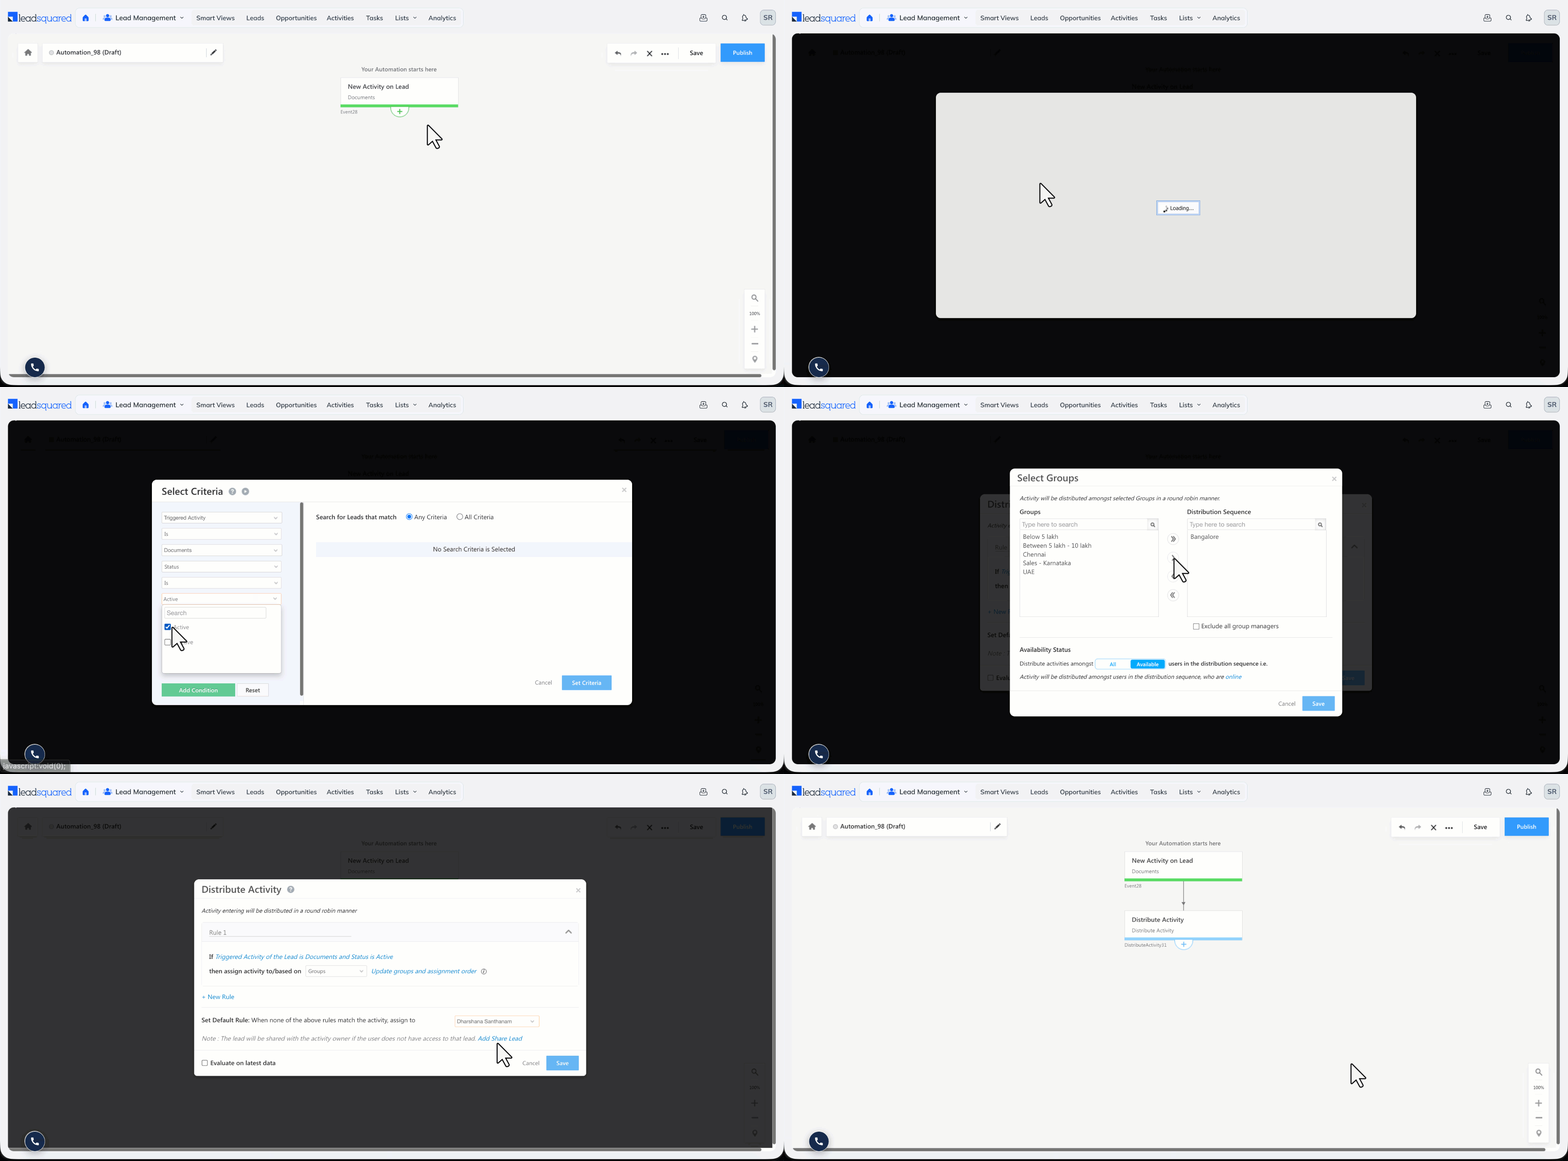
- On the automation canvas, click Sales Execution, and then click Distribute Activity.
- On the Distribute Activity pop-up window, enter a rule name. To add another rule, click New Rule.
- Click Choose Condition(s).
- Select the conditions, click Add Condition, and then click Set Criteria. For more information on conditions, see How to Use Advanced Search.
- Select Users, Sales Groups, or User Properties, and then select the recipients.
- Set the default rule.
- Evaluate on latest data decides which version of the record the rule reads. When it is enabled, the rule reads the current field values. When it is disabled, the rule reads the values the record held when it entered the automation.
- Click Save.
You can now add more conditions and actions to the automation.
Share the Lead With the Assigned User
If you assign an activity to a user who cannot view the associated lead, click Add Share Lead to grant that user temporary access to the lead. A lead can be shared only with the activity owner. For more information, see How to Share Leads for a Limited Duration.
10. Distribute Tasks
Use the Distribute Task action to assign tasks to your users. The action appears only when the automation uses the Task Created on Lead or Task Reminder for Lead trigger.
10.1 Configure Task Distribution
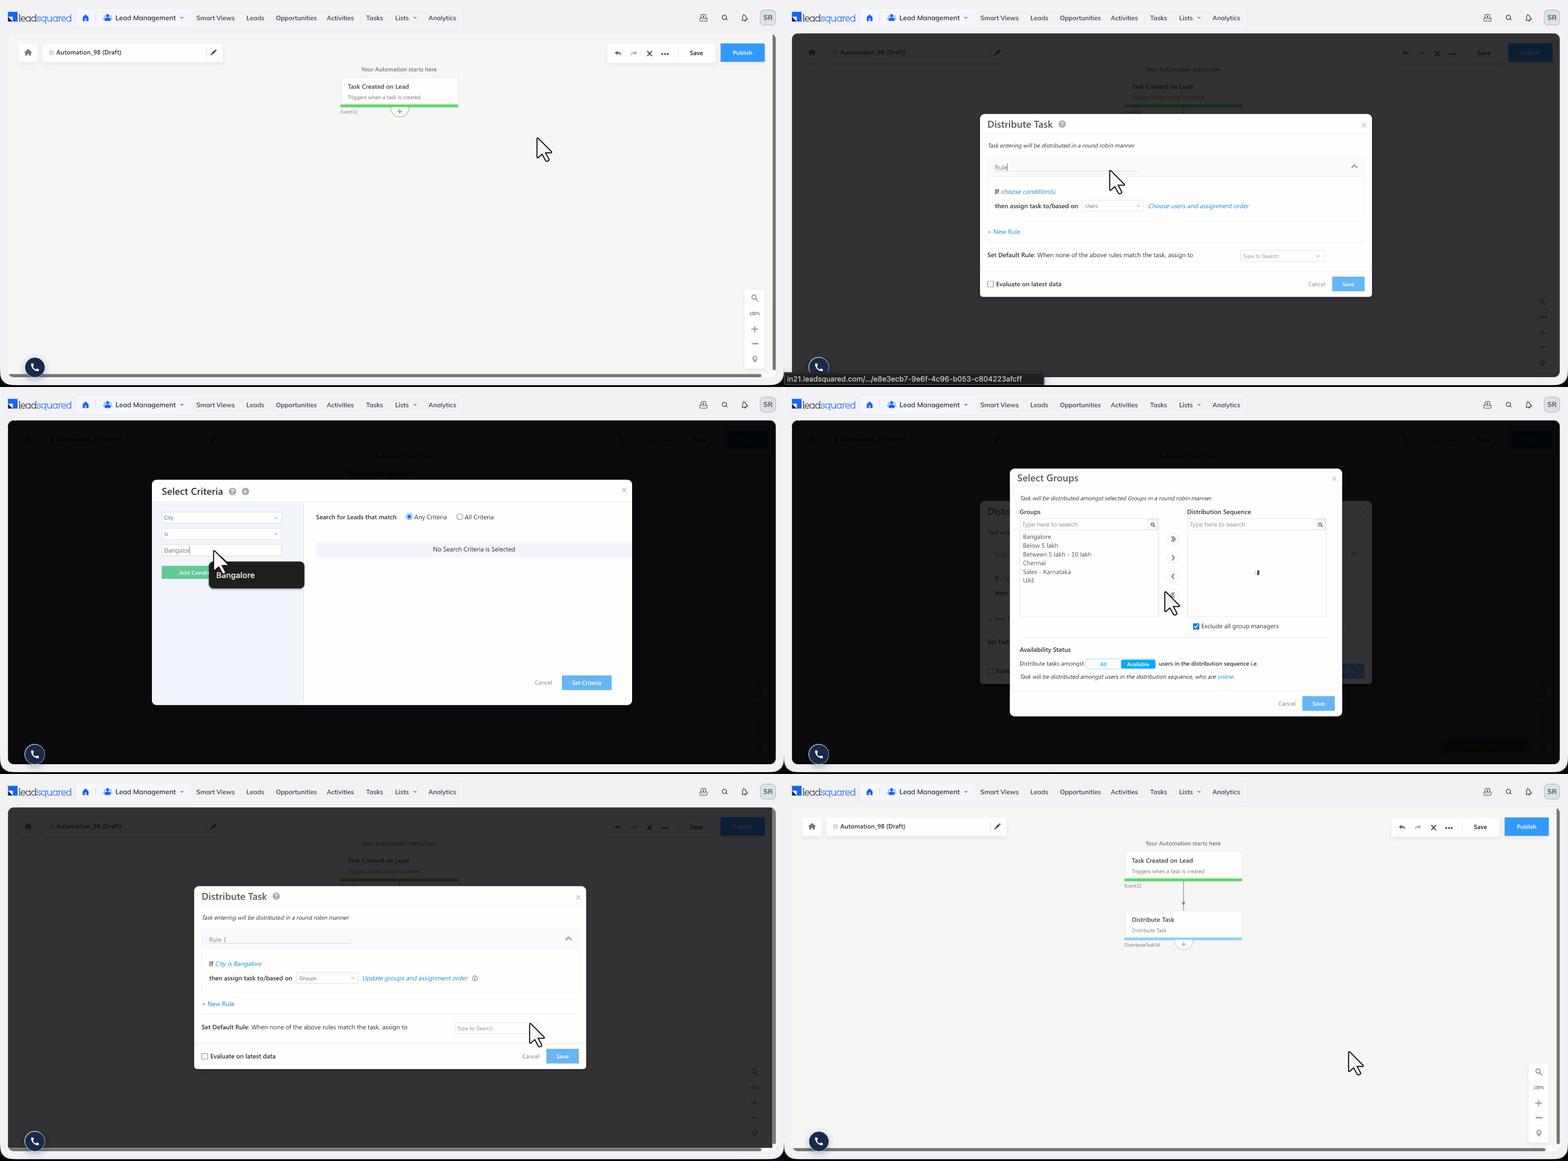
- On the automation canvas, click Sales Execution, and then click Distribute Task.
- On the Distribute Task pop-up window, enter a rule name. To add another rule, click New Rule.
- Click Choose Condition(s).
- Select the conditions, click Add Condition, and then click Set Criteria.
- Select Users, Sales Groups, or User Properties, and then select the recipients.
- Set the default rule.
- Click Save.
11. Troubleshooting
| Issue | What to check |
| Records are assigned to the default user instead of the matching rule | The rule conditions were not satisfied. Check the Evaluate on latest data setting, since the record’s field values may have changed inside the automation. Check for extra whitespace in the record fields and in the card. |
| No records are assigned to a user | The user may be deactivated. Check the user on the Manage Users page. If Available is selected under Availability Status, the user may have been checked out when the automation ran. |
| Round-robin distribution is uneven | When user availability is enabled, users check in at different times, so the rotation is not uniform. |
| Users receive more records than their quota allows | Distribute cards running in parallel can assign past the quota. Manual owner changes do not count against the quota. For parallel card issues, write to support@leadsquared.com. |
| A lead cannot be unshared | The activity ID used to unshare the lead must match the activity ID used to share it. |
For more troubleshooting, see Automation FAQ & Troubleshooting.
Any Questions?
Did you find this article helpful? If you have any questions or feedback, please leave a comment below.
what does evaluate on latest data do?
Hi Komal,
You can configure an automation card to process the latest data of an entity (Lead/Activity/Opportunity/Task), or to process the trigger data (the entity data present at the automation trigger).
When you enable ‘Evaluate on latest data’, the automation card considers the latest data of the Lead/Activity/Opportunity/Task.
If there are any updated fields in the card (the fields may have been updated by previous cards in the automation or manually) where ‘evaluate on latest data’ is enabled, the card will consider the updated value of the field at the time of processing.
If this option is disabled, the card will only process the data of the Lead/Activity/Opportunity/Task as it was during the trigger.
Hope this helps!