


Get Started
Sales Suite
Field Ops
Marketing
Service CRM
Integrations & Apps
FloStack
Lead Automation Conditions – Wait
Feature Overview
The wait condition lets you delay an action or condition for a specified period. A few of the many applications of this feature are listed here –
- Delay sending emails to avoid flooding a lead’s inbox.
- Wait till a lead score exceeds ‘x’ number and then change the lead stage.
- Wait a certain amount of time to see if a lead has performed an activity (Email opened, email link clicked, etc.) and then send a follow-up email.
- Wait till a lead’s stage changes from ‘Opportunity’ to ‘Customer’ and then send ‘Customer-only’ discount emails.
- Send email campaigns on specific occasions (birthdays, festivals, etc.).
- Wait till a sales user has sold a product and then send a thank you email.
Note: Daylight savings are accounted for when you choose a specific date and time to wait until. This functionality is configured for all time zones that observe daylight savings. You can edit your time zone and other profile settings under My Profile>Settings>My Profile.
2. Set Wait Condition
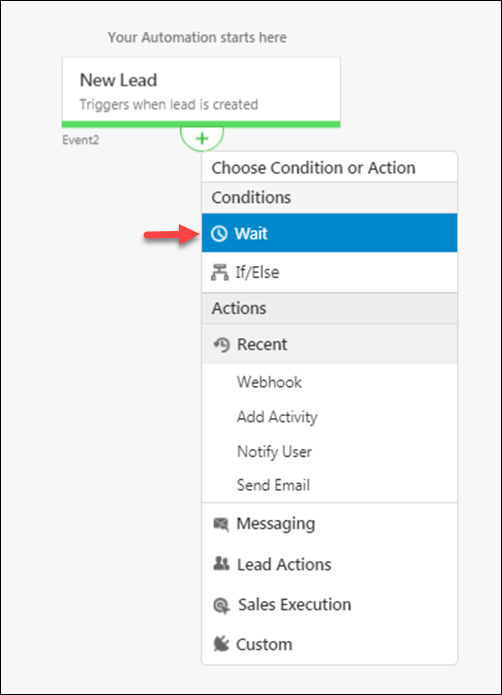
Click the Wait condition highlighted above to see the Set Wait Condition pop-up.
Here you can specify the time period to delay the action in two different ways –
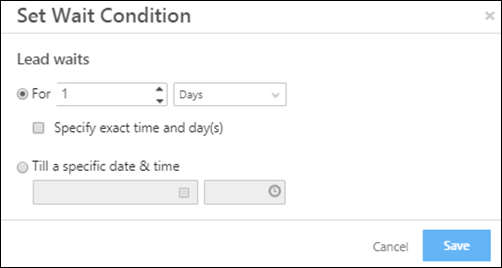
1. For a Specific Amount of Time
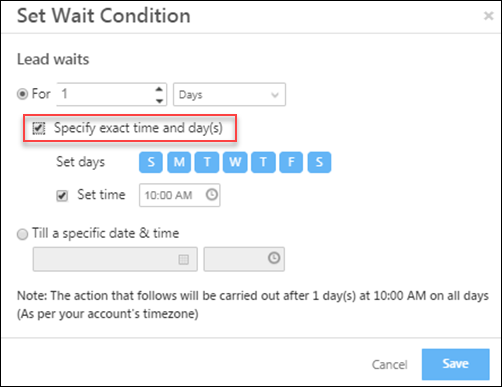
Allows you to enter the time delay in minutes, hours, days, weeks, months and years. In addition to this, you can also set the exact day of the week and time of day that you want to wait before the next action. Use the highlighted checkbox to pick a day and set a time.
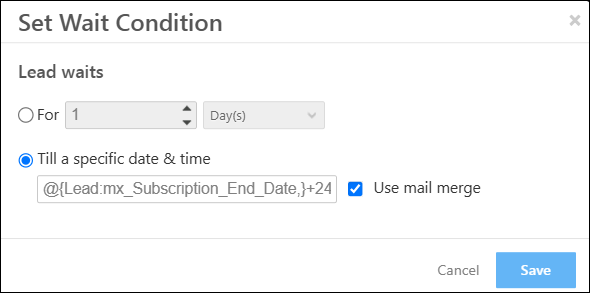
2. Until a Specific Date & Time
Allows you to enter the date and time till which the succeeding activity will be delayed. Click the checkbox highlighted below to use this feature.

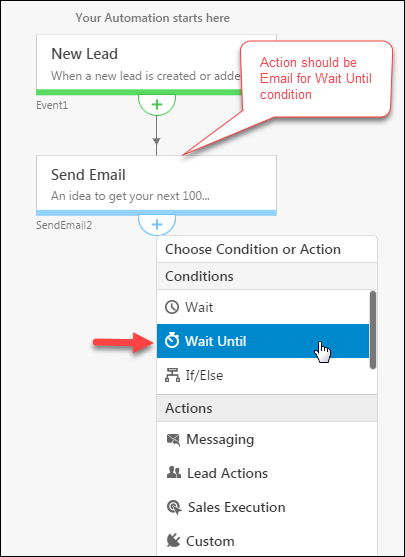
If you are giving an Email action, you have the option to give another condition called Wait Until. This condition allows you to delay until an Email activity is satisfied by the Lead in order to proceed to another action.
To add the Wait Until condition:
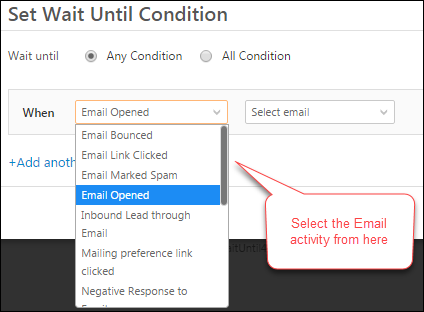
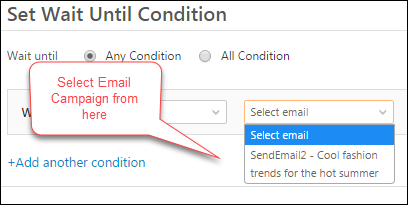
After an Email action, click Wait Until under Conditions. The Set Wait Until Condition pop-up box appears.
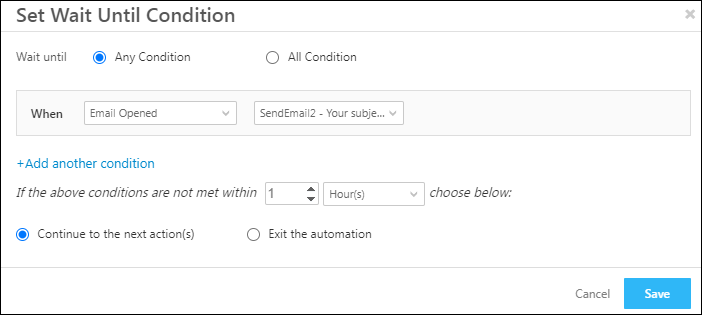
Here you can specify the Email condition and the Email Campaign which the Lead should satisfy in order to proceed to the next action.
You can also define the time within which the selected action (Email Opened) should be performed. If the action isn’t performed within the defined time, you can choose to continue with the next action or exit the automation.
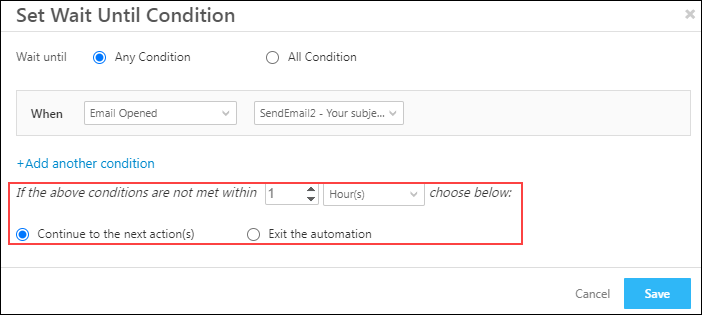
Note: You can add multiple conditions here. Select Any Condition, if you want your Lead to satisfy any one of the conditions that you provide. Select All Condition, if you want the Lead to satisfy all the conditions that you provide.
Click Save when you’re done.
3. Set Wait Condition (Advanced)
In addition to the Set Wait Condition, you also have the option to use the Set Wait Condition (Advanced). The difference between the two conditions is on the Set Wait Condition (Advanced), you can configure a timezone of your choice when setting up the condition. This is useful when your LeadSquared account follows a particular timezone, but leads are present across multiple timezones.
To set the timezone –
- On the Set Wait Condition (Advanced) pop-up, alongside Set Time Zone, enable the checkbox
 .
. - From the timezone dropdown, select the timezone you want to set.
- Alternatively, you can Use mail merge option to mail merge the relevant timezone lead field.
- Once you select the mail merge field, set a default timezone. This will be applied when there’s no value in the selected mail merge field.
- Once you’re done, enter the other details, and click Save. The rest of the steps to set the condition are the same as the ones listed above.
Note: The Set Wait Condition (Advanced) card is available for automations set-up using the following triggers –
- Lead
- Opportunity
- Accounts
- Activity
- Tasks
- Users
4. Example
A sample image of an automation with the Wait Until condition is given below:
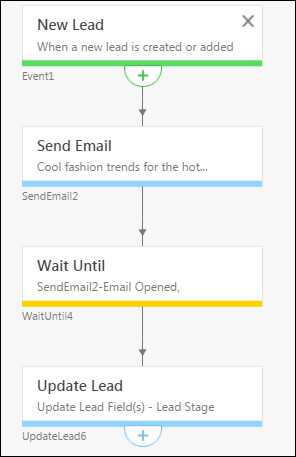
Here, after the new lead is created, an Email is sent to the Lead. After this, a Wait Until condition to wait until the Lead opens the first Email is given. If the Lead opens the Email, the Lead Stage of the Lead is updated to ‘Opportunity’.
5. FAQs
Can I subtract days from a “Date and Time” field in automation? What’s the Rule Syntax for Subtracting Days from a Date-Time Field in Automation.
You can only subtract or add the number of hours, not days to/from a date-time field in the Wait automation card. The syntax is as follows – @{Lead:mx_Subscription_End_Date,}+24
Is is possible to use time operations using a lead field? For example: “Wait until [Date from a lead field] – 1 day” ?
Hi, Cristian. This is not possible directly from the product UI. But we might be able to set-up a workaround. To do this, please contact your account manager, or write to support@leadsquared.com.