


Get Started
Sales Suite
Field Ops
Marketing
Service CRM
Integrations & Apps
FloStack
Google Reviews Connector
1. Feature Overview
The Google Reviews Connector captures and syncs customer reviews from your business’s Google page to your LeadSquared account. From LeadSquared, send personalized responses to customers based on their review sentiment (Positive and Negative) using predefined templates or Chat GPT. Additionally, you can invite leads to share their reviews, boosting your business’s visibility and online ratings. All of this allows you to view and manage your reviews from one place. Other advantages of this connector include –
- Sync and Manage Reviews – Sync all your Google My Business (GMB) reviews, along with the business locations in which these reviews were posted.
- Reply to Customers – Easily reply to reviews from LeadSquared, either manually, or by using predefined reply templates or Chat GPT. This ensures a reply from the business owner is sent to your customers as soon as they post a review.
- Leverage ChatGPT – Generate contextual replies using Chat GPT for tailored responses to each review.
- Invites for Reviews – Send review invitation links to leads, encouraging more feedback about your business.
- Analyze Your Reviews – Identify common words across all reviews to gauge overall customer sentiment.
2. Prerequisites
- You must be the Administrator of your LeadSquared account to install and configure this connector.
- This is a paid feature. To activate it, contact your account manager or email support@leadsquared.com.
- There are additional costs involved if you’re looking to integrate Chat GPT with the connector. To know more, contact your account manager or email support@leadsquared.com.
3. How it Works
This connector sync all the reviews posted on your Google My Business account with your LeadSquared account. You can access and respond to these reviews from the connector’s dashboard.
- First, install and configure the connector. When completing the configuration –
- Link your GMB account with the connector, and if you have multiple businesses across different locations, select the businesses you want to sync.
- Verify if a review link URL is generated, which can be shared with your leads for posting reviews about your business.
- Choose a communication channel to post an auto-response to your customers. This can be done by setting up a default review template for Positive and Negative reviews, or by using Chat GPT to generate contextual replies.
- Once the connector is configured, navigate to the Google Review Connector screen to –
- Create and configure review templates by adding relevant content for each template type. While this step is optional, it is highly recommended you add review templates as they simplify the task of responding to customer reviews.
- Monitor and respond to customer reviews promptly to address any grievances and provide timely resolutions.
If needed, you can also share review link URLs directly with your leads via email from the Lead Details page.
4. Installation
- Navigate to Apps>Apps Marketplace.
- Search for Google Reviews Connector, and click Install.
- Alternatively, you can find the connector on the left panel, under Analytics.
- Once installed, hover your cursor over
 , and click Configure.
5. Configure the Connector
5.1 Configure Business API
Here, link your Google My Business (GMB) account with the connector.
- On the Google Reviews Connector pop-up, go to the Configure Business API tab and click Connect Account.
- On the Sign in with Google pop-up, choose the Google account linked to your GMB account. Ensure all required permissions are granted, and click Continue.
- Once you’re redirected back to LeadSquared’s Google Reviews Connector pop-up, click Save & Next.

5.2 Configure Locations
Here, select the businesses linked to your GMB account you want to sync with the Google Reviews Connector. You will only be able to view reviews posted on the synced business locations. Alongside a business location you want to sync, enable the ![]() slider.
slider.
- To refresh the location list that’s visible, alongside Google Locations, click
 .
. - If you have multiple locations, use the search bar to enter keywords (such as the locality name) to find a specific business.
- If you have multiple GMB accounts linked to the connector, use the dropdown menu to select other GMB accounts. All businesses listed under the selected accounts will be visible here.
Once you’re done, click Save & Next.
5.3 Configure Review Invites
The connector automatically generates review links for each business, which you can share with your leads. If you prefer to share a shortened URL (using tools such as Bitly, TinyURL, etc.), click on ![]() edit to add the URL. When your leads receive these links, they can post reviews about your business.
edit to add the URL. When your leads receive these links, they can post reviews about your business.
Once you’re done reviewing the link/adding a new link, click Save & Next.
5.4 Configure Auto Reply
To automate replies to your customers, alongside Configure Auto Reply, enable the ![]() slider. You can choose to send replies through pre-defined templates, or through Chat GPT.
slider. You can choose to send replies through pre-defined templates, or through Chat GPT.
- If you select Templates, refer to Configure Templates to add and configure your Templates.
- If you select Chat GPT, no further configuration steps are required from your end. Contextual responses will be auto-generated using Chat GPT.
Once you’ve selected the channel, you can choose up to 10 users from the Notify Users on Auto Reply dropdown to receive email notifications whenever an automated reply is sent to a customer. Once you’re done, click Save & Next. This completes the connector configuration process.
Note:
- You’ll be charged for each individual response that’s generated through Chat GPT, and the total number of responses generated will be totalled and billed every month.
- Note that you will be charged for a generated response even if you don’t end up using it as a reply to your customer.
- This entire section is optional. You can choose to skip it, and click Save & Close. However, this means you’ll need to manually type out replies whenever you want to respond to a customer’s review.
- Selecting users to notify when an automated reply is posted is also optional. You can choose to skip it, and click Save & Close.
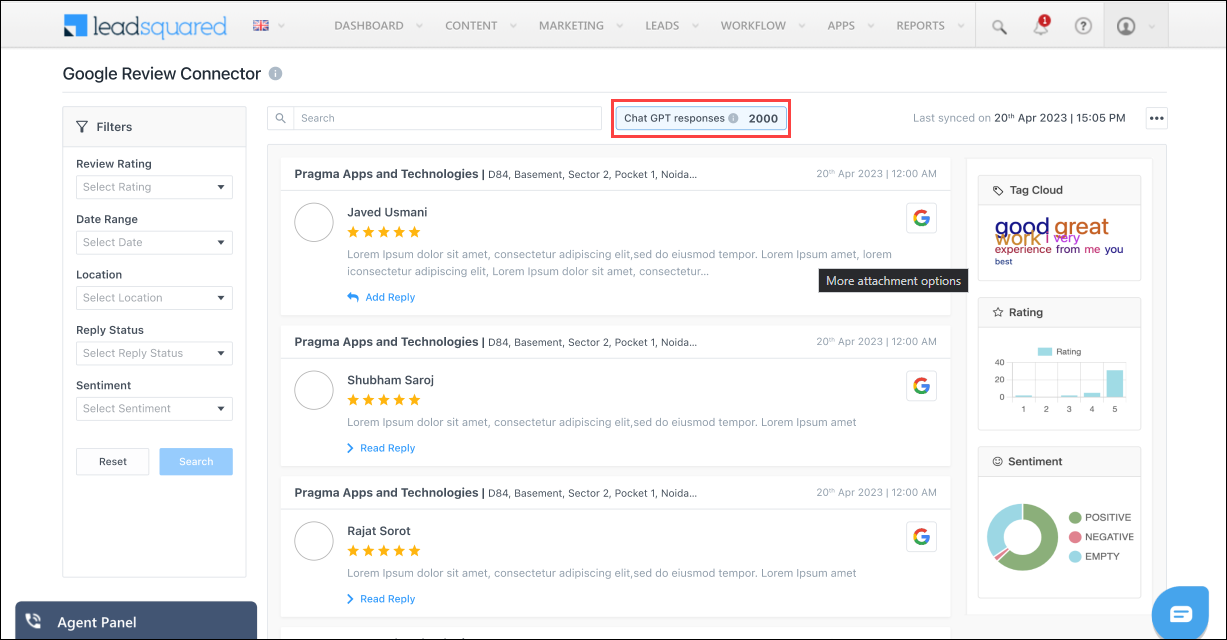
6. Connector Dashboard
Once the connector is installed and configured, navigate to Apps>Google Review Connector. On the Google Review Connector page, to view all the reviews posted on your business –
- On the top-right corner of your screen, click
 .
. - From the options available, click Sync Now.
- Refresh the page after a couple of minutes, and you’ll be able to view all the reviews posted on the businesses synced with the connector.
6.1 Configure Templates
If you’ve chosen to configure auto replies using Templates, you’ll have to follow the steps listed below to configure these templates –
- On the top-right corner of your screen, click .
- From the options available, click Configure Templates.
- The steps to configure a Positive Template and a Negative Template are the same.
- If a customer rates your business 4 or 5 stars, the Positive Template will be sent as the response.
- If a customer rates your business 3, 2 or 1 star, the Negative Template will be sent as the response.
- Enter the response text in the textbox. To mail merge a customer’s name, click
 . This will pick up the customer’s name stored in their Google account.
 - Once you’re done, click Save Changes.
- You can add multiple templates, and set one template each (under Positive and Negative) as the primary template. To do this, alongside the template, click
 , and then click Save Changes.

6.2 Filters
You can apply the following filters to your reviews –
- Review Rating – Filter reviews based on their ratings.
- Select Date – Filter reviews by when they were posted. The options available are Last 24 Hours, Last 7 Days, Last Month and All.
- Location – Filter reviews specific to each business location synced with the connector.
- Reply Status – Filter by reviews that have not received a response yet.
- Sentiment – Filter reviews based on their associated sentiment. Our advanced metrics determine whether a review is Positive or Negative.
Once you’ve applied filters, click Search.

6.3 Graphs
You can view the following graphs about your reviews –
- Tag Cloud – Shows a list of the most frequently used words across all reviews synced with the connector.
- Ratings – Presents a bar graph representing reviews categorized by their assigned ratings. Hover your cursor over each bar to view the number of reviews posted for each specific star rating.
- Sentiment – Displays a pie chart illustrating reviews categorized by their associated sentiment. Hover your cursor over each section to see the number of reviews posted for each specific sentiment.

6.4 Send a Reply
From the dashboard screen, here’s how you can send replies to your customers –
- Under a customer’s review, click Add Reply.
- You’ll see two options to post a Response from the Admin –
- Use Template – The textbox will be auto-populated with the primary review template you’ve configured. You can edit this response if necessary. If you have multiple templates saved for the sentiment associated with the review, you can choose a preferred template from the dropdown.
- Generate GPT Reply – Chat GPT will generate an appropriate response, which will get auto-populated in the textbox. You can edit this response if required.
- Once you’re satisfied with the response, to post the reply to your customer’s review, click Save. The Leadsquared users you selected when Configuring the Auto Reply will get a notification once the response is posted.

6.5 Other Actions
- To find reviews containing specific keywords, enter these keywords in the search box.
- After sending a response to a customer, you have the option to either Delete or Edit the sent response.
7. Share Review Link with Leads
To share review links (you added when Configuring Review Invites) with your leads by email, follow these steps –
- Navigate to Leads>Manage Leads, and click on the lead you want to share the invite link with.
- From the Lead Actions menu, hover your cursor over Custom Actions, and click Ask Reviews.
- On the Ask Reviews pop-up, provide the following details –
- Location – From the dropdown, select the business location for which you’re requesting the review.
- Review URL – The URL link for the review. This field is auto-populated and cannot be edited from this screen.
- Email – The lead’s email address. This field is auto-populated and cannot be edited from this screen.
- Subject – Enter the subject line for the email (e.g., “Please Review Our Business”, etc.).
- Description – Enter the email body (e.g., “Please post a review using this link…”, etc.).
- Once you’re done, click Send Email. The review link will be sent to your lead.

Note:
- To edit the lead’s email address, close the Ask Reviews pop-up and make changes to the email ID on the Lead Details page.
- To edit the review link, navigate to Apps>Apps Marketplace, and on the Google Reviews Connector, click Configure, and on the Configure Review Invites tab, edit
 the email ID.

8. FAQs
- Is Chat GPT available as part of the connector’s basic offering?
No, Chat GPT is not available as part of the connector’s basic offering. The basic offering allows you to connect your GMB account with your LeadSquared account and create reply templates. However, if you want to use Chat GPT, there will be additional charges for each generated response. Integrating Chat GPT with the connector does not require any additional steps.
- When will I be charged for using Chat GPT?
You will incur charges for every response generated through Chat GPT. Even if your user generates three responses but only uses one as a reply to your customer, you will still be billed for all three responses generated. The total number of responses generated in each calendar month will be calculated, and you will be billed accordingly. You can monitor your monthly Chat GPT usage on the dashboard to track your usage.
Any Questions?
Did you find this article helpful? Please let us know any feedback you may have in the comments section below. We’d love to hear from you and help you out!