


Get Started
Sales Suite
Field Ops
Marketing
Service CRM
Integrations & Apps
FloStack
Leave Tracker
Updated
24 May 2024 | 04:28 PM
The Leave Tracker enables you to manage the leaves of all your users in one place. Users can create their own leaves while administrators can create leaves for all users. The following sections tell you how you can fill in your own leaves if you’re not an administrator user (or sales group manager) and how you can manage all leaves if you are.
For Non-Administrator Users
If you’re a non-admin user, you can fill in your leaves as follows –
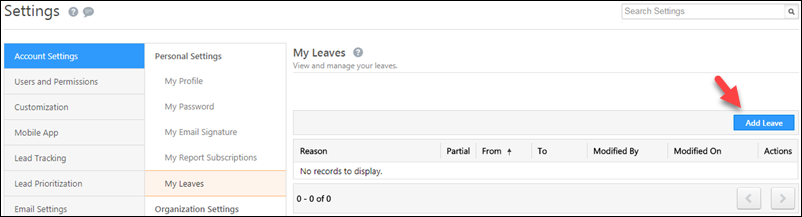
- Navigate to My Account>Settings>Account Settings>My Leaves and click the Add Leave button.
- In the New Leave pop-up enter the appropriate details (see table below).
- Click Save when you’re done.
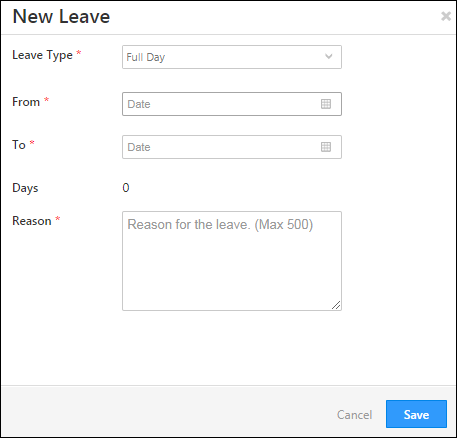
| Field | Description |
| Leave Type | Apply for full day or partial leaves. If you choose the full day option, you can see the number of days you’re creating leaves for. |
| From | The day the leave starts from. You can also enter the time for partial leaves. |
| To | The day the leave ends on. You can also enter the time for partial leaves. |
| Reason | It is mandatory to enter a reason for each leave you create. |
For Administrator Users & Sales Group Managers
Admins can view the leaves of all users as well as create leaves for users –
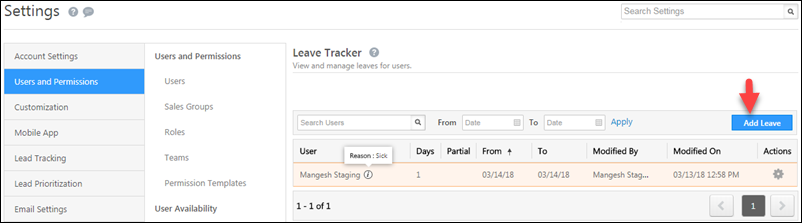
- Navigate to My Account>Settings>Users and Permissions>Leave Tracker.
- Click Add Leave to create new leaves for users. A user select drop-down will be available in the Add Leave pop-up.
- You can also edit or delete leaves by clicking the Settings
 icon.
icon.
How to edit/delete applied leave if anyone wants to make any changes?
Hi Vishal.
To edit or delete an applied leave,
1. Navigate to Settings>Users and Permissions>Leave Tracker.
2. Click the Actions icon to edit or delete an applied leave.
Note that a past-date leave cannot be edited or deleted.
Thank you very much!
Glad we could help!
Does adding a leave date remove a user from lead distribution for that time frame?
Hi Scott,
It depends on how your lead distribution automation is set up. Also, the check-in/check-out feature must be enabled for your users.
When setting up the lead distribution automation card and choosing the users and assignment order, you’ll see an option to distribute leads to ‘All’ or ‘Available’ users. Select ‘Available Users’ to ensure that leads only go to users who are checked-in and Online. If a user is on leave, and doesn’t check-in that day, he won’t be assigned any leads.
You can also automate the entire process of checking in/out your users –
Sorry for the long reply, hope it was helpful.