


Get Started
Sales Suite
Field Ops
Marketing
Service CRM
Integrations & Apps
FloStack
Lead Distribution Automation in LeadSquared
1. Feature Overview
This article covers how the Distribute Lead card works in automations. The distribute lead action allows you to set conditions to distribute leads among your users. Example – You may want to distribute leads based on their location, interest, industry type and so on. If you’re new to the lead distribution feature we highly recommend you first understand the best way to distribute leads to your users.
With the Lead Distribution automation card, you can build a series of rules and assign leads to one specific user, groups of users, or based on user properties, in a round-robin manner. When a new lead is created in your account (or based on any other trigger), the lead distribution engine executes each rule, one by one, till the conditions defined in your rule match the new lead. Once a rule’s conditions match the lead, no more rules are executed.
When no rule matches the incoming lead, then the default rule is executed.
Note: You can define lead/opportunity distribution quotas to limit the number of leads/opportunities assigned to your users through the distribution engine. To know more, refer to
2. Create an Automation
To get started –
- Navigate to Workflow>Automation, and click Create Automation.
- From the list of available triggers, select any trigger.
- After selecting a trigger, click Sales Execution, and then click Distribute Lead.
- On the Distribute Lead pop-up, you can create lead distribution rules. Based on these rules, you can –
- Distribute leads to users
- Distribute leads to groups
- Distribute leads based on user properties
3. Create Lead Distribution Rules
The distribute lead action allows you to set conditions to distribute leads among your users.
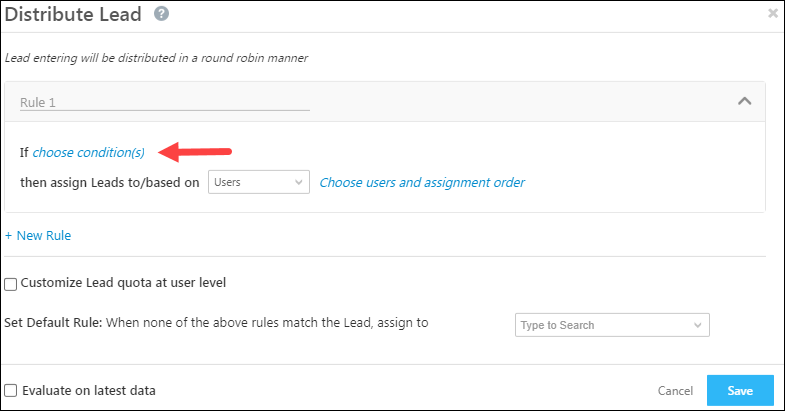
As an example, let’s say you want to distribute all leads from a certain city to specific users. Click the Distribute Lead action to open the Distribute Lead pop-up window.
Enter a rule name in the space provided and then click the choose conditions(s) link.
On the Select Criteria pop up, choose the lead field as City and then enter Bangalore. Next, click Add Condition.

Your criteria will show up as highlighted below. Click Set Criteria to proceed.

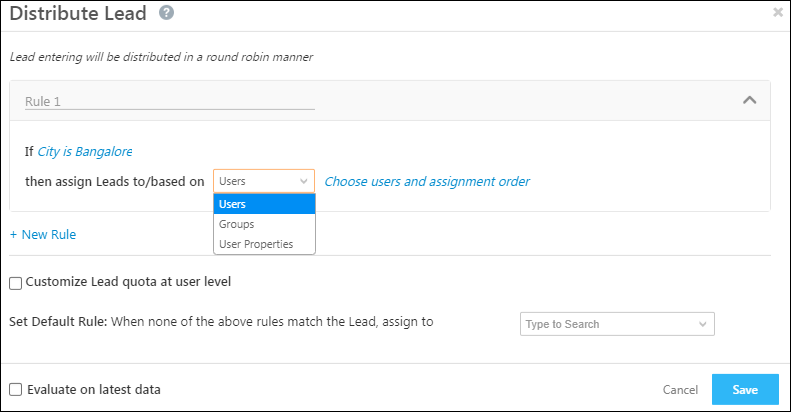
Now select one of the following options from the drop-down
- Users – Select particular users to distribute the leads to.
- Sales Groups – Select the group you want to distribute leads to.
- User Properties – Perform an advanced search based on user attributes. For more information, see User Advanced Search.
3.1 Distributing Leads to Users
From the dropdown, select Users.
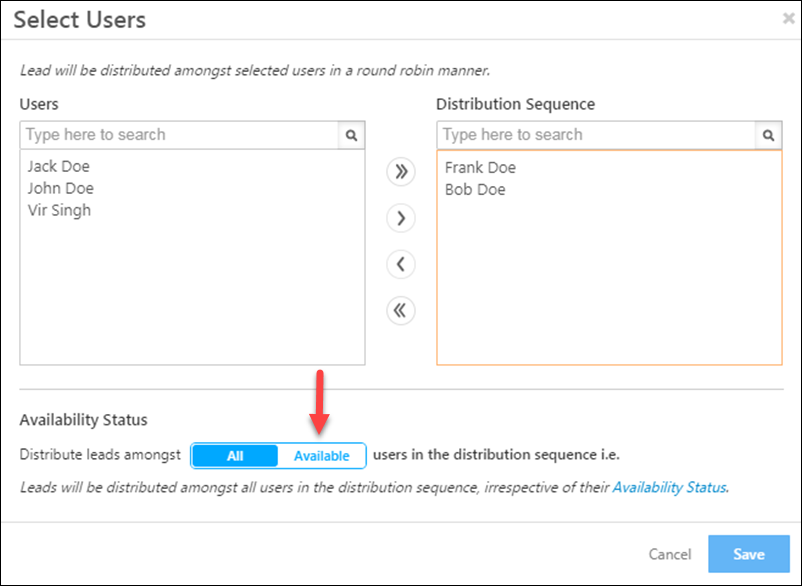
On the Select Users pop-up, choose the users and the sequence you want your distribution to follow.
You’ll see an Availability Status section at the bottom if you’ve enabled the Check In and Check Out feature for user management. You can toggle the between the All and Available options to distribute leads to all users or to available users only. Click Save when you’re done.
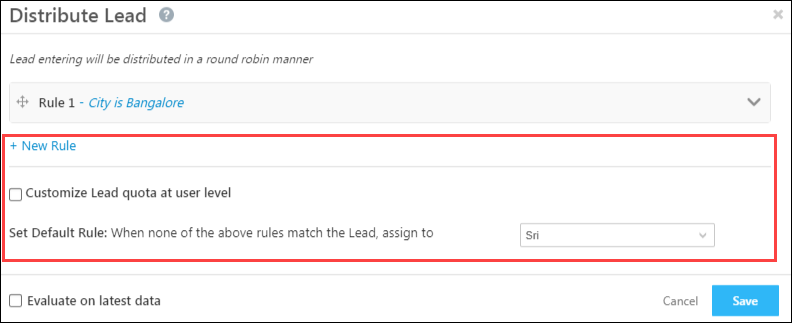
You can proceed to add multiple rules by using the New Rule link. You can name each rule and then re-order them by simply dragging and dropping. The rules will execute in the sequence you set up.
You must set a default rule that will execute when no other rules match the set criteria. The default rule will automatically distribute the lead to a user you select.
Note: If you’ve chosen the Available users option and the user is not available, the lead will be distributed to the user specified in your default rule.
Note: Evaluate on latest data assesses the distribution rule on the current lead data in your account. For example, you set a lead distribution rule where the ‘Stage is Prospect’. A lead, whose stage is ‘Prospect’, enters the automation. While passing through the automation, the lead’s stage changes to ‘Disqualified’.
- If ‘Evaluate on latest data’ is enabled, the lead won’t be considered by the lead distribution rule (Stage is Prospect), because according to the latest data, the lead’s stage is now ‘Disqualified’.
- If ‘Evaluate on latest data’ isn’t enabled, the lead will be considered by the lead distribution rule (Stage is Prospect), because only the data at the time the lead entered the automation will be considered (and at that time the lead’s stage was ‘Prospect’).
Your automation is now set up to distribute leads to your users based on the city lead field.

3.2 Distributing Leads to Sales Groups
You can distribute leads to multiple sales groups (in different regions for instance). For example, you can create 2 rules, such that Delhi leads get assigned to the Delhi sales group and Mumbai Leads get assigned to the Mumbai sales group –
- On the Distribute Lead pop-up, once you’ve set up the conditions for the rule, select the Groups option and click Choose groups and assignment order.
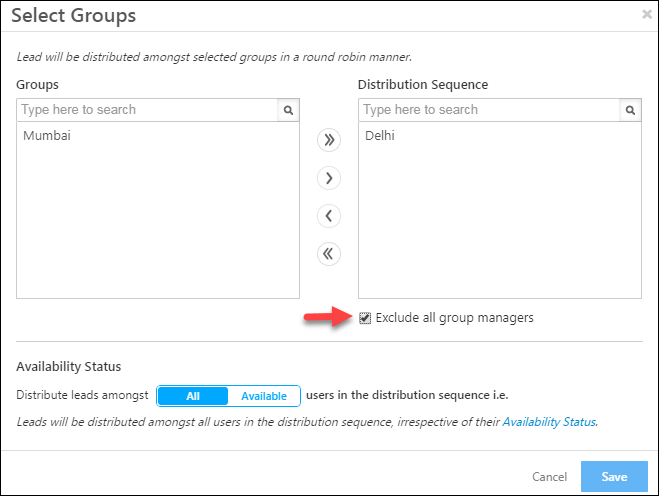
- The Select Groups pop-up will appear. Select the groups you want to distribute the leads to.
- You can also distribute leads to only the available users in a group by clicking the
 option. This feature will only work if you’ve configured the Check-in/Check-Out functionality.
 - Click Save when you’re done.
- Back on the Distribute Lead pop-up, you’ll have to set a default rule that will execute when no other rules match the set criteria. The default rule will automatically distribute the lead to a user you select.
- Click Save.
Note: If you don’t want leads to be distributed to the managers of a sales group, click the Exclude all group managers checkbox as shown below –
3.3 Distributing Leads based on User Properties
You can also distribute leads to user’s based on user properties. For instance, you can distribute leads to users based on their designation, department, Manager name etc. You can even combine multiple properties using the All Conditions (And) and Any Condition (Or) operators. So for example, you can assign leads to users who are from a particular department and have a particular designation.
In this example, we’re setting up the lead distribution such that If a lead’s state is Maharashtra then we’re assigning him to users who work out of Mumbai Or Pune –
- On the Distribute Lead pop-up, once you’ve set up the conditions for the rule, select the User Properties option and click Choose user properties.
- The Select Users pop-up will appear. You can also distribute leads to only the available users in a group by clicking the option. This feature will only work if you’ve configured the Check-in/Check-Out functionality.
- Choose the operator you want to use between condition groups (AND/OR). Select the user details from the drop-down. To add another condition within the same group click the And/Or button inside the condition group box.
- If you want to add multiple condition groups, click Add Condition Group on the bottom left side of the pop-up.
- When your conditions are set up, click Set Criteria button.
- Back on the Distribute Lead pop-up, you’ll have to set a default rule that will execute when no other rules match the set criteria. The default rule will automatically distribute the lead to a user you select.
- Click Save.
Note: You can also mail merge fields while creating condition groups. For more information, see How to distribute leads to users by matching lead and user properties?
4. Assign Leads based on Lead Distribution Quota
After you have configured lead distribution in the previous step, you can further define quotas determining how many leads will be assigned to your users. To learn more, please refer to Limit the Number of Leads Assigned to a User – Lead Assignment Quotas.
4.1 Set Quotas on User Role Level
This will set limits on lead distribution on a user role level (such as sales users, admin users, marketing users). To understand this better, let’s look at the following example. Once enabled from the Settings page (Account>Settings>Users and Permissions>Lead Assignment Quota), the quotas defined at the user role level will automatically apply to the lead distribute automation.
4.2 Set Quotas on Individual User Level
This will set limits on lead distribution quotas for individual users (rather than the user role level). The organization can further define quotas for different durations (daily, weekly, monthly) for each individual users. To know more, please refer to Limit the Number of Leads Assigned to a User – Lead Assignment Quotas.
To enable this –
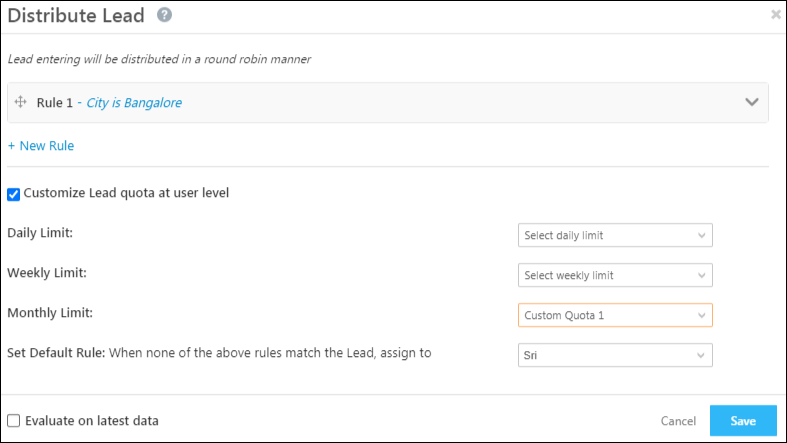
- On the Distribute Lead pop-up, check the
 checkbox against Customize Lead quota at user level.
 - Depending on your preference, choose the Custom Quota options from the dropdown. This will ensure that leads are distributed to only the users who fulfil the criteria of that specific quota.
- You can set quotas for the daily, weekly and monthly durations. These quotas first have to be first configured under Lead Assignment Quota settings page (Account>Settings>Users and Permissions>Lead Assignment Quota).
- For example, if you select a monthly duration, then the leads captured for that month will get distributed based on the quota you’ve set for that month.
- Once you’re done, click Save.
Note: The assignment quota limit for a user will apply across all automations. So for example, if a user’s quota is defined as 10, and multiple automations are set up, leads assigned from either automation will increase the assignment quota counter. Once the quota is exceeded, more leads won’t be assigned to the user from any of the automations.
FAQs
The leads are not getting assigned to my users/or assigned to the default user even after setting up the Lead Distribution Automation. Why could this be the case?
It could be because of one or more of the following reasons –
- The rule conditions you’d set up were not satisfied.
- When you’ve enabled or disabled the Evaluate on Latest Data setting. This depends on the use case you’re trying to solve, and enable/disable the setting accordingly.
- Under Availability Status, you’ve selected Available users, and when the automation was executed, none of your users was available (online).
- When the Lead Assignment Quota (if configured) was exceeded for all your users.
Any Questions?
Have any questions you’d like to voice? Or any experiences with this feature you’d like to share? Please feel free to start a discussion in the comments section.
I want only when the lead is created and it is assigned to a User by automation using the lead distribution card, then only the Lead Quota will be counted. If the manager is assigned some old leads, then the quota will not be counted. How can we achieve this?
Hi, Abhishek. All automation executions using the Distribute Lead card will count towards the Lead Assignment Quota. So, if a lead is created and assigned to a user through automation, the quota will be applied as expected. However, if a manager manually assigns leads outside of automation, those assignments will not be considered under the Lead Assignment Quota.
Thanks
If Team A selects Under Process – CC, Under Process -BR, Not Interested or Not Eligible, then the enquiry needs to remain with the same agent.
Hi, Khaleel. I couldn’t understand your query, can you help me with additional context? Alternatively, you can send an email to support@leadsquared.com for a quick resolution.
Can we move a lead from one use to different users after multiple same activity like if a person marked a lead 7 time not reachable the can we distribute that lead to another person or if that person also marked that lead 7 times not reachable then that lead should transfer to another user
Hi. It is possible to create this flow (I’ve attached an image of an example flow below). Please reach out to support@leadsquared.com and they will help you recreate the flow depending on your use case.
%20of%20auto.png)
Can I manually apply a automation retrospectively…. i.e after lead creation I want to run an automation which I have modified now
Hi, Ranjiv. I’m not sure I understand your question completely. Are you wondering if an automation can be triggered on leads that have already been created? If so, then the answer is yes. Do let me know if this was your query.
Yes… Could you pls guide me how do we do that
Depending on your use case, you could use the lead update trigger, activity on lead triggers, task on lead triggers, or on specific dates.
For example, let’s consider the Lead Update trigger. Through the Lead Update trigger, we can set up an Automation to distribute an existing lead to a specific user when its Lead Stage field changes to Opportunity.
For more information, you can read this documentation on Automation Triggers.
I want to assign leads to sales groups based on their performance (for ex, team 1 gets 60% of all new leads, Team 2 gets 20% of all new leads..etc.) How do I do that?
Hi, Allwin. Thank you for your question. You can set quotas on the number of leads assigned to your users. To know more, refer to https://help.leadsquared.com/lead-assignment-quota/