


Get Started
Sales Suite
Field Ops
Marketing
Service CRM
Integrations & Apps
FloStack
Manage Plans on Journeys for Web Users
1. Feature Overview
Plans in LeadSquared are structured visit schedules created for sales users to manage their field activities over a specific date range. They help organize which leads a sales user should visit, on which days, and what tasks they need to complete during those visits.
Plans can be created by selecting leads manually or through lead templates (Beats). Admins and Managers approve and reject users’ plans as well as create new plans on the Manage Plans page. Admins can also delete irrelevant plans. Once a plan is published or approved, the configured To-Dos will be created against the added leads. The plan execution can then be tracked by users through My Trips, Tasks, Task Smart Views, etc., on the LeadSquared mobile app.
Note:
- Only Admins, Sales Managers, Reporting Managers and Sales Group Managers can access Journeys on the Web App. Sales users can access plans on the Mobile App.
- To know more about Lead Templates, refer to Manage Lead Templates on Web App.
2. Prerequisite
- Admins must first set up the user hierarchy for the account.
- Admins must finish setting up Journeys on the web app.
- Users must have the latest version of the LeadSquared mobile app installed on their devices. To know more about using Journeys on the LeadSquared mobile app, refer to Manage Plans on the Mobile App.
- This feature is not available by default. To enable this feature, reach out to support@leadsquared.com.
3. How It Works
Plans help managers organize and monitor field visits for their sales users through a structured workflow:
- Create a Plan: Admins or managers create plans for users by selecting a date range and adding leads either manually or through lead templates (Beats).
- Submit or Publish the Plan: The plan can be submitted for approval or published directly (depending on configuration).
- Review: Admins and managers review submitted plans and either approve or reject them. Rejected plans are sent back to the user for edits.
- Task Creation: Once a plan is approved or published, the configured To-Dos are automatically created for the assigned leads.
- Plan Execution: Sales users execute their visits through the LeadSquared mobile app using My Trips, Tasks, and Smart Views.
- Tracking and Management: Admins and managers can monitor, edit, export, or delete plans from the Manage Plans page when required.
This workflow ensures field visits are planned in advance, properly approved, and easily tracked during execution.
4. Create Plans for Users
To create plans for your users –
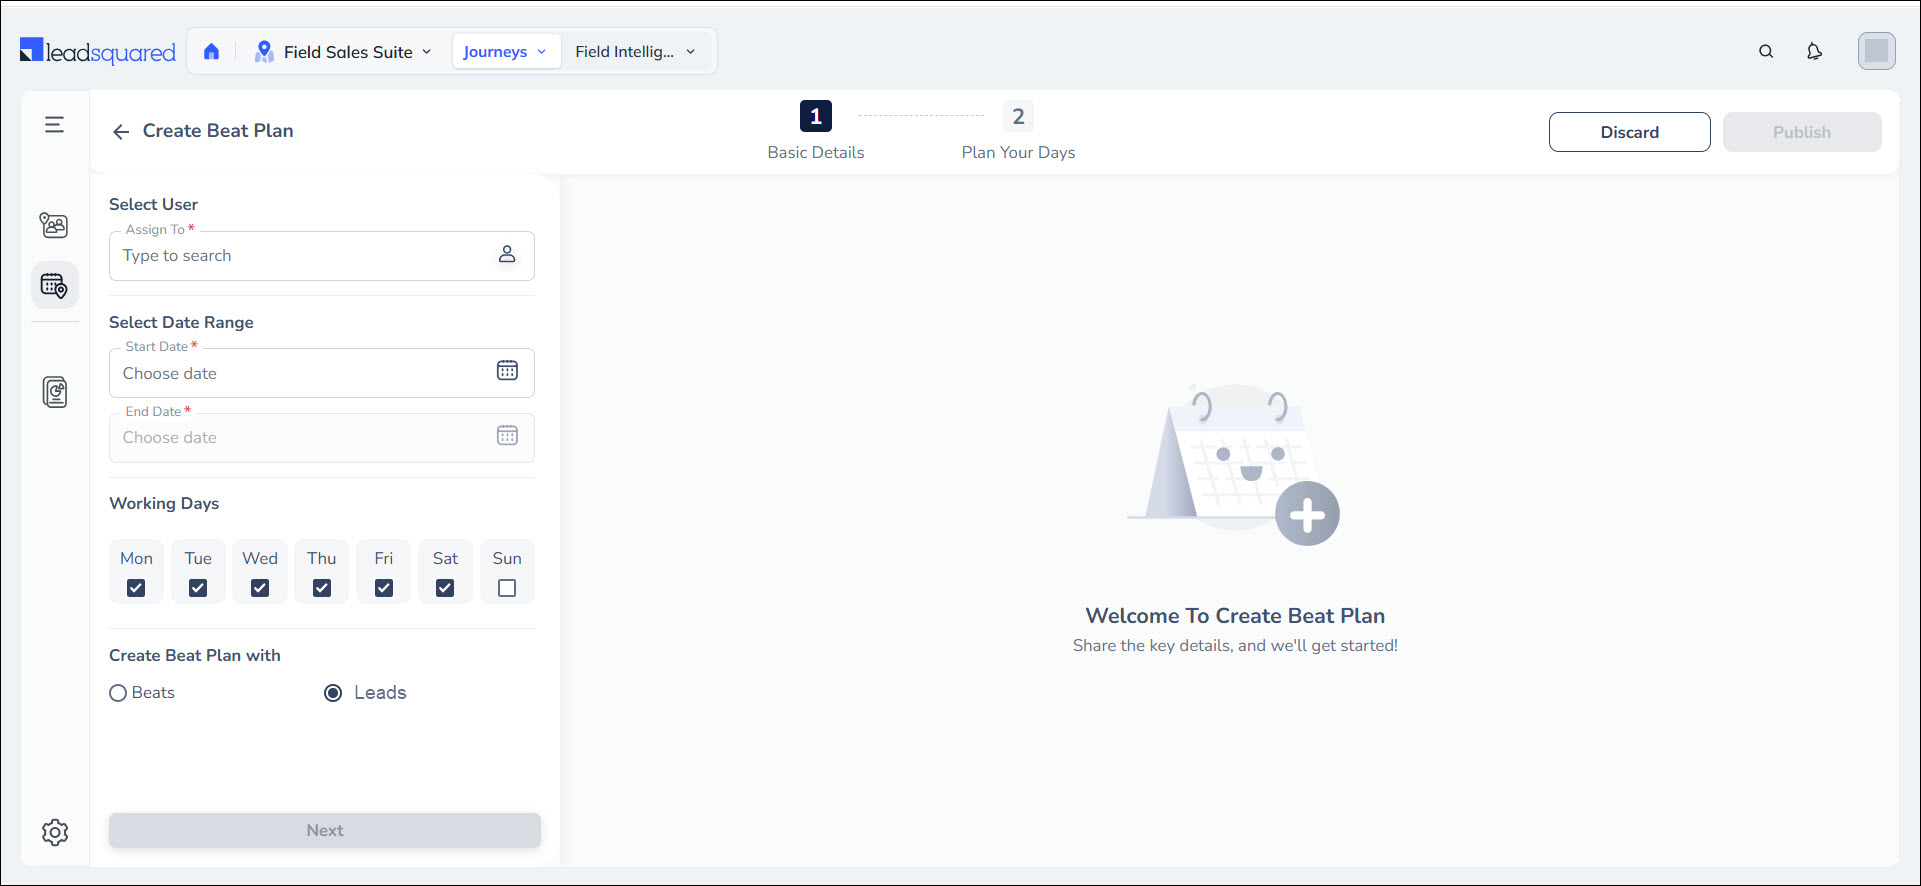
- Navigate to Field Sales Suite>Journeys>Manage Plans.
- Click Create. Under Select User, select the user you want to assign this plan to.
- Enter the Date Range of the plan and select the relevant working days for the user.
- Under Create Plan With, you can choose to create this plan by searching for leads manually or using a pre-existing lead template (Beats). Once you select the relevant option, click Next.
4.1 Create Plans with Lead Templates
- Once you land on the Create Template (Beat) Plan page, on the left side, select a Template.
- To add the Template to a date on the plan, select the date. On the relevant date, a number denoting the leads already assigned to the user on that particular day (i.e., user’s task load) is displayed. The number mentioned above each date represents the number of tasks assigned. Clicking the number will open a popup with a list view of the tasks.
- Repeat this process to add Templates on all the dates added. Any holiday falling within the plan duration will automatically be blocked.
- To add a lead to the plan, click the relevant date. Alongside the lead name, click the plus icon. Once added, you can create a joint meeting for this lead with your user by sliding the Joint Meet toggle. When this setting is enabled, users will be able to plan joint meetings with their respective managers/reportees while creating or approving a plan.
- Any holiday falling within the plan duration will automatically be blocked. To delete a plan for the day or add a day block, alongside the date, click
 and select the relevant option.
 - Once you’re done, click Submit for Approval or Publish.

4.2 Create Plans with Leads
- On the left side of the page, you can view the dates of the plan. The number mentioned above each date represents the number of tasks assigned. Clicking the number will open a list view of the tasks on the right side of the page.
On the right side of the page, you can also view all the leads assigned to the selected user. And you can view the distance between each lead on the map and plan accordingly. - To add a lead to the plan, alongside the lead name, click the plus icon. Once added, you can create a joint meeting for this lead with your user by sliding the Joint Meet toggle.
- You can also add leads by drawing on the map. On the bottom of the map, select how you want to draw the area on the map – Freehand, Polygon, or Circle. Once you draw a territory, the leads assigned to the user within that will be added to the selected day’s plan.
- To delete a plan for the day or add a day block, alongside the date, click and select the relevant option.
- Once you’re done, click Submit for Approval or Publish.

5. Approve or Reject Plans
As an Admin, Sales Manager, Reporting Manager or Sales Group Manager, you can approve or reject lead-based as well as template-based plans submitted by your users.
- In Journeys, on the Manage Plans page, under Pending, you can view all the plans you haven’t approved or rejected yet.
- To filter specific plans, click the Filter icon and choose relevant filters.
- To view the details of a plan, click on it. The number of leads added on the plan for each day will be visible on the calendar. Click on a day’s lead count to view added leads.
- To view the lead’s details, click on the lead name. You will now be directed to the Lead Details page on a new tab.
- To create a joint meeting for any of the leads, under the relevant lead name, slide the Joint Meet toggle. Then, click Update.
- Once you’re done reviewing the plan, click Approve or Reject. If you click Reject, you must write a comment on why you’ve rejected the plan. Approved and rejected plans move from Pending to the All section. In All, view all plans, including Pending, Approved, and Rejected ones. The rejected plans are sent back to the user to edit if they have not expired.
Note: Plans must be approved/rejected on or before their start date. For instance, if a user’s plan begins on February 3rd, the manager must approve it by that date at the latest. If no action is taken by the 3rd, the plan will expire. If Auto-Approval is enabled by the admin in the Journeys settings, the pending plans will be approved automatically on the day of the plan.
6. Edit Pending or Approved Plans
Pending or approved plans submitted by your users can be edited to add or remove leads, block a day or revoke a user’s holiday.
Note: You must be an Admin, Sales Manager, Reporting Manager or Sales Group Manager.
6.1 Edit Pending Plans
You can edit plans that are pending for approval to ensure that the user’s plan is optimized.
- Navigate to Manage Plans on Journeys.
- Select the relevant plan in the Pending status.
- Click the Edit icon and you will be redirected to the Edit Plan page.
- Here, you can make the relevant changes to the plan and click Update Plan.
6.2 Edit Approved Plans
You can also edit plans that are already approved. This lets you reduce or increase tasks for your user based on their existing plan.
- Navigate to Manage Plans on Journeys.
- Toggle from Pending to All.
- Select the relevant plan in the Approved status.
- Click the Edit icon and you will be redirected to the Edit Plan page.
- Once you’ve made the relevant edits to the plan, click Update Plan.
7. Import Lead-Based Plans for Users
As an admin, you can bulk upload lead-based plans for your users. To enable this, you must complete a One-Time Setup by selecting a primary unique identifier for each lead (e.g., email, phone number, first name, etc.) to be used when importing plans. A unique lead identifier is a unique piece of information used to distinguish one lead from another in a database. It helps identify existing leads and prevents creating duplicate leads in your account. You can update or change this unique identifier at any time after the initial setup.
- Navigate to Field Sales Suite>Journeys>Manage Plans.
- Click the Settings gear icon at the bottom-left corner of the page and select Import.
- You will see a dropdown under Set Unique Lead Identifier containing all the lead fields that are marked as unique on your LeadSquared account.
- From the dropdown, select the relevant option.
- Click Confirm.

You will be redirected to the Import Plan page. Before you move forward with your plan import, ensure that you have exported your leads. To learn more, see How to Export Your Leads/Lead Details? . Once the lead details CSV is downloaded, open the file in MS Excel.
Then, to import lead-based plans for users,
- On Journeys, select the Start Date and End Date of the plan you are about to create.
- Click Download Sample and open the file in MS Excel.
- From the previously downloaded lead details CSV file, take the unique identifier of the lead and the email ID of the user you are creating the plan for.
- Ensure that –
- You have not added, removed, modified the column headers in the CSV file or change the file format.
- The plan dates are formatted as DD/MM/YYYY and fall within the plan duration selected in the Import Plan page.
- You are adding the correct unique lead identifier against the planned dates and users.
- The leads are correctly mapped either to the Admin or the user added for generating the plans.
- The user email IDs are active users in LeadSquared User Management.
5. Once you have saved the file, on the Import Plan page in Journeys, click Browse Files and select the relevant CSV file for import.
To ensure that the plan file has been imported,
- Click the Refresh icon alongside History.
- If the status says “Successful”, then your plan has been created. If it says “Failed”, this could mean that there is an error in the file.
- To understand errors in your plan file and make corrections, click the Download icon and download the report.
The possible errors could be –
| Reason | Error |
| Lead not found | “Lead does not exist. Please check if the Lead ID is incorrect or the Lead is deleted.” |
| Multiple errors | “Error found in one or more planned dates for this user.” |
| Date falls outside duration | “Planned date is outside the planned duration. Please remove this date from the plan and upload the file again.” |
| User not found | “User does not exist. Please check if the user is inactive or the email is incorrect.” |
| Users limit surpassed | “Total number of unique users exceeded the limit of 100.” |
| Daily lead limit surpassed | “Maximum leads per day exceeded the limit of 40.” |
Note:
- Individual plans will be created for each user based on the provided Start Date and End Date. For example, if 30 user email IDs are added, 30 separate plans will be generated with the specified start and end dates.
- If no leads are assigned to plan dates within the plan duration or if the dates are omitted in the file, those dates will be left empty.
- Only 100 Individual Plans can be uploaded via Import at one time.
- Templates, Joint Meetings, Minimum Quota, Overlapping Date Ranges Restrictions, Day Blocking, Default Plan Duration and Workday Templates are currently not supported in this feature.
8. Export Plans
Admins can export plans created by users directly from the LeadSquared web app. They can choose to export plans created by all users or limit the export to specific sales groups or teams. Additionally, admins can filter the export by the date range when the plans were created and by their status.
Note: To learn more about Sales Groups and Teams on LeadSquared, see What is the difference between Sales Groups and Teams?
To export plans –
- In Journeys, navigate to Manage Plans and click Export.
- On the Export Plans pop-up, select the Users Groups whose plans you want to export. You can choose All Users, Sales Groups, or Teams. If you select Sales Groups or Teams, you can choose multiple options using the multi-select dropdown.
- Select the Date Range for the plans. The date range is based on when the plans were created, not the plan start date. You can choose to export the data from the Last 30 Days, This Month, or a Custom date range (Upto 90 days).
- Select the relevant Plan Statuses from the multi-select dropdown. The available options include Approved, Auto-Approved, Pending, Not Submitted, Published, and Rejected.
- After selecting the required options, click Export. On the Export Request Queued pop-up, click Okay.

8.1 View Export Request and Download CSV
Once your export request is queued –
- Navigate to Settings>Request History on Journeys. You can view your Journeys Data Export here.
- Click the Download Report icon under Action to download the data as a CSV file.

9. Delete Plans
Admins can delete incorrect or irrelevant plans created by users to clean up data when Approvals is enabled or disabled.
9.1 Delete Plans when Approvals is disabled
Admins can permanently delete a submitted plan from Journeys in the web app. When a plan is deleted, all tasks created for the planned leads are also deleted.
To delete a plan –
- In Journeys on the web app, select the plan you want to delete.
- Click the Delete icon at the top of the plan grid.
In the confirmation popup, click Delete Plan to permanently delete the plan and its associated tasks.
9.2 Delete Plans when Approvals is enabled
In this scenario, Admins can only delete the plans that are rejected. Approved plans cannot be deleted.
Any Questions?
We’d love to answer your questions or hear your own unique use cases. Feel free to share your experiences in the comments section below.
How can I compare if the user is performing against the plan
Hi, we need more context on this. Can you give us a detailed description of the issue you’re facing?
Where can we enable auto – approval in journey settings
Hi Kiran.
To enable Auto-Approval,
1. Navigate to Journeys>Settings.
2. Select Journeys and go to the Templates and Approvals tab.
3. Ensure that Enable Approvals setting is enabled.
4. Click the checkbox alongside Auto-Approve pending plans on planned start date.