


Get Started
Sales Suite
Field Ops
Marketing
Service CRM
Integrations & Apps
FloStack
Nudges Connector
1. Feature Overview
The LeadSquared Nudges Connector sends nudges (push notifications) to your user’s desktop and mobile devices for various events, such as Lead Creation, Upcoming Tasks, Opportunity Creation, Activity Completion, etc.
Additionally, you can create custom nudge templates and add images to them for custom events such as policy update announcements, upcoming holidays, etc. You can also add and configure actions your users can perform through these nudges, such as View Lead Details, Call Lead, etc.
This connector will help you –
- Close More Leads – Help your users achieve their goals by sending reminders and important updates as nudges.
- Engage Your Team – Help your team prioritize key tasks with custom messages, program highlights, and policy updates.
- Personalize Notifications – Send custom nudges to your users, unique to your organization.
To know more about this connector, please refer to Nudges via Carter.
Note:
- If the Mobile App Notifications Connector is installed and configured on your account, you will not be able to send nudges to your user’s mobile device. Uninstall the Mobile App Notifications Connector before you install the Nudges Connector.
- To send nudges to your user’s desktop, Carter must be enabled on your account. Contact us at support@leadsquared.com or your account manager to get it enabled for your account.
2. Prerequisites
- You must be an Administrator to configure this connector.
- The Nudges Connector is a paid feature. To enable it on your account, please reach out to your account manager, or write to support@leadsquared.com.
- To send desktop notifications, Carter must be enabled on your account.
- To send mobile notifications, your users must be running the following versions of the mobile app –
- Android v12 or higher
- iOS v10.2 or higher
- Users must be signed in to the LeadSquared mobile and/or the web app to receive notifications.
- Users must be connected to the internet on their mobile and/or desktop devices to receive notifications.
3. How it Works
To send nudge notifications, install and set up the Nudges Connector in your account. To send desktop notifications (in addition to mobile notifications), configure Carter Settings during installation.
Once the connector is installed, configure the templates that will go out as nudges to your users. You can choose from the default templates that are available, or you can build your own custom template from scratch.
After the templates are configured, nudges are sent to your users based on –
- The pre-defined events for default templates.
- Events you configure through automation triggers for custom templates. Ensure that the category you select while creating the template is the same as the automation trigger. For example, if you create a custom template with the Activity template, create an automation using an activity trigger (activity create, activity update, etc.).
You can also send one-time nudges to your users (in bulk) from the User Settings page.
4. Install the Connector
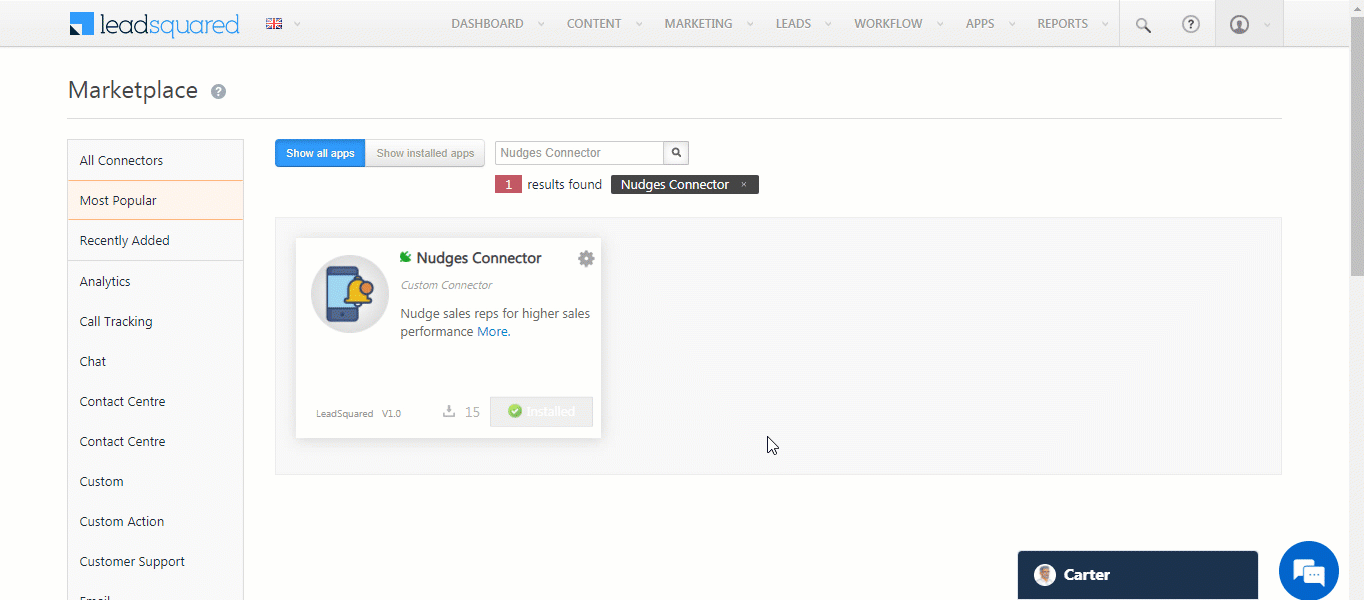
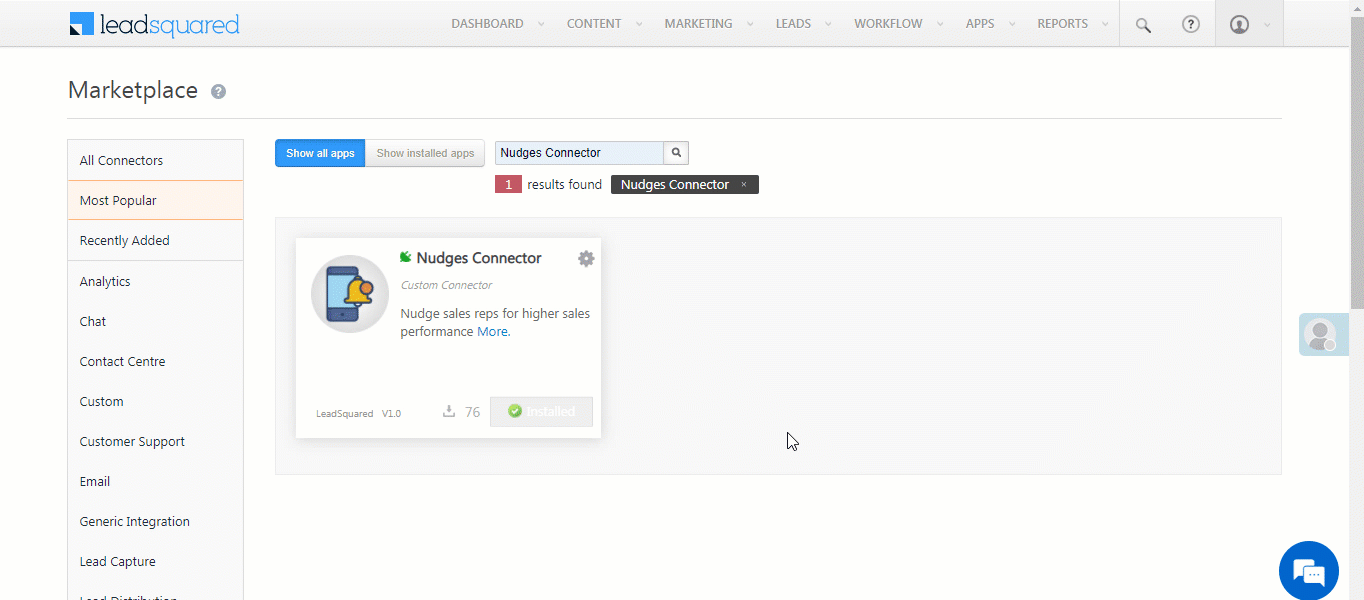
To install the Nudges Connector on your account –
- From the main menu, navigate to Apps>Apps Marketplace.
- Search for Nudges Connector, and click Install.
- Alternatively, you can find the connector on the left panel, under Custom.
- Once the connector is installed, hover your cursor over
 , and click Configure.
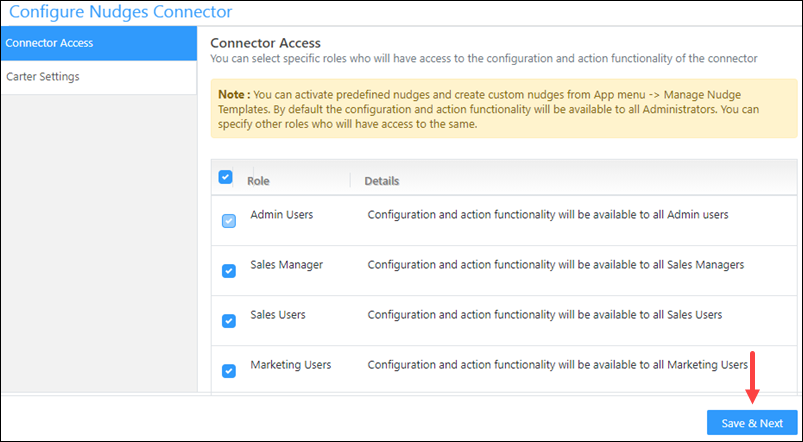
4.1 Connector Access
- On the Connector Access pop-up, click the
 checkbox against the user roles for which you want to give template configuration and actions permissions.
- By default, all the permissions are granted for the Admin User role.
- If you choose to not give permissions to other user roles, then skip this step, and directly click Save & Next.
- Once you’re done, click Save & Next.
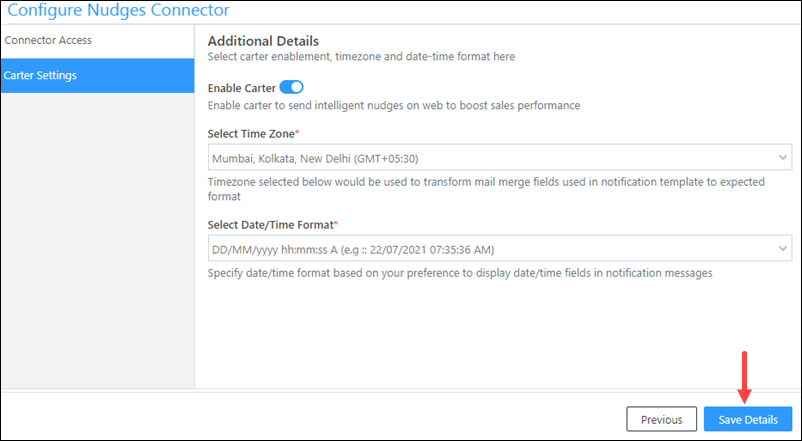
4.2 Carter Settings
To send desktop notifications to your users, enable and configure Carter.
- On the Carter Settings pop-up, against Enable Carter, enable the
 slider.
 - From the Select Time Zone dropdown, select the time zone in which your users work.
- From the Select Date/Time Format dropdown, select the format you want to follow for date/time entries in your nudge templates.
- Once you’re done, click Save Details.
5. Manage Default Nudge Templates
Once the connector is installed, configure and enable nudge templates. The following pre-defined nudge templates are available on the Manage Default Nudge Templates page –
- Lead Create
- Lead Owner Change (Update)
- Task Create
- Task Update
- Task Reminder
To enable and manage the pre-defined nudge templates for leads and tasks –
- Navigate to Apps>Manage Nudge Templates.
- On the Manage Nudge Templates page, default templates are available under the Lead tab and the Task & Appointments tab.
- To do enable a default template, under Status, enable the slider.
- To edit and configure a default template, under Actions, click
 , and edit the template from the Edit Predefined Nudges pop-up.
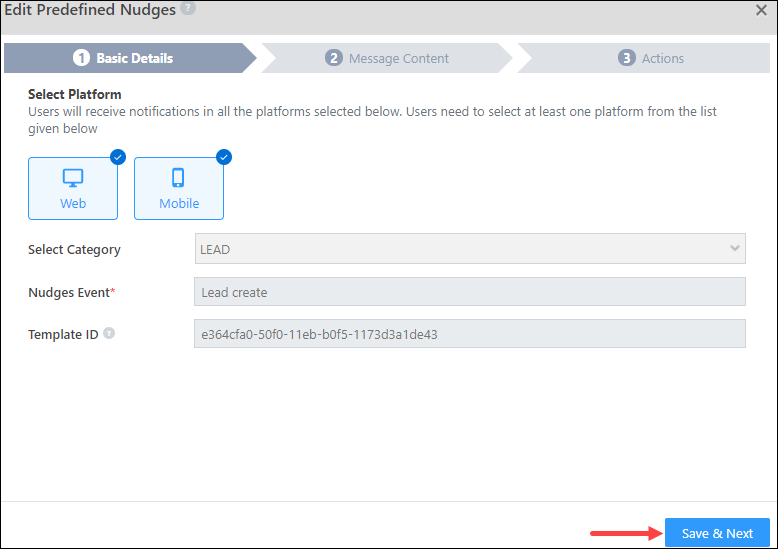
5.1 Basic Details
Select the platform (Web and/or Mobile) on which you want your users to receive nudges. If you select both options, then the same notification will be sent to your user’s desktop as well as mobile.
Additionally, the following fields are available, but they cannot be edited –
- Select Category – The category under which the default nudge template was created (Lead or Tasks & Appointments).
- Nudge Event – The event (like Lead Create or Lead Owner change) on which you’re sending a nudge.
- Template ID – The template ID of the nudge.
Once you’re done, click Save & Next.
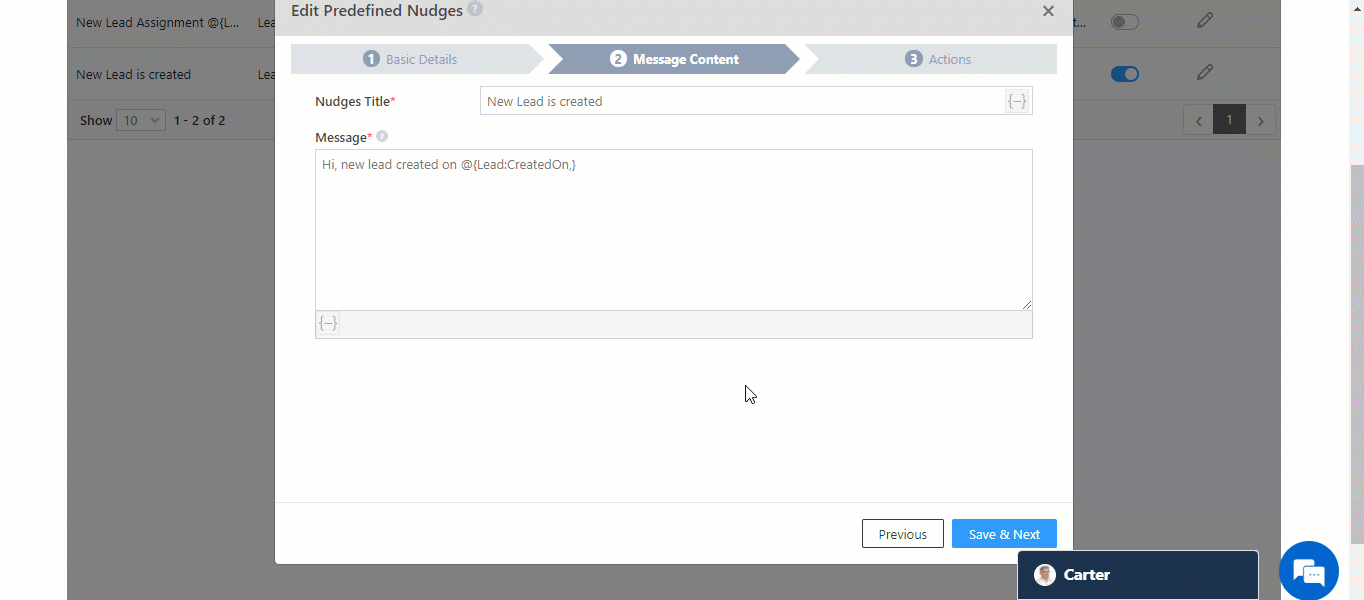
5.2 Message Content
Here, add the following –
- Nudges Title – The title of the nudge notification your user will receive. If required, you can add mail merge lead fields to the title by clicking
 . For e.g, you can title the nudge as New Lead Created – @{Lead:FirstName,}, Updated Lead Owner – @{LeadOwner:FirstName,}, etc.
 - Message – The notification message your users will receive. If required, you can add mail merge lead fields to the title by clicking . You can include up to 500 characters in the message.
Once you’re done, click Save & Next.
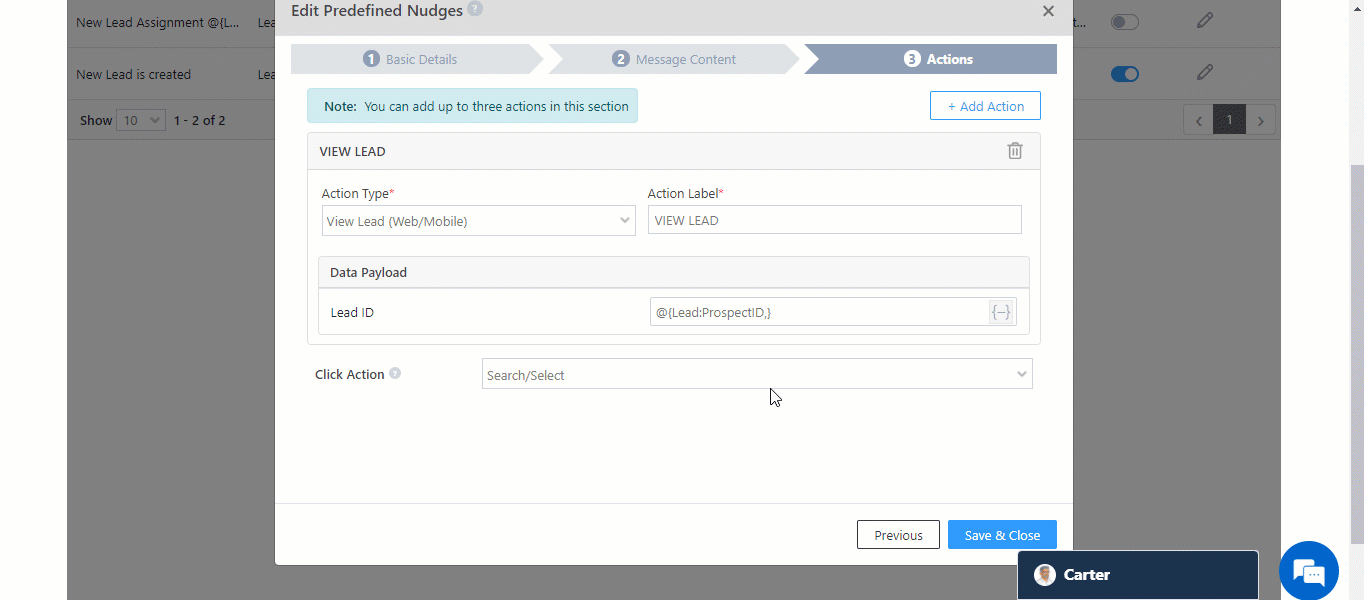
5.3 Actions
The actions that your users can perform through the nudge notification. These actions will redirect your users to the selected screen within LeadSquared.
- Click the Add Action button to add a new action. In total, you can add up to three actions.
- Action Type – From the following options, select the action that will take place when your user interacts with the nudge notification –
- View Lead
- View Opportunity
- View Activity
- View Task
- Open URL (Web/Mobile)
- Open URL in device browser (Mobile Only)
- Call
- Check-In (Mobile Only)
- Check-Out
- Add Lead
- Add Activity
- Add Opportunity
- Add Task
- Call Routing (Mobile Only)
- Open Smartviews (Mobile Only)
- Action Label – The display name for the action inside the nudge notification.
- Data Payload – For each action, we’ve configured the parameters that will be passed in the notification payload. You don’t need to edit the payload unless your implementation requires you to send certain parameters in place of the default ones.
- Click Action – From the Action Types you’ve selected, only one action can be set as the Click Action. The click action will be performed when a user clicks (or taps) anywhere on the nudge notification. To perform the other two actions, the user must click on the Action Label inside the notification.
Once you’re done, click Save & Close. The template is automatically assigned to relevant users.
Note:
- For Call Routing to work as intended, add only the Call Routing action to the Nudge template (and not other actions). To configure the Call Routing Custom Action, refer to Call From Mobile – Initiate phone calls from LeadSquared.
- To add an action, click the Add Action button.
- To delete an action, against an action, click
 .
.
6. Manage Custom Nudge Templates
In addition to the pre-defined templates listed above, you can also create custom templates and add images to them. These templates can be created on events not listed as default templates. You can create templates for events like Opportunity Creation, Activity Creation, User Check-Out, etc. To create a custom template –
- Navigate to Apps>Manage Nudge Templates.
- On the Manage Nudge Templates page, navigate to the Custom Nudges tab, and click Create New Template.
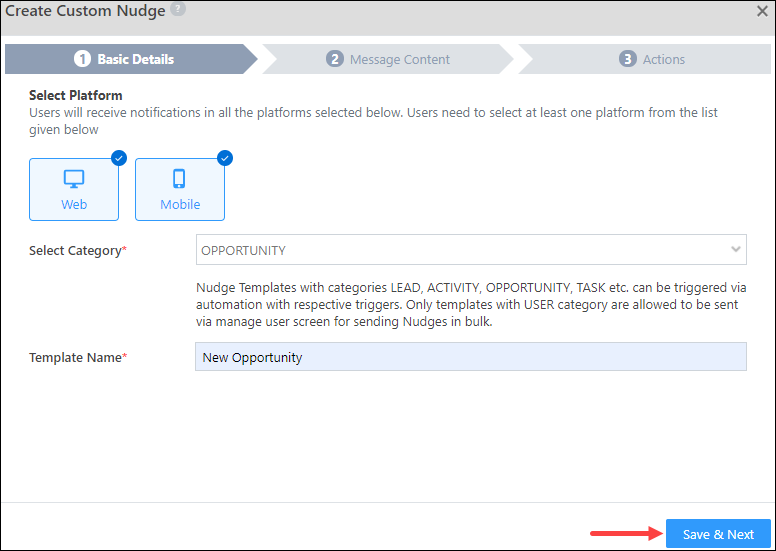
6.1 Basic Details
Add the following details –
- Select Category – Select the LeadSquared category (Leads, Opportunity, Activity, Task, and User) under which you want to create a nudge.
- Template Name – Display name for the template.
Once you’re done, click Save & Next.
6.2 Message Content
Here, add the following –
- Nudges Title – The title of the nudge notification your user will receive. If required, you can add mail merge lead fields to the title by clicking . For e.g, you can title the nudge as New Opportunity Assigned – @{Opportunity:Opportunity:mx_Custom_1,}, etc.
- Message – The notification message your users will receive. If required, you can add mail merge fields to the title by clicking . You can include up to 500 characters in the message.
- Attach Image – You can display an image inside your custom template. Upload and attach the image by clicking
 , or mail merge an image type field that contains the image by clicking . This field is optional.
Once you’re done, click Save & Next.

6.3 Actions
To know how to add actions to your nudges, please refer to Manage Default Nudge Templates – Actions.
Once you’re done, click Save & Close. After you publish the custom template, set up an automation to assign it to your users.
7. Assign Custom Templates through Automations
Once a custom template is created, set up an automation (except for One-time User nudges) that will assign the nudge to your users. In the automation, specify the trigger event that will prompt the nudges to be sent.
7.1 Lead, Opportunity, Activity and Task Triggers
If you’re setting up the automation using Lead, Opportunity, Activity, or Task triggers, to assign nudges to your users –
Note:
- The entity selected as the category in your custom template should match the entity selected as an automation trigger. For example, if you choose “Lead” as the category when creating the custom template, ensure that the automation uses a Lead trigger (such as lead create, lead update, etc.).
- If you’ve used a User trigger to set-up the automation, refer to the section below.
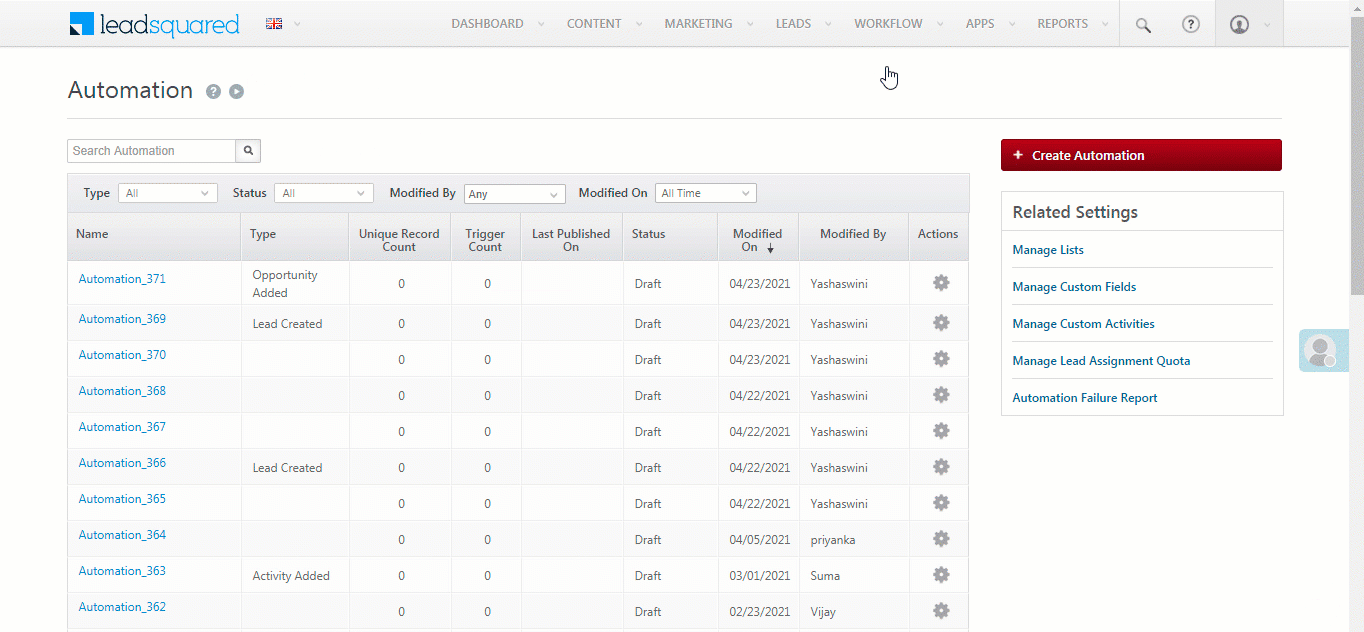
- Navigate to Workflow>Automation, and click Create Automation.
- Set up an automation, and ensure the trigger is the same as the entity used to create the template.
- Click the
 button, click Custom, and then click Nudge Users.
 - On the Nudge Users pop-up, from the Add Recipient dropdown, select the user that should receive the nudge. The following options are available –
- Lead Owner
- Activity Owner
- Opportunity Owner
- Task Owner
- Select User – From this dropdown, you can select individual users to whom you want to send the nudge.
- Object Field – If you have any field of type “User” that you want to send the nudge to, select the field here.
- From the Select Template dropdown, select the custom template you want to send to your users.
- Once you’re done, click Save, and Publish the automation.
7.2 User Triggers
Send nudges to users on significant occasions, such as Anniversary Date, Appraisal Date, upon logging in, and similar events. To assign nudges to your users –
Note: Before you set up the automation, it is mandatory to obtain the token, which is passed as a Custom Header in the webhook. To obtain this, contact your account manager, or write to marketplaceteam@leadsquared.com, with the email subject line – [CM-Nudges] Access Token for {{Organization Name}}. For example, the email subject for us would be “[CM-Nudges] Access Token for LeadSquared”.
- Navigate to Apps>Nudges Connector. Alongside the template you want to send through the automation, click , and copy the Template ID.
- Then, navigate to Workflow>Automation, and click Create Automation. Select any User trigger. We’ve selected the On a Specific Date trigger.
- Click , and under Custom, click Webhook. On the Webhook pop-up, enter the following details –
- Name – Enter a relevant name for the webhook. We’re calling it “Nudge check in”.
- URL – Select the method as https://, and paste this URL – nudges-api.leadsquaredapps.com/nudges/notificationPushEvent/api?to=@{User:UserID,}&templateId={{templateId}}&userId=@{User:UserID,}
- In the URL, replace {{templateId}} with the Template ID copied from the Nudges Connector page.
- Remove “https://” from the URL before you paste it.
- Content Type – Select application/json.
- Save Response – You can select either Yes or No.
- Custom Headers – Click Add. Name the header as “x-auth-token” and pass the token value shared via email*.
- Notify on Failure – Select which user you want to notify if the webhook fails.
- Retry Count – The number of times you want to retry when the webhook fails.
- Once you’re done, click Save, and Publish.
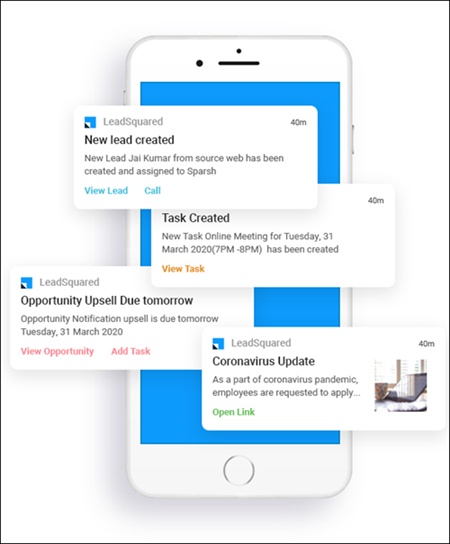
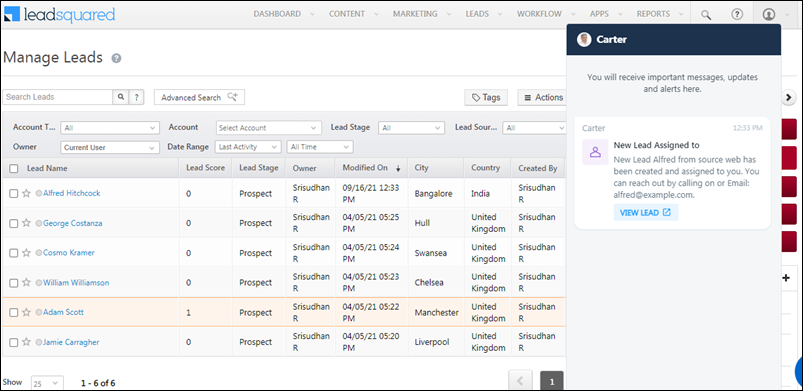
8. View Nudges
This is how Nudges look like on the desktop –
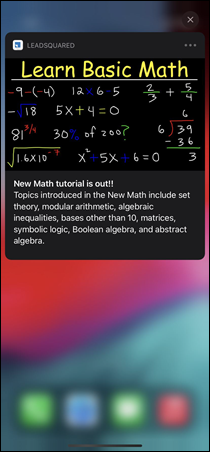
And this is how it’ll look on the mobile app –
9. Send One-time Nudge Templates to Users
You can also send a single, one-time nudge (for both custom and default templates) to your users. This can be used for important announcements like a policy update, an upcoming event (a holiday), a critical situation at work, etc.
- Navigate to My Profile>Settings>Users and Permissions>Users.
- Against the users you want to send the nudge to, click the
 checkbox.
 - Then, hover your cursor over the
 button, and click Nudge Users.
 - On the Nudge User pop-up, from the Select Template dropdown, select the template you want to assign.
- Once you’re done, click Send. Your users will receive the nudge on their mobile devices.
Any Questions?
Did you find this article helpful? Please let us know any feedback you may have in the comments section below. We’d love to hear from you and help you out!