1. Feature Overview
When an incoming phone call is received by an agent, it’s recommended they verify the customer’s identity before proceeding with resolving the ticket. This adds security for both your organization and your customers and reduces the chances of fraud and errors.
Configure the Customer Verifications feature to help your agents verify customers based on various unique lead fields such as Phone Number, Email ID, SSN, Aadhaar Number, etc.
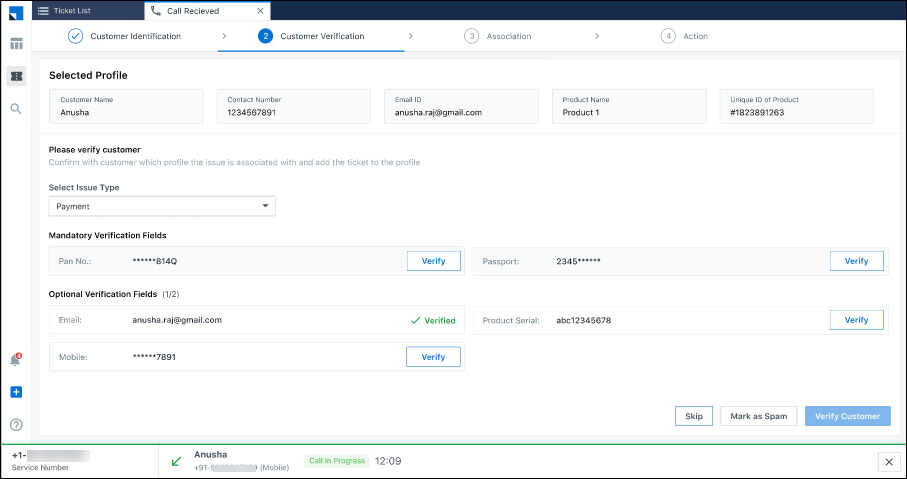
The customer verification screen appears when an agent answers a call from a customer. Here, they can verify the information the customer provides with the details in the system.
2. Prerequisites
- Service CRM is a paid feature. To enable it, contact your account manager, or write to scsupport@leadsquared.com.
- You must be a Service CRM Admin to configure the Customer Verification feature.
3. How it Works
When your agent receive a call from a customer, the lead fields configured in the verification flow are displayed on the customer verification screen. Your agent can use this information to verify if the customer is who they claim to be. Once they’re satisfied, they can proceed with the conversation and help resolve the issue.
To configure the flow –
- Integrate the lead fields that store the lead data you want your agents to use when verifying the customer.
- Select the ticket type for which you want to display the verification flow and add the lead fields to the flow.
4. Configure Customer Verifications
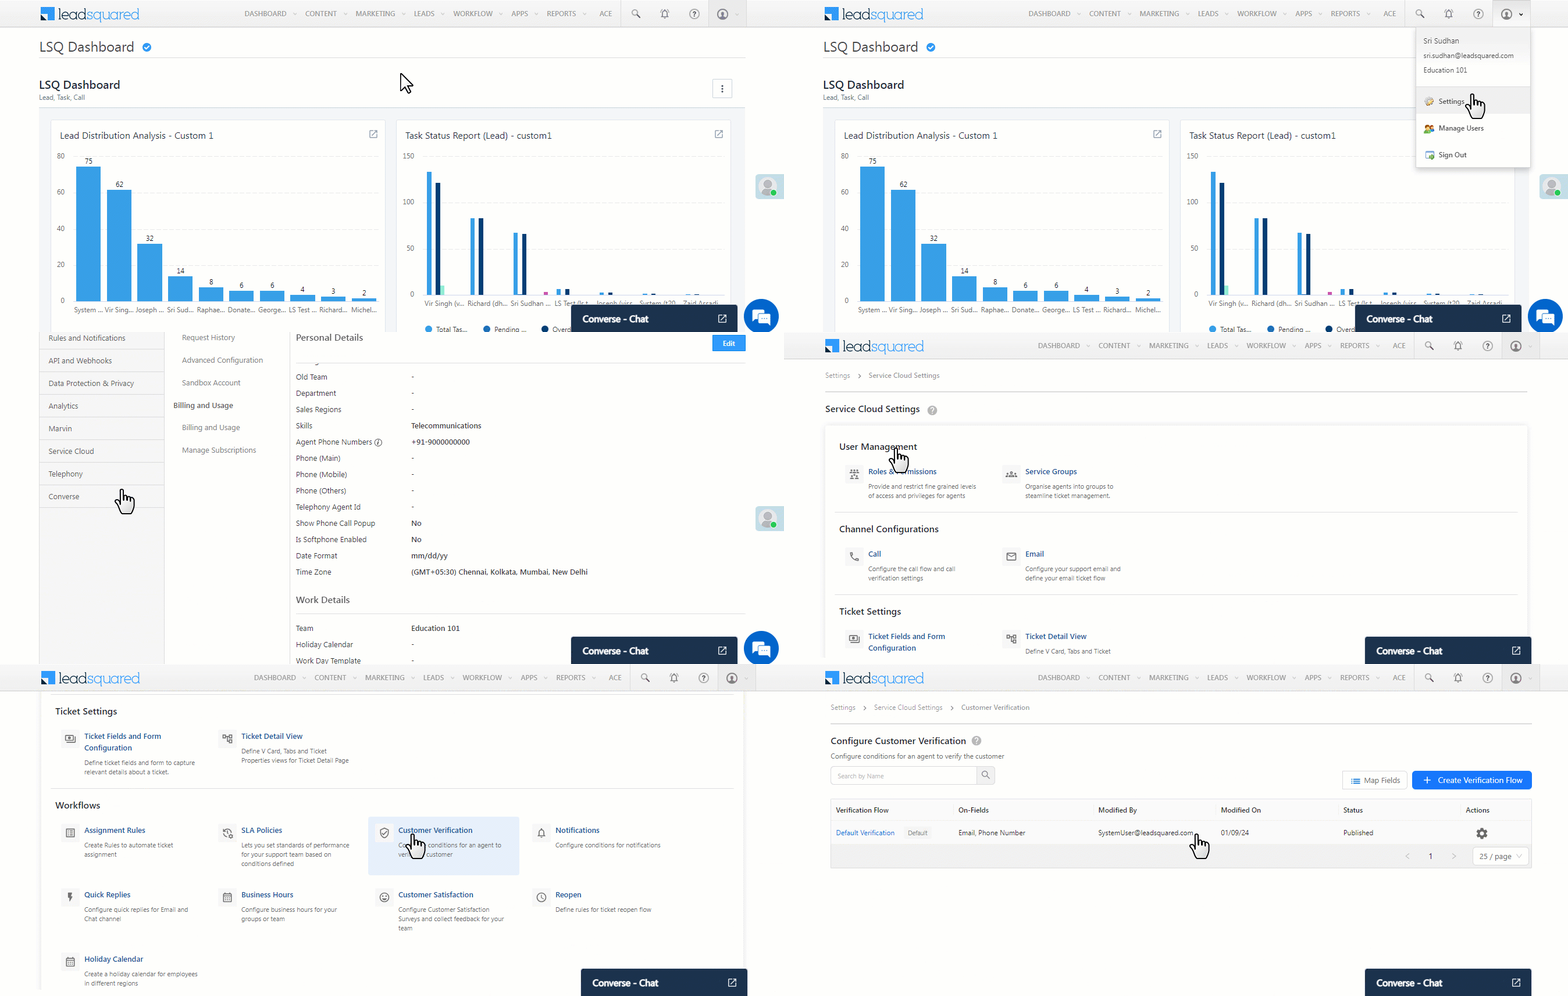
Once you log in to LeadSquared (https://login.leadsquared.com/), to access the Customer Verification screen –
- Navigate to My Profile>Settings>Service Cloud.
- On the Service Cloud Settings page, under Workflows, click Customer Verification.
4.1 Map Fields
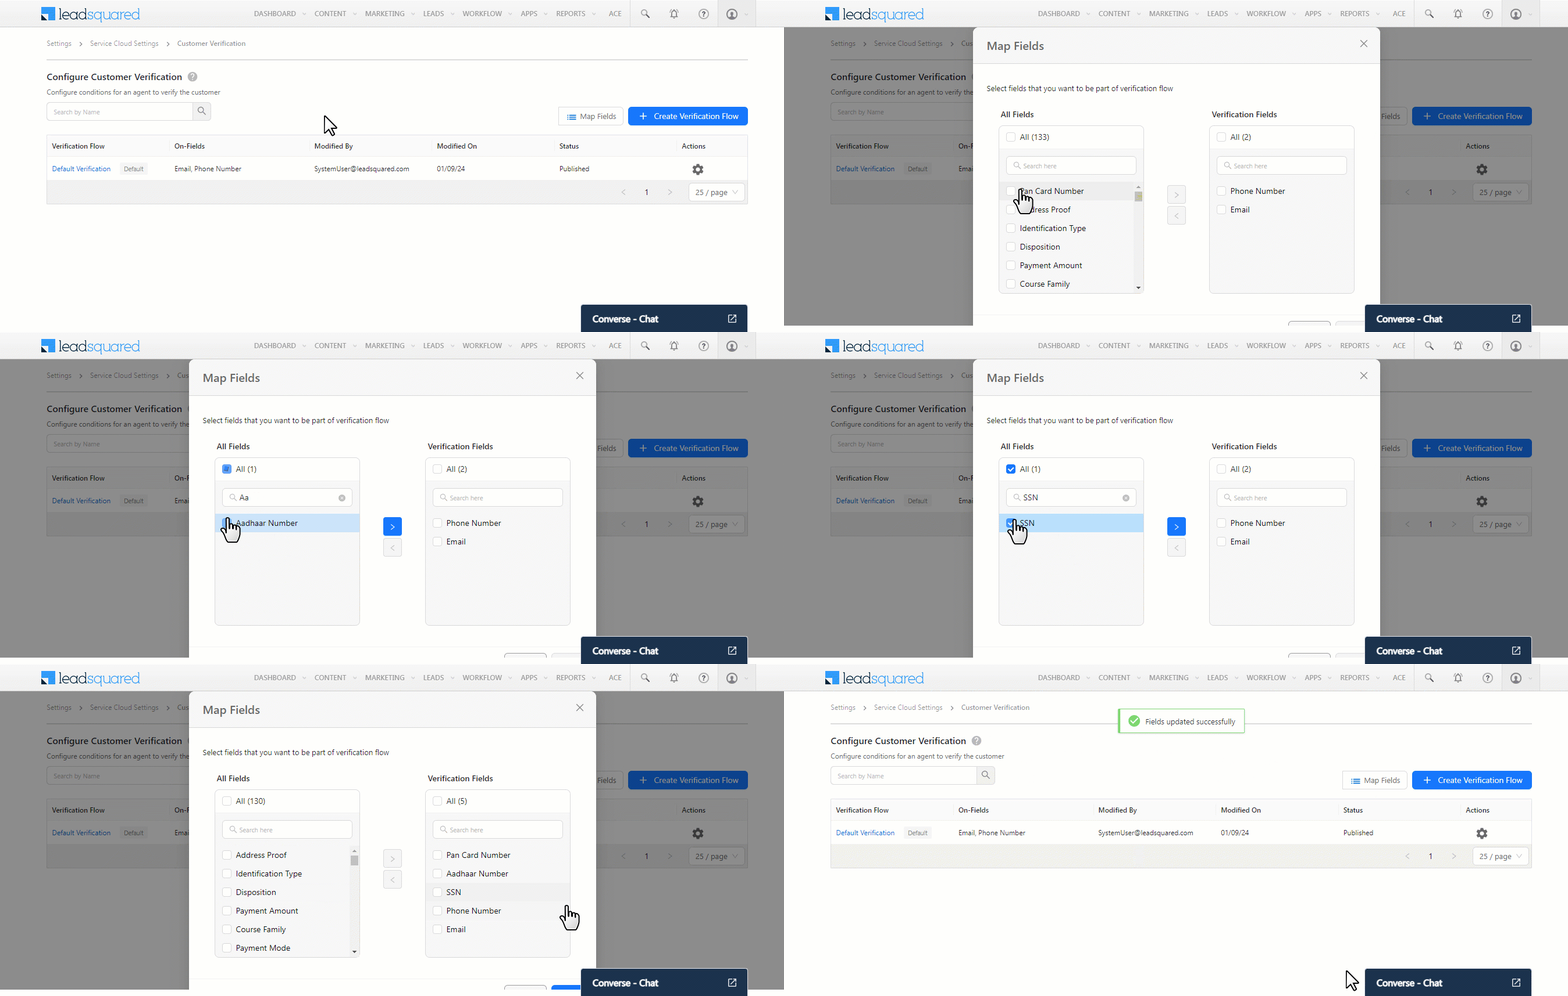
Before configuring the verification flow, link existing LeadSquared lead fields with Service CRM. This ensures the selected fields can be integrated with the verification flow you’re building.
- On the Configure Customer Verification page, click the Map Fields button.
- By default, the Phone Number and Email fields are listed under Verification Fields.
- On the Map Fields pop-up, under All Fields, all the default and custom lead fields in your account are listed. From here, select the lead fields you want to link, and click
 .
. - Once you’re done, click Save.
5. Create Verification Flow
We’ve listed a default verification flow. You can edit this flow and update it as per your requirements. Alternatively, you can choose to create a new flow from scratch. In this section, we’ll be creating a flow from scratch.
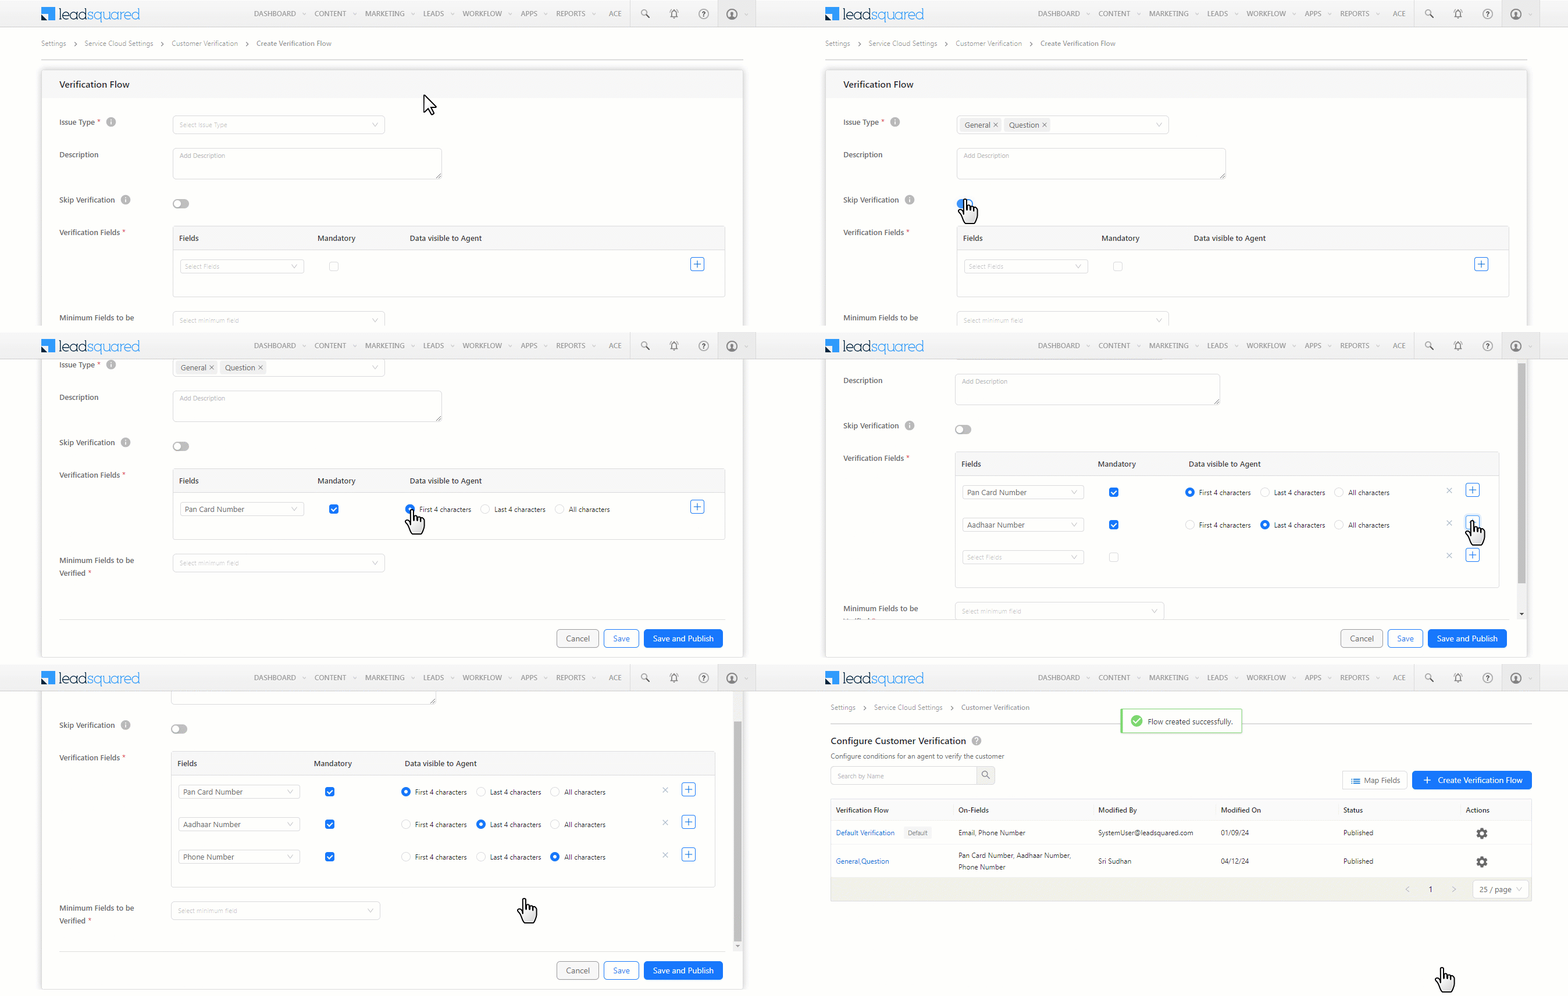
Once you’ve linked the necessary lead fields with this feature, click the Create Verification Flow button to configure the flow for your agents. On the Verification Flow page –
- Issue Type – Select the ticket type for which the flow will be displayed to your agents.
- Description – Add a description for the flow. This is optional.
- Skip Verification* – When enabled, your agents will have the option to skip customer verification.
- Verification Fields – Add and configure the lead fields you want to display to your agents –
- Fields – From the dropdown, select the lead field you want to display to your agents from the list of lead fields you’ve linked to this feature.
- Mandatory – Enable this checkbox if you want your agents to mandatorily verify your customer’s details for the selected lead field. For example, if you’ve added the Aadhaar field and enabled this checkbox, then your agents won’t be able to proceed further with the call until they’ve verified the customer’s Aadhaar details, and acknowledged this on the call disposition form.
- Data Visible to Agent – You can choose whether to display the first 4 characters (e.g., 9999******), the last four characters (e.g., ******9999), or all the characters (e.g., 9999999999) of the selected lead field. This is especially useful when you need to mask sensitive customer information to meet compliance requirements.
- To add additional lead fields as part of the verification flow, click
 .
. - Minimum Fields to be Verified -If you’ve added more than one field, from the dropdown, you can select the number of fields you want to keep as part of the verification flow.
- Once you’re done, click Save and Publish.
- You can alternatively click Save, but the flow won’t be live. To make it live, you’ll have to revisit this page at a later time and publish the flow.
6. Other Actions
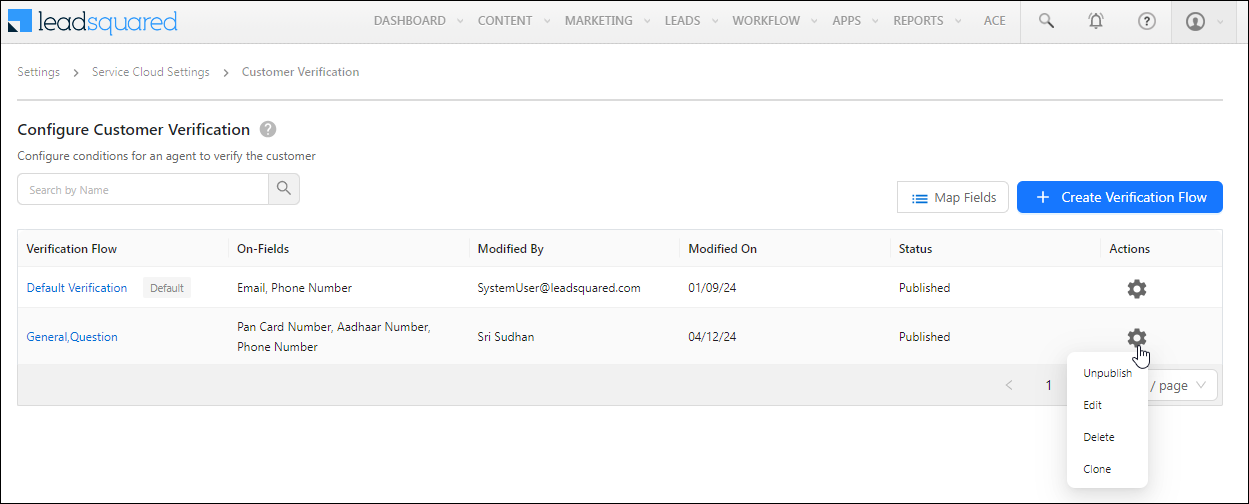
On the Configure Customer Verification page, alongside a verification flow, under Actions, click ![]() to perform the following actions –
to perform the following actions –
- Unpublish – Unpublishes the flow, but retains all the configurations you’ve made.
- Edit – Lets you edit and update an existing flow.
- Delete – Deletes an existing flow.
- Clone – Clones an existing flow.
7. Next Steps
Once you’ve configured the verification, ensure the Call feature is configured on your Service CRM account. To do this, refer to Telephony Call Configuration.
Any Questions?
Did you find this article helpful? Please let us know your feedback in the comments section below. We’d love to hear from you and help you out!


