


Get Started
Sales Suite
Field Ops
Marketing
Service CRM
Integrations & Apps
FloStack
Service Level Agreement (SLA) Policy – Admin Configuration
1. Feature Overview
Once tickets are assigned to your agents (either through Manual assignment or Assignment Rules), agents have specific deadlines to respond to and resolve tickets based on criticality and priority levels. These deadlines, also known as Service Level Agreements (SLAs), are defined by your organization’s policy. The Response Time and Resolution times can be configured based on the ticket’s priority levels. You can also configure Reminders and Escalations if the SLAs are breached.
Through SLAs, you can immediately address customer grievances, track your agent’s performance, and link the achievement of their SLAs with their KRAs and KPIs. This article explains how to configure SLAs in your account.
2. Prerequisites
- Service CRM is a paid feature. To enable it, contact your account manager, or write to scsupport@leadsquared.com.
- You must be a Service CRM Admin to configure SLAs in your account.
3. How it Works
This article helps you configure SLAs within Service CRM to align with your organization’s policies. Once a ticket is created in LeadSquared, the SLA you define is automatically applied to it, and the SLA target is calculated from when the ticket was created.
A pre-defined SLA policy is provided by default, which you can update to match your organisation’s SLA policy. However, if you require more than one SLA policy, you can create additional custom policies.
- Edit the existing policy or create a new SLA policy from scratch.
- Next, configure the SLA Target, and whether you want to send out Reminder emails before the target is due and Escalation emails after the target is breached.
- Once you’re done, publish the SLA.
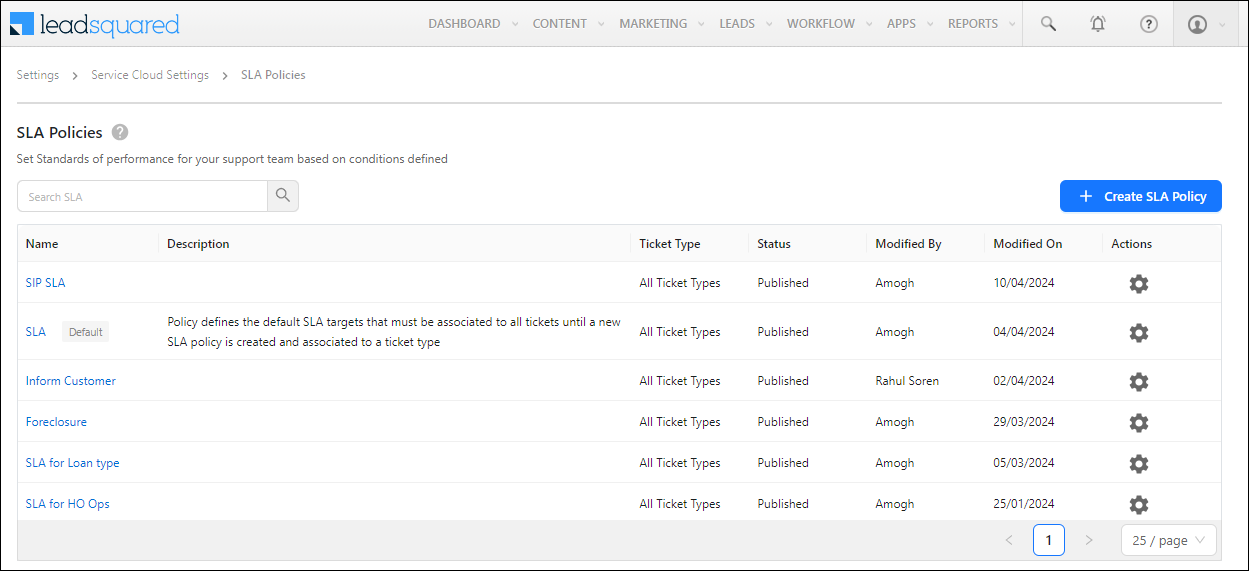
4. SLA Configuration
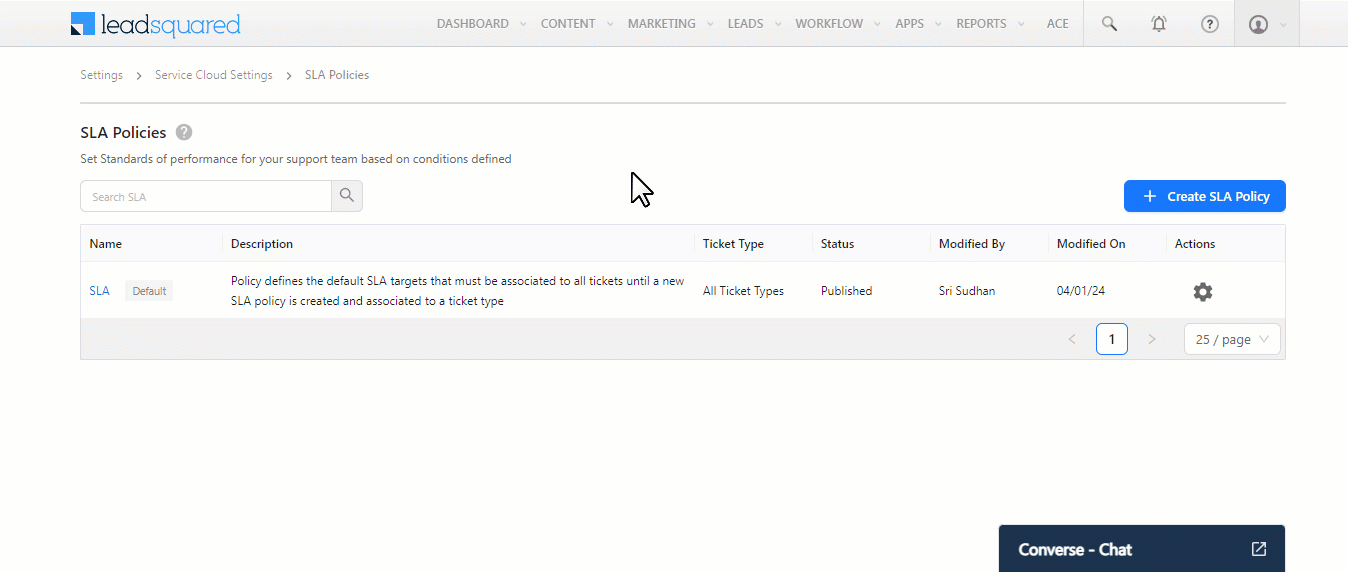
A pre-defined SLA policy is available by default on your account. If you do not create any custom SLA policy, this policy will be applied to all the tickets created in your account. You can update this default SLA to reflect your organization-level policies.
However, if you want to have more than one SLA policy (e.g., policies for different products, policies based on different geographies, etc.), you can create custom SLA policies. In this section, we’ll be creating a custom policy.
Once you log in to LeadSquared (https://login.leadsquared.com/), to configure the SLA policies on your account –
- Navigate to My Profile>Settings>Service Cloud.
- On the Service Cloud Settings page, under Channel Configurations, click Email.
- On the SLA Policies page, click the Create SLA Policy button.
- Alternatively, alongside the default SLA, click
 , and then click Edit.
- Alternatively, alongside the default SLA, click
5. Basic Details
Configure the following basic SLA details –
- Name – Enter a display name for the SLA policy (e.g., Loan SLAs, Escalation SLA, etc.).
- Description – Enter a description for the policy. This is optional.
- Business Hours – From the list of options configured in your account, select the business hours you want this SLA policy to follow. To know more, refer to Business Hours.
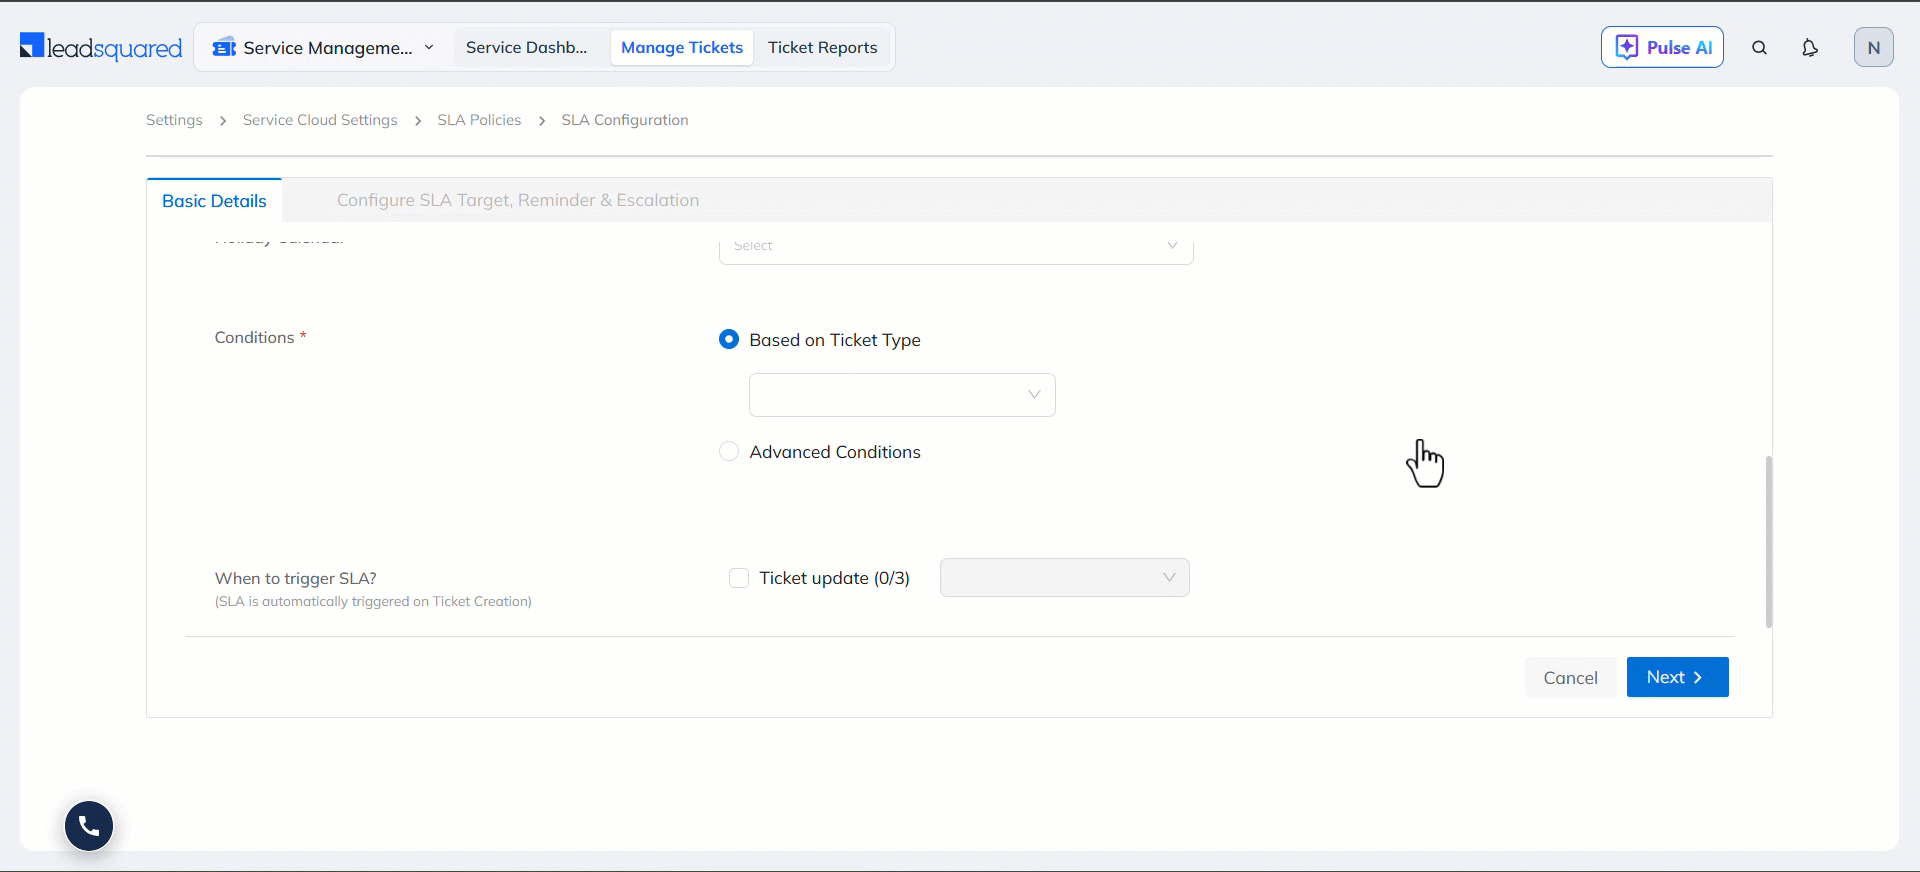
- Conditions – You can either configure this SLA policy for specific ticket types or based on any other conditions –
- Based on Ticket Type – The SLA policy will be applied to the ticket type you select. For example, if you choose the Incident ticket type, the SLA policy will only apply to tickets created with this ticket type. Agents handling this ticket type will be required to resolve the tickets within the SLA configured here.
- Advanced Conditions – This gives you the option to apply the SLA based on a wider range of ticket properties, such as Ticket Status, Ticket Owner, Channel, etc. We’ll set up an example rule to apply the SLA to all the tickets with the Status “Pending”. Click Add advanced search –
- All Tickets – This is the “AND” operator. The SLA will be applied to all tickets that meet the set conditions. For example, if you add a rule for City and select Delhi, and add another rule for Status and select Open, the SLA will only be applied to tickets created with the City field populated with Delhi and with the Status set to Open. The SLA is applied only if both conditions are met.
- Any Tickets – This is the “OR” operator. The SLA will be applied to any tickets that meet the set conditions. For example, if you add a rule for City and select Delhi, and add another rule for Status and select Open, the SLA is applied to tickets that either have the City field populated with Delhi or have the Status set to Open. If either of these conditions is satisfied, the SLA is applied.
- Select – From this dropdown, select the ticket field. The SLA will be applied based on whether the values in the field satisfy the conditions you’re setting up. You can choose from both system and custom ticket fields. We’re selecting the Status ticket field.
- Operator – Based on the type of field you’ve selected, choose a relevant operator from the list of options provided. Some of the options you’ll find are “is”, “is not”, “contains”, “starts with”, “is defined”, and so on. We’re selecting “is”.
- Value – Based on the type of field you’ve selected, you can enter or select a value here. Since the Status ticket field has predefined values, we’ll select “Open” here.
- Add Rule – Click this to add multiple rules within the same group.
- Add Group – To add multiple conditions, click Add Group. Once you’ve added a new group of conditions, you can select “AND” or “OR”.
- If you select “AND”, the SLA is applied only to tickets that satisfy both groups of conditions.
- If you select “OR”, the SLA is applied only to tickets that satisfy any one of the groups of conditions.
- Once you’re done, click Search.
- When to trigger SLA – By default, the SLA is applied as soon as a ticket is created. In addition to this, enable the checkbox alongside Ticket update to apply the SLA when a ticket is updated.* Once enabled, from the “Select Fields” dropdown, you can select up to three system (default) ticket fields. Whenever any of these fields are updated, the SLA will automatically be applied to the ticket that was updated. This is optional.
- Once you’re done, click Next.
6. Sentiment based SLA Escalation
When customers are not satisfied with ticket progress and raise concerns, the sentiment-based SLA escalation feature detects customer dissatisfaction using advanced AI systems and escalates the ticket up the SLA chain. It helps you identify dissatisfied customers in real time, reduce manual monitoring, prioritise critical tickets, and improve response times and customer satisfaction. To configure this –
- On the Basic Details screen, under Conditions, select Advanced Conditions, and click Add advanced conditions.
- On the Advance Search pop-up, configure either Intent or Emotion as the variable.
- Intent looks at the intent behind the customer’s response, and whether it was a Query, Request or Complaint.
- Emotion looks at the emotions present in the customer’s response, and the options are Frustrated, Sad, Happy, Anger, Disgust and Neutral.
- Once you’re done, save the configured conditions, and enter the remaining Basic Details and move to the next section.
7. SLA Target, Reminder and Escalation
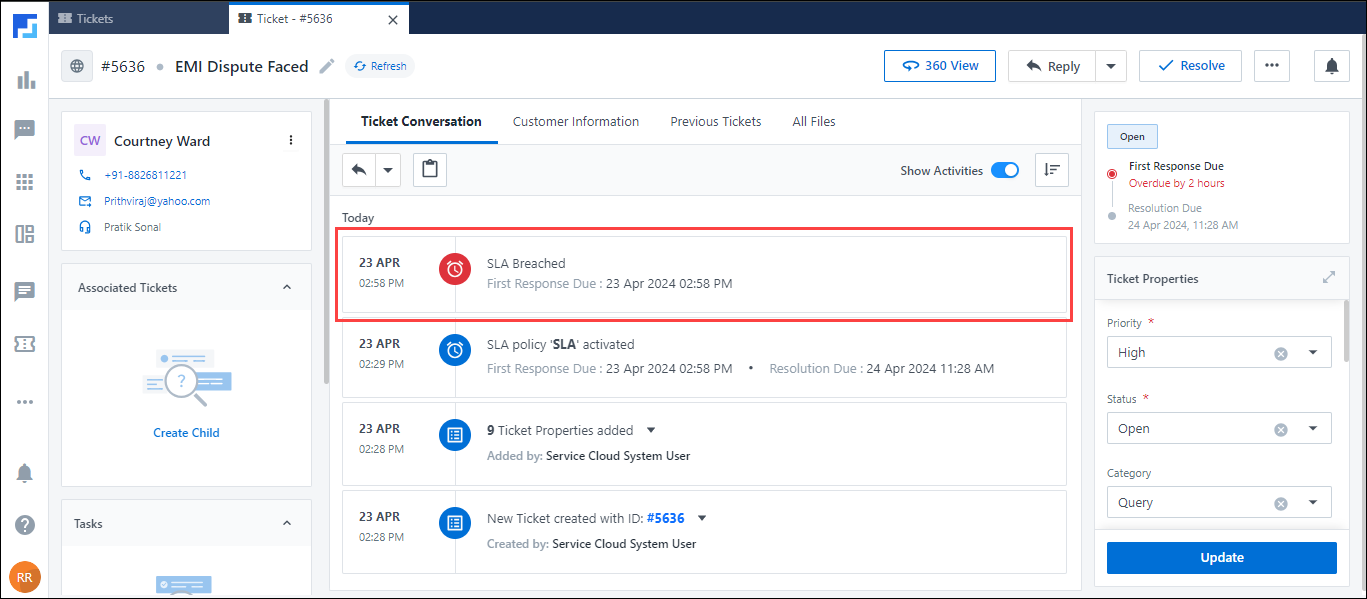
SLA Target refers to the deadline within which a ticket should be responded to and resolved as per your company’s policies. Reminders are email notifications sent to your agents to ensure progress is being made, and the SLA targets are maintained. Escalations are sent to supervisors and managers when the SLA targets are breached.
This section helps you configure all three elements, which are critical to ensuring tickets are being resolved on time.
7.1 SLA Target
You can configure the SLA target individually for each of the following ticket Priority levels –
- Urgent
- High
- Medium
- Low
For each type, there are three deadlines –
- First Response Time – The maximum time within which your agent must send an initial response to your customer, addressing the issue highlighted in the ticket. To activate this, enable the slider.
- For example, if the First Response time for a Medium priority ticket is set to 2 hours, and if your customer raised the ticket at 11 AM, your agent must send a response to the customer before 1 PM. Failing to do so will cause an SLA breach on your agent’s behalf.
- Next Response Time – The maximum time allowed between a customer’s message and the agent’s reply. To activate this, enable the slider.
- For example, if the Next Response Time for a Medium priority ticket is set to 3 hours, and the customer replies at 2 PM, the agent must respond before 5 PM. Failing to do so will result in an SLA breach for the agent.
- Resolution Time – The maximum time within which your agent must resolve the ticket.
- For example, if the Resolution Time for a Medium priority ticket is set to 6 hours, and if your customer raised the ticket at 11 AM, your agent must resolve the ticket before 5 PM on the same day. Failing to do so will cause an SLA breach on your agent’s behalf.
To configure the SLA targets for each of the Priority levels –
- Alongside each Priority type, configure the days, hours, and minutes within which each ticket must be responded to or resolved. This is based on the deadlines defined in your organization’s SLA policy. For example, if the SLA policy defines the Resolution Time as 1 day 6 hours and 30 minutes for a Low priority ticket, then under Resolution Time, enter the corresponding values.
- If required, you can turn off the First Response Time by disabling the
 slider. When it’s turned off, only the Resolution Time SLAs will be applied to the tickets.
- If required, you can turn off the First Response Time by disabling the
- To enable sending Reminders and Escalations for any Priority level, enable the checkbox corresponding to the priority level.
- If you’re not setting up Reminders and Escalations, click Save & Publish. The SLA is now live.

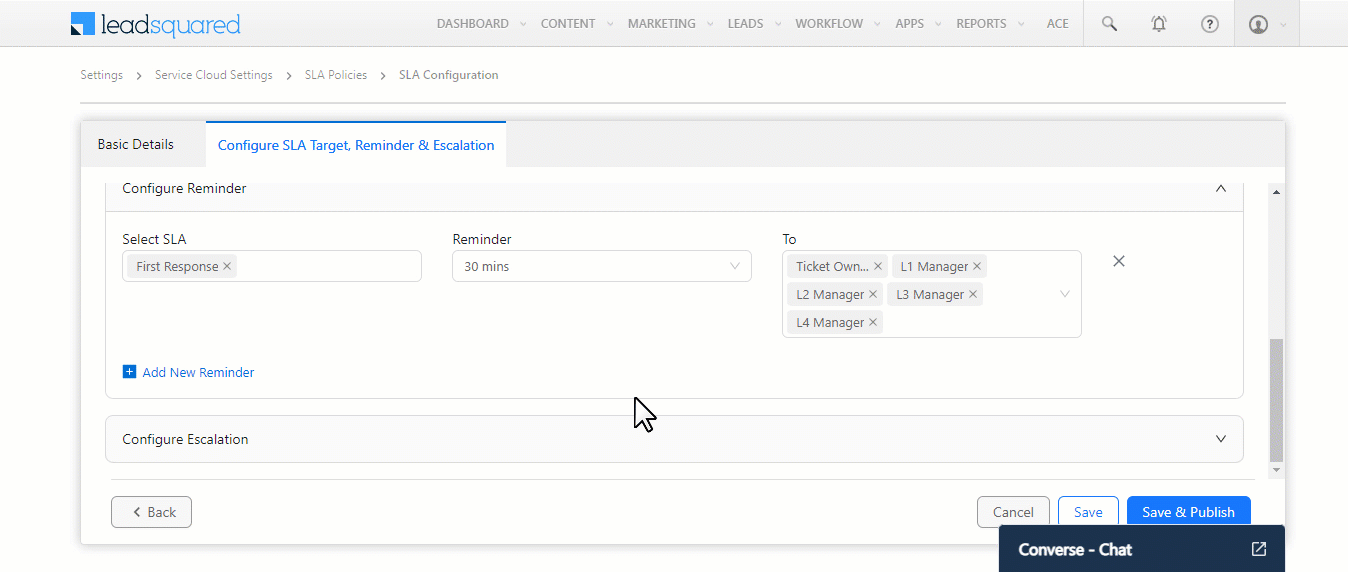
7.2 Configure Reminder
When configured, an email reminder is sent out to the selected users before the SLA target for a ticket is due. You can add reminders based on any of the SLA targets. You can add up to 2 reminders, and up to 4 levels within each reminder. To add a reminder, click Add New Reminder.
- Select SLA – Select the KPI based on which you want to send out the reminder.
- Select Level 1 Reminder – Select how many minutes/hours before the SLA target do you want the reminders to be sent.
- If you choose Immediately, the reminder is sent as soon as the SLA target is breached.
- If you choose 1 day, the reminder is sent 24 hours before the SLA target is due.
- To – You can select multiple users to whom you want to send the reminders.
- To add up to 4 levels of reminders, follow the same steps above. For each breached level, configure the reminder to go to the corresponding senior stakeholder in the employee hierarchy.
- To Add a New Reminder, follow the steps listed above.
If you’re not setting up Escalations, click Save & Publish. The SLA is now live.

7.3 Configure Escalations
Escalations are triggered when the First Response, Next Response Time or Resolution Time is breached. Selected users are notified by email when a ticket hasn’t been responded to or resolved within the targets configured. You can add up to 2 escalations, and up to 4 levels within each escalation. To add a reminder, click Add New Escalation.
- Select SLA – Select the First Response or Resolution time.
- Select level 1 Escalation – Select how many minutes/hours after the SLA target is breached that you want the escalations to be sent.
- If you choose Immediately, the escalation is sent as soon as the SLA target is breached.
- If you choose 1 day, the escalation is sent 24 hours after the SLA target is breached.
- Add Level 2 Escalation – This is sent out when there was no response even after the first level escalation was sent. For example, if a ticket’s resolution SLA was breached at 10:30 AM, and the first level escalation is configured to be sent out to the L1 manager 10 minutes after the SLA was breached (10:40 AM), and the second level escalation is configured to be sent out to the L2 manager 30 minutes after the SLA was breached (11:00 AM). If the ticket is not closed by 11 AM, then an escalation email is sent to the L2 manager. The same logic is applied to Level 3 and Level 4 escalations.
- To – You can select multiple users to whom you want to send the reminders.
Once you’re done, click Save & Publish. The SLA is now live, and it will be applied to all the tickets created in your account.
7.4 Other Actions
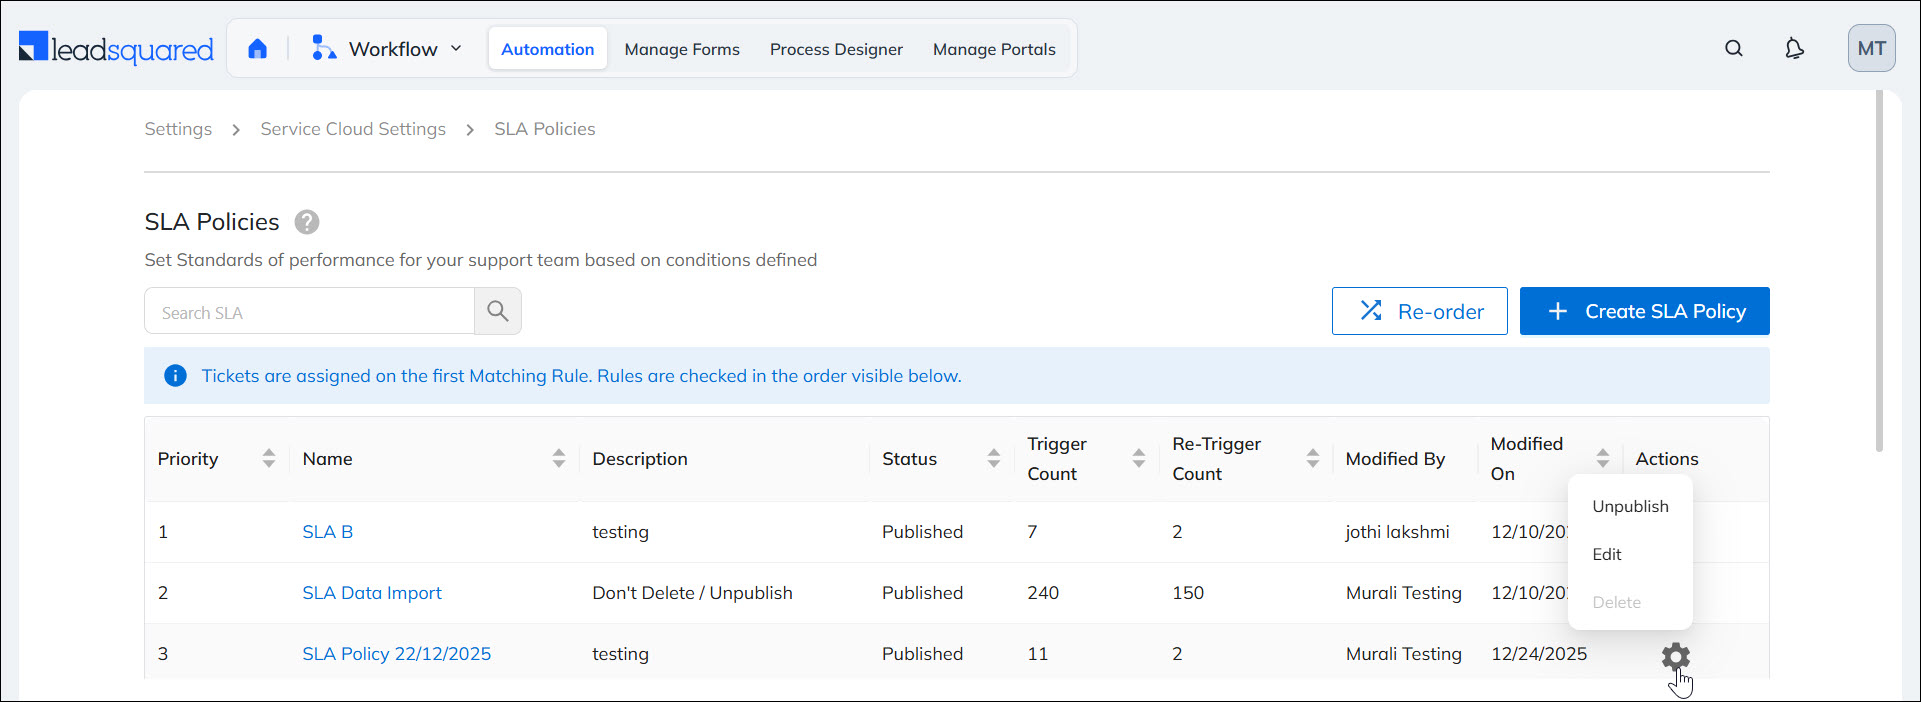
From the SLA Policies page, alongside an existing SLA, click ![]() to perform the following actions on existing policies –
to perform the following actions on existing policies –
- Re-order – Lets you reorder policies to define their priority. The system evaluates the top SLA first and, if its conditions are not met, moves to the next SLA to apply the most relevant SLA to each ticket.
- Unpublish – Unpublishes a live SLA, but retains all the configurations you’ve made.
- Edit – Let’s you edit a live SLA, and update the configurations.
- Delete – Deletes an SLA, and removes all the configurations you’ve made.
- Trigger Count – Shows how many times this SLA policy was triggered when a ticket was created.
- Re-trigger Count – Shows how many times this SLA policy was triggered when a ticket was updated.
Any Questions?
Did you find this article helpful? Please let us know your feedback in the comments section below. We’d love to hear from you and help you out!